Prometheus + Grafana 监控 Silience4j
Silience4j指标暴露
引入依赖
    org.springframework.boot
    spring-boot-starter-actuator
    2.1.6.RELEASE


    io.micrometer
    micrometer-registry-prometheus
    2.1.6.RELEASE


    io.github.resilience4j
    resilience4j-spring-boot2
    0.17.0
暴露接口
Silience4j其实是有默认的Endpoint的,但是为了接口灵活,可以自己提供api让Prometheus进行拉取,一般使用默认的"/metrics",这是Prometheus默认的路径,保持统一的暴露端口可以在结合服务发现时比较简单。
@RestController
@RequestMapping
public class PrometheusController {

    @Autowired
    private CollectorRegistry collectorRegistry;

    //这里produces必须这样设置才能被Prometheus解析
    @GetMapping(value = "/metrics", produces = "text/plain; version=0.0.4; charset=utf-8")
    public String data() {
        try {
            Writer writer = new StringWriter();
            TextFormat.write004(writer, collectorRegistry.metricFamilySamples());

            return writer.toString();
        }
        catch (IOException ex) {
            // This actually never happens since StringWriter::write() doesn't throw any
            // IOException
            throw new RuntimeException("Writing metrics failed", ex);
        }
    }
}
使用collectorRegistry.metricFamilySamples()方法就可以拿到metrics了,这些指标也包括jvm等一系列的mertics。启动之后访问http://localhost:8080/metrics就可以看到暴露出来的metrics了。
Prometheus设置
默认prometheus已经安装好,在linux下,我的prometheus安装在/usr/loacal/prometheus/目录下:
cd /usr/local/prometheus/
vim prometheus.yml
关于具体的配置详见prometheus官网,这里主要配置以下项:
scrape_configs:
    - job_name: "resilience4j_exporter"
      metrics_path: '/metrics' #这里可以设置暴露的api
      static_configs:
        - targets: ['127.0.0.1:8080']
          labels:
              application: resilience4j
后台启动prometheus:
./prometheus --config.file=prometheus.yml --web.enable-lifecycle &
--web.enable-lifecycle可以允许更改配置之后不用重启prometheus,只需要执行一遍:
curl -X POST http://localhost:9090/-/reload
访问http://localhost:9090/targets:
可见prometheus已经拿到metrics了。
以上是静态的配置方法,如果服务很多的话,这样一个一个配置必然很麻烦,接下来介绍利用服务发现consul动态进行配置,consul的安装参见consul官网。我的consul路径为/usr/local/consul/:
cd /usr/local/consul/
mkdir consul.d
cd consul.d
为简单起见,忽略服务发现的过程,我们在consul.d文件夹下手写一下配置文件,表明有两个服务注册上consul,一个resilience4j.json和web.json:
resilience4j.json
{
   "service": {
        "name": "resilience4j",
        "address": "172.17.205.72",
        "port": 8080
    }
}
web.json
{
    "service":{
        "name":"web",
        "address": "127.0.0.1"
        "port":80
    }
}
指定配置所在文件夹启动consul:
cd /usr/local/consul/
consul agent -dev -client 0.0.0.0 -ui -config-dir=/web/cdo/consul/consul.d
访问http://localhost:8500/ui:
服务已经注册上来了,接下来在prometheus.yml配置下consule:
scrape_configs:
    -job_name: "try"
      consul_sd_configs:
          - server: ['127.0.0.1:8500']
            services: [] #需要拉取指标的服务列表(填服务名),如果为空则为所有服务
      relabel_configs:
          - action: replace
            source_labels: ['__meta_consul_service'] #源目标label
            regex: (.*) #正则,匹配'__meta_consul_service'的值
            replacement: $1 #选取匹配到的第一个分组,即resilience4j
            target_label: application #替换目标label
这里relabel了一下标签,让服务中的一些信息可以作为prometheus的标签,这样可以用来区分服务,关于relabel可以看:https://blog.rj-bai.com/post/158.html,讲解的很详细。
接下来看一下prometheus:
在consul中注册的服务都被prometheus拉取到了。
Grafana可视化
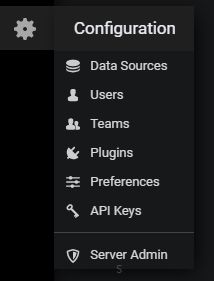
首先设置数据源,点击Data Sources:
添加新数据源:
Type选择Prometheus,填写URL,名字可以随意
然后下载resilience4j用于grafna的json文件:grafana_dashboard.json:
"annotations": {
    "list": [
      {
        "builtIn": 1,
        "datasource": "-- Grafana --", #这里改成数据源的名称
        "enable": true,
        "hide": true,
        "iconColor": "rgba(0, 211, 255, 1)",
        "name": "Annotations & Alerts",
        "type": "dashboard"
      }
    ]
  }
点击import导入;
点击Uplosd .json File
就可以查看可视化的监控界面了:


