导言
这节主要讲的是UI优化方面关于GPU相关的知识,比方说过渡绘制和硬件加速
过渡绘制
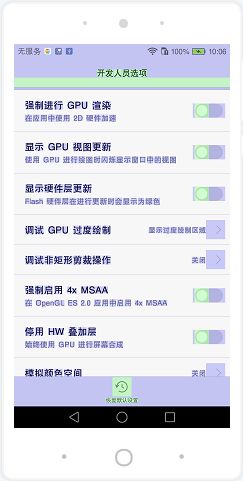
在Google的教程中我们可以看到人家专门提了过渡绘制的问题,这个在平时使用的时候也非常的简单,直接找到手机的开发者选项,然后打开GPU过渡绘制即可
这里可以看到一些控件上面有一些颜色,这些颜色就是用于反馈过渡绘制的程度
1.白色:没有过渡绘制
2.蓝色:过渡绘制一次
3.浅绿色:过渡绘制两次
4.浅红色:过渡绘制三次
5.红色:过渡绘制四次及以上
过渡绘制所导致问题就是在绘图的时候可能会重复绘制一些用户并不能看到的像素点,比方说一些互相重叠的视图,从而造成性能方面的损失
常用的解决方案
因为视图默认是展示在window上面,而window本身就有一个背景,在很多时候,你不能确定窗体的背景是否有展示的必要,而且完全可以用更高层级的视图背景来替代,从而降低过渡绘制
此外就是注意自身的布局,减少不必要的重叠以及背景,一般原则上就是层级越低的布局优先设置背景,否则才考虑顶层布局设置背景。
减少重叠有一个方案,这个可以参考官方的DrawerLayout中的代码
        if (drawingContent) {
            final int childCount = getChildCount();
            for (int i = 0; i < childCount; i++) {
                final View v = getChildAt(i);
                if (v == child || v.getVisibility() != VISIBLE
                        || !hasOpaqueBackground(v) || !isDrawerView(v)
                        || v.getHeight() < height) {
                    continue;
                }

                if (checkDrawerViewAbsoluteGravity(v, Gravity.LEFT)) {
                    final int vright = v.getRight();
                     //只选择了抽屉右边的区域
                    if (vright > clipLeft) clipLeft = vright;
                } else {
                    final int vleft = v.getLeft();
                    //只选择了抽屉左边的区域
                    if (vleft < clipRight) clipRight = vleft;
                }
            }
            canvas.clipRect(clipLeft, 0, clipRight, getHeight());
        }
重点关注clipRect方法
    /**
     * Intersect the current clip with the specified rectangle, which is
     * expressed in local coordinates.
     *
     * @param left   The left side of the rectangle to intersect with the
     *               current clip
     * @param top    The top of the rectangle to intersect with the current clip
     * @param right  The right side of the rectangle to intersect with the
     *               current clip
     * @param bottom The bottom of the rectangle to intersect with the current
     *               clip
     * @return       true if the resulting clip is non-empty
     */
    public boolean clipRect(int left, int top, int right, int bottom) {
        return nClipRect(mNativeCanvasWrapper, left, top, right, bottom,
                Region.Op.INTERSECT.nativeInt);
    }
从注释中可以看出,实际上就是指定绘制的区域,也就是说可以通过该方法来优化绘制的范围。
DrawerLayout就是通过这个方法,来避免当抽屉出现的时候重复绘制内容被遮挡的部分,从而优化过渡绘制
硬件加速
平常看视频之类的都知道有一个硬件加速,在Android中同样也可以使用,通过View的
setLayerType(LAYER_TYPE_HARDWARE,null);
可以指定开启硬件加速层,看一下具体的注释
    /**
     * Indicates that the view has a hardware layer. A hardware layer is backed
     * by a hardware specific texture (generally Frame Buffer Objects or FBO on
     * OpenGL hardware) and causes the view to be rendered using Android's hardware
     * rendering pipeline, but only if hardware acceleration is turned on for the
     * view hierarchy. When hardware acceleration is turned off, hardware layers
     * behave exactly as {@link #LAYER_TYPE_SOFTWARE software layers}.
     *
     * A hardware layer is useful to apply a specific color filter and/or
     * blending mode and/or translucency to a view and all its children.
     * A hardware layer can be used to cache a complex view tree into a
     * texture and reduce the complexity of drawing operations. For instance,
     * when animating a complex view tree with a translation, a hardware layer can
     * be used to render the view tree only once.
     * A hardware layer can also be used to increase the rendering quality when
     * rotation transformations are applied on a view. It can also be used to
     * prevent potential clipping issues when applying 3D transforms on a view.
     *
     * @see #getLayerType()
     * @see #setLayerType(int, android.graphics.Paint)
     * @see #LAYER_TYPE_NONE
     * @see #LAYER_TYPE_SOFTWARE
     */
    public static final int LAYER_TYPE_HARDWARE = 2;
注释中提到,开启硬件加速层可以很有效的进行视图树绘制缓存,降低绘制的次数,这样对于一些复杂的动画来说是一个非常大的优化,也就是说在使用动画的时候应该考虑开启硬件加速进行优化
但是注意硬件加速会带来其他的问题,比方说在GPU层会有明显的内存占用增加
可以看到GPU层所使用的内存大量增加,所以一般来说在动画结束之后需要关闭硬件加速层,从而去释放这一部分的内存,比方说
    text1.setLayerType(View.LAYER_TYPE_HARDWARE,null)
    val animator = ValueAnimator.ofFloat(0.0f,90.0f)
    animator.addUpdateListener {
         text1.rotation = it.animatedValue as Float
    }
    animator.addListener(object :Animator.AnimatorListener{
         override fun onAnimationRepeat(animation: Animator?) {

         }

        override fun onAnimationCancel(animation: Animator?) {
             text1.setLayerType(View.LAYER_TYPE_NONE,null)
         }

         override fun onAnimationStart(animation: Animator?) {

         }

         override fun onAnimationEnd(animation: Animator?) {
             text1.setLayerType(View.LAYER_TYPE_NONE,null)
         }
     })
     animator.setTarget(text1)
     animator.repeatCount = ValueAnimator.INFINITE
     animator.start()
总结
这部分主要是介绍了过渡绘制的处理以及硬件加速的使用,是关于GPU层的一种优化手段
文章系列:
基本的优化总结(一)
基本的优化总结(二)
基本的优化总结(三)
基本的优化总结(四)
基本的优化总结(五)
基本的优化总结(六)
基本的优化总结(七)


