前置准备
windows系统:windows 10 专业版(家庭版无法开启虚拟机)
windows用户:Administrator (普通用户可能会有莫名其妙的一些问题)

WIN10 开启 wsl2 支持
-
找到windows控制面板中的程序和功能,点击启动或关闭windows功能
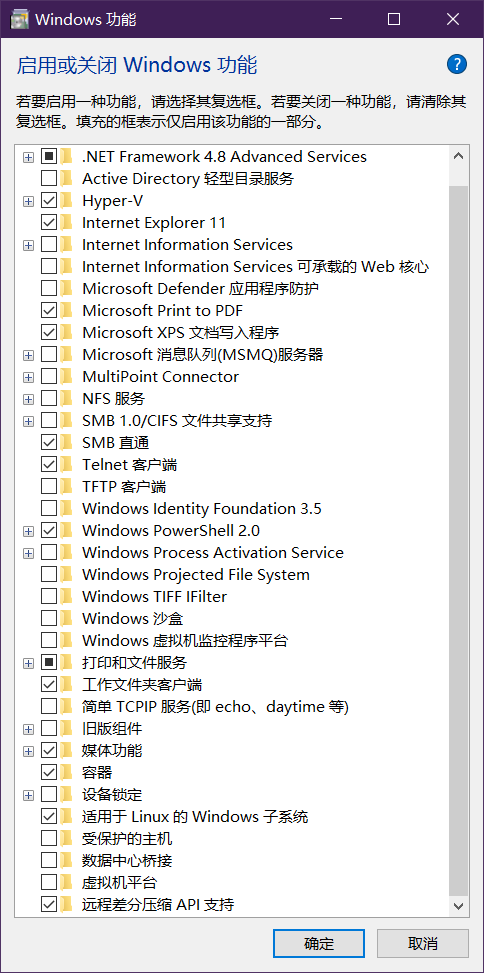 勾选Hyper-v和适用于Linux的windows子系统
下载适用于 x64 计算机的 WSL2 Linux 内核更新包
运行上一步中下载的更新包进行安装。
安装完成后,设置 wsl 默认版本为 2
wsl --set-default-version 2
安装ubuntu
-
打开win10应用商店,搜索ubuntu,选第一个安装。
 安装ubuntu
查看ubuntu 的wsl版本
wsl -l -v

version 为 2 表示 ubuntu 是以 wsl2 运行的。如果这里是 1,可以再次运行如下命令
wsl --set-version Ubuntu 2
安装Windows Terminal (可选)
-
打开应用商店,搜索windows terminal,选第一个安装。
 windows terminal
 windows terminal
安装gsudo https://github.com/gerardog/gsudo (可选)
- 打开windos terminal,在powershell中执行下面的命令安装gsudo
PowerShell -Command "Set-ExecutionPolicy RemoteSigned -scope Process; iwr -useb https://raw.githubusercontent.com/gerardog/gsudo/master/installgsudo.ps1 | iex"
- 打开windows terminal的设置,将配置文件修改为:
// This file was initially generated by Windows Terminal 1.1.2233.0
// It should still be usable in newer versions, but newer versions might have additional
// settings, help text, or changes that you will not see unless you clear this file
// and let us generate a new one for you.

// To view the default settings, hold "alt" while clicking on the "Settings" button.
// For documentation on these settings, see: https://aka.ms/terminal-documentation
{
    "$schema": "https://aka.ms/terminal-profiles-schema",

    "defaultProfile": "{61c54bbd-c2c6-5271-96e7-009a87ff44bf}",

    // You can add more global application settings here.
    // To learn more about global settings, visit https://aka.ms/terminal-global-settings

    // If enabled, selections are automatically copied to your clipboard.
    "copyOnSelect": false,

    // If enabled, formatted data is also copied to your clipboard
    "copyFormatting": false,

    // A profile specifies a command to execute paired with information about how it should look and feel.
    // Each one of them will appear in the 'New Tab' dropdown,
    //   and can be invoked from the commandline with `wt.exe -p xxx`
    // To learn more about profiles, visit https://aka.ms/terminal-profile-settings
    "profiles":
    {
        "defaults":
        {
            // Put settings here that you want to apply to all profiles.
        },
        "list":
        [
            {
                // Make changes here to the powershell.exe profile.
                "guid": "{61c54bbd-c2c6-5271-96e7-009a87ff44bf}",
                "name": "Windows PowerShell",
                "commandline": "gsudo powershell.exe",
                "hidden": false
            },
            {
                // Make changes here to the cmd.exe profile.
                "guid": "{0caa0dad-35be-5f56-a8ff-afceeeaa6101}",
                "name": "命令提示符",
                "commandline": "gsudo cmd.exe",
                "hidden": false
            },
            {
                "guid": "{2c4de342-38b7-51cf-b940-2309a097f518}",
                "hidden": false,
                "name": "Ubuntu",
                "source": "Windows.Terminal.Wsl"
            },
            {
                "guid": "{b453ae62-4e3d-5e58-b989-0a998ec441b8}",
                "hidden": false,
                "name": "Azure Cloud Shell",
                "source": "Windows.Terminal.Azure"
            }
        ]
    },

    // Add custom color schemes to this array.
    // To learn more about color schemes, visit https://aka.ms/terminal-color-schemes
    "schemes": [],

    // Add custom keybindings to this array.
    // To unbind a key combination from your defaults.json, set the command to "unbound".
    // To learn more about keybindings, visit https://aka.ms/terminal-keybindings
    "keybindings":
    [
        // Copy and paste are bound to Ctrl+Shift+C and Ctrl+Shift+V in your defaults.json.
        // These two lines additionally bind them to Ctrl+C and Ctrl+V.
        // To learn more about selection, visit https://aka.ms/terminal-selection
        { "command": {"action": "copy", "singleLine": false }, "keys": "ctrl+c" },
        { "command": "paste", "keys": "ctrl+v" },

        // Press Ctrl+Shift+F to open the search box
        { "command": "find", "keys": "ctrl+shift+f" },

        // Press Alt+Shift+D to open a new pane.
        // - "split": "auto" makes this pane open in the direction that provides the most surface area.
        // - "splitMode": "duplicate" makes the new pane use the focused pane's profile.
        // To learn more about panes, visit https://aka.ms/terminal-panes
        { "command": { "action": "splitPane", "split": "auto", "splitMode": "duplicate" }, "keys": "alt+shift+d" }
    ]
}
其实里面要改的地方就两个,在powershell 和 cmd 中分别找到 commandline 属性 ,在原有的命令前面加上 gsudo 就好了

这样以后再打开 powershell 或 cmd 就是以管理员身份运行的了。
ubuntu 替换阿里源
- 进入linux子系统
输入用户名:hezhigang (以hezhigang为例)
输入密码:**** - 查看一下ubuntu 版本
lsb_release -c

focal代表ubuntu20.04
eoan代表ubuntu19.10
disco代表ubuntu19.04
bionic代表ubuntu18.04
xenial代表ubuntu16.04
- 原来的软件源并另存
sudo cp -v /etc/apt/sources.list /etc/apt/sources.list.backup
- 执行chmod命令更改文件权限使软件源文件可编辑
sudo chmod 777 /etc/apt/sources.list
- 替换成阿里源
vim /etc/apt/sources.list
把所有文本用下面的替换掉
deb http://mirrors.aliyun.com/ubuntu/ focal main restricted universe multiverse

deb http://mirrors.aliyun.com/ubuntu/ focal-security main restricted universe multiverse

deb http://mirrors.aliyun.com/ubuntu/ focal-updates main restricted universe multiverse

deb http://mirrors.aliyun.com/ubuntu/ focal-proposed main restricted universe multiverse

deb http://mirrors.aliyun.com/ubuntu/ focal-backports main restricted universe multiverse

deb-src http://mirrors.aliyun.com/ubuntu/ focal main restricted universe multiverse

deb-src http://mirrors.aliyun.com/ubuntu/ focal-security main restricted universe multiverse

deb-src http://mirrors.aliyun.com/ubuntu/ focal-updates main restricted universe multiverse

deb-src http://mirrors.aliyun.com/ubuntu/ focal-proposed main restricted universe multiverse

deb-src http://mirrors.aliyun.com/ubuntu/ focal-backports main restricted universe multiverse
完成后更新一下
sudo apt update
ubuntu安装docker
- 按照官网文档https://docs.docker.com/engine/install/ubuntu/指示,依次执行如下命令
$ sudo apt-get update

$ sudo apt-get install \
    apt-transport-https \
    ca-certificates \
    curl \
    gnupg-agent \
    software-properties-common


$ sudo apt remove gpg
$ sudo apt install gnupg1

$ curl -fsSL https://download.docker.com/linux/ubuntu/gpg | sudo apt-key add -
$ sudo apt-key fingerprint 0EBFCD88

$ sudo apt-get update
$ sudo apt-get install docker-ce docker-ce-cli containerd.io
- 安装mysql docker镜像测试一下
查询mysql镜像,我这里查询mysql-employee,这是一个带实例employee示例数据库的版本
sudo docker search mysql-employee

选第一个 pull 下来
sudo docker pull genschsa/mysql-employees
等pull完后,执行下面的命令将其启动,其中参数--restart=always 表示该容器随docker启动后会自动启动。
sudo docker run -d --name mysql-employees -p 3306:3306 -e MYSQL_ROOT_PASSWORD=123456 -v $PWD/data:/var/lib/mysql genschsa/mysql-employees --restart=always
在win10中安装 wsl2host
-
下载wsl2host
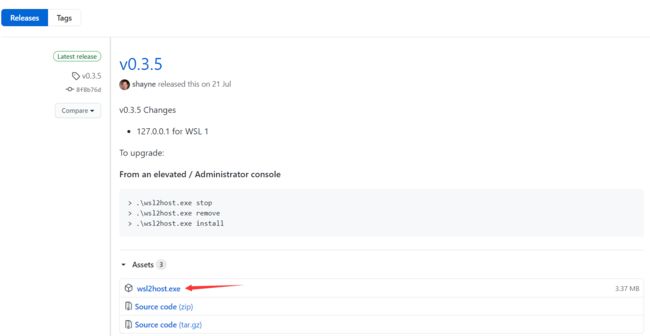 下载
下载 以管理员方式运行powershell,输入以下命令安装wsl2host
> .\wsl2host.exe install
Windows Username:
Windows Password:
输入win10系统的用户名和登录密码,没有报错即表示安装成功(注意,我第一次用非超级管理员账户安装后,启动后就立刻停止了,后来重新用administrator用户安装后才启动成功)
如果想卸载或重新安装:
>.\wsl2host.exe remove
安装成功后,重启wsl, 打开host文件,看其中是否多了下图中的一行
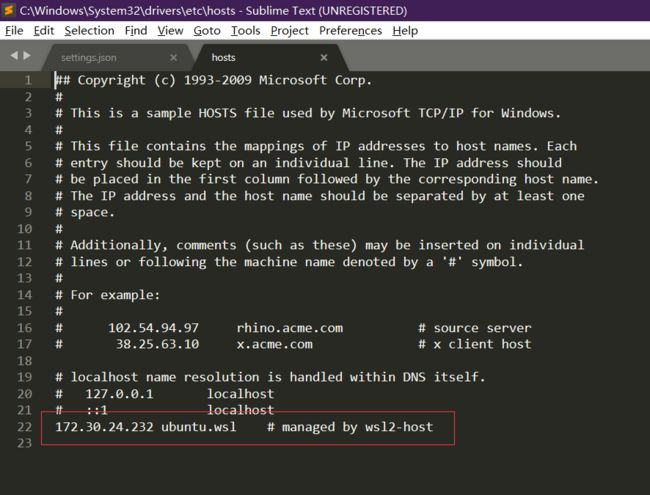
此后,每次wsl重启,wsl2host都会自动把wsl中的IP更新到host文件中,我们只要使用ubuntu.wsl即可访问到wsl中的docker服务了。
让docker服务随windows系统启动而自动启动
一、让docker服务器随ubuntu 系统启动而自动启动
- 把当前用户hezhigang加入 docker 用户组
sudo usermod -aG docker hezhigang
- wsl2中创建启动脚本
sudo vim /usr/local/sbin/start_docker.sh
- 然后, 把以下内容添加到脚本中
#!/usr/bin/env bash
sudo cgroupfs-mount
sudo service docker start
- 给脚本添加执行权限
sudo chmod 755 /usr/local/sbin/start_docker.sh
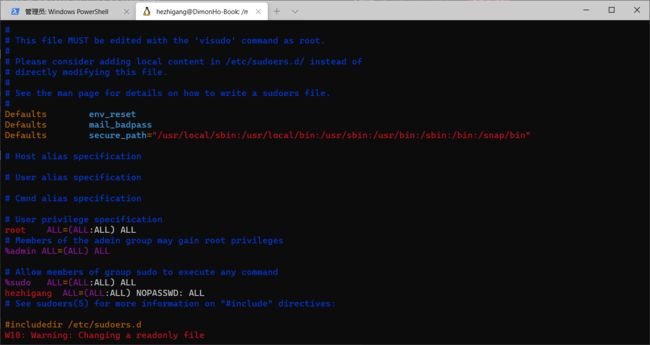
- 给当前用户添加权限, 使在使用 sudo命令的时候不需要输入密码
sudo vim /etc/sudoers
在打开的文本中找到 %sudo ALL=(ALL:ALL) ALL 这一行后面添加如下代码
hezhigang ALL=(ALL:ALL) NOPASSWD: ALL
二、让ubuntu系统随windows启动而自动启动
-
通过创建任务计划, 在windows登录的时候, 启动 wsl2中的docker
 image.png
 -
创建新的任务计划
 创建任务
创建任务
 常规
常规
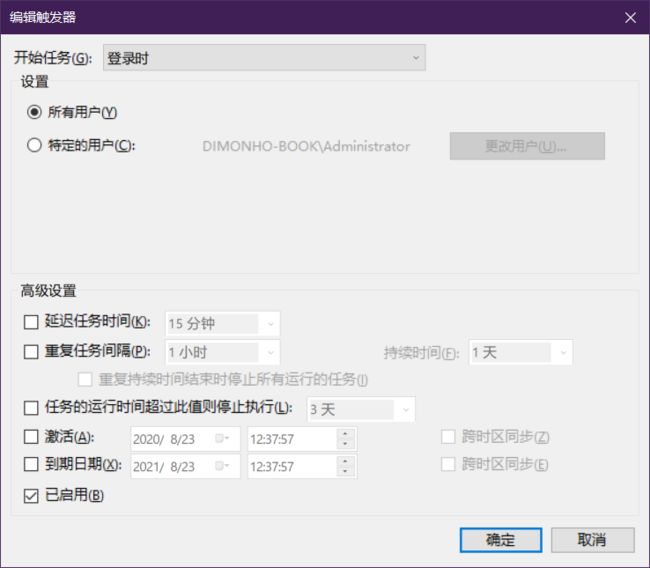 触发器
触发器
在操作tab页中程序或脚本栏填入C:\Windows\System32\bash.exe,
添加参数栏填入-c "sudo /bin/sh /usr/local/sbin/start_docker.sh"

把 只有计算机使用交流电.... 这个选项的勾给去掉

-
重启后直接用navicate或其它的工具链接mysql,主机填写host文件中wsl2host给你自动生成的域名, 看是否可以成功连接,如果能,表示大功告成。
 连接mysql