慕课网学习笔记。
学习视频地址:https://www.imooc.com/learn/295
教程版本为2.x,部分API已经被废弃或处于别名状态,但功能类似,可供参考。
我在学习中使用的为4.0.2,没有遇到问题。
引言
Sql数据库:关系型数据库,如Qracle,Mysql等。但是其设计模式在现在的互联网模式下存在一些弊端。例如,其表结构使得数据库的横向扩充存在限制。
NoSql数据库:Redis,MongoDB
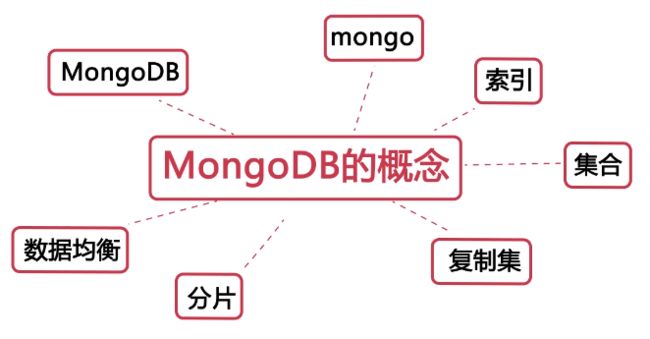
一: MongoDB概念
1. 为什么是选择MongoDB
无数据结构的限制
没有表结构的概念,每条记录可以有不同的结构。
业务开发方便。
不需要像sql数据库那样,事先定义表结构。完全的索引支持
redis存储为key-value对,只支持按键值查询。
hbase为单索引,二级索引需要自己实现。
MongoDB支持单键索引,数据索引,全文索引等。方便的冗余和扩展
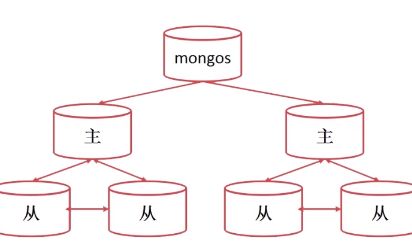
复制集保证了数据的安全性
分片扩展数据规模
分片技术提供了自动数据均衡,对数据库的同一入口。不需要人为的在应用层进行访问的分发,较少了很多人工操作。
- 良好的支持
完整的文档。
齐全的驱动支持。
2. 名词说明
| sql中的概念 | mongo中的概念 | 说明 |
|---|---|---|
| database | database | 数据库 |
| table | collection | 数据库表/集合 |
| row | document | 数据记录行/文档 |
| column | field | 数据字段/域 |
| index | index | 索引 |
| table | joins | 表连接,MongoDB不支持 |
| primary key | primary key | 主键,MongoDB自动将_id字段设置为主键 |
二: 搭建MongoDB
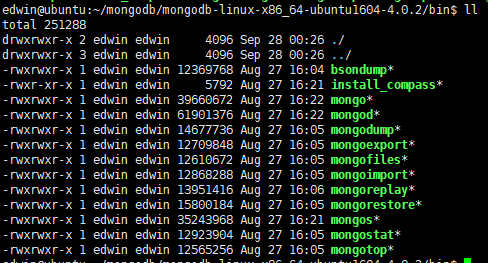
1. 目录结构
mongod数据库部署工具
mongo文件为客户端链接工具
mongoimport和mongoexport用于数据的导入导出
mongodump和mongorestore用于数据的二进制导入导出,用于数据的备份。
mongooplog用于数据库的操作记录
mongostat用于查看数据库状态
2. 搭建服务器
参考:https://www.runoob.com/mongodb/mongodb-linux-install.html
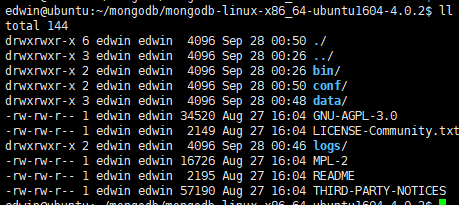
通过wget下载tgz包并解压,目录如下:
MongoDB所需要的目录在安装过程不会自动创建,所以你需要手动创建data目录,log目录和conf目录。
mkdir log
mkdir -p data/db
mkdir conf
然后在conf目录下创建mongodb.conf配置文件,添加如下内容:
dbpath = data
logpath = logs/mongod.log
storageEngine=mmapv1
fork = true
bind_ip = 0.0.0.0
fork 指明该服务为后台启动。
bind_ip 0.0.0.0 表明允许所有ip访问
启动时指定配置文件
./bin/mongod -f conf/mongodb.conf
这里补充一个问题,我在执行上述指令的时候出现了报错:
error while loading shared libraries: libcurl.so.4: cannot open shared object file: No such file or directory
然后我查看了一下依赖:
需要安装一下:libcurl4-openssl-dev
然后启动成功:
之后可以从其它主机进行访问:
三: MongoDB的基本使用
主要设计mongoDB的增删查改。
首先通过客户端连接mongoDB
./bin/mongo ip:port
如果为本地直接使用:./bin/mongo
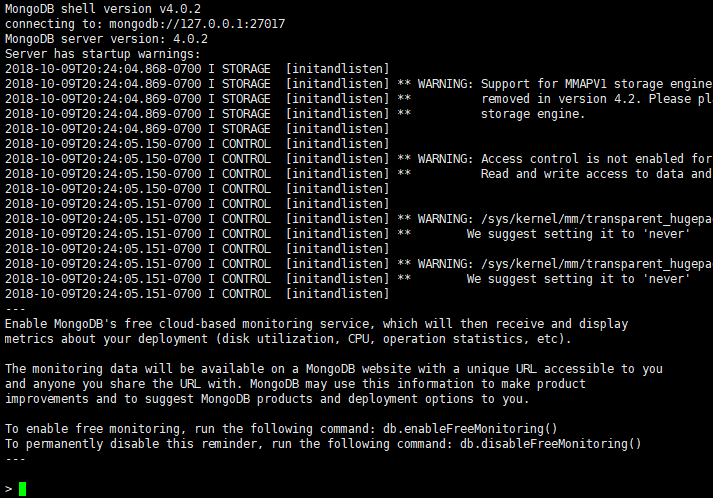
连接成功:
1. 数据库的增删改查
- 查看已有数据库:
show dbs - 切换数据库:
use *** - 删除当前库:
db.dropDatabase()
如果使用use时,所指定的db并不存在,那么将自动生成相应的DB
2. 数据的增删改查
-
插入数据
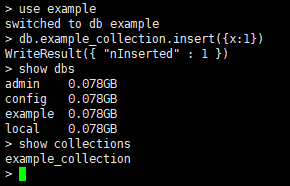
通过use example 创建了db:example
通过db.表名.insert({json})创建了记录。
通过js语法进行操作:
- 在对应表中查询数据
db.表名.find(条件)
- 对find结果进行设置:
count()统计了总数
skip()跳过了表中的前x项
limit()设置返回的条目数
sort()设置根据哪个字段排序
- 更新:
--全更新
> db.example_collection.update({x:1},{x:999})
WriteResult({ "nMatched" : 1, "nUpserted" : 0, "nModified" : 1 })
> db.example_collection.find({x:999})
{ "_id" : ObjectId("5bbd91ce0980ab8f024199ac"), "x" : 999 }

> db.example_collection.insert({x:123,y:223,z:323})
WriteResult({ "nInserted" : 1 })
--部分更新,需要使用$set:
> db.example_collection.update({x:123},{$set:{z:999}})
WriteResult({ "nMatched" : 1, "nUpserted" : 0, "nModified" : 1 })
> db.example_collection.find({x:123})
{ "_id" : ObjectId("5bbd95e00980ab8f02419a11"), "x" : 123, "y" : 223, "z" : 999 }
当我们更新一条不存在的内容时,可以通过在update后面加true令其自动创建。
mongodb的update每次只对一条数据生效,当需要批量更新时,语法如下:
- 删除
删除默认是删除所有匹配到的数据,与更新不同。
3. 数据表的增删改查
增加
当使用db.表名.insert()时,会根据表名自动创建表。删表:
db.表名.drop()
四: 不同类型索引的创建与使用
用索引来优化大规模数据时的查询效率。
1. 索引的基本操作
- 查看集合的索引情况:
> db.example_collection.getIndexes()
[
    {
        "v" : 2,
        "key" : {
            "_id" : 1
        },
        "name" : "_id_",
        "ns" : "example.example_collection"
    }
]
- 创建索引
1为正向索引,-1为负向索引。
需要说明的是:索引一般在使用数据库前就创建完毕,若是数据库中已有大量数据,这时创建索引可能会出现错误。
> db.example_collection.ensureIndex({x:1})
{
    "createdCollectionAutomatically" : false,
    "numIndexesBefore" : 1,
    "numIndexesAfter" : 2,
    "ok" : 1
}
2. 索引的种类与使用
_id索引
绝大多数集合默认建立的索引,每当插入数据的时候,MongoDB会自动的生成一条唯一的_id字段。单键索引
指定某个字段作为索引。其值为单一的值
> db.example_collection.ensureIndex({x:1})
{
    "createdCollectionAutomatically" : false,
    "numIndexesBefore" : 1,
    "numIndexesAfter" : 2,
    "ok" : 1
}
- 多键索引
指定某个字段作为索引。其值有多个记录,例如数组。
对于该条数据,mongoDB认为上文创建了一个多键索引。
- 复合索引
当查询条件不止一个时,就需要建立复合索引。
- 过期索引
是在一段时间后会过期的索引。
在索引过期后,相应的数据会被删除。
建立方法如下:
过期索引字段的值必须是时间类型,为ISODate或者ISODate数组。
不能是时间戳。
插入时间类型的方式如下:
db.example_collection.insert({time:new Date()})
如果索引字段指定的是数组,则根据最早过期的时间进行删除。
过期索引不能是复合索引。
最小时间间隔为60秒,因为服务60s运行一次输出操作。
全文索引
比较特殊的索引,在后文中详细介绍地理位置索引
比较特殊的索引,在后文中详细介绍
3. 全文索引
全文索引,对字符串与字符串数组创建全文可搜索的索引。
例如,我们有三个字段:{author:"",title:"",article:""}
我们希望关键字去匹配author、title和article三者的内容。
建立方法:
单个字段:
db.articles.ensureIndex({key:"text"})

多个字段:
db.articles.ensureIndex({key:"text",key2:"text"})

任意字段:
db.articles.ensureIndex({"$**":"text"})
每个数据集合只允许创建一个数据索引
使用方法:
查找包含coffee字段的数据
> db.article.find({$text:{$search:"coffee"}})

查找包含coffee字段或fee字段的数据
> db.article.find({$text:{$search:"coffee fee"}})

查找包含coffee字段且不包含fee字段的数据
> db.article.find({$text:{$search:"coffee -fee"}})

通过\个特殊字符进行转义,“”包含的内容是必须被匹配上的。
> db.article.find({$text:{$search:" \"america\" coffee"}})
全文匹配的相似度
$meta操作符:{score:{$meta:"textScore"}}
写在查询条件后可以返回反馈结果的相似度,一般与sort一起使用。
db.example_collection.find({$text:{$search:"1"}},{score:{$meta:"textScore"}})

根据score进行排序:
db.example_collection.find({$text:{$search:"1"}},{score:{$meta:"textScore"}}).sort({score:{$meta:"textScore"}})
全文索引的使用限制
每次查询只能使用一个$text查询
$text查询不能出现在$nor查询中
查询包含$text后,不能使用hint指定索引。
4. 地理位置索引
将一些点的位置存储在MongoDB中,创建索引后,可以按照位置来查找其他点。
分为:
- 2d索引:用于平面查找。
- 2dsphere索引:用于球面查找。
查找方式:
- 查找距离某点一定范围内的点。
- 查找包含在某个区域内的点。
2d索引的使用
创建:
> db.location.ensureIndex({"w":"2d"})
{
    "createdCollectionAutomatically" : true,
    "numIndexesBefore" : 1,
    "numIndexesAfter" : 2,
    "ok" : 1
}
位置表示方式:经纬度[j经度,纬度]
取值范围:经度[-180,180],纬度[-90,90]
插入了如下点:
查询方法:
- $near查询:查找最近的点。
near查询默认返回100个点。:

> db.location.find({w:{$near:[1,1]}})
{ "_id" : ObjectId("5bbde1fd7b9cb8b60db8f0ac"), "w" : [ 1, 1 ] }
{ "_id" : ObjectId("5bbde20a7b9cb8b60db8f0ad"), "w" : [ 1, 2 ] }
{ "_id" : ObjectId("5bbde20e7b9cb8b60db8f0ae"), "w" : [ 3, 2 ] }
{ "_id" : ObjectId("5bbde2747b9cb8b60db8f0b0"), "w" : [ 100, 20 ] }
{ "_id" : ObjectId("5bbde27d7b9cb8b60db8f0b1"), "w" : [ 180, 80 ] }

通过maxDistance进行最大距离的限定。

> db.location.find({w:{$near:[1,1],$maxDistance:10}})
{ "_id" : ObjectId("5bbde1fd7b9cb8b60db8f0ac"), "w" : [ 1, 1 ] }
{ "_id" : ObjectId("5bbde20a7b9cb8b60db8f0ad"), "w" : [ 1, 2 ] }
{ "_id" : ObjectId("5bbde20e7b9cb8b60db8f0ae"), "w" : [ 3, 2 ] }
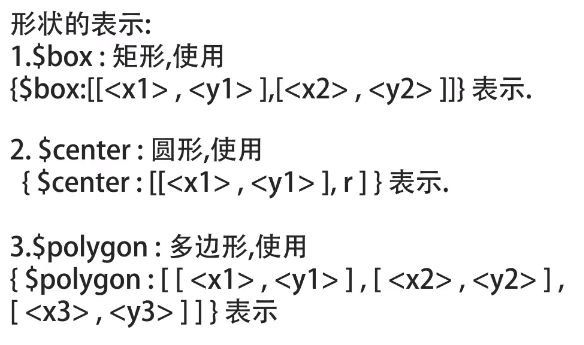
- $geoWithin查询:查找某个形状内的点。
例如:
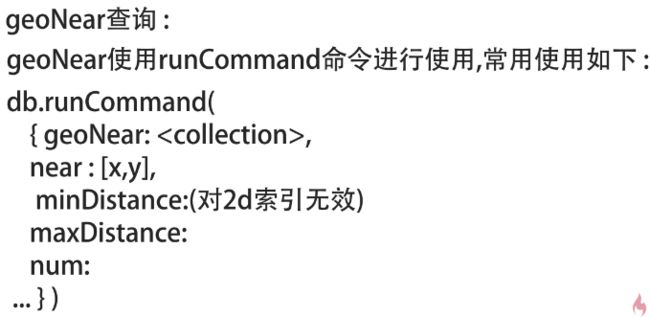
- $geoNear查询:near查询的进化版,可以使用更多的参数
使用实例:
> db.runCommand({geoNear:"location",near:[1,2],maxDistance:10,num:1})
{
    "results" : [
        {
            "dis" : 0,
            "obj" : {
                "_id" : ObjectId("5bbde20a7b9cb8b60db8f0ad"),
                "w" : [
                    1,
                    2
                ]
            }
        }
    ],
    "stats" : {
        "nscanned" : 3,
        "objectsLoaded" : 1,
        "avgDistance" : 0,
        "maxDistance" : 0,
        "time" : 690
    },
    "ok" : 1
}
可以看到,返回的结果更加丰富,可以用于支持更多的功能。
2dsphere索引
创建:
> db.location.ensureIndex({"w":"2dsphere"})
位置表示方式:描述一个点,一条直线,多边形等形状。
格式为:{type:" ",coordinates:[
例如:
db.location.insert( { w: { type: "Point", coordinates: [ 120.31, 30.21] }, title: "location"})
除了支持之前的查询方式外,还支持查询两个多边形的交叉点。
5. 索引属性:
name:
在建立索引的时候可以对索引进行命名:
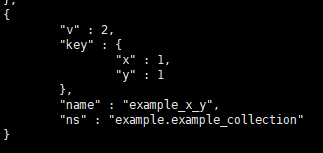
db.example_collection.ensureIndex({x:1,y:1},{name:"example_x_y"})
使用名称可以更方便的删除索引:
db.example_collection.dropIndex("example_x_y")
unique,唯一性
db.example_collection.ensureIndex({x:1,y:1},{unique:true/false})
设置了unique的索引,表明该索引为唯一索引。不允许在同一集合中,插入两条具有相同唯一索引的字段的数据。
例如设置了x,y为唯一索引。
那么,不能插入x,y值都一样的数据。
sparse,稀疏性
db.example_collection.ensureIndex({x:1,y:1},{sparse:true/false}),默认是稀疏的。
设置稀疏意义在于,在你对于x字段创建了索引后,如果插入了一条没有x字段的数据,那么不会对该条数据建立x索引。
同样,你不能在这个稀疏索引上针对x进行搜索。
五:简单运维
1. 索引构建情况分析
索引的有点:加快索引相关的查询。
索引的缺点:增加磁盘空间消耗,降低写入性能。
评判从四个角度进行:
2. 常见的一些工具指令
- mongostat:查看mongodb运行状态的程序。
使用方法 :mongostat -h 127.0.0.1:27017

edwin@ubuntu:~/mongodb/mongodb-linux-x86_64-ubuntu1604-4.0.2$ ./bin/mongostat
insert query update delete getmore command flushes mapped vsize   res faults qrw arw net_in net_out conn                time
    *0    *0     *0     *0       0     1|0       0        1.64G 79.0M      0 0|0 0|0   155b   31.2k    3 Oct 10 19:38:13.316
    *0    *0     *0     *0       0     2|0       0        1.64G 79.0M      0 0|0 0|0   162b   32.6k    3 Oct 10 19:38:14.286
    *0    *0     *0     *0       0     2|0       0        1.64G 79.0M      0 0|0 0|0   158b   31.6k    3 Oct 10 19:38:15.286
    *0    *0     *0     *0       0     1|0       0        1.64G 79.0M      0 0|0 0|0   157b   31.6k    3 Oct 10 19:38:16.286
    *0    *0     *0     *0       0     1|0       0        1.64G 79.0M      0 0|0 0|0   157b   31.5k    3 Oct 10 19:38:17.288
    *0    *0     *0     *0       0     2|0       0        1.64G 79.0M      0 0|0 0|0   158b   31.7k    3 Oct 10 19:38:18.286
    *0    *0     *0     *0       0     1|0       0        1.64G 79.0M      0 0|0 0|0   157b   31.6k    3 Oct 10 19:38:19.286
    *0    *0     *0     *0       0     1|0       0        1.64G 79.0M      0 0|0 0|0   157b   31.6k    3 Oct 10 19:38:20.286
    *0    *0     *0     *0       0     1|0       0        1.64G 79.0M      0 0|0 0|0   157b   31.6k    3 Oct 10 19:38:21.287
    *0    *0     *0     *0       0     2|0       0        1.64G 79.0M      0 0|0 0|0   158b   31.6k    3 Oct 10 19:38:22.285
其中,qrw为读写队列数,会很直观的影响mongodb的性能。
- profile集合
db.getProfilingLevel()
该指令可以查看Profile级别,级别为0不会记录任何操作,级别为2时,记录所有操作。

> db.getProfilingStatus()
{ "was" : 0, "slowms" : 100, "sampleRate" : 1 }
当level为1时,配合slowms作为阈值,高于其则记录。

>  db.setProfilingLevel(2)
{ "was" : 0, "slowms" : 100, "sampleRate" : 1, "ok" : 1 }
> db.getProfilingLevel()
2
对level进行修改。
直接show tables无法看到该集合,但是对system.profile进行find()操作,可以看到所记录的内容。
字段含义可以查看文档:
https://docs.mongodb.com/manual/reference/database-profiler/
> show tables
example.location
example_collection
location
> db.system.profile.find().limit(1)
{ "op" : "insert", "ns" : "example.location", "command" : { "insert" : "location", "ordered" : true, "lsid" : { "id" : UUID("e535e60c-0998-46e4-8eb9-1443ca5fdfdc") }, "$db" : "example" }, "ninserted" : 1, "keysInserted" : 2, "numYield" : 0, "locks" : { "Global" : { "acquireCount" : { "r" : NumberLong(1), "w" : NumberLong(1) } }, "MMAPV1Journal" : { "acquireCount" : { "w" : NumberLong(2) } }, "Database" : { "acquireCount" : { "w" : NumberLong(1) } }, "Collection" : { "acquireCount" : { "W" : NumberLong(1) } } }, "responseLength" : 45, "protocol" : "op_msg", "millis" : 0, "ts" : ISODate("2018-10-11T03:06:57.484Z"), "client" : "127.0.0.1", "appName" : "MongoDB Shell", "allUsers" : [ ], "user" : "" }
>
profile在生产环境中建议关闭,以为在操作频繁时,profile的读写会占用mongoDB大量的资源。
- 日志
日志在配置文件中进行配置,在第二大章中有提到,在配置文件中添加verbose字段:
...
verbose = vvvvv
...
v越多,详细程度越高。
- explain()
使用在指令之后,会显示出指令的详细信息。
> db.example_collection.find({x:1})
{ "_id" : ObjectId("5bbdb18b41b7cdd7f5ed175b"), "x" : [ 1, 2, 3, 4, 5, 6 ] }
> db.example_collection.find({x:1}).explain()
{
...
}
3. 安全性问题
一些基本的方面包括:
物理隔离与网络隔离
IP白名单
用户密码及权限
一般用户名密码及权限是最常规的方法。
开启权限认证
- auto开启
在配置文件中添加:
auth = true
一般先创建用户,再设置该条选项。
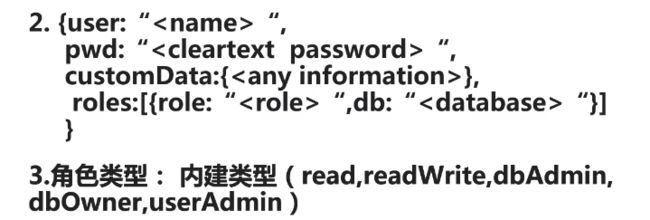
指令为createUser
结构为:
roles的内建类型为:
read:读权限
readWrite:读写权限
dbAdmin:db的管理权限,除了读写还可以创建索引。
dbOwner:db所以权限
userAdmin:对其它角色进行管理。
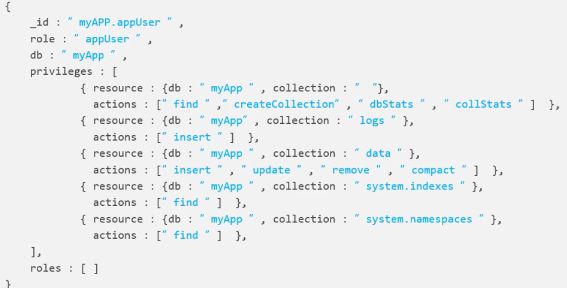
可以对权限进行组合,创建一个新的role。
示例如下:
> db.createUser({user:"edwin",pwd:"1234",roles:[{role:"userAdmin",db:"example"},{role:"read",db:"example"}]})
Successfully added user: {
    "user" : "edwin",
    "roles" : [
        {
            "role" : "userAdmin",
            "db" : "example"
        },
        {
            "role" : "read",
            "db" : "example"
        }
    ]
}
这时再通过直接登陆,在操作时会报错:
进行如下验证:
> use example
switched to db example
> db.auth("edwin","1234")
1
返回1说明成功
可以创建特殊的角色

