Activity、Window、PhoneWindow、Decorview、Rootview关系
应用的界面怎么显示出来的?
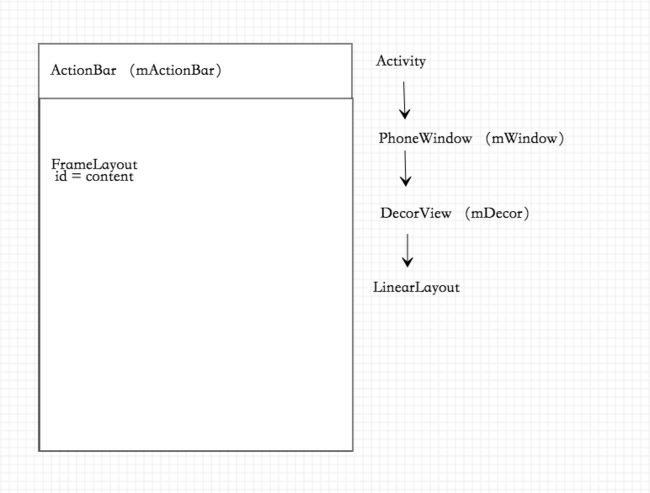
Activity包含一个window,通过getwindow()可以得到抽象的Window类,代表一个窗口。window持有一个DecorView,是视图的根布局。Decorview继承自Framelayout,内部有垂直方向的Linearlayout。上面是标题栏ActionBar,下面是内容栏contentview。
图解层级关系:
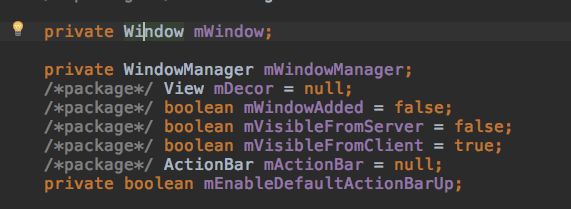
Activity内部属性,这里可见有mWindow,mDecor,有mActionBar:
setContentView()过程:
1.创建一个DecorView的对象mDecor,该mDecor对象将作为整个应用窗口的根视图。
2.依据Feature等style theme创建不同的窗口修饰布局文件,并且通过findViewById获取Activity布局文件该存放的地方(窗口修饰布局文件中id为content的FrameLayout)。
3.将Activity的布局文件添加至id为content的FrameLayout内。
    public void setContentView(int layoutResID) {
        getWindow().setContentView(layoutResID);
        initWindowDecorActionBar();
    }

    public void setContentView(View view) {
        getWindow().setContentView(view);
        initWindowDecorActionBar();
    }

    public void setContentView(View view, ViewGroup.LayoutParams params) {
        getWindow().setContentView(view, params);
        initWindowDecorActionBar();
    }
View渲染机制
自定义view构造函数调用:
public class CustomView extends View{

    /**
     * 构造函数1
     * @param context
     */
    public CustomView(Context context) {
        super(context);
    }

    /**
     * 构造函数2
     * @param context
     */
    public CustomView(Context context, @Nullable AttributeSet attrs) {
        super(context, attrs);
    }

    /**
     * 构造函数3
     * @param context
     */
    public CustomView(Context context, @Nullable AttributeSet attrs, int defStyleAttr) {
        super(context, attrs, defStyleAttr);
    }
}
1.直接new一个CustomView时,调用构造函数1。
2.在布局中引入CustomView时,调用构造函数2;并且此时可以通过context.obtainStyledAttributes()获取自定义属性值。
3.构造函数3中,defStyleAttr用来给View提供一个基本的style,需要构造函数1和2主动调用才会调用。
获取style属性:
public TypedArray obtainStyledAttributes (AttributeSet set, int[] attrs, int defStyleAttr, int defStyleRes)
onMeasure讲解
View绘制出来需要知道自己的宽高是多少,所以要先进行测量尺寸。
从门缝里面看世界,那就从View的内部类MeasureSpec测量类去学:
public static class MeasureSpec {
        private static final int MODE_SHIFT = 30;
        private static final int MODE_MASK  = 0x3 << MODE_SHIFT;

      /** @hide */
        @IntDef({UNSPECIFIED, EXACTLY, AT_MOST})
        @Retention(RetentionPolicy.SOURCE)
        public @interface MeasureSpecMode {}

        /**
         * Measure specification mode: The parent has not imposed any constraint
         * on the child. It can be whatever size it wants.
         */
        public static final int UNSPECIFIED = 0 << MODE_SHIFT;

        /**
         * Measure specification mode: The parent has determined an exact size
         * for the child. The child is going to be given those bounds regardless
         * of how big it wants to be.
         */
        public static final int EXACTLY     = 1 << MODE_SHIFT;

        /**
         * Measure specification mode: The child can be as large as it wants up
         * to the specified size.
         */
        public static final int AT_MOST     = 2 << MODE_SHIFT;


        public static int makeMeasureSpec(@IntRange(from = 0, to = (1 << MeasureSpec.MODE_SHIFT) - 1) int size,
                                          @MeasureSpecMode int mode) {
            if (sUseBrokenMakeMeasureSpec) {
                return size + mode;
            } else {
                return (size & ~MODE_MASK) | (mode & MODE_MASK);
            }
        }

        public static int makeSafeMeasureSpec(int size, int mode) {
            if (sUseZeroUnspecifiedMeasureSpec && mode == UNSPECIFIED) {
                return 0;
            }
            return makeMeasureSpec(size, mode);
        }

        @MeasureSpecMode
        public static int getMode(int measureSpec) {
            //noinspection ResourceType
            return (measureSpec & MODE_MASK);
        }

        public static int getSize(int measureSpec) {
            return (measureSpec & ~MODE_MASK);
        }
    }
测量模式:
UNSPECIFIED
EXACTLY
AT_MOST
为了认准测量模式的对应方式,我写了一个简单测试类:
public class CustomView extends View{

    public CustomView(Context context) {
        super(context);
    }

    public CustomView(Context context, @Nullable AttributeSet attrs) {
        super(context, attrs);
    }

    public CustomView(Context context, @Nullable AttributeSet attrs, int defStyleAttr) {
        super(context, attrs, defStyleAttr);
    }

    @Override
    protected void onMeasure(int widthMeasureSpec, int heightMeasureSpec) {
        super.onMeasure(widthMeasureSpec, heightMeasureSpec);

        int widthMode = MeasureSpec.getMode(widthMeasureSpec);
        int heightMode = MeasureSpec.getMode(heightMeasureSpec);

        switch (widthMode){
            case MeasureSpec.UNSPECIFIED:
                Log.e("TAG","widthMode " + "UNSPECIFIED");
                break;
            case MeasureSpec.AT_MOST:
                Log.e("TAG","widthMode " + "AT_MOST");
                break;
            case MeasureSpec.EXACTLY:
                Log.e("TAG","widthMode " + "EXACTLY");
                break;
        }
        Log.e("TAG","widthSize " + MeasureSpec.getSize(widthMeasureSpec));

        switch (heightMode){
            case MeasureSpec.UNSPECIFIED:
                Log.e("TAG","heightMode " + "UNSPECIFIED");
                break;
            case MeasureSpec.AT_MOST:
                Log.e("TAG","heightMode " + "AT_MOST");
                break;
            case MeasureSpec.EXACTLY:
                Log.e("TAG","heightMode " + "EXACTLY");
                break;
        }
        Log.e("TAG","heightSize " + MeasureSpec.getSize(heightMeasureSpec));
    }

}
测试结果:
布局中宽高均为match_parent: 测量模式为EXACTLY
布局中宽高均为wrap_content: 测量模式为AT_MOST
布局中宽高均为200dp(固定数值): 测量模式为EXACTLY
- UNSPECIFIED 父容器没有对当前View有任何限制,可以随便用空间,老爸的卡随便刷的富二代
- EXACTLY 父容器测量的值是多少,那么这个view的大小就是这个specSize,毫不讨价还价
- AT_MOST 父容器给定一个子view的最大尺寸,大小在这个值范围以内,具体是多少看子view的表现
测量完成:
测量完成回调onMeasure(int widthMeasureSpec, int heightMeasureSpec)方法。
那么这两个名字长长的变量是什么呢?就是测量出的宽和高的信息。
回到MeasureSpec类分析,一个Int有32位,用前2位表示SpecMode ,2位数有四种表示方法了,00,01,11分别表示上面的模式顺序。后30位表示SpecSize。那我们是不是获取测量模式和尺寸都要自己使用位移计算呢?不用的,MeasureSpec类已经有了,自带了拆分和打包方法。
public static int makeMeasureSpec(int size, int mode) {
            if (sUseBrokenMakeMeasureSpec) {
                return size + mode;
            } else {
                return (size & ~MODE_MASK) | (mode & MODE_MASK);
            }
        }

public static int getMode(int measureSpec) {
            return (measureSpec & MODE_MASK);
        }

public static int getSize(int measureSpec) {
            return (measureSpec & ~MODE_MASK);
        }
获取测量模式和测量大小:
    @Override
    protected void onMeasure(int widthMeasureSpec, int heightMeasureSpec) {
        super.onMeasure(widthMeasureSpec, heightMeasureSpec);

        int widthMode = MeasureSpec.getMode(widthMeasureSpec);
        int heightMode = MeasureSpec.getMode(heightMeasureSpec);
        int widthSize = MeasureSpec.getSize(widthMeasureSpec);
        int heightSize = MeasureSpec.getSize(heightMeasureSpec);
}
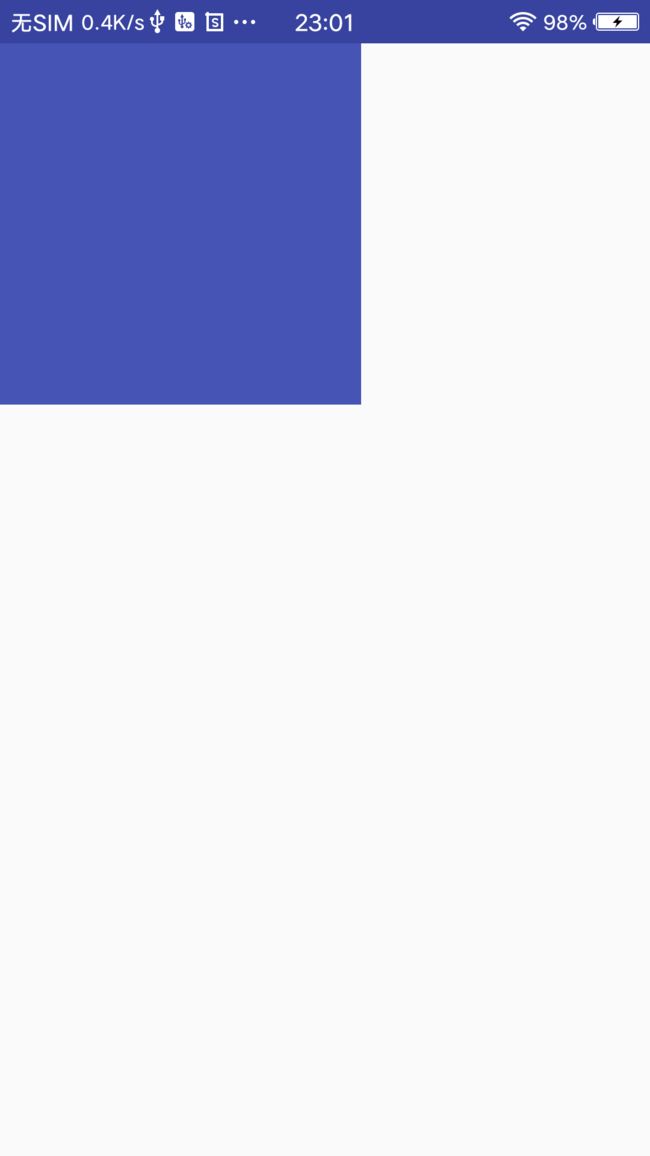
现在,我们要写一个正方形ImageView,使用setMeasuredDimension()自己重设测量值,让高度值也等于宽度值:
public class SquareImageView extends AppCompatImageView{

    public SquareImageView(Context context) {
        super(context);
    }

    public SquareImageView(Context context, @Nullable AttributeSet attrs) {
        super(context, attrs);
    }

    @Override
    protected void onMeasure(int widthMeasureSpec, int heightMeasureSpec) {
        setMeasuredDimension(widthMeasureSpec,widthMeasureSpec);
    }
}
效果:
onDraw机制:
将view绘制到屏幕上有以下几步:
- 绘制背景 background.draw(sanvas)
- 绘制自己 onDraw
- 绘制children dispatchDraw (ViewGroup才有,View没有)
- 绘制滚动条 onDrawScrollBars
View绘制机制:
Android应用程序调用SurfaceFlinger服务把经过测量、布局和绘制后的Surface渲染到显示屏幕上。
Android目前有两种绘制模型:基于软件的绘制模型和硬件加速的绘制模型。
在基于软件的绘制模型下,CPU主导绘图,视图按照两个步骤绘制:
让View层次结构失效
-
绘制View层次结构
当应用程序需要更新它的部分UI时,都会调用内容发生改变的View对象的invalidate()方法。无效(invalidation)消息请求会在View对象层次结构中传递,以便计算出需要重绘的屏幕区域(脏区)。然后,Android系统会在View层次结构中绘制所有的跟脏区相交的区域。不幸的是,这种方法有两个缺点:
绘制了不需要重绘的视图(与脏区域相交的区域)
-
掩盖了一些应用的bug(由于会重绘与脏区域相交的区域)
注意:在View对象的属性发生变化时,如背景色或TextView对象中的文本等,Android系统会自动的调用该View对象的invalidate()方法。
在基于硬件加速的绘制模式下,GPU主导绘图,绘制按照三个步骤绘制:
让View层次结构失效
记录、更新显示列表
绘制显示列表
这种模式下,Android系统依然会使用invalidate()方法和draw()方法来请求屏幕更新和展现View对象。但Android系统并不是立即执行绘制命令,而是首先把这些View的绘制函数作为绘制指令记录一个显示列表中,然后再读取显示列表中的绘制指令调用OpenGL相关函数完成实际绘制。另一个优化是,Android系统只需要针对由invalidate()方法调用所标记的View对象的脏区进行记录和更新显示列表。没有失效的View对象则能重放先前显示列表记录的绘制指令来进行简单的重绘工作。
使用显示列表的目的是,把视图的各种绘制函数翻译成绘制指令保存起来,对于没有发生改变的视图把原先保存的操作指令重新读取出来重放一次就可以了,提高了视图的显示速度。而对于需要重绘的View,则更新显示列表,以便下次重用,然后再调用OpenGL完成绘制。
硬件加速提高了Android系统显示和刷新的速度,但它也不是万能的,它有三个缺陷:
- 兼容性(部分绘制函数不支持或不完全硬件加速)
- 内存消耗(OpenGL API调用就会占用8MB,而实际上会占用更多内存)
- 电量消耗(GPU耗电)
自定义View自定义属性:
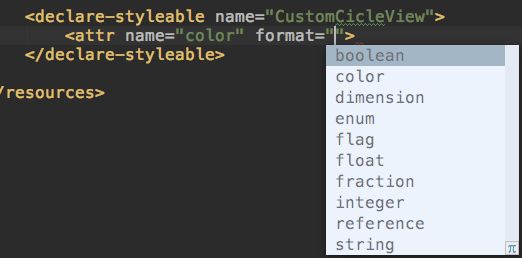
在style中declare-styleable中声明属性,可自定属性的种类有
boolean:设置布尔值
color:颜色
dimension:设置尺寸
enum:枚举值
flag:位或运算
float:浮点值
fraction:百分数
integer:整形
reference:指定Theme中资源ID
string:字符串
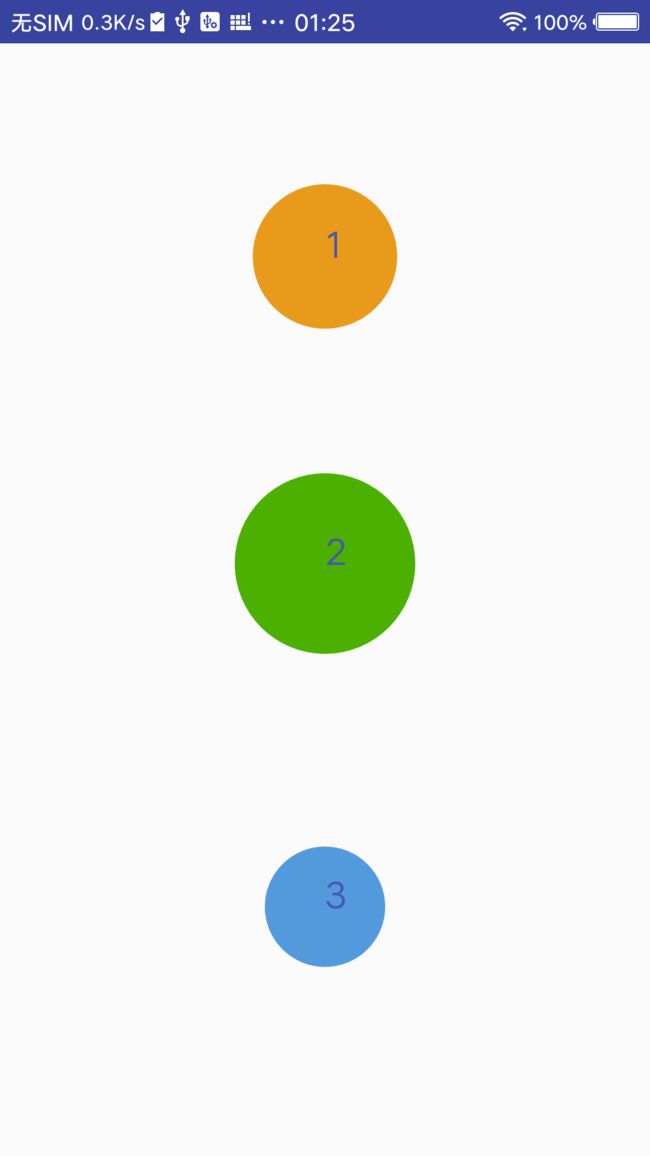
举个栗子来了,现在我们要画一个圆形,写一个CustomCicleView,可以在引用到布局的时候自定义半径,可选择红黄蓝颜色之一,圆心文字编号。
按照需求定义属性:
CustomCicleView类:TypedArray是存储资源数组的容器,他可以通过obtaiStyledAttributes()方法创建出来。如果不在使用了,需用recycle()方法把它释放。通过array.getXX获取各个对应属性值。
import android.content.Context;
import android.content.res.TypedArray;
import android.graphics.Canvas;
import android.graphics.Paint;
import android.support.annotation.Nullable;
import android.util.AttributeSet;
import android.view.View;

public class CustomCicleView extends View{
    private int defaultSize = 100;
    private int colorType;
    private int circleColor;
    private int radius = defaultSize;
    private String text = "0";
    private int textColor = R.color.colorPrimary;
    private Paint paint;

    public CustomCicleView(Context context) {
        super(context);
        init();
    }

    public CustomCicleView(Context context, @Nullable AttributeSet attrs) {
        super(context, attrs);

        TypedArray array = context.obtainStyledAttributes(attrs,R.styleable.CustomCicleView);
        colorType = array.getInt(R.styleable.CustomCicleView_colorType,0);
        radius = array.getInteger(R.styleable.CustomCicleView_radius,defaultSize);
        text = array.getString(R.styleable.CustomCicleView_text);
        array.recycle();

        init();
    }

    private void init(){
        paint = new Paint();
        paint.setAntiAlias(true);

        if(colorType == 0){
            circleColor = R.color.orange;
        }else if(colorType == 1){
            circleColor = R.color.Skyblue;
        }else{
            circleColor = R.color.Grassgreen;
        }
        paint.setColor(getResources().getColor(circleColor));
        paint.setTextSize(60);
    }

    @Override
    protected void onDraw(Canvas canvas) {
        super.onDraw(canvas);

        canvas.drawCircle(getWidth()/2,getHeight()/2,radius,paint);
        paint.setColor(getResources().getColor(textColor));
        canvas.drawText(text,getMeasuredWidth()/2,getMeasuredHeight()/2,paint);
    }

}
那么,现在就可以使用该自定义view并设置不同的属性值了:
效果图:
好了,自定义View的机制就总结完了,该篇文章是自定义View的基础,磨刀不误砍柴工,相信看完这篇文章的你对自定义View的知识体系有了全面的认识了吧。这篇文章会继续完善,继续更新。想继续深造的看我的该系列其他自定义View控件。祝你早日写出各种牛逼轰轰的自定义View。
年底了,Android和IOS工作更不好找了,我也回想起去年和前年在寒风凛冽中找工作的心酸,这种环境和压力下一定要坚持,风雨过后才会更加懂得珍惜。但是市场饱和的是大量的初级开发人员,只要肯花时间学,梳理出自己良好的知识体系,一步一步走向高级,从被公司踢来踢去的小白变成强者!
