Android插件化的探索
简介
对于App而言,所谓的插件化,个人的理解就是把一个完整的App拆分成宿主和插件两大部分,我们在宿主app运行时可以动态的载入或者替换插件的部分,插件不仅是对宿主功能的扩展而且还能减小宿主的负担,所谓的宿主就是运行的app,插件即宿主运行时加载的apk文件,这样宿主和插件结合的方案技术大概就是插件化了吧。

为什么要插件化?
- 解耦,独立各大模块的业务成为插件,互不干扰,即用即插,方便开发与维护。当业务庞大、繁琐之后,是否存在牵一发而动全身的感觉,是否存在逻辑过于复杂、耦合度较高、难以掌控整个项目。
- 加快编译。每次修改后无需重新编辑整个工程项目,可以单独编译某个插件工程,对于庞大的项目而言,速度就是至上的武功。
- 动态更新。无需重新下载与安装app,可以单独下载某个插件apk,直接加载,从动态更新、包体积和流量上感觉是个不错的选择。
- 模块定制。需要什么模块下载什么模块,无需让app变得庞大,所需所得。

插件化原理简单描述
关于插件化主要解决的大概就是类加载、资源加载、组件的加载这些核心问题了吧,所谓的原理也就是围绕这些问题进行的探讨。

Android的类加载
android中的类加载系统的ClassLoader可以大致划分为BaseDexClassLoader,SecureClassLoader。作为插件化我们只简单分析一下PathClassLoader与DexClassLoader,毕竟类加载的内容也很多,要写的东西也很多?,先看下android类加载继承关系图:

- PathClassLoader 提供一个简单的类加载器实现,该实现对本地文件系统中的文件和目录列表进行操作,但不尝试从网络加载类。Android将该类用于其系统类加载器和应用程序类加载器(简单讲可加载已安装的apk)。下面是官方的描述:
Provides a simple ClassLoader implementation that operates on a list of files and directories in the local file system, but does not attempt to load classes from the network. Android uses this class for its system class loader and for its application class loader(s).
- DexClassLoader 它从.jar和.apk文件中加载包含类.dex条目的类。这可以用于执行未作为应用程序的一部分安装的代码(简单讲可加载未安装的apk,热修复与动态更新可能就是靠它了)在API级别26之前,这个类加载器需要一个应用程序专用的可写目录来缓存优化的类。使用Context.getCodeCacheDir()创建这样一个目录:以下为官方的描述:
A class loader that loads classes from .jar and .apk files containing a classes.dex entry. This can be used to execute code not installed as part of an application.
Prior to API level 26, this class loader requires an application-private, writable directory to cache optimized classes. Use Context.getCodeCacheDir() to create such a directory:
以上关于android的类加载只是轻描淡写了一下,说了半天,关于插件化当然用到了DexClassLoader,我们来看一下DexClassLoader的实现吧。
public class DexClassLoader extends BaseDexClassLoader {
   public DexClassLoader(String dexPath, String optimizedDirectory,
            String librarySearchPath, ClassLoader parent) {
    super(dexPath, new File(optimizedDirectory), librarySearchPath, parent);
  }
}

英语不是很好,下面我简单翻译一下?
dexPath: 字符串变量,包含类和资源的jar/apk文件列表,用File.pathSeparator分隔,在Android上默认为“:”。
optimizedDirectory:不推荐使用此参数,貌似是一个废弃的参数,据说是.dex文件的解压路径,自API级别26起不再生效,那么26之前是怎么用的呢,查了一下是通过 context.getCodeCacheDir()。
librarySearchPath: 包含native库的目录列表,C/C++库存放的路径,用File.pathSeparator分隔;可能为null。
parent: 父类加载器ClassLoader.
再看一下调用的父类BaseDexClassLoader的构造方法及核心方法
public class BaseDexClassLoader extends ClassLoader {
  private final DexPathList pathList;
  public BaseDexClassLoader(String dexPath, File optimizedDirectory,
           String libraryPath, ClassLoader parent) {
       super(parent);
       this.pathList = new DexPathList(this, dexPath, libraryPath, optimizedDirectory);
   }
    @Override
   protected Class findClass(String name) throws ClassNotFoundException {
       List suppressedExceptions = new ArrayList();
       Class c = pathList.findClass(name, suppressedExceptions);
       if (c == null) {
           ClassNotFoundException cnfe = new ClassNotFoundException("Didn't find class \"" + name + "\" on path: " + pathList);
           for (Throwable t : suppressedExceptions) {
               cnfe.addSuppressed(t);
           }
           throw cnfe;
       }
       return c;
   }
    @Override
   protected URL findResource(String name) {
       return pathList.findResource(name);
   }
    @Override
   protected Enumeration findResources(String name) {
       return pathList.findResources(name);
   }
    @Override
   public String findLibrary(String name) {
       return pathList.findLibrary(name);
   }
}
显然看出DexPathList这个成员对象的重要性,初始化构造方法的时候实例化DexPathList对象,同时,BaseDexClassLoader重写了父类findClass()方法,通过该方法进行类查找的时候,会委托给pathList对象的findClass()方法进行相应的类查找,下面继续查看DexPathList类的findClass方法:
final class DexPathList {
    private Element[] dexElements;
    DexPathList(ClassLoader definingContext, String dexPath,
            String librarySearchPath, File optimizedDirectory, boolean isTrusted) {
        ...

        this.dexElements = makeDexElements(splitDexPath(dexPath), optimizedDirectory,
                                           suppressedExceptions, definingContext, isTrusted);
        ...
    }
    private static Element[] makeDexElements(List files, File optimizedDirectory,
            List suppressedExceptions, ClassLoader loader, boolean isTrusted) {
      Element[] elements = new Element[files.size()];
      int elementsPos = 0;
      for (File file : files) {
          if (file.isDirectory()) {
              elements[elementsPos++] = new Element(file);
          } else if (file.isFile()) {
              String name = file.getName();

              DexFile dex = null;
              if (name.endsWith(DEX_SUFFIX)) {
                  // Raw dex file (not inside a zip/jar).
                  try {
                      dex = loadDexFile(file, optimizedDirectory, loader, elements);
                      if (dex != null) {
                          elements[elementsPos++] = new Element(dex, null);
                      }
                  } catch (IOException suppressed) {
                      System.logE("Unable to load dex file: " + file, suppressed);
                      suppressedExceptions.add(suppressed);
                  }
              } else {
                  try {
                      dex = loadDexFile(file, optimizedDirectory, loader, elements);
                  } catch (IOException suppressed) {
                      suppressedExceptions.add(suppressed);
                  }

                  if (dex == null) {
                      elements[elementsPos++] = new Element(file);
                  } else {
                      elements[elementsPos++] = new Element(dex, file);
                  }
              }
          } else {
              System.logW("ClassLoader referenced unknown path: " + file);
          }
      }
      return elements;
    }
    public Class findClass(String name, List suppressed) {
        for (Element element : dexElements) {
            DexFile dex = element.dexFile;
            if (dex != null) {
                Class clazz = dex.loadClassBinaryName(name, definingContext, suppressed);
                if (clazz != null) {
                    return clazz;
                }
            }
        }
        if (dexElementsSuppressedExceptions != null) {
            suppressed.addAll(Arrays.asList(dexElementsSuppressedExceptions));
        }
        return null;
    }
}
DexPathList构造方法被调用的时候其实就是通过makeDexElements方法把dexPath进行遍历,依次加载每个dex文件,然后通过数组Element[]存放,而在DexPathList类的findClass调用的时候,通过遍历Element[]的dex文件,在通过DexFile类的loadClassBinaryName()来加载类,如果不为空那么代表加载成功,并且返回class,否则返回null。
下面再来看一下基类的ClassLoader是如何实现的吧
public abstract class ClassLoader {
    private final ClassLoader parent;
    protected Class loadClass(String name, boolean resolve)
        throws ClassNotFoundException{
            Class c = findLoadedClass(name);
            if (c == null) {
                try {
                    if (parent != null) {
                        c = parent.loadClass(name, false);
                    } else {
                        c = findBootstrapClassOrNull(name);
                    }
                } catch (ClassNotFoundException e) {
                }
                if (c == null) {
                    c = findClass(name);
                }
            }
            return c;
    }
}
这明显就是一个双亲委派模型,在类加载的时候,首先去查找这个类之前是否已经被加载过,如果加载过直接返回,否则委托父类加载器去查找,如果父类加载器找不到那么就去系统的BootstrapClass去查找,到最后还是找不到的话,那么就自己亲自上阵查找了。这样就避免了重复加载,实现了更加安全。
好了总结一下DexClassLoader的加载过程:loadClass->findClass->BaseDexClassLoader.findClass->DexPathList.findClass->loadDexFile->DexFile.loadClassBinaryName->DexFile.defineClass,大体上就这样么个过程吧。
资源加载
Android系统加载资源都是通过Resource资源对象来进行加载的,因此只需要添加资源(即apk文件)所在路径到AssetManager中,即可实现对插件资源的访问。
 /**
     * Create a new AssetManager containing only the basic system assets.
     * Applications will not generally use this method, instead retrieving the
     * appropriate asset manager with {@link Resources#getAssets}.    Not for
     * use by applications.
     * @hide
     */
    public AssetManager() {
        final ApkAssets[] assets;
        synchronized (sSync) {
            createSystemAssetsInZygoteLocked();
            assets = sSystemApkAssets;
        }

        mObject = nativeCreate();
        if (DEBUG_REFS) {
            mNumRefs = 0;
            incRefsLocked(hashCode());
        }

        // Always set the framework resources.
        setApkAssets(assets, false /*invalidateCaches*/);
    }
不难发现AssetManager的构造方法是@hide隐藏的api,所以不能直接使用,这里肯定是需要通过反射啦,不过有人说Android P不是对系统的隐藏Api做出了限制,因此插件化估计要凉凉,但是我想说现在一些主流的插件化技术基本都已经适配了Android9.0了,所以无需担心。下面先简单贴出Android资源的加载流程。关于插件化的资源加载可以参考下滴滴VirtualApk资源的加载思想 (传送门)
class ContextImpl extends Context {
//...
    private ContextImpl(ContextImpl container, ActivityThread mainThread,
            LoadedApk packageInfo, IBinder activityToken, UserHandle user, boolean restricted,
            Display display, Configuration overrideConfiguration) {
    //....
    Resources resources = packageInfo.getResources(mainThread);
    //....
    }
//...
}
这里不去关注packageInfo是如何生成的,直接跟踪到下面去.
public final class LoadedApk {
  private final String mResDir;
  public LoadedApk(ActivityThread activityThread, ApplicationInfo aInfo,
            CompatibilityInfo compatInfo, ClassLoader baseLoader,
            boolean securityViolation, boolean includeCode, boolean registerPackage) {
        final int myUid = Process.myUid();
        aInfo = adjustNativeLibraryPaths(aInfo);
        mActivityThread = activityThread;
        mApplicationInfo = aInfo;
        mPackageName = aInfo.packageName;
        mAppDir = aInfo.sourceDir;
        mResDir = aInfo.uid == myUid ? aInfo.sourceDir : aInfo.publicSourceDir;
        // 注意一下这个sourceDir,这个是我们宿主的APK包在手机中的路径,宿主的资源通过此地址加载。
        // 该值的生成涉及到PMS,暂时不进行分析。
        // Full path to the base APK for this application.
       //....
    }
//....
   public Resources getResources(ActivityThread mainThread) {
        if (mResources == null) {
            mResources = mainThread.getTopLevelResources(mResDir, mSplitResDirs, mOverlayDirs,
                    mApplicationInfo.sharedLibraryFiles, Display.DEFAULT_DISPLAY, null, this);
        }
        return mResources;
    }
//....
}
进入到ActivityThread.getTopLevelResources()的逻辑中
public final class ActivityThread {
  Resources getTopLevelResources(String resDir, CompatibilityInfo compInfo) {
  //我们暂时只关注下面这一段代码

       AssetManager assets = new AssetManager();
        if (assets.addAssetPath(resDir) == 0) {  //此处将上面的mResDir,也就是宿主的APK在手机中的路径当做资源包添加到AssetManager里,则Resources对象可以通过AssetManager查找资源,此处见(老罗博客:Android应用程序资源的查找过程分析)
            return null;
        }
        // 创建Resources对象,此处依赖AssetManager类来实现资源查找功能。
       r = new Resources(assets, metrics, getConfiguration(), compInfo);

 }
}
从上面的代码中我们知道了我们常用的Resources是如何生成的了,那么理论上插件也就按照如此方式生成一个Resources对象给自己用就可以了。
组件的加载
这个其实不能一概而论,因为Android拥有四大组件,分别为Activity、Service、ContentProvider、BoradCastRecevier,每个组件的属性及生命周期也不一样,所以关于插件中加载的组件就需要分别研究每个组件是如何加载的了。
简单拿Activity组件来说,现在一些主流的方式基本上都是通过“坑位”的思想,这个词最早据说也是来源于360,总的来说,先占坑,因为我们宿主app的Manifest中是不会去申请插件中的Activity的,那我就先占一个坑,欺骗系统,然后替换成插件中的Activity。这里可能需要多个坑位,因为一些资源属性都是可以动态配置的。比如launchMode、process、configChanges、theme等等。
这里还需要了解一下Activity的启动流程,这里我们可以简单看一下。
 @Override
    public void startActivity(Intent intent, @Nullable Bundle options) {
        if (options != null) {
            startActivityForResult(intent, -1, options);
        } else {
            // Note we want to go through this call for compatibility with
            // applications that may have overridden the method.
            startActivityForResult(intent, -1);
        }
    }
可以看出,我们平时startActivity其实都是通过调用startActivityForResult(),我们接下来继续看
 public void startActivityForResult(@RequiresPermission Intent intent, int requestCode,
            @Nullable Bundle options) {
        if (mParent == null) {
            options = transferSpringboardActivityOptions(options);
            Instrumentation.ActivityResult ar =
                mInstrumentation.execStartActivity(
                    this, mMainThread.getApplicationThread(), mToken, this,
                    intent, requestCode, options);
            if (ar != null) {
                mMainThread.sendActivityResult(
                    mToken, mEmbeddedID, requestCode, ar.getResultCode(),
                    ar.getResultData());
            }
            if (requestCode >= 0) {
                mStartedActivity = true;
            }
            cancelInputsAndStartExitTransition(options);
            // TODO Consider clearing/flushing other event sources and events for child windows.
        } else {
            if (options != null) {
                mParent.startActivityFromChild(this, intent, requestCode, options);
            } else {
                // Note we want to go through this method for compatibility with
                // existing applications that may have overridden it.
                mParent.startActivityFromChild(this, intent, requestCode);
            }
        }
    }
我们可以看到是通过系统的Instrumentation这个类execStartActivity()来执行启动Activity的,我们继续可以看到下面的这个方法:
  public ActivityResult execStartActivity(
  、、、、、
        try {
            intent.migrateExtraStreamToClipData();
            intent.prepareToLeaveProcess(who);
            int result = ActivityManager.getService()
                .startActivity(whoThread, who.getBasePackageName(), intent,
                        intent.resolveTypeIfNeeded(who.getContentResolver()),
                        token, target != null ? target.mEmbeddedID : null,
                        requestCode, 0, null, options);
            checkStartActivityResult(result, intent);
        } catch (RemoteException e) {
            throw new RuntimeException("Failure from system", e);
        }
        return null;
    }

 /**
     * @hide
     */
    public static IActivityManager getService() {
        return IActivityManagerSingleton.get();
    }
    private static final Singleton IActivityManagerSingleton =
            new Singleton() {
                @Override
                protected IActivityManager create() {
                    final IBinder b = ServiceManager.getService(Context.ACTIVITY_SERVICE);
                    final IActivityManager am = IActivityManager.Stub.asInterface(b);
                    return am;
                }
            };
ActivityManager.getService()拿到IActivityManager对象,然后就去调用startActivity()了,而IActivityManager只是一个抽象接口,下面看看它的实现类
public abstract class ActivityManagerNative extends Binder implements IActivityManager

public final class ActivityManagerService extends ActivityManagerNative
        implements Watchdog.Monitor, BatteryStatsImpl.BatteryCallback

class ActivityManagerProxy implements IActivityManager
可以看到它的两个实现类ActivityManagerProxy与ActivityManagerService,简称AMP与AMS,AMP只是AMS的本地代理对象,其startActivity方法会调用到AMS的startActivity方法。而且要注意,这个startActivity方法会把ApplicationThread对象传递到AMS所在进程,当然AMS拿到的实际上是ApplicationThread的代理对象ApplicationThreadProxy,AMS就要通过这个代理对象与我们的App进程进行通信。
既然Activity是否存在的校验是发生在AMS端,那么我们在与AMS交互前,提前将Activity的ComponentName进行替换为占坑的名字,选择hook Instrumentation或者ActivityManagerProxy应该都是可以的,然后Activity经过复杂的启动流程后最终会执行Instrumentation的newActivity(),这里我们可以进行还原成插件的Activity。
 public Activity newActivity(Class clazz, Context context,
            IBinder token, Application application, Intent intent, ActivityInfo info,
            CharSequence title, Activity parent, String id,
            Object lastNonConfigurationInstance) throws InstantiationException,
            IllegalAccessException {
        Activity activity = (Activity)clazz.newInstance();
        ActivityThread aThread = null;
        // Activity.attach expects a non-null Application Object.
        if (application == null) {
            application = new Application();
        }
        activity.attach(context, aThread, this, token, 0 /* ident */, application, intent,
                info, title, parent, id,
                (Activity.NonConfigurationInstances)lastNonConfigurationInstance,
                new Configuration(), null /* referrer */, null /* voiceInteractor */,
                null /* window */, null /* activityConfigCallback */);
        return activity;
    }
关于插件化四大组件的加载原理过于复杂,我只简单的描述了一下插件化的思想,如果想看具体的思想流程,也可以查看滴滴VirtualApk的组件加载原理,插件化思想都有共通之处(传送门)

关于插件化方案的选取
如果你在做插件化,或者想去研究插件化,上面看不懂没有关系,反正市场上已经拥有非常多的成熟方案,下面是从万千的方案中挑取较好的几个方案,以免走更多的弯路,毕竟我也是从茫茫的插件化方案中走了一遭。
- VirtualApk 滴滴插件化方案,功能非常强大,而且兼容性强,目前已经适配Android 9.0,如果项目插件和宿主存在依赖的话是个不错的选择。
- DroidPlugin 360的一款插件化方案,最大的特色就是插件独立,不依赖宿主,当然就无耦合啦
- RePlugin 360另外一款插件化方案,它与DroidPlugin代表2个不同方向,各个功能模块能独立升级,又能需要和宿主、插件之间有一定交互和耦合。
- Shadow 腾讯最近刚开源的插件化方案,最大特色零反射,核心库采取Kotlin实现,个人觉得以后是个不错的选择,但是因为刚开源,还未受到大众的检测。
- VirtualApp 罗盒科技的一款运行于Android系统的沙盒产品,可以理解为轻量级的“Android虚拟机”,非常的牛,广泛应用于插件化开发、无感知热更新、云控自动化、多开、手游租号、手游手柄免激活、区块链、移动办公安全、军队政府保密、手机模拟信息、脚本自动化、自动化测试等技术领域,最大的特色app双开及多开,沙盒能力,内外隔离。不过2017已经商业化了。

滴滴插件化尝鲜
VirtualAPK的工作过程
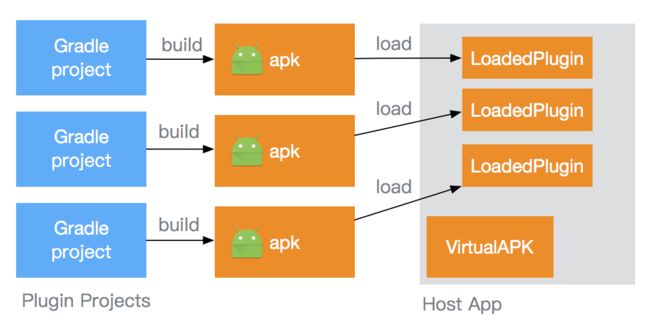
VirtualAPK对插件没有额外的约束,原生的apk即可作为插件。插件工程编译生成apk后,即可通过宿主App加载,每个插件apk被加载后,都会在宿主中创建一个单独的LoadedPlugin对象。如下图所示,通过这些LoadedPlugin对象,VirtualAPK就可以管理插件并赋予插件新的意义,使其可以像手机中安装过的App一样运行。

如何使用
第一步: 宿主Project的build.gradle添加
dependencies {
    classpath 'com.didi.virtualapk:gradle:0.9.8.6'
}
第二步:宿主的Moudle的build.gradle添加
apply plugin: 'com.didi.virtualapk.host'
implementation 'com.didi.virtualapk:core:0.9.8'
第三步:宿主app的Applicaiton中添加初始化:
@Override
protected void attachBaseContext(Context base) {
    super.attachBaseContext(base);
    PluginManager.getInstance(base).init();
}
第四步:增加混淆:
-keep class com.didi.virtualapk.internal.VAInstrumentation { *; }
-keep class com.didi.virtualapk.internal.PluginContentResolver { *; }

-dontwarn com.didi.virtualapk.**
-dontwarn android.**
-keep class android.** { *; }
第五步:宿主的使用:
String pluginPath = Environment.getExternalStorageDirectory().getAbsolutePath().concat("/Test.apk");
File plugin = new File(pluginPath);
PluginManager.getInstance(base).loadPlugin(plugin);

// Given "com.didi.virtualapk.demo" is the package name of plugin APK,
// and there is an activity called `MainActivity`.
Intent intent = new Intent();
intent.setClassName("com.didi.virtualapk.demo", "com.didi.virtualapk.demo.MainActivity");
startActivity(intent);
第六步:插件的Project的build.gradle配置:
dependencies {
    classpath 'com.didi.virtualapk:gradle:0.9.8.6'
}
第七步: 插件app的build.gradle配置:
apply plugin: 'com.didi.virtualapk.plugin'
virtualApk {
    packageId = 0x6f             // The package id of Resources.
    targetHost='source/host/app' // The path of application module in host project.
    applyHostMapping = true      // [Optional] Default value is true.
}
第八步:关于编译运行命令
宿主:gradlew clean assembleRelease
插件:gradlew clean assemblePlugin
原理
- 合并宿主和插件的ClassLoader 需要注意的是,插件中的类不可以和宿主重复
- 合并插件和宿主的资源 重设插件资源的packageId,将插件资源和宿主资源合并
- 去除插件包对宿主的引用 构建时通过Gradle插件去除插件对宿主的代码以及资源的引用
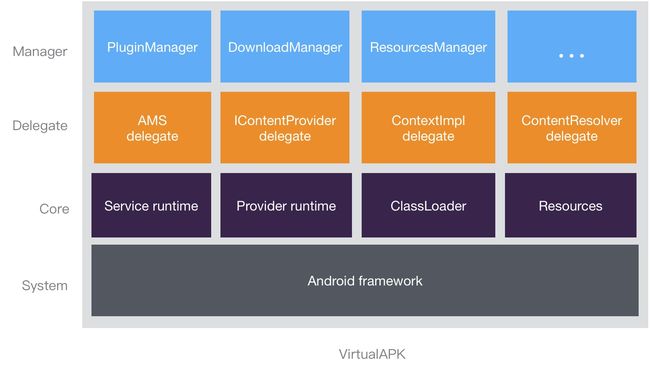
四大组件的实现原理
- Activity 采用宿主manifest中占坑的方式来绕过系统校验,然后再加载真正的activity;
- Service 动态代理AMS,拦截service相关的请求,将其中转给Service Runtime去处理,Service Runtime会接管系统的所有操作;
- Receiver 将插件中静态注册的receiver重新注册一遍;
- ContentProvider 动态代理IContentProvider,拦截provider相关的请求,将其中转给Provider Runtime去处理,Provider Runtime会接管系统的所有操作。
如下是VirtualAPK的整体架构图,更详细的内容请大家阅读源码。

偶编译运行遇见的问题
- 插件和宿主既可在同工程也可不在同工程,他们是通过targetHost来关联的,所以非常灵活,无需担心结构(正常来说插件和宿主都是不同的工程)
- 与阿里的热修复框架产生了不兼容,大概跟初始化有关系(暂时剔除)
- 与JobIntentService产生了不兼容,会报No such service componentInfo(用IntentService替代)
- 宿主跳转插件,发现资源界面还是宿主的(资源id不能和宿主的资源重名)
- 报宿主需要依赖所有com.android.support包(插件和宿主都要同时依赖com.android.support包且版本都要一样)
- 报IllegalStateException:You need to use a Theme.AppCompat theme,构建插件时,请使用(gradlew clean assemblePlugin)
- 发现插件的主题未起作用(请确保宿主和插件使用同一主题)
- 报The directory of host application doesn’t exist!(targetHost路劲配置错误)
- 发现腾讯X5浏览器加载失败默认采取的是系统的WebView(检查so文件,确保宿主和插件的cpu核心保持一致)
最后
关于android的插件化简单研究大概就是酱样子了,初次尝鲜感觉还是蛮不错的,但是最大的苦恼应该是业务插件该如何拆分了,基础组件如何拆分,如何从复杂的荆棘业务中杀出一条血路,想要“万花丛中过,片叶不沾身”,骚年,我相信你可以的。
