【偷偷卷死小伙伴Pytorch20天】-【day11】-【张量的结构操作】
系统教程20天拿下Pytorch
最近和中哥、会哥进行一个小打卡活动,20天pytorch,这是第11天。欢迎一键三连。
后面可能会考虑加速,开学前刷完。
文章目录
- 一、创建张量
- 二、索引切片
- 三、维度变换
- 四、合并分割
- 总结
-
- 创建张量
- 索引切片
- 维度变换
- 合并分割
Pytorch的低阶API主要包括张量操作,动态计算图和自动微分。
如果把模型比作一个房子,那么低阶API就是【模型之砖】。
在低阶API层次上,可以把Pytorch当做一个增强版的numpy来使用。
Pytorch提供的方法比numpy更全面,运算速度更快,如果需要的话,还可以使用GPU进行加速。
前面几章我们对低阶API已经有了一个整体的认识,本章我们将重点详细介绍张量操作和动态计算图。
张量的操作主要包括张量的结构操作和张量的数学运算。
张量结构操作诸如:张量创建,索引切片,维度变换,合并分割。
张量数学运算主要有:标量运算,向量运算,矩阵运算。另外我们会介绍张量运算的广播机制。
动态计算图我们将主要介绍动态计算图的特性,计算图中的Function,计算图与反向传播。
一、创建张量
张量创建的许多方法和numpy中创建array的方法很像。
import numpy as np
import torch
a = torch.tensor([1,2,3],dtype = torch.float)
print(a)
b = torch.arange(1,10,step = 2)
print(b)
![]()
c = torch.linspace(0.0,2*3.14,10)
print(c)
d = torch.zeros(3,3)
print(d)
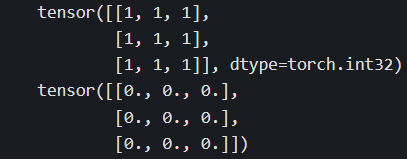
a = torch.ones((3,3),dtype = torch.int)
b = torch.zeros_like(a,dtype = torch.float)
print(a)
print(b)
torch.fill_(b,5)
print(b)
#均匀随机分布
torch.manual_seed(0)
minval,maxval = 0,10
a = minval + (maxval-minval)*torch.rand([5])
print(a)
#正态分布随机
b = torch.normal(mean = torch.zeros(3,3), std = torch.ones(3,3))
print(b)
#整数随机排列
d = torch.randperm(20)
print(d)
#特殊矩阵
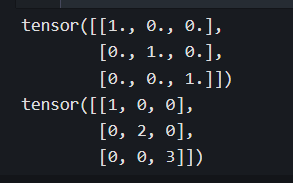
I = torch.eye(3,3) #单位矩阵
print(I)
t = torch.diag(torch.tensor([1,2,3])) #对角矩阵
print(t)
二、索引切片
张量的索引切片方式和numpy几乎是一样的。切片时支持缺省参数和省略号。
可以通过索引和切片对部分元素进行修改。
此外,对于不规则的切片提取,可以使用torch.index_select, torch.masked_select, torch.take
如果要通过修改张量的某些元素得到新的张量,可以使用torch.where,torch.masked_fill,torch.index_fill
#均匀随机分布
torch.manual_seed(0)
minval,maxval = 0,10
t = torch.floor(minval + (maxval-minval)*torch.rand([5,5])).int()
print(t)
#第0行
print(t[0])
![]()
#倒数第一行
print(t[-1])
![]()
#第1行第3列
print(t[1,3])
print(t[1][3])
#第1行至第3行
print(t[1:4,:])
#第1行至最后一行,第0列到最后一列每隔两列取一列
print(t[1:4,:4:2])
#可以使用索引和切片修改部分元素
x = torch.tensor([[1,2],[3,4]],dtype = torch.float32,requires_grad=True)
x.data[1,:] = torch.tensor([0.0,0.0])
x
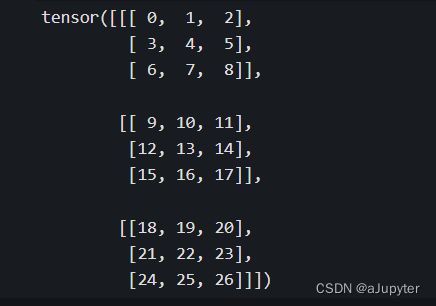
a = torch.arange(27).view(3,3,3)
print(a)
#省略号可以表示多个冒号
print(a[...,1])

以上切片方式相对规则,对于不规则的切片提取,可以使用torch.index_select, torch.take, torch.gather, torch.masked_select.
考虑班级成绩册的例子,有4个班级,每个班级10个学生,每个学生7门科目成绩。可以用一个4×10×7的张量来表示。
minval=0
maxval=100
scores = torch.floor(minval + (maxval-minval)*torch.rand([4,10,7])).int()
print(scores)

'''
tensor([[[55, 95,  3, 18, 37, 30, 93],
         [17, 26, 15,  3, 20, 92, 72],
         [74, 52, 24, 58,  3, 13, 24],
         [81, 79, 27, 48, 81, 99, 69],
         [56, 83, 20, 59, 11, 15, 24],
         [72, 70, 20, 65, 77, 43, 51],
         [61, 81, 98, 11, 31, 69, 91],
         [93, 94, 59,  6, 54, 18,  3],
         [94, 88,  0, 59, 41, 41, 27],
         [69, 20, 68, 75, 85, 68,  0]],

        [[17, 74, 60, 10, 21, 97, 83],
         [28, 37,  2, 49, 12, 11, 47],
         [57, 29, 79, 19, 95, 84,  7],
         [37, 52, 57, 61, 69, 52, 25],
         [73,  2, 20, 37, 25, 32,  9],
         [39, 60, 17, 47, 85, 44, 51],
         [45, 60, 81, 97, 81, 97, 46],
         [ 5, 26, 84, 49, 25, 11,  3],
         [ 7, 39, 77, 77,  1, 81, 10],
         [39, 29, 40, 40,  5,  6, 42]],

        [[50, 27, 68,  4, 46, 93, 29],
         [95, 68,  4, 81, 44, 27, 89],
         [ 9, 55, 39, 85, 63, 74, 67],
         [37, 39,  8, 77, 89, 84, 14],
         [52, 14, 22, 20, 67, 20, 48],
         [52, 82, 12, 15, 20, 84, 32],
         [92, 68, 56, 49, 40, 56, 38],
         [49, 56, 10, 23, 90,  9, 46],
         [99, 68, 51,  6, 74, 14, 35],
         [33, 42, 50, 91, 56, 94, 80]],

        [[18, 72, 14, 28, 64, 66, 87],
         [33, 50, 75,  1, 86,  8, 50],
         [41, 23, 56, 91, 35, 20, 31],
         [ 0, 72, 25, 16, 21, 78, 76],
         [88, 68, 33, 36, 64, 91, 63],
         [26, 26,  2, 60, 21,  5, 93],
         [17, 44, 64, 51, 16,  9, 89],
         [58, 91, 33, 64, 38, 47, 19],
         [66, 65, 48, 38, 19, 84, 12],
         [70, 33, 25, 58, 24, 61, 59]]], dtype=torch.int32)
'''
#抽取每个班级第0个学生,第5个学生,第9个学生的全部成绩
torch.index_select(scores,dim = 1,index = torch.tensor([0,5,9]))
#抽取第0个班级第0个学生的第0门课程,第2个班级的第4个学生的第1门课程,第3个班级的第9个学生第6门课程成绩
#take将输入看成一维数组,输出和index同形状
s = torch.take(scores,torch.tensor([0*10*7+0,2*10*7+4*7+1,3*10*7+9*7+6]))
s
#抽取分数大于等于80分的分数(布尔索引)
#结果是1维张量
g = torch.masked_select(scores,scores>=80)
print(g)

以上这些方法仅能提取张量的部分元素值,但不能更改张量的部分元素值得到新的张量。
如果要通过修改张量的部分元素值得到新的张量,可以使用torch.where,torch.index_fill 和 torch.masked_fill
torch.where可以理解为if的张量版本。
torch.index_fill的选取元素逻辑和torch.index_select相同。
torch.masked_fill的选取元素逻辑和torch.masked_select相同。
#如果分数大于60分,赋值成1,否则赋值成0
ifpass = torch.where(scores>60,torch.tensor(1),torch.tensor(0))
print(ifpass)
#将每个班级第0个学生,第5个学生,第9个学生的全部成绩赋值成满分
torch.index_fill(scores,dim = 1,index = torch.tensor([0,5,9]),value = 100)
#等价于 scores.index_fill(dim = 1,index = torch.tensor([0,5,9]),value = 100)
#将每个班级第0个学生,第5个学生,第9个学生的全部成绩赋值成满分
torch.index_fill(scores,dim = 1,index = torch.tensor([0,5,9]),value = 100)
#等价于 scores.index_fill(dim = 1,index = torch.tensor([0,5,9]),value = 100)
#将分数小于60分的分数赋值成60分
b = torch.masked_fill(scores,scores<60,60)
#等价于b = scores.masked_fill(scores<60,60)
三、维度变换
维度变换相关函数主要有 torch.reshape(或者调用张量的view方法), torch.squeeze, torch.unsqueeze, torch.transpose
torch.reshape 可以改变张量的形状。
torch.squeeze 可以减少维度。
torch.unsqueeze 可以增加维度。
torch.transpose 可以交换维度。
# 张量的view方法有时候会调用失败,可以使用reshape方法。

torch.manual_seed(0)
minval,maxval = 0,255
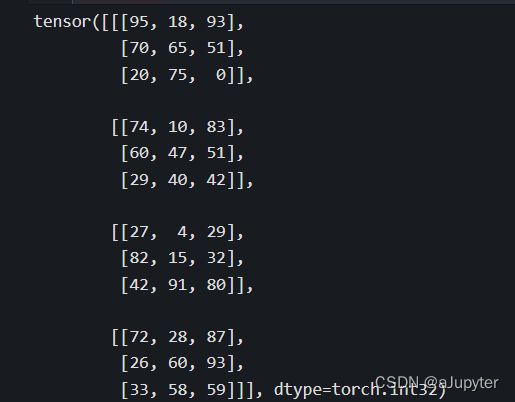
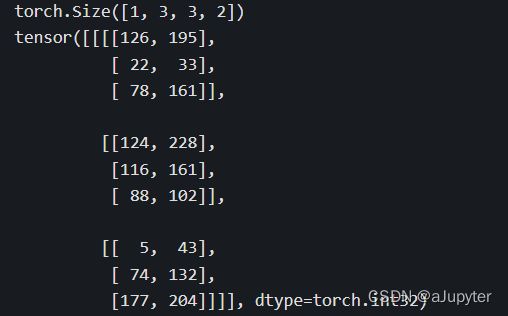
a = (minval + (maxval-minval)*torch.rand([1,3,3,2])).int()
print(a.shape)
print(a)
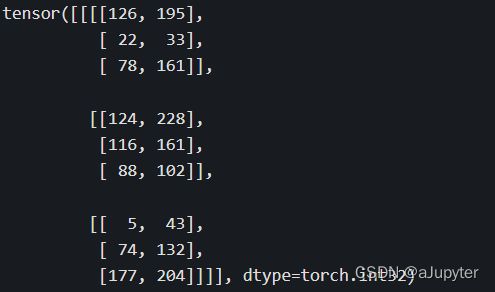
# 改回成 [1,3,3,2] 形状的张量
c = torch.reshape(b,[1,3,3,2]) # b.view([1,3,3,2])
print(c)
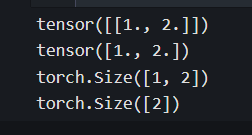
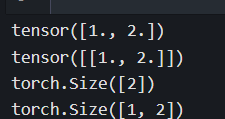
如果张量在某个维度上只有一个元素,利用torch.squeeze可以消除这个维度。
torch.unsqueeze的作用和torch.squeeze的作用相反。
a = torch.tensor([[1.0,2.0]])
s = torch.squeeze(a)
print(a)
print(s)
print(a.shape)
print(s.shape)
#在第0维插入长度为1的一个维度

d = torch.unsqueeze(s,axis=0)
print(s)
print(d)

print(s.shape)
print(d.shape)
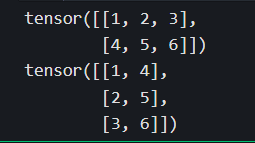
torch.transpose可以交换张量的维度,torch.transpose常用于图片存储格式的变换上。
如果是二维的矩阵,通常会调用矩阵的转置方法 matrix.t(),等价于 torch.transpose(matrix,0,1)。
minval=0
maxval=255
# Batch,Height,Width,Channel
data = torch.floor(minval + (maxval-minval)*torch.rand([100,256,256,4])).int()
print(data.shape)

# 转换成 Pytorch默认的图片格式 Batch,Channel,Height,Width
# 需要交换两次
data_t = torch.transpose(torch.transpose(data,1,2),1,3)
print(data_t.shape)
matrix = torch.tensor([[1,2,3],[4,5,6]])
print(matrix)
print(matrix.t()) #等价于torch.transpose(matrix,0,1)
四、合并分割
可以用torch.cat方法和torch.stack方法将多个张量合并,可以用torch.split方法把一个张量分割成多个张量。
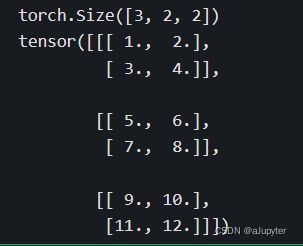
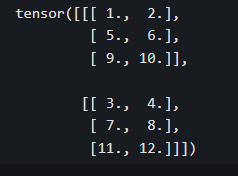
torch.cat和torch.stack有略微的区别,torch.cat是连接,不会增加维度,而torch.stack是堆叠,会增加维度。
a = torch.tensor([[1.0,2.0],[3.0,4.0]])
b = torch.tensor([[5.0,6.0],[7.0,8.0]])
c = torch.tensor([[9.0,10.0],[11.0,12.0]])

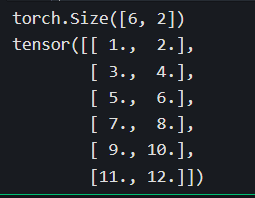
abc_cat = torch.cat([a,b,c],dim = 0)
print(abc_cat.shape)
print(abc_cat)
abc_stack = torch.stack([a,b,c],axis = 0) #torch中dim和axis参数名可以混用
print(abc_stack.shape)
print(abc_stack)
torch.cat([a,b,c],axis = 1)
torch.stack([a,b,c],axis = 1)
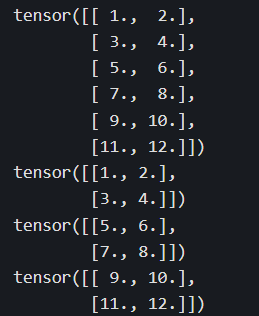
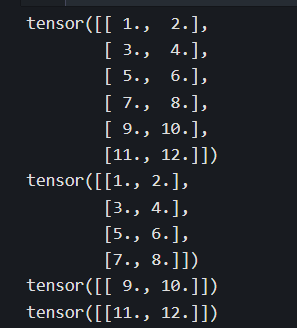
torch.split是torch.cat的逆运算,可以指定分割份数平均分割,也可以通过指定每份的记录数量进行分割。
print(abc_cat)
a,b,c = torch.split(abc_cat,split_size_or_sections = 2,dim = 0) #每份2个进行分割
print(a)
print(b)
print(c)
print(abc_cat)
p,q,r = torch.split(abc_cat,split_size_or_sections =[4,1,1],dim = 0) #每份分别为[4,1,1]
print(p)
print(q)
print(r)
总结
创建张量
torch.fill_(b,5)
torch.randperm(20)#整数随机排列
torch.eye(3,3) #单位矩阵
torch.diag(torch.tensor([1,2,3])) #对角矩阵
索引切片
#第1行至最后一行,第0列到最后一列每隔两列取一列
print(t[1:4, :4:2])
#可以使用索引和切片修改部分元素
x = torch.tensor([[1,2],[3,4]],dtype = torch.float32,requires_grad=True)
x.data[1,:] = torch.tensor([0.0,0.0])
#省略号可以表示多个冒号
print(a[…,1])
torch.floor(input, out=None)返回一个新张量,包含输入input张量每个元素的floor,即取不大于元素的最大整数。
#对于不规则的切片提取,可以使用torch.index_select, torch.masked_select, torch.take
如果要通过修改张量的某些元素得到新的张量,可以使用torch.where,torch.masked_fill,torch.index_fill
torch.where(scores>60,torch.tensor(1),torch.tensor(0))
维度变换
torch.squeeze 可以减少维度。
torch.unsqueeze 可以增加维度。
torch.transpose 可以交换维度。
reshape和view都不改变原来的形状
torch中dim和axis可以混用
合并分割
可以用torch.cat方法和torch.stack方法将多个张量合并,可以用torch.split方法把一个张量分割成多个张量。
torch.cat和torch.stack有略微的区别,torch.cat是连接,不会增加维度,而torch.stack是堆叠,会增加维度。


