vue 小细节功能
Loading
1、样式如图:

2、在 src/components/shared 里面新建 Loading.vue 组件,里面添加如下代码:
<template>
  <div class="loading">
    <div><span>span>div>
    <div><span>span>div>
    <div><span>span>div>
  div>
template>

<style>
.loading {
  width: 60px;
  height: 60px;
  margin: 0 auto;
  margin-top: 100px;
  position: relative;
  -webkit-animation: load 3s linear infinite;
}

.loading div {
  width: 100%;
  height: 100%;
  position: absolute;
}

.loading span {
  display: inline-block;
  width: 20px;
  height: 20px;
  border-radius: 50%;
  background: #FF6666;
  position: absolute;
  left: 50%;
  margin-top: -10px;
  margin-left: -10px;
  -webkit-animation: changeBgColor 3s ease infinite;
}

@-webkit-keyframes load {
  0% {
    -webkit-transform: rotate(0deg);
  }
  33.3% {
    -webkit-transform: rotate(120deg);
  }
  66.6% {
    -webkit-transform: rotate(240deg);
  }
  100% {
    -webkit-transform: rotate(360deg);
  }
}

@-webkit-keyframes changeBgColor {
  0%, 100% {
    background: #99CC66;
  }
  33.3% {
    background: #FFFF66;
  }
  66.6% {
    background: #FF6666;
  }
}

.loading div:nth-child(2) {
  -webkit-transform: rotate(120deg);
}

.loading div:nth-child(3) {
  -webkit-transform: rotate(240deg);
}

.loading div:nth-child(2) span {
  -webkit-animation-delay: 1s;
}

.loading div:nth-child(3) span {
  -webkit-animation-delay: 2s;
}
style>
3、在 main.js 中,全局注册该组件
.
.
import Loading from "./components/shared/Loading";

Vue.component("Loading", Loading);
.
.
4、在views/Home.vue 中,添加如下代码:
<template>
  <div id="wrapper">
    <Loading v-if="loading" />
    <div class="page-index" id="home" data-log="首页" v-else>
      .
      .
      .
    div>
  div>
template>

<script>
import request from "../utils/request";

export default {
  name: "Home",
  data() {
    return {
      loading: false  // 默认不加载 Loading
    };
  },
  created() {
    this.loading = true;  // 当访问页面时,开启 Loading
    this.init();  // 读取接口
    setTimeout(() => {
      this.loading = false;  // 当接口读完后,延迟 1 秒关闭 Loading
    }, 1000);
  },
  methods: {
    async init() {
      const res = await request.get("xxx");
      // 这里是赋值
    }
  }
};
script>
Top
1、在 src/components/shared 里面新建 Top.vue 组件,里面添加如下代码:
<template>
  <div id="goTop">
    <div class="goTop" v-show="goTopShow" @click="goTop">
      <i class="el-icon-caret-top goTopIcon">i>
      回到顶部
    div>
  div>
template>
<script>
export default {
  name: "goTop",
  data() {
    return {
      scrollTop: "",
      goTopShow: false
    };
  },
  watch: {
    scrollTop() {
      if (this.scrollTop > 300) {
        this.goTopShow = true;
      } else {
        this.goTopShow = false;
      }
    }
  },
  methods: {
    handleScroll() {
      this.scrollTop =
        window.pageYOffset ||
        document.documentElement.scrollTop ||
        document.body.scrollTop;
      if (this.scrollTop > 300) {
        this.goTopShow = true;
      }
    },
    goTop() {
      let timer = null,
        _that = this;
      cancelAnimationFrame(timer);
      timer = requestAnimationFrame(function fn() {
        if (_that.scrollTop > 0) {
          _that.scrollTop -= 250;
          document.body.scrollTop = document.documentElement.scrollTop =
            _that.scrollTop;
          timer = requestAnimationFrame(fn);
        } else {
          cancelAnimationFrame(timer);
          _that.goTopShow = false;
        }
      });
    }
  },
  mounted() {
    window.addEventListener("scroll", this.handleScroll);
  },
  destroyed() {
    window.removeEventListener("scroll", this.handleScroll);
  }
};
script>

<style scoped>
.goTop {
  position: fixed;
  right: 40px;
  bottom: 60px;
  width: 40px;
  height: 40px;
  border-radius: 50%;
  background: #fff;
  padding: 10px;
  cursor: pointer;
  box-shadow: 0 0 6px rgba(0, 0, 0, 0.12);
}

.goTop:hover .goTopIcon {
  color: rgba(51, 153, 255, 1);
}

.goTopIcon {
  font-size: 20px;
  color: rgba(51, 153, 255, 0.8);
}
style>
2、在 main.js 中,全局注册该组件
.
.
import Top from "./components/shared/Top";

Vue.component("Top", Top);
.
.
3、在views/Home.vue 首页中,添加如下代码:
<template>
  <div id="wrapper">
    <div class="page-index" id="home" data-log="首页">
     .
     .
     .
      <Top />
    div>
  div>
template>
iconfont
1、进入阿里 图标库,登录自己的账号密码,如果没有账号,请先注册账号后登录。
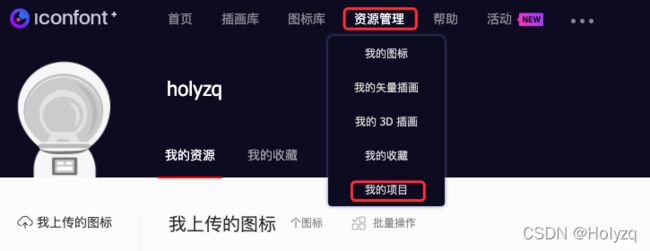
2、在iconfont首页 点击资源管理后选择我的项目,如下图所示:

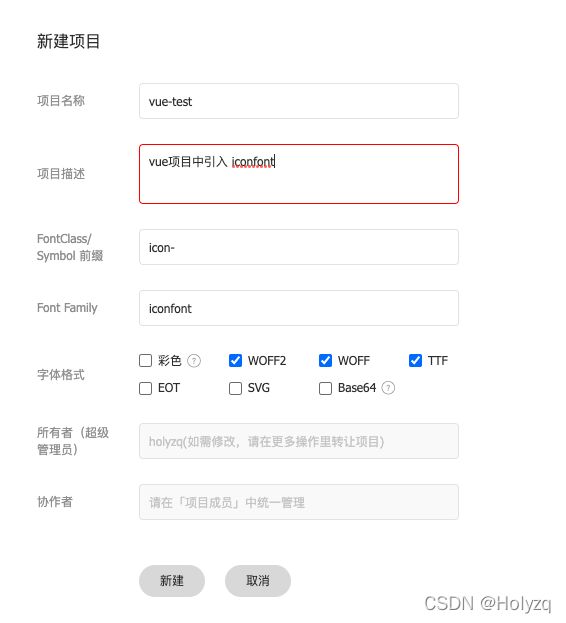
3、新建项目,在我的项目中,选择如下图所示的紫色按钮图标,点击后会出现新建项目的弹框,如下图所示:


3、在搜索框中搜索你想要的图标,并加入购物车,点击购物车,如下图所示:

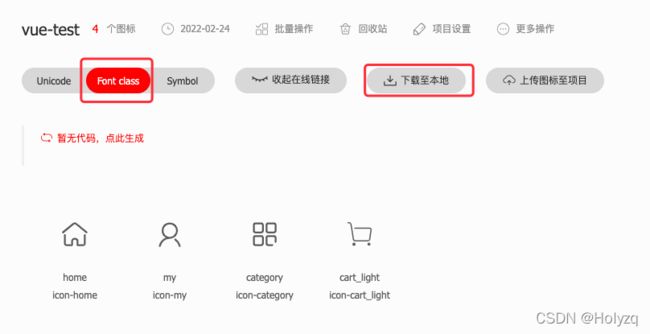
4、按下图操作

5、将下载后的文件添加到vue项目中,解压后的文件如下,可以将demo相关的文件删除。


6、在main.js中引入icconfont.css
import "./assets/iconfont/iconfont.css";
7、组件中使用
<i class="iconfont icon-home">i>
filter
我们这里以时间日期为例,写一个过滤器。
1、首先装包:
// 两种方式自选
npm install moment --save   # npm
yarn add moment             # Yarn
2、在src文件夹中新建 filter 文件夹,里面新建 index.js 文件,里面添加如下代码:
import moment from 'moment';

/**
 * "Fri Dec 10 2021 01:01:49 GMT+0800 (China Standard Time)" => "2021年12月10日凌晨1点01分"
 * @param {number} num
 */
export function dateFormat(value) {
  if (!value) {
    return "";
  }

  moment.locale('zh-cn');
  return moment(value).format('LL');
}

/**
 * 10000 => "10,000"
 * @param {number} num
 */
export function thousandFormat(num) {
  const result = (+num || 0).toString().replace(/^-?\d+/g, m => m.replace(/(?=(?!\b)(\d{3})+$)/g, ','));
  return result + '元';
}
3、然后在 main.js 中全局引入并注册过滤器
.
.
import * as filters from "./filters";
.
.

// 注册全局过滤器
Object.keys(filters).forEach(key => {
  Vue.filter(key, filters[key]);
});
.
.
4、组件中使用
<div>{{ product.createdAt|dateFormat }}div>