Android 5.0 Handler 消息机制源码流程分析
文章仅仅用于个人的学习记录,基本上内容都是网上各个大神的杰作,此处摘录过来以自己的理解学习方式记录一下。
个人最为推崇的大神连接:
https://my.oschina.net/youranhongcha/blog/492591
http://blog.csdn.net/luoshengyang/article/details/6817933
http://www.myexception.cn/android/2074450.html
Android平台, 主要的两种通信机制,一种是进程间的通信Binder机制。另一种Handler消息机制,属于进程内部的通信机制。但注意 不止有这些如还有Socket、管道等,下面开始学习整理Handler机制。
总的来说Handler机制, 消息发送者,将 消息发送到 消息队列,而消息队列中有一个循环处理器,循环处理收到的消息。
网上的图:
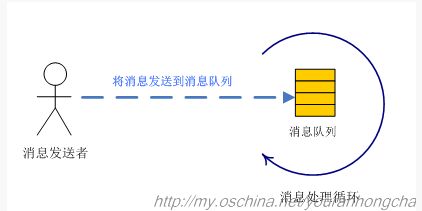
基本的三大概念:
1、消息发送者。如两个线程之间通信,发送者就属于当前线程嘛。
2、消息队列。名字是队列,但是最终这个队列是一条类似链表数据结构的数据集合,不是队列数据结构。(按照时间顺序排列)
3、消息循环处理。
Android中把整个右边封装成了一个Looper类,这个类内部有队列MessageQueue和循环函数loop。但注意looper不能自己凭空运行起来。 所以要寄宿到 某个线程,而且每个线程 最多有一个Looper ,怎么保证的那?看下面的prepare函数(暂时只考虑标准调用流程,不标准时下 面也有分析,会报错)。
        private static void prepare(boolean quitAllowed) {


            if (sThreadLocal.get() != null) {


                throw new RuntimeException("Only one Looper may be created per thread");


            }


            sThreadLocal.set(new Looper(quitAllowed));


        }
首先每个Looper都需要先调用它的 perpare函数, 在perpare中利用java的ThreadLocal类,往当前运行的线程中存入局部变量,最终存入到 了 ThreadLocal. ThreadLocalMap当中。 以key = Looper.sThreadLocal。(每个线程都一样) value = new Looper.. 存入值。由于每个Thread 的 ThreadLocalMap不同(通过每个Thread的ID保证),所以即使key相同取出来时也是自己存入的而互不影响。关于ThreadLocal的更详细的 说明,可参考: http://blog.csdn.net/zy00000000001/article/details/52795870 有个人的比较全的整理。
此处就理解为每个线程都为自己保存了一个Looper对象,且可以通过 ThreadLocal的 get方法获取这个对象。各个线程之间相互不影 响。 在
一些需要判断的地方通过sThreadLocal的get方法,会自动的从当前线程中以相关的key。取出存入的value值。 一旦发sThreadLocal.get() != null, 证明前面已经设置过,抛出异常。那么一定要先 prepare吗? 这就要结合loop函数了。
    public static void loop() {


        final Looper me = myLooper();


            if (me == null) {


                throw new RuntimeException("No Looper; Looper.prepare() wasn't called on this thread.");


            }


        .......


    }
        public static Looper myLooper() {


            return sThreadLocal.get();


        }
综上可以看出,调用loop进行循环前,假如没有prepare的话,me == null直接抛出异常。loop的操作你总是要做的吧,不然那怎么处理消息。那么为什么在主线程中用的时候也没有调用loop那?后面分析。
Android的消息机制中另一个关键类是Handler.当消息循环器在其寄宿的线程里正式运作后(loop),消息发送者就可以通过该looper对 应的 Handler 向该 消息 循环发出事件。
网上的图:
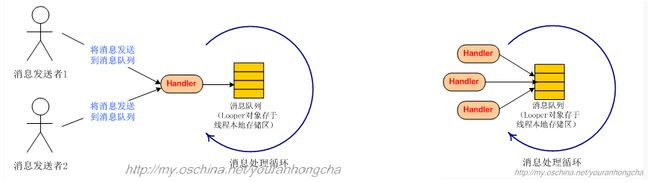
当你构造完Handler的时候,你就可以通过获取 目标线程的Handler对象,然后往目标线程发送消息了。最终处理还是由目标线程的消息队列和loop配合来完成, 这样就实现了同一进程内两个不同线程之间的通信。注意:一个线程也可以由多个Handler进行访问(只要这个 Handler属于这个Looper),但是他们 的MessageQueue只有一个,因 为由前面可知Looper只有一个,而Looper中封装的MessageQueue。
注意:一旦获得到这个线程的looper对象以后,就可以。通过这个looper,来获得一个对应的handler对象,这个handler对象就可以往这个
looper对 应的messagequeue中发送消息了。但处理回调还是这个handler,因为一个looper,可以有多个handler。所以系统提供了获取主线
程Looper对象的函数。便于和主线程通信。
2、使用。
基本的使用方法十分简单,网上也是一大推。此处不再记录。此处先说几个概念分享,个人的理解。
进程:感觉可以用一个CPU的任务调度的概念,完成一次什么什么的操作。当你开始申请进程的时候,CPU开始为这个进程开辟资源空间、复制数据等等。当完成这个调度之后,就会销毁它。
每个进程启动的时候都会有一条主线程,这个主线程贯穿这个进程的始终,在它的执行时间段内,可以分化出很多子线程。对于Android
的UI 操作, 考虑到安全性,只允许在主线程进行操作。注意这个主线程的概念。刚进入一个app就已经开始执行这条主线程,此时你从这个界
面跳转到另一个界面, 它还是在主线程上进行的操作(以前每太理解这个)。要理解这个概念。下面就开始讨论Handler、Looper的用法。
对于Handler:
1、构造:
它的构造有很多的重写。其实就是三个参数Looper、Callback、boolean async初始化的值的问题。此处没有讨论 Callback、 async赋值 的问题,CallBack好像是用于handler内部接口Callback实现时覆盖我们Handler的handleMessage,感兴趣可以去看一下Handler中的dispat chMessage的方法, async为true时候,表示当前是个异步的Handler,发出的消息为异步消息,本文在于理解整个Handler机制,暂未分析 此两个参数。
最常用的空构造Handler()--->Handler(Callback callback, boolean async ).首先就会检查Looper.myLooper(),获得的就是线程的本地存储区 中存放的Looper,假如没有执行过相应代码(prepare)时就会为null。假如为null那么就会抛出异常。只有调用Looper .prepare ()就能实例化通过, (无论 是系统中调用了还是你调用了)由此也可以看出,你想要发送信息,肯定的实例化Handler把,你实例化它,你 的先prepare,不然出问题。
        public Handler(Callback callback, boolean async) {


            ......


            mLooper = Looper.myLooper();


            if (mLooper == null) {


                throw new RuntimeException(


                    "Can't create handler inside thread that has not called Looper.prepare()");


            }


            mQueue = mLooper.mQueue;


            mCallback = callback;


            mAsynchronous = async;


        }
第二常用的构造new Handler(Looper)---->new Handler(Looper looper, Callback callback, boolean async)。实例化时候过 看起来不调用prapare没事,但是你肯定的调用loop把让其循环跑起来,由前面loop方法中也会进行检查(由于没有set),到时候报错。
        public Handler(Looper looper, Callback callback, boolean async) {


            mLooper = looper;


            mQueue = looper.mQueue;


            mCallback = callback;


            mAsynchronous = async;


        }
对于Looper:
1、它是一个final的类,并且构造是私有的,且只在本类的prepare中进行了new。
构造函数中实例化了一个MessageQueue,用来处理和存放消息(存放的只是java层的消息,现在looper在底层页有实现,功能更为强大),和当前所在的线程mThread.
        private Looper(boolean quitAllowed) {


            mQueue = new MessageQueue(quitAllowed);


            mThread = Thread.currentThread();


        }
对于MessageQueue此处先简单看一下它的构造流程:
        MessageQueue(boolean quitAllowed) {


            mQuitAllowed = quitAllowed;//设置是否允许退出线程,主线程是不允许退出的。


            mPtr = nativeInit();//这个long类型最终指向了本地的NativeMessageQueue对象。


        }
private native static long nativeInit();可以看到nativeInit是一个本地的方法,通过JNI调用到android_os_MessageQueue.cpp。
     static jlong android_os_MessageQueue_nativeInit(JNIEnv* env, jclass clazz) {


         NativeMessageQueue* nativeMessageQueue = new NativeMessageQueue();


         if (!nativeMessageQueue) {


             jniThrowRuntimeException(env, "Unable to allocate native queue");


             return 0;


         }


         nativeMessageQueue->incStrong(env);


         return reinterpret_cast<jlong>(nativeMessageQueue);  //强制转换为把本地的对象nativeMessageQueue返回回去.


     }
从源码中看mPtr,最大的用途就是在MessageQueue中的next()函数内调用nativePollOnce(ptr, nextPollTimeoutMillis);使线程等
待 时用于往底层传入变量,底层要使用。注意在NativeMessageQueue的构造中实例化了一个本地的Looper对象。
    NativeMessageQueue::NativeMessageQueue() : mInCallback(false), mExceptionObj(NULL) {


        mLooper = Looper::getForThread();


        if (mLooper == NULL) {


            mLooper = new Looper(false);


            Looper::setForThread(mLooper);


        }


    }
注意Java层的Looper对象和底层的Looper对象不是同一个对象。它们各司其职,来完成整个消息机制。上层的Looper用来完成消息队列的创建和消息的循环检查。而native层的looper主要是用来通过Linux的epoll机制实现dengdai/唤醒,以及对底层的消息的分发处理。也可以看出来,有java层的Looper对象,那么就一定有一个和它对应的native层的Looper对象,但注意有native层的不一定需要java层 的Looper,可擦肩input系统中的InputDispatcher。
接下来对于Looper的实例,其它类只能通过如下两个接口进行获取。
        /** Returns the application's main looper, which lives in the main thread of the application.


         */


        public static Looper getMainLooper() {


            synchronized (Looper.class) {


                return sMainLooper;


            }


        }
         /**


          * Return the Looper object associated with the current thread.  Returns


          * null if the calling thread is not associated with a Looper.


          */


         public static Looper myLooper() {


             return sThreadLocal.get();


         }
2、在使用消息机制前,Looper循环器必须已经实例化,且存入到它所在的线程的,本地存储区当中,key为成员变量sThreadLocal。(没有循环 器,你怎么读取消息?),那么这 个实例化并且存入到所在县城本地的操作什么时候执行的那?尤其是在主线程中直接new Han d l er使用,也没有 看到实例化Looper。
谈一些个人概念理解:
主线程和其它线程一样,只不过可能优先级什么的高一点。Android应用程序是消息驱动的,在应用程序中,主线程也是围绕这它 的消息队列无限的循环,知道应用退出。如果队列中有消息,并且消息已到时那么就分发给相应的Handler处理,如果队列中没有符合 条件的消息,那么主线程也不会一直的空转,而会空闲等待,知道下一个消息的到来(怎么实现的看完文章就清楚了)。个人理解注 意此时的空闲等待,不是我们平常所获的ANR出现的地方,不是说这边等一定时长没消息后,系统会出现ANR。这块是整个线程一直在 循环工作的地方,如主线程就一直在这个循环中跑,等消息,分发处理消息等等。当你再在这个循环中处理某些费时操作的时候才有 可能出现ANR(应该是android设置的什么检测).
在主线程中:
进程启动时,会启动一条主线程,然后在在ActivityThread类中的main方法里,完成了对Looper的初始化以及循环调用。问题:这个主线程在哪体现的? ActivityThread我看也不是线程类啊?(暂不懂)
另一个需要注意的问题,执行完Looper.loop后当前的线程会进入到一个循环当中,界面上看就是一直卡死在这,等待消息过来。 所以你在 OnCreate中再次执行这个会导致界面无法显示,无法完成 OnCreate。你要是在 Looper.loop()后面还有一些必须的参数 的实例化,他 们也 会执行不到,完成不了实例化 。
下面摘取进程启动流程的一部分,至于进程启动的流程,大家可以去看罗升阳,罗老师的博客(个人非常崇拜)。
         public static void main(String[] args) {


             ......


             Looper.prepareMainLooper();


             ActivityThread thread = new ActivityThread();


             thread.attach(false);


             if (sMainThreadHandler == null) {


                 sMainThreadHandler = thread.getHandler();


             }


             if (false) {


                 Looper.myLooper().setMessageLogging(new


                         LogPrinter(Log.DEBUG, "ActivityThread"));


             }


             Looper.loop();


             throw new RuntimeException("Main thread loop unexpectedly exited");


         }
已经看到会先执行prepareMainLooper方法。所以此时有个限定,就是无论你在 主线程还是子线程中都不可以再调用 prepare Main Looper 了。 因为很明显它会抛出异常的。所以这个 prepareMainLooper其实就是让系统调用的。
        public static void prepareMainLooper() {


            prepare(false);


            synchronized (Looper.class) {


                if (sMainLooper != null) {//由于第二次调用的时候这里不为null那么必然报错。


                    throw new IllegalStateException("The main Looper has already been prepared.");


                }


                sMainLooper = myLooper();


            }


        }
在执行 prepareMainLooper方法中,会先执行prepare(false),执行这个操作的时候就会new一个Looper对象,然后把它以key = sThreadLocal存入到 本地存储区域。然后再赋值给sMainLooper。
        private static void prepare(boolean quitAllowed) {


            if (sThreadLocal.get() != null) {


                throw new RuntimeException("Only one Looper may be created per thread");


            }


            sThreadLocal.set(new Looper(quitAllowed));


        }
综上在进程启动的时候就已经完成了主线程的Looper的初始化,此步骤是源码内部实现的(myLooper和sMainLooper都有值了 )。
所以你在主线程中实例化Handler时可以直接。new Handler()。不需要传入Looper对象,因为早已有。假如你非要传入的话,通过一开 始 的两个接口 获得Looper实例然后传入,调用另外重写的构造,这也是一样的。没啥影响。
在子线程中:
子线程中就没有上面的便利了,你new 出来新的线程后,不会自动的调用prepare,然后去loop。
此时有如下几种错误,根据前面相关构造和方法的分析。
假如你直接 new Handler()的时候 Looper.mLooper() == null,会抛出异常。
假如你new Handler(Looper.myLooper());由于传入带Looper,最终会走到三个参数的,进行赋值。但是mQueue = looper.mQueue,由于 传入的参数 Looper.myLooper()为null,导致 looper为null,进而 mQueue = looper.mQueue 也会 looper == null的 报错。
假如你 new Handler(Looper.getMainLooper ()),此时sMainLooper r肯定不为null,那么 mQueue = looper.mQueue不会报错,看起来能 往 下走。但是当你执行looper.loop()开始轮询的时候,会执行如下代码: final Looper me = myLooper(); myLooper函数就是调用: sThreadLocal.get();去获取当前正在运行的线程存入到的局部变量的Looper,此时由于没有prepare肯定为null。在looper中有如下判 断
if (me == null) {
throw new RuntimeException("No Looper; Looper.prepare() wasn't called on this thread.");
}
最后也会抛出异常。
综上你必须在当前线程中调用Looper. prepare().(注意你不能调用main的perpare会出错的哦).下面对prepare做出简单分析
        public static void prepare() {


            prepare(true);


        }
         private static void prepare(boolean quitAllowed) {


             if (sThreadLocal.get() != null) {


                 throw new RuntimeException("Only one Looper may be created per thread");


             }


             sThreadLocal.set(new Looper(quitAllowed));


         }
首先可以看出来多次perpare由于get不为null会抛出异常。
然后就是实例化一个Looper为这个Thread,并且存放到当前线程的本地存储区,以key = sThreadLocal.
所以在你实例化Handler的时候,先调用prepare,然后你再用空构造或者带 new Handler(Looper.myLooper())都不会报错了。因为 new Handler(Looper.myLooper())是正确的looper。此时有个小知识点 当你用 new Handler( Looper.getMainLooper
() )时,最后你再 Looper.loop()也能正常的消息传递。 这是因为在你是在操作主线程的消息队列啊,真是醉了(当时没注意考虑到还纳闷那)。此处核心 知识点:可以 通过传入的looper对象来获得一个新的Handler,然后就可以往对应的 Looper中的messagequeue中发送消息就。 (当时的错误理解: final Looper me = myLooper()。而这个 myLooper-->sThreadLocal.get(); 注意!!是从当前线程的本地存储区当中 取 值。这个取出 来就是前面 Looper. prepare() 放的。所以自己线程的循环还是轮询起来了。但是注意个问题。最终到构造的时候, mLooper = looper; mQueue = looper.mQueue;这都已经是main Looper的了啊!!不是自己的那个looper的。但是为什么竟然能收到消息 啊?????? 本地跟踪代码如下,按理说main的时候会入队到main消息队列当中,那么,这个是怎么触发的那?可能是就算是在main 中,main已经 轮训起来了 ,那么也会回到这个msg的相关信息。可能和后期传递有点关系吧????以前的错误理解)
注意事项: 一定要注意Handler的定义位置,很多时候你以为定义到了子线程中,其实还定义在主线程中。只有在子线程的类中,或者run方法中 定义了,这 样才会到子线程中。
3、内部源码实现。
由于Android中实现的消息机制用到了下面两个技术点,为了更好地认识Handler机制。分别把下面的知识点做了整理。
3.1 java中的线程的本地存储技术ThreadLocal类。
参考 http://blog.csdn.net/zy00000000001/article/details/52795870 有个人的比较全的整理。
3.2 linux下的epoll机制的初识。
参考 http://blog.csdn.net/zy00000000001/article/details/52797127 有个人初识epoll的整理。
3.3 消息分隔符/同步分隔栏解释说明。
我也不知道这个到底该怎么称呼.反正这个玩意就是消息的一种。Message有三种类型
a、普通Message
它的成员变量target为发送Message的Handler自己。通过入队时的函数进行了赋值处理
        private boolean enqueueMessage(MessageQueue queue, Message msg, long uptimeMillis) {


            msg.target = this;// 当前的往外发送消息的Handler


            if (mAsynchronous) {


                msg.setAsynchronous(true);


            }


            return queue.enqueueMessage(msg, uptimeMillis);


        }
b、异步Message
同样也是在调用enqueueMessage的时候判断mAsynchronous是否为true。 mAsynchronous是在Handler实例化的时候传入的,如果为 true那么就调用Message的setAsynchronous设置为异步消息。
        public void setAsynchronous(boolean async) {


            if (async) {


                flags |= FLAG_ASYNCHRONOUS;


            } else {


                flags &= ~FLAG_ASYNCHRONOUS;


            }


        }
c、Message分隔符(同步分隔栏)
它是一种特殊的Message,在队列中作为一个分隔符,以它为标志后面的同步信息即使已经到了触发时间,也不会被Looper处理. MessageQueue提供了enqueueSyncBarrier(long when)、removeSyncBarrier分别用于插入和移除分隔符。
         int enqueueSyncBarrier(long when) {


             // Enqueue a new sync barrier token.


             // We don't need to wake the queue because the purpose of a barrier is to stall it.


             synchronized (this) {


                 final int token = mNextBarrierToken++;


                 final Message msg = Message.obtain();


                 msg.markInUse();


                 msg.when = when;


                 msg.arg1 = token;


                 Message prev = null;


                 Message p = mMessages;


                 if (when != 0) {


                     while (p != null && p.when <= when) {


                         prev = p;


                         p = p.next;


                     }


                 }


                 if (prev != null) { // invariant: p == prev.next


                     msg.next = p;


                     prev.next = msg;


                 } else {


                     msg.next = p;


                     mMessages = msg;


                 }


                 return token;


             }


         }
          void removeSyncBarrier(int token) {


              // Remove a sync barrier token from the queue.


              // If the queue is no longer stalled by a barrier then wake it.


              synchronized (this) {


                  Message prev = null;


                  Message p = mMessages;


                  while (p != null && (p.target != null || p.arg1 != token)) {


                      prev = p;


                      p = p.next;


                  }


                  if (p == null) {


                      throw new IllegalStateException("The specified message queue synchronization "


                              + " barrier token has not been posted or has already been removed.");


                  }


                  final boolean needWake;


                  if (prev != null) {


                      prev.next = p.next;


                      needWake = false;


                  } else {


                      mMessages = p.next;


                      needWake = mMessages == null || mMessages.target != null;


                  }


                  p.recycleUnchecked();


                  // If the loop is quitting then it is already awake.


                  // We can assume mPtr != 0 when mQuitting is false.


                  if (needWake && !mQuitting) {


                      nativeWake(mPtr);


                  }


              }


          }
网上的图:
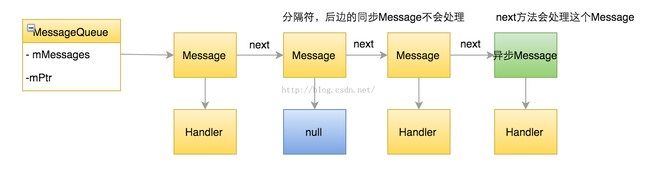
至于为什么这么设计,暂时没想到。我在源码工程下搜索整个android目录。发现除了cts的测试包,其它所有的系统应用都没有调用这个。个人感觉可能和某些具体的消息处理有关,比如有些消息需要在什么之完成之后了等等。而且在Android的消息机制里面,同步消息和异步消息,目前也就这点区别了(遇到分隔符时后面会不会被执行)。
3.3 消息的发送:入队、唤醒。
获得到目标线程的Handler对象以后,就可以调用相应的发送消息的方法,把消息放入到MessageQueue当中,其实最终是在它的成员变量 mMessages所包含的Messgae对象以及通过Message对象的next成员变量组成的一条链式的消息当中,这个消息是按照触发时间的顺序排列 的。
此处以一个标准的消息发送过程来分析。
在Handler中的流程如下:sendMessgae-->sendMessageDelay----->sendMessageAtTime--->enqueueMessage
        public final boolean sendMessage(Message msg)


        {


            return sendMessageDelayed(msg, 0);


        }
         public final boolean sendMessageDelayed(Message msg, long delayMillis)


         {


             if (delayMillis < 0) {


                 delayMillis = 0;


             }


             return sendMessageAtTime(msg, SystemClock.uptimeMillis() + delayMillis);//SystemClock.uptimeMillis() 开机到现在的时间。


         }
          public boolean sendMessageAtTime(Message msg, long uptimeMillis) {


              MessageQueue queue = mQueue;


              if (queue == null) {


                  RuntimeException e = new RuntimeException(


                          this + " sendMessageAtTime() called with no mQueue");


                  Log.w("Looper", e.getMessage(), e);


                  return false;


              }


              return enqueueMessage(queue, msg, uptimeMillis);


          }
           private boolean enqueueMessage(MessageQueue queue, Message msg, long uptimeMillis) {


               msg.target = this;// 当前的往外发送消息的Handler


               if (mAsynchronous) {//Handler构造中传入的用来标记是否是异步的Handler


                   msg.setAsynchronous(true);


               }


               return queue.enqueueMessage(msg, uptimeMillis);


           }
然后会调入到MessageQueue中的enqueueMessage函数,尝试去把消息入队。
        boolean enqueueMessage(Message msg, long when) { //!!!注意next域的赋值,它是用来代表当前消息的下一个要处理的消息


            if (msg.target == null) {


                throw new IllegalArgumentException("Message must have a target.");


            }


            if (msg.isInUse()) {


                throw new IllegalStateException(msg + " This message is already in use.");


            }


            synchronized (this) {


                if (mQuitting) {


                    IllegalStateException e = new IllegalStateException(


                            msg.target + " sending message to a Handler on a dead thread");


                    Log.w("MessageQueue", e.getMessage(), e);


                    msg.recycle();


                    return false;


                }


                msg.markInUse(); //写标志位,让人知道消息正在使用。


                msg.when = when;//发送的消息处理的时间,当前系统时间或者是当前系统时间加上你延迟的时间。


                Message p = mMessages;//mMessages成员变量存放的就是当前消息链条(不能说是链表,又不能说是集合)中的触发时间最靠前的那个消息。


                boolean needWake;


                //p == null时是第一次往消息链条插入;when == 0时需要立刻处理这个信息;


               //又或者when < p.when当前传入的消息的触发时间小于以前的在消息链条最先面的消息的触发时间时候。


                if (p == null || when == 0 || when < p.when) {//进入判断后需要往消息链条的头部插入消息。


                    // New head, wake up the event queue if blocked.


                    msg.next = p;//而此时原先的消息链条的头部消息就放到了当前传入的消息的next变量中,用于下次处理。


                    mMessages = msg;//当前正在处理的msg设置为成员变量mMessages,也就是消息链条最前面最需要先触发的消息。


                    needWake = mBlocked; // 根据是否阻塞来决定是否要唤醒。//一般走到这的话,应该就为true了。需要唤醒一下。


                } else {


                    // 这样就不是插入消息链条头部了,而是插入到链条当中某个合适的位置,所以不需要调整唤醒时间。


                    needWake = mBlocked && p.target == null && msg.isAsynchronous();//needWake为true时插入的肯定是"同步分隔栏"(p.target == null && msg.isAsynchronous())。


                    Message prev;


                    for (;;) {//循环找合适的位置,按照触发时间进行的排序


                        prev = p;


                        p = p.next;  //配合prev = p 就这样一直循环的找合适位置。


                        if (p == null || when < p.when) {//下一个消息是null 或者 当前消息的触发时间小于某个消息的触发时间时,找到正确位置退出循环。


                            break;


                        }


                        if (needWake && p.isAsynchronous()) {


                            needWake = false;//此处不懂???????????


                        }


                    }


                    msg.next = p; //在前面找到合适位置when < p.when,所以此时的p应该是msg下一个需要处理的消息


                    prev.next = msg;// prev 是当前消息的前一个需要处理的消息。


                }


                // We can assume mPtr != 0 because mQuitting is false.


                if (needWake) { //需要唤醒就唤醒,就是往管道中写入一个字符"w",这样epoll机制就监听到了事件,然后处理.


                    nativeWake(mPtr);


                }


            }


            return true;


        }
这样就完成把当前消息插入到了消息链条中,也把msg.next域做了正确处理。(下一个要处理的消息)。nativeWake是一个java本地方 法,通过 JNI技术调用到稍微底层一点的函数。 private native static void nativeWake(long ptr);调用到android/framework/base/core/jni/ android_os_ MessageQueue.cpp当中的 android_os_MessageQueue_nativeWake方法。
     static void android_os_MessageQueue_nativeWake(JNIEnv* env, jclass clazz, jlong ptr) {


         //可以看出来ptr被强制转换成 *
     nativeMessageQueue 指针对象。


         NativeMessageQueue* nativeMessageQueue = reinterpret_cast<NativeMessageQueue*>(ptr);


         return nativeMessageQueue->wake();//然后去调用它的wake。


     }
NativeMessageQueue就定义在当前文件当中,它的wake方法实现如下:
    void NativeMessageQueue::wake() {


        mLooper->wake();


    }
调用到了Lopper中的wake。千万要注意和这个looper可不是java层的looper对象。而是c++实现的一个Looper对象。它位于system/core/libutils / 在看Looper对象的wake函数之前我们看一下Looper.cpp的构造函数。
    Looper::Looper(bool allowNonCallbacks) :


            mAllowNonCallbacks(allowNonCallbacks), mSendingMessage(false),


            mResponseIndex(0), mNextMessageUptime(LLONG_MAX) {


        int wakeFds[2];


        int result = pipe(wakeFds); //调用系统的pipe函数,创建一个管道。


        LOG_ALWAYS_FATAL_IF(result != 0, "Could not create wake pipe.  errno=%d", errno);


        mWakeReadPipeFd = wakeFds[0];


        mWakeWritePipeFd = wakeFds[1];


        result = fcntl(mWakeReadPipeFd, F_SETFL, O_NONBLOCK);//设置为非阻塞模式


        LOG_ALWAYS_FATAL_IF(result != 0, "Could not make wake read pipe non-blocking.  errno=%d",


                errno);


        result = fcntl(mWakeWritePipeFd, F_SETFL, O_NONBLOCK);//设置为非阻塞模式


        LOG_ALWAYS_FATAL_IF(result != 0, "Could not make wake write pipe non-blocking.  errno=%d",


                errno);


        mIdling = false;


        // Allocate the epoll instance and register the wake pipe.


        mEpollFd = epoll_create(EPOLL_SIZE_HINT); //创建一个epoll句柄。


        LOG_ALWAYS_FATAL_IF(mEpollFd < 0, "Could not create epoll instance.  errno=%d", errno);


        struct epoll_event eventItem;


        memset(& eventItem, 0, sizeof(epoll_event)); // zero out unused members of data field union


        eventItem.events = EPOLLIN; //要监听的事件,具体可参考上面epoll整理连接中的内容


        eventItem.data.fd = mWakeReadPipeFd;


        result = epoll_ctl(mEpollFd, EPOLL_CTL_ADD, mWakeReadPipeFd, & eventItem); //注册监听事件.


        LOG_ALWAYS_FATAL_IF(result != 0, "Could not add wake read pipe to epoll instance.  errno=%d",


                errno);


    }
总的来说就是创建了一个管道,然后初始化好一个epoll句柄,来监控这个管道的读取端。具体的实现基本用法可以看给出的链接。 到时 候就明了。不懂epoll的建议去看看基本的概念,不深入研究实现的话还是比较好理解的。
     void Looper::wake() {


     #if DEBUG_POLL_AND_WAKE


         ALOGD("%p ~ wake", this);


     #endif


         ssize_t nWrite;


         do {


             nWrite = write(mWakeWritePipeFd, "W", 1);//就是往管道中写入了一个“W”字符。用于唤醒没有实际的含义。


         } while (nWrite == -1 && errno == EINTR);


         if (nWrite != 1) {


             if (errno != EAGAIN) {


                 ALOGW("Could not write wake signal, errno=%d", errno);


             }


         }


     }
至此发送消息的标准流程算是分析完毕,看到这里可能还有为什么要往管道中写入一个“W”字符去唤醒epoll,这就要接着分析一下循环的实现原理了。
3.4 消息的循环。
前面我们已经分析过,想要正常的使用Handler往目标线程发送消息并得到处理,那么必须先实例化Looper对象,并且让Looper对象调用loop使它 循环的处理消息队列中的消息。Looper.perpare( )然后调用 Looper.loop().使Looper循环起来,下面我们来分析loop函数的具体实现。
        public static void loop() {


            final Looper me = myLooper();//此处就会检测本线程有没有调用perpare方法。


            if (me == null) {


                throw new RuntimeException("No Looper; Looper.prepare() wasn't called on this thread.");


            }


            final MessageQueue queue = me.mQueue;


            // Make sure the identity of this thread is that of the local process,


            // and keep track of what that identity token actually is.


            Binder.clearCallingIdentity();


            final long ident = Binder.clearCallingIdentity();


            for (;;) {//在一个 for循环中 不断的尝试去摘取队列里的下一条消息


                Message msg = queue.next(); // might block 此处是关键,去获取下一个消息,但是也可能阻塞。


                if (msg == null) {//不发生大的异常或者调用Handler的quit方法时,此处不会是null的。


                    // No message indicates that the message queue is quitting.


                    return;


                }


                // This must be in a local variable, in case a UI event sets the logger


                Printer logging = me.mLogging;


                if (logging != null) {


                    logging.println(">>>>> Dispatching to " + msg.target + " " +


                            msg.callback + ": " + msg.what);


                }


                msg.target.dispatchMessage(msg); //通过msg.targ往外派送消息,msg.target就是我们发送消息时用的那个handler。(前面有)


                if (logging != null) {


                    logging.println("<<<<< Finished to " + msg.target + " " + msg.callback);


                }


                // Make sure that during the course of dispatching the


                // identity of the thread wasn't corrupted.


                final long newIdent = Binder.clearCallingIdentity();


                if (ident != newIdent) {


                    Log.wtf(TAG, "Thread identity changed from 0x"


                            + Long.toHexString(ident) + " to 0x"


                            + Long.toHexString(newIdent) + " while dispatching to "


                            + msg.target.getClass().getName() + " "


                            + msg.callback + " what=" + msg.what);


                }


                msg.recycleUnchecked();


            }


        }
loop函数中的整体逻辑很简单,主要就是先通过MessageQueue的next()函数去获取下一个Message,注意可能阻塞。而当正确取到消息的时候在调用 Handler的dispatchMessage函数做进一步分发处理消息。
       public void dispatchMessage(Message msg) {


            if (msg.callback != null) {


                handleCallback(msg);


            } else {


                if (mCallback != null) {


                    if (mCallback.handleMessage(msg)) {


                        return;


                    }


                }


                handleMessage(msg);//就会调用到我们重写的handleMessage函数。


            }


        }
至此整体流程走完,但是我们还需要去进一步的分析一下MessageQueue的next函数,以便来更深入的理解为什么有时候要阻塞,又要怎么阻塞,这个里 面的循环到底是个什么逻辑。
MessageQueue的next()函数就是要去MessageQueue的message消息链条中摘取消息,然后用于分发处理。
对于消息队列而言在摘取消息时,为了提高效率,减少内存和CPU的使用应该考虑很多的技术细节:
a、如果消息队列中没有合适的消息可以摘取,那么就要让它所属的线程阻塞,而不应该一直循环的做无用的查询动作。
b、消息链条上面的消息按触发时间的顺序依次排列。谁先触发谁在前。(这个感觉在发送消息入队的时候就已经排序好了)
c、没有消息时阻塞,阻塞的时间最好能精准一点儿,所以应该算出一个合适的时间差。根据还有多长时间首条消息触发。
d、有时候外界希望在进入阻塞状态之前做一些动作(反正这会儿没消息处理),这些动作可以成为idle操作,我们要处理这些操作。 典型的应用很 多时候系统内部,在队列进入阻塞之前会做一次垃圾回收。
        Message next() {


            // Return here if the message loop has already quit and been disposed.


            // This can happen if the application tries to restart a looper after quit


            // which is not supported.


            final long ptr = mPtr;


            if (ptr == 0) {


                return null;


            }


            int pendingIdleHandlerCount = -1; // -1 only during first iteration


            int nextPollTimeoutMillis = 0; //下一个消息到来的时间。(也就是阻塞的时间)


            for (;;) {


                if (nextPollTimeoutMillis != 0) {


                    Binder.flushPendingCommands();


                }


                //第一次nextPollTimeoutMillis传入0肯定会立马返回的,不会导致阻塞,传入一定时间的时候就阻塞这么长时间,传入-1时,用就阻塞直到epoll监听到事件。


                nativePollOnce(ptr, nextPollTimeoutMillis);


                synchronized (this) {


                    // Try to retrieve the next message.  Return if found.


                    final long now = SystemClock.uptimeMillis();


                    Message prevMsg = null;


                    Message msg = mMessages; //mMessages 就是我们前面发送消息,插入消息链条时处理的这个,最终把在最前面的消息赋值给他。


                    if (msg != null && msg.target == null) {//如果是同步分隔栏,直接去找下一个异步消息。这个同步分隔栏,其实就是一个targ为null的Msg.


                        // Stalled by a barrier.  Find the next asynchronous message in the queue.


                        do {


                            prevMsg = msg;


                            msg = msg.next;  // 配合prevMsg = msg 循环查找。


                        } while (msg != null && !msg.isAsynchronous());// 不是null,并且不是异步的消息的时候就一直循环,直到找到第一个异步的。


                    }


                    if (msg != null) {//如果次消息不为null,无论是不是同步分隔栏。


                        if (now < msg.when) { // 那么如果消息链条中的位于头部的消息还要等一段时间才到时的话,取时间差即为要堵塞的时间。


                            // Next message is not ready.  Set a timeout to wake up when it is ready.


                            nextPollTimeoutMillis = (int) Math.min(msg.when - now, Integer.MAX_VALUE);


                        } else {//此时就是已经到时了,该处理这个消息了。


                            // Got a message.


                            mBlocked = false;//阻塞置为false


                            if (prevMsg != null) {//不等于null的时候肯定取到的是同步分隔栏后的第一个异步的消息。


                                prevMsg.next = msg.next;//把这个异步消息的下一个消息复制到它的前一个消息的next。(此时取的不是第一个即将到时的消息)


                            } else {


                                mMessages = msg.next;//把当前到时的信息的下一个赋值给mMessages,使其成为以后要处理的第一个。


                            }


                            msg.next = null;


                            if (false) Log.v("MessageQueue", "Returning message: " + msg);


                            return msg;// 返回要处理的这个


                        }


                    } else {


                        // No more messages.


                        //如果取出来的消息为null,也就是没有消息要处理了,那么赋值为-1,利用epoll机制,无限阻塞直到下一个消息到来(然后会在C++中做处理)。


                        nextPollTimeoutMillis = -1;//这样下一个循环到前面的nativePollOnce会是线程进入阻塞。


                    }


                    // Process the quit message now that all pending messages have been handled.


                    if (mQuitting) { //主线程不允许退出(主线程一直在等界面各种消息,然后作相应的逻辑处理啊).


                        dispose();   //而我们一般也没有调用退出啊。退出以后就不循环了,程序不卡那了等消息,这个线程没有其它的阻塞的话,执行完会退出。


                        return null;


                    }


                    // If first time idle, then get the number of idlers to run.


                    // Idle handles only run if the queue is empty or if the first message


                    // in the queue (possibly a barrier) is due to be handled in the future.


                    //能走到此处,那就是msg为null了,暂时没什么要处理的,那么就准备处里一些idle操作


                    if (pendingIdleHandlerCount < 0


                            && (mMessages == null || now < mMessages.when)) {


                        pendingIdleHandlerCount = mIdleHandlers.size();


                    }


                    if (pendingIdleHandlerCount <= 0) {


                        // No idle handlers to run.  Loop and wait some more.


                        mBlocked = true;


                        continue; //没有idle操作,直接开始下一个循环,并且把阻塞标志置为true。


                    }


                    if (mPendingIdleHandlers == null) {


                        mPendingIdleHandlers = new IdleHandler[Math.max(pendingIdleHandlerCount, 4)];


                    }


                    mPendingIdleHandlers = mIdleHandlers.toArray(mPendingIdleHandlers);


                }


                // Run the idle handlers.


                // We only ever reach this code block during the first iteration.


                for (int i = 0; i < pendingIdleHandlerCount; i++) {


                    final IdleHandler idler = mPendingIdleHandlers[i];


                    mPendingIdleHandlers[i] = null; // release the reference to the handler


                    boolean keep = false;


                    try {


                        keep = idler.queueIdle(); //实现 IdleHandler 接口


                    } catch (Throwable t) {


                        Log.wtf("MessageQueue", "IdleHandler threw exception", t);


                    }


                    if (!keep) {


                        synchronized (this) {


                            mIdleHandlers.remove(idler);


                        }


                    }


                }


                // Reset the idle handler count to 0 so we do not run them again.


                pendingIdleHandlerCount = 0;//处理完handle操作后,重置一下


                // While calling an idle handler, a new message could have been delivered


                // so go back and look again for a pending message without waiting.


                //只要队列中有Idle Handler需要处理,那么在处理完所有Idle Handler之后,会强制将nextPollTimeoutMillis赋值为0。


                //这主要是考虑到在处理Idle Handler时,不知道会耗时多少,虽然处理前已经没有消息了,但在此期间消息队列极有可能有新的消息,或者到时了。


                nextPollTimeoutMillis = 0;//然后就置0,让nativePollOnce传入0,不等待直接处理一次消息。


            }


        }
然后就是nativePollOnce函数的具体分析以及如何实现阻塞的,也是java native函数通过JNI调用到了android_os_MessageQueue的 android_os_MessageQueue_nativePollOnce当中。 NativeMessageQueue--->pollOnce--->Looper.pollOnce(time)-----> Looper. pollOnce (time,x,x,x)
    static void android_os_MessageQueue_nativePollOnce(JNIEnv* env, jclass clazz,


            jlong ptr, jint timeoutMillis) {


        NativeMessageQueue* nativeMessageQueue = reinterpret_cast<NativeMessageQueue*>(ptr);


        nativeMessageQueue->pollOnce(env, timeoutMillis);


    }
     void NativeMessageQueue::pollOnce(JNIEnv* env, int timeoutMillis) {


         mInCallback = true;


         mLooper->pollOnce(timeoutMillis);


         mInCallback = false;


         if (mExceptionObj) {


             env->Throw(mExceptionObj);


             env->DeleteLocalRef(mExceptionObj);


             mExceptionObj = NULL;


         }


     }
     int Looper::pollOnce(int timeoutMillis, int* outFd, int* outEvents, void** outData) {


         int result = 0;


         for (;;) {


             .....//此处省略了一些针对于c++的层的Message信息的处理。Handler不仅能处理java层的信息,还能处理c++层的消息。


             result = pollInner(timeoutMillis);//循环调用
     pollInner


         }


     }
      int Looper::pollInner(int timeoutMillis) {//次方法只分析和java层相关的处理


          ......


          struct epoll_event eventItems[EPOLL_MAX_EVENTS];


          //利用epoll机制行程阻塞,根据
      timeoutMillis决定阻塞的时长。或者立即返回、或者永久(直到事件触发)或者特定时间


          int eventCount = epoll_wait(mEpollFd, eventItems, EPOLL_MAX_EVENTS, timeoutMillis);


          // No longer idling.


          mIdling = false;


          // Acquire lock.


          mLock.lock();


          for (int i = 0; i < eventCount; i++) { // 等到事件以后。


              int fd = eventItems[i].data.fd;


              uint32_t epollEvents = eventItems[i].events;


              if (fd == mWakeReadPipeFd) {


                  if (epollEvents & EPOLLIN) { //接收到数据,读socket


                      awoken(); // 从管道中感知到EPOLLIN,于是调用awoken()


                  } else {


                      ALOGW("Ignoring unexpected epoll events 0x%x on wake read pipe.", epollEvents);


                  }


              } else {


                  ssize_t requestIndex = mRequests.indexOfKey(fd);


                  if (requestIndex >= 0) {


                      int events = 0;


                      if (epollEvents & EPOLLIN) events |= EVENT_INPUT;


                      if (epollEvents & EPOLLOUT) events |= EVENT_OUTPUT;


                      if (epollEvents & EPOLLERR) events |= EVENT_ERROR;


                      if (epollEvents & EPOLLHUP) events |= EVENT_HANGUP;


                      pushResponse(events, mRequests.valueAt(requestIndex));


                  } else {


                      ALOGW("Ignoring unexpected epoll events 0x%x on fd %d that is "


                              "no longer registered.", epollEvents, fd);


                  }


              }


          }


          ......


          // Release lock.


          mLock.unlock();


          }


          return result;


      }
       void Looper::awoken() {


       #if DEBUG_POLL_AND_WAKE


           ALOGD("%p ~ awoken", this);


       #endif


           char buffer[16];


           ssize_t nRead;


           do {


               nRead = read(mWakeReadPipeFd, buffer, sizeof(buffer));


           } while ((nRead == -1 && errno == EINTR) || nRead == sizeof(buffer));


       }
可以看出awoken函数只是把管道中的数据全部给读取出来,完成清空管道。至此整个获取下一个消息的处理完毕。
4、总结:
两个线程之间进行通信,获取到目标线程的Handler后,通过这个Handler向目标线程发送消息,然后消息就会被插入到目标线程的消息队列中, 注意此时的队列不是说队列数据结构,是一个概念就是一个链条式的消息集合。目标线程是一直在loop中等待事件的到来的,本身来说不具 备链表 一变动就能感知的功能,但通过管道和linux的epoll机制来完成阻塞循环和感知消息的到来,进而处理分发这个消息。
个人小知识点理解整理:
1、为什么不同notify和wait来实现循环等待了?
现在来看的话在c++层实现的手,Handler的功能更加强大,并且native层也可以利用Looper.cpp的函数实现native消息的循环处理。可能效率会更快。
2、Handler.post(Runnable r).使用这个方法为什么Runable执行在Handler所属的线程中。
它最终是通过Handler的getPostMessage方法把Runable封装到了Message的callback变量当中.最后插入到了Handler所属的Looper的消息队列当中,然后循环等待执行dispatchMessage时候会进入到msg.callback != null的判断去执行当前runable的润方法,此时已经到了 Handler 所在的线程中。所以要是主线程的Handler,那么就会放到主线程中。下面放一部分源码
         public final boolean post(Runnable r)


         {


            return  sendMessageDelayed(getPostMessage(r), 0);


         }
          private static Message getPostMessage(Runnable r) {


              Message m = Message.obtain();


              m.callback = r;


              return m;


          }
           public void dispatchMessage(Message msg) {


               if (msg.callback != null) {


                   handleCallback(msg);


               } else {


                   if (mCallback != null) {


                       if (mCallback.handleMessage(msg)) {


                           return;


                       }


                   }


                   handleMessage(msg);


               }


           }
            private static void handleCallback(Message message) {


                message.callback.run();


            }