手撸一个简易Spring框架(三)
目录
- 前言
- 非懒加载的提前初始化
- 初始化核心方法getBean
- 依赖注入
- 中段成果展示
- 最后
前言
上一章fresh()中还差第4步“Bean实例化”没有完成,这一章就来搞定它,大名鼎鼎的DI依赖注入也会在这Bean实例化的过程中完成。
非懒加载的提前初始化
这是fresh()的最后一步,逻辑是遍历BeanDefinition集合,将非懒加载的Bean提前初始化。
public void refresh() throws Exception {

    //1、定位,定位配置文件
    reader = new BeanDefinitionReader(this.configLocation);

    //2、加载配置文件,扫描相关的类,把它们封装成BeanDefinition
    List<BeanDefinition> beanDefinitions = reader.loadBeanDefinitions();

    //3、注册,把配置信息放到容器里面(伪IOC容器)
    //到这里为止,容器初始化完毕
    doRegisterBeanDefinition(beanDefinitions);

    //4、把不是延时加载的类,提前初始化
    doAutowired();
}

private void doAutowired() {
    for (Map.Entry<String, BeanDefinition> beanDefinitionEntry : beanDefinitionMap.entrySet()) {
        String beanName = beanDefinitionEntry.getKey();
        if (!beanDefinitionEntry.getValue().isLazyInit()) {
            try {
                getBean(beanName);
            } catch (Exception e) {
                e.printStackTrace();
            }
        }
    }
}
可见实例化的核心方法就是getBean(),它是BeanFactory中的接口方法,我们在系列第二章已经将此框架搭出来了,下面来具体实现它。
初始化核心方法getBean
核心逻辑也不难:
- 如果已经实例化了,则直接获取实例化后的对象返回即可。如果没有实例化则走后面的逻辑
- 拿到该Bean的BeanDefinition 信息,通过反射实例化
- 将实例化后的对象封装到BeanWrapper中
- 将封装好的BeanWrapper保存到IOC容器(实际就是一个Map)中
- 依赖注入实例化的Bean
- 返回最终实例
/**保存了真正实例化的对象*/
private Map<String, BeanWrapper> factoryBeanInstanceCache = new ConcurrentHashMap<>();

@Override
public Object getBean(String beanName) throws Exception {
    //如果是单例,那么在上一次调用getBean获取该bean时已经初始化过了,拿到不为空的实例直接返回即可
    Object instance = getSingleton(beanName);
    if (instance != null) {
        return instance;
    }

    BeanDefinition beanDefinition = this.beanDefinitionMap.get(beanName);

    //1.调用反射初始化Bean
    instance = instantiateBean(beanName, beanDefinition);

    //2.把这个对象封装到BeanWrapper中
    BeanWrapper beanWrapper = new BeanWrapper(instance);

    //3.把BeanWrapper保存到IOC容器中去
    //注册一个类名(首字母小写,如helloService)
    this.factoryBeanInstanceCache.put(beanName, beanWrapper);
    //注册一个全类名(如com.lqb.HelloService)
    this.factoryBeanInstanceCache.put(beanDefinition.getBeanClassName(), beanWrapper);

    //4.注入
    populateBean(beanName, new BeanDefinition(), beanWrapper);

    return this.factoryBeanInstanceCache.get(beanName).getWrappedInstance();
}

private Object instantiateBean(String beanName, BeanDefinition beanDefinition) {
//1、拿到要实例化的对象的类名
String className = beanDefinition.getBeanClassName();

//2、反射实例化,得到一个对象
Object instance = null;
try {
    Class<?> clazz = Class.forName(className);
    instance = clazz.newInstance();
} catch (Exception e) {
    e.printStackTrace();
}

return instance;
}
依赖注入
上一步中Bean只是实例化了,但是Bean中被@Autowired注解的变量还没有注入,如果这个时候去使用就会报空指针异常。下面是注入的逻辑:
- 拿到Bean中的所有成员变量开始遍历
- 过滤掉没有被@Autowired注解标注的变量
- 拿到被注解变量的类名,并从IOC容器中找到该类的实例(上一步已经初始化放在容器了)
- 将变量的实例通过反射赋值到变量中
private void populateBean(String beanName, BeanDefinition beanDefinition, BeanWrapper beanWrapper) {

    Class<?> clazz = beanWrapper.getWrappedClass();

    //获得所有的成员变量
    Field[] fields = clazz.getDeclaredFields();
    for (Field field : fields) {
        //如果没有被Autowired注解的成员变量则直接跳过
        if (!field.isAnnotationPresent(Autowired.class)) {
            continue;
        }

        Autowired autowired = field.getAnnotation(Autowired.class);
        //拿到需要注入的类名
        String autowiredBeanName = autowired.value().trim();
        if ("".equals(autowiredBeanName)) {
            autowiredBeanName = field.getType().getName();
        }

        //强制访问该成员变量
        field.setAccessible(true);

        try {
            if (this.factoryBeanInstanceCache.get(autowiredBeanName) == null) {
                continue;
            }
            //将容器中的实例注入到成员变量中
            field.set(beanWrapper.getWrappedInstance(), this.factoryBeanInstanceCache.get(autowiredBeanName).getWrappedInstance());
        } catch (IllegalAccessException e) {
            e.printStackTrace();
        }
    }
}
中段成果展示
上一章中我们完成了IOC容器的初始化,本章完成了Bean的初始化和依赖注入,按道理说是应该可以正常启动容器并可以通过getBean()来获取到被Spring管理的Bean了,下面来检验一下成果。
将我们的项目通过mvn clean install打成jar包,此时如果读者碰到打包失败不妨在项目的pom中添加一个打包插件。
<project xmlns="http://maven.apache.org/POM/4.0.0"
         xmlns:xsi="http://www.w3.org/2001/XMLSchema-instance"
         xsi:schemaLocation="http://maven.apache.org/POM/4.0.0 http://maven.apache.org/xsd/maven-4.0.0.xsd">
    <modelVersion>4.0.0modelVersion>

    <groupId>com.lqbgroupId>
    <artifactId>my-springartifactId>
    <version>1.0-SNAPSHOTversion>

    <properties>
        <servlet.api.version>2.4servlet.api.version>
    properties>

    <dependencies>

        <dependency>
            <groupId>org.projectlombokgroupId>
            <artifactId>lombokartifactId>
            <version>1.18.8version>
            <scope>providedscope>
        dependency>
    dependencies>


    <build>
        <plugins>
            <plugin>
                <artifactId>maven-compiler-pluginartifactId>
                <version>2.3.2version>
                <configuration>
                    <source>1.8source>
                    <target>1.8target>
                    <encoding>UTF-8encoding>
                    <compilerArguments>
                        <verbose />
                        <bootclasspath>${java.home}/lib/rt.jarbootclasspath>
                    compilerArguments>
                configuration>
            plugin>
        plugins>
    build>
project>
新建一个空Maven项目,并引用我们的工程。
<project xmlns="http://maven.apache.org/POM/4.0.0"
         xmlns:xsi="http://www.w3.org/2001/XMLSchema-instance"
         xsi:schemaLocation="http://maven.apache.org/POM/4.0.0 http://maven.apache.org/xsd/maven-4.0.0.xsd">
    <parent>
        <artifactId>spring-wheelartifactId>
        <groupId>com.lqbgroupId>
        <version>1.0-SNAPSHOTversion>
    parent>
    <modelVersion>4.0.0modelVersion>

    <artifactId>spring-testartifactId>

    <dependencies>
        <dependency>
            <groupId>com.lqbgroupId>
            <artifactId>my-springartifactId>
            <version>1.0-SNAPSHOTversion>
        dependency>
    dependencies>

project>
在resource目录下新建配置文件application.properties并指定扫描路径
scanPackage=com.lqb.demo
在制定的扫描路径下定义一个接口IHelloService,以及HelloService实现这个接口
package com.lqb.demo;

public interface IHelloService {
    void sayHello();
}
package com.lqb.demo;

import com.lqb.springframework.annotation.Service;

@Service
public class HelloService implements IHelloService{
    public void sayHello() {
        System.out.println("hello world!");
    }
}
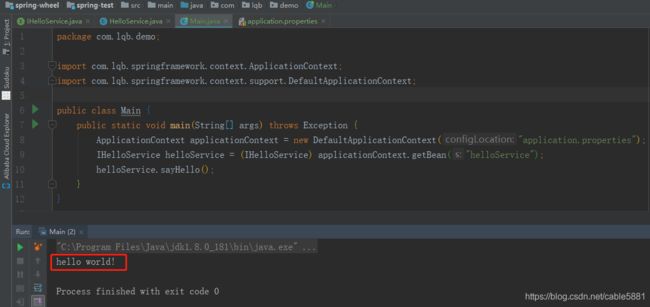
最后新建一个程序启动入口,尝试通过getBean获取IHelloService并调用其方法,控制台成功输出程序员拯救世界的口号“hello world!”
package com.lqb.demo;

import com.lqb.springframework.context.ApplicationContext;
import com.lqb.springframework.context.support.DefaultApplicationContext;

public class Main {
    public static void main(String[] args) throws Exception {
        ApplicationContext applicationContext = new DefaultApplicationContext("application.properties");
        IHelloService helloService = (IHelloService) applicationContext.getBean("helloService");
        helloService.sayHello();
    }
}
package com.lqb.demo;

import com.lqb.springframework.annotation.Service;

@Service
public class MotherService {
    public String call() {
        return "你妈妈叫你不要加班!";
    }
}
将该类注入到之前写好的HelloService中
package com.lqb.demo;

import com.lqb.springframework.annotation.Autowired;
import com.lqb.springframework.annotation.Service;

@Service
public class HelloService implements IHelloService{

	//尝试注入MotherService
    @Autowired
    private MotherService motherService;

    public void sayHello() {
        System.out.println("hello world!");
        System.out.println(motherService.call());
    }
}
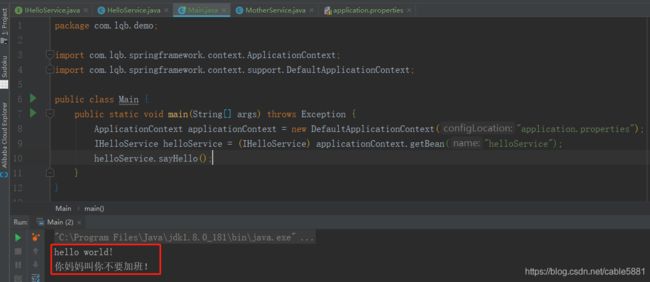
再来运行一次Main方法,成功输出即使拯救地球也要牢记的教训“你妈妈叫你不要加班!”

最后
最后总结一下,Bean的初始化流程主要是在getBean()方法中,说白了逻辑无非就是“利用反射初始化”、“保存实例化对象到Map中”、“利用反射注入成员变量”。
Github源码
系列:
手撸一个简易Spring框架(一)
手撸一个简易Spring框架(二)
手撸一个简易Spring框架(四)
手撸一个简易Spring框架(五)
