写在前面
此系列是本人一个字一个字码出来的,包括示例和实验截图。由于系统内核的复杂性,故可能有错误或者不全面的地方,如有错误,欢迎批评指正,本教程将会长期更新。 如有好的建议,欢迎反馈。码字不易,如果本篇文章有帮助你的,如有闲钱,可以打赏支持我的创作。如想转载,请把我的转载信息附在文章后面,并声明我的个人信息和本人博客地址即可,但必须事先通知我。
你如果是从中间插过来看的,请仔细阅读 羽夏看Win系统内核——简述 ,方便学习本教程。
看此教程之前,问几个问题,基础知识储备好了吗?保护模式篇学会了吗?练习做完了吗?没有的话就不要继续了。
华丽的分割线
调试对象
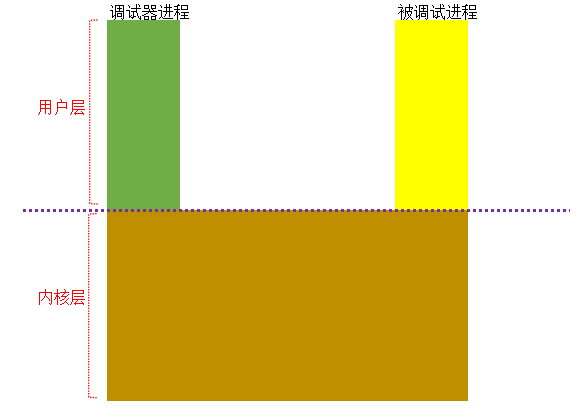
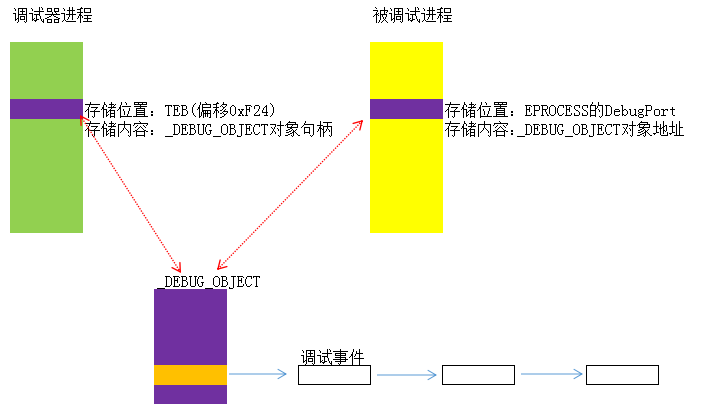
我们都知道在高2G的空间是共用的,调试进程和被调试进程就是通过内核对象建立起联系,示意图如下:
如何在调试器与被调试程序之间通过调用API建立起联系呢?一个是通过CreateProcess在参数带上调试标志以创建进程的方式进行,另一个就是DebugActiveProcess,直接附加正在运行的进程。由于DebugActiveProcess比较简单,就以该函数进行介绍,如下是它的执行流程:
完整具体细节流程将会在总结与提升进行。我们先看看所谓的调试对象是啥:
typedef struct _DEBUG_OBJECT {
    //
    // Event thats set when the EventList is populated.
    //
    KEVENT EventsPresent;
    //
    // Mutex to protect the structure
    //
    FAST_MUTEX Mutex;
    //
    // Queue of events waiting for debugger intervention
    //
    LIST_ENTRY EventList;
    //
    // Flags for the object
    //
    ULONG Flags;
} DEBUG_OBJECT, *PDEBUG_OBJECT;
注意,该结构体符号里面没有,这个是从WRK获得的。
DEBUG_OBJECT这个的作用是啥,它是调试器进程和被调试进程的桥梁,如果这个桥被拆了,它们就无法通信,也就无法调试:
接下来我们查看它是如何搭起这座桥的:
BOOL __stdcall DebugActiveProcess(DWORD dwProcessId)
{
  int res; // eax
  BOOL result; // eax
  void *handle; // esi
  int res_1; // edi

  res = DbgUiConnectToDbg();                    // 创建结构体,与调试对象建立链接
  if ( res >= 0 )
  {
    result = ProcessIdToHandle(dwProcessId);
    handle = result;
    if ( result )
    {
      res_1 = DbgUiDebugActiveProcess(result);
      NtClose(handle);
      if ( res_1 >= 0 )
      {
        result = 1;
      }
      else
      {
        BaseSetLastNTError(res_1);
        result = 0;
      }
    }
  }
  else
  {
    BaseSetLastNTError(res);
    result = 0;
  }
  return result;
}
这个函数上来调用DbgUiConnectToDbg,通过名字猜测这个函数对于我们很重要,我们来跟过去看看:
int __stdcall DbgUiConnectToDbg()
{
  int result; // ecx
  OBJECT_ATTRIBUTES attr; // [esp+0h] [ebp-18h] BYREF

  result = 0;
  if ( !NtCurrentTeb()->DbgSsReserved[1] )
  {
    attr.Length = 24;
    attr.RootDirectory = 0;
    attr.Attributes = 0;
    attr.ObjectName = 0;
    attr.SecurityDescriptor = 0;
    attr.SecurityQualityOfService = 0;
    result = ZwCreateDebugObject(&NtCurrentTeb()->DbgSsReserved[1], 0x1F000Fu, &attr, 1u);
  }
  return result;
}
可以看出,该函数会创建调试对象,并把它放到TEB的DbgSsReserved[1]成员,也就是该偏移0xF24位置,这时候调试器与调试对象的联系就搭建好了。
下面就开始将被调试对象与调试对象建立起联系,我们来看看DbgUiDebugActiveProcess函数:
int __stdcall DbgUiDebugActiveProcess(HANDLE Handle)
{
  int res; // esi

  res = NtDebugActiveProcess(Handle, NtCurrentTeb()->DbgSsReserved[1]);
  if ( res >= 0 )
  {
    res = DbgUiIssueRemoteBreakin(Handle);
    if ( res < 0 )
      DbgUiStopDebugging(Handle);
  }
  return res;
}
可以看到,该函数又会调用NtDebugActiveProcess实现建立起联系,如下是其伪代码:
NTSTATUS __stdcall NtDebugActiveProcess(HANDLE Process, HANDLE DebugObject)
{
  // [COLLAPSED LOCAL DECLARATIONS. PRESS KEYPAD CTRL-"+" TO EXPAND]

  AccessMode = KeGetCurrentThread()->PreviousMode;
  result = ObReferenceObjectByHandle(Process, 0x800u, PsProcessType, AccessMode, &Process, 0);
  if ( result >= 0 )
  {
    process = Process;
    if ( Process == KeGetCurrentThread()->ApcState.Process || Process == PsInitialSystemProcess )
    {
      res = STATUS_ACCESS_DENIED;
    }
    else
    {
      res = ObReferenceObjectByHandle(DebugObject, 2u, DbgkDebugObjectType, AccessMode, &Process, 0);
      if ( res >= 0 )
      {
        if ( ExAcquireRundownProtection(&process->RundownProtect) )
        {
          v5 = DbgkpPostFakeProcessCreateMessages(&process->Pcb, Process, &DebugObject);
          res = DbgkpSetProcessDebugObject(process, Process, v5, DebugObject);
          ExReleaseRundownProtection(&process->RundownProtect);
        }
        else
        {
          res = STATUS_PROCESS_IS_TERMINATING;
        }
        ObfDereferenceObject(Process);
      }
    }
    ObfDereferenceObject(process);
    result = res;
  }
  return result;
}
有了前置知识,我就不赘述前面的流程,我们把注意力放到DbgkpSetProcessDebugObject这个函数上:
NTSTATUS
DbgkpSetProcessDebugObject (
    IN PEPROCESS Process,
    IN PDEBUG_OBJECT DebugObject,
    IN NTSTATUS MsgStatus,
    IN PETHREAD LastThread
    )
/*++

Routine Description:

    Attach a debug object to a process.

Arguments:

    Process     - Process to be debugged
    DebugObject - Debug object to attach
    MsgStatus   - Status from queing the messages
    LastThread  - Last thread seen in attach loop.

Return Value:

    NTSTATUS - Status of call.

--*/
{
    NTSTATUS Status;
    PETHREAD ThisThread;
    LIST_ENTRY TempList;
    PLIST_ENTRY Entry;
    PDEBUG_EVENT DebugEvent;
    BOOLEAN First;
    PETHREAD Thread;
    BOOLEAN GlobalHeld;
    PETHREAD FirstThread;

    PAGED_CODE ();

    ThisThread = PsGetCurrentThread ();

    InitializeListHead (&TempList);

    First = TRUE;
    GlobalHeld = FALSE;

    if (!NT_SUCCESS (MsgStatus)) {
        LastThread = NULL;
        Status = MsgStatus;
    } else {
        Status = STATUS_SUCCESS;
    }

    //
    // Pick up any threads we missed
    //
    if (NT_SUCCESS (Status)) {

        while (1) {
            //
            // Acquire the debug port mutex so we know that any new threads will
            // have to wait to behind us.
            //
            GlobalHeld = TRUE;

            ExAcquireFastMutex (&DbgkpProcessDebugPortMutex);

            //
            // If the port has been set then exit now.
            //
            if (Process->DebugPort != NULL) {
                Status = STATUS_PORT_ALREADY_SET;
                break;
            }
            //
            // Assign the debug port to the process to pick up any new threads
            //
            Process->DebugPort = DebugObject;

            //
            // Reference the last thread so we can deref outside the lock
            //
            ObReferenceObject (LastThread);

            //
            // Search forward for new threads
            //
            Thread = PsGetNextProcessThread (Process, LastThread);
            if (Thread != NULL) {

                //
                // Remove the debug port from the process as we are
                // about to drop the lock
                //
                Process->DebugPort = NULL;

                ExReleaseFastMutex (&DbgkpProcessDebugPortMutex);

                GlobalHeld = FALSE;

                ObDereferenceObject (LastThread);

                //
                // Queue any new thread messages and repeat.
                //

                Status = DbgkpPostFakeThreadMessages (Process,
                                                      DebugObject,
                                                      Thread,
                                                      &FirstThread,
                                                      &LastThread);
                if (!NT_SUCCESS (Status)) {
                    LastThread = NULL;
                    break;
                }
                ObDereferenceObject (FirstThread);
            } else {
                break;
            }
        }
    }

    //
    // Lock the debug object so we can check its deleted status
    //
    ExAcquireFastMutex (&DebugObject->Mutex);

    //
    // We must not propagate a debug port thats got no handles left.
    //

    if (NT_SUCCESS (Status)) {
        if ((DebugObject->Flags&DEBUG_OBJECT_DELETE_PENDING) == 0) {
            PS_SET_BITS (&Process->Flags, PS_PROCESS_FLAGS_NO_DEBUG_INHERIT|PS_PROCESS_FLAGS_CREATE_REPORTED);
            ObReferenceObject (DebugObject);
        } else {
            Process->DebugPort = NULL;
            Status = STATUS_DEBUGGER_INACTIVE;
        }
    }

    for (Entry = DebugObject->EventList.Flink;
         Entry != &DebugObject->EventList;
         ) {

        DebugEvent = CONTAINING_RECORD (Entry, DEBUG_EVENT, EventList);
        Entry = Entry->Flink;

        if ((DebugEvent->Flags&DEBUG_EVENT_INACTIVE) != 0 && DebugEvent->BackoutThread == ThisThread) {
            Thread = DebugEvent->Thread;

            //
            // If the thread has not been inserted by CreateThread yet then don't
            // create a handle. We skip system threads here also
            //
            if (NT_SUCCESS (Status) && Thread->GrantedAccess != 0 && !IS_SYSTEM_THREAD (Thread)) {
                //
                // If we could not acquire rundown protection on this
                // thread then we need to suppress its exit message.
                //
                if ((DebugEvent->Flags&DEBUG_EVENT_PROTECT_FAILED) != 0) {
                    PS_SET_BITS (&Thread->CrossThreadFlags,
                                 PS_CROSS_THREAD_FLAGS_SKIP_TERMINATION_MSG);
                    RemoveEntryList (&DebugEvent->EventList);
                    InsertTailList (&TempList, &DebugEvent->EventList);
                } else {
                    if (First) {
                         DebugEvent->Flags &= ~DEBUG_EVENT_INACTIVE;
                        KeSetEvent (&DebugObject->EventsPresent, 0, FALSE);
                        First = FALSE;
                    }
                    DebugEvent->BackoutThread = NULL;
                    PS_SET_BITS (&Thread->CrossThreadFlags,
                                 PS_CROSS_THREAD_FLAGS_SKIP_CREATION_MSG);

                }
            } else {
                RemoveEntryList (&DebugEvent->EventList);
                InsertTailList (&TempList, &DebugEvent->EventList);
            }

            if (DebugEvent->Flags&DEBUG_EVENT_RELEASE) {
                DebugEvent->Flags &= ~DEBUG_EVENT_RELEASE;
                ExReleaseRundownProtection (&Thread->RundownProtect);
            }

        }
    }

    ExReleaseFastMutex (&DebugObject->Mutex);

    if (GlobalHeld) {
        ExReleaseFastMutex (&DbgkpProcessDebugPortMutex);
    }

    if (LastThread != NULL) {
        ObDereferenceObject (LastThread);
    }

    while (!IsListEmpty (&TempList)) {
        Entry = RemoveHeadList (&TempList);
        DebugEvent = CONTAINING_RECORD (Entry, DEBUG_EVENT, EventList);
        DbgkpWakeTarget (DebugEvent);
    }

    if (NT_SUCCESS (Status)) {
        DbgkpMarkProcessPeb (Process);
    }

    return Status;
}
由于伪代码的结果和它差不多,重命名比较复杂,就用WRK好了。然后你就关注到关键代码:
//
// Assign the debug port to the process to pick up any new threads
//
Process->DebugPort = DebugObject;
这样被调试进程和调试对象建立起联系。
调试事件的收集
既然调试器进程和被调试进程是通过调试对象建立联系的,如果要通信就需要调试事件,DEBUG_OBJECT的EventList存放调试事件。
调试事件不可能仅仅一种,如下是其枚举:
typedef enum _DBGKM_APINUMBER
{
    DbgKmExceptionApi = 0,  //异常
    DbgKmCreateThreadApi = 1,   //创建线程
    DbgKmCreateProcessApi = 2,  //创建进程
    DbgKmExitThreadApi = 3, //线程退出
    DbgKmExitProcessApi = 4,    //进程退出
    DbgKmLoadDllApi = 5,    //加载DLL
    DbgKmUnloadDllApi = 6,  //卸载DLL
    DbgKmErrorReportApi = 7,    //已废弃
    DbgKmMaxApiNumber = 8,  //最大值
} DBGKM_APINUMBER;
前7个就是我们能够使用的调试事件种类,那么这些调试事件是如何采集的呢?
在创建进程、线程的函数中,会走如下流程:
在退出线程、进程的函数中,会走如下流程:
在加载模块的函数中,会走如下流程:
在卸载模块的函数中,会走如下流程:
在异常的函数中,会走如下流程:
这一切的一切都是DbgkpSendApiMessage来实现的调试事件的收集操作,我们来看看它的代码:
NTSTATUS
DbgkpSendApiMessage(
    IN OUT PDBGKM_APIMSG ApiMsg,
    IN BOOLEAN SuspendProcess
    )

/*++

Routine Description:

    This function sends the specified API message over the specified
    port. It is the caller's responsibility to format the API message
    prior to calling this function.

    If the SuspendProcess flag is supplied, then all threads in the
    calling process are first suspended. Upon receipt of the reply
    message, the threads are resumed.

Arguments:

    ApiMsg - Supplies the API message to send.

    SuspendProcess - A flag that if set to true, causes all of the
        threads in the process to be suspended prior to the call,
        and resumed upon receipt of a reply.

Return Value:

    NTSTATUS.

--*/

{
    NTSTATUS st;
    PEPROCESS Process;

    PAGED_CODE();

    if ( SuspendProcess ) {
        SuspendProcess = DbgkpSuspendProcess();
    }

    ApiMsg->ReturnedStatus = STATUS_PENDING;

    Process = PsGetCurrentProcess();

    PS_SET_BITS (&Process->Flags, PS_PROCESS_FLAGS_CREATE_REPORTED);

    st = DbgkpQueueMessage (Process, PsGetCurrentThread (), ApiMsg, 0, NULL);

    ZwFlushInstructionCache (NtCurrentProcess (), NULL, 0);
    if ( SuspendProcess ) {
        DbgkpResumeProcess();
    }

    return st;
}
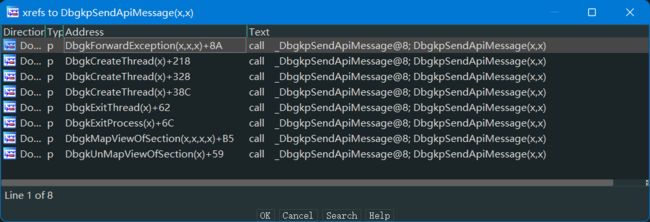
通过交叉引用,我们发现了调用该函数的调用者:
PDBGKM_APIMSG是个结构体,存放消息结构,每种消息都有自己的消息结构。下面我们来看看它的成员:
typedef struct _DBGKM_APIMSG {
    PORT_MESSAGE h;
    DBGKM_APINUMBER ApiNumber;
    NTSTATUS ReturnedStatus;
    union {
        DBGKM_EXCEPTION Exception;
        DBGKM_CREATE_THREAD CreateThread;
        DBGKM_CREATE_PROCESS CreateProcessInfo;
        DBGKM_EXIT_THREAD ExitThread;
        DBGKM_EXIT_PROCESS ExitProcess;
        DBGKM_LOAD_DLL LoadDll;
        DBGKM_UNLOAD_DLL UnloadDll;
    } u;
} DBGKM_APIMSG, *PDBGKM_APIMSG;
SuspendProcess参数指示要不要把本进程内除了自己之外的其他线程挂起,比如int3,但有些不需要比如加载模块等操作。
综上所述,DbgkSendApiMessage是调试事件收集的总入口,如果在这里挂钩子,调试器将无法调试。
剩下所有的与调试事件的收集的细节将会在总结与提升篇进行介绍。
调试事件的处理
有关调试事件的处理,我们简单用API实现一个调试器,如下是通过CreateProcess实现的调试器:
#include "stdafx.h"
#include
#include

int main(int argc, char* argv[])
{
    char filename[]= "C:\\WINDOWS\\NOTEPAD.EXE";
    STARTUPINFO si ={sizeof(STARTUPINFO)};
    PROCESS_INFORMATION pi ;
    bool isContinue = true;
    DEBUG_EVENT dbgEvent;

    BOOL ret =CreateProcess(NULL,filename,NULL,NULL,FALSE,DEBUG_PROCESS|DEBUG_ONLY_THIS_PROCESS,NULL,NULL,&si,&pi);

    if (ret)
    {
        while (isContinue)
        {
            ret = WaitForDebugEvent(&dbgEvent,INFINITE);
            if (!ret)
            {
                printf("WaitForDebugEvent 出错:%d",GetLastError());
                break;
            }

            switch (dbgEvent.dwDebugEventCode)
            {
            case EXCEPTION_DEBUG_EVENT:
                puts("EXCEPTION_DEBUG_EVENT");
                break;
            case CREATE_THREAD_DEBUG_EVENT:
                puts("CREATE_THREAD_DEBUG_EVENT");
                break;
            case CREATE_PROCESS_DEBUG_EVENT:
                puts("CREATE_PROCESS_DEBUG_EVENT");
                break;
            case EXIT_THREAD_DEBUG_EVENT:
                puts("EXIT_THREAD_DEBUG_EVENT");
                break;
            case EXIT_PROCESS_DEBUG_EVENT:
                puts("EXIT_PROCESS_DEBUG_EVENT");
                break;
            case LOAD_DLL_DEBUG_EVENT:
                puts("LOAD_DLL_DEBUG_EVENT");
                break;
            case UNLOAD_DLL_DEBUG_EVENT:
                puts("UNLOAD_DLL_DEBUG_EVENT");
                break;
            case OUTPUT_DEBUG_STRING_EVENT:
                puts("OUTPUT_DEBUG_STRING_EVENT");
                break;
            default:
                break;
            }

            ret = ContinueDebugEvent(dbgEvent.dwProcessId,dbgEvent.dwThreadId,DBG_CONTINUE);

        }
    }
    else
    {
        printf("创建进程失败:%d\n",GetLastError());
    }

    system("pause");
    return 0;
}
编译运行后,它的输出如下:
CREATE_PROCESS_DEBUG_EVENT
LOAD_DLL_DEBUG_EVENT
LOAD_DLL_DEBUG_EVENT
LOAD_DLL_DEBUG_EVENT
LOAD_DLL_DEBUG_EVENT
LOAD_DLL_DEBUG_EVENT
LOAD_DLL_DEBUG_EVENT
LOAD_DLL_DEBUG_EVENT
LOAD_DLL_DEBUG_EVENT
LOAD_DLL_DEBUG_EVENT
LOAD_DLL_DEBUG_EVENT
LOAD_DLL_DEBUG_EVENT
LOAD_DLL_DEBUG_EVENT
LOAD_DLL_DEBUG_EVENT
EXCEPTION_DEBUG_EVENT
LOAD_DLL_DEBUG_EVENT
LOAD_DLL_DEBUG_EVENT
LOAD_DLL_DEBUG_EVENT
LOAD_DLL_DEBUG_EVENT
LOAD_DLL_DEBUG_EVENT
LOAD_DLL_DEBUG_EVENT
LOAD_DLL_DEBUG_EVENT
LOAD_DLL_DEBUG_EVENT
LOAD_DLL_DEBUG_EVENT
LOAD_DLL_DEBUG_EVENT
LOAD_DLL_DEBUG_EVENT
LOAD_DLL_DEBUG_EVENT
LOAD_DLL_DEBUG_EVENT
LOAD_DLL_DEBUG_EVENT
你如果细心的话可能会发现EXCEPTION_DEBUG_EVENT,这个我们记事本正常运行,没有出现异常,为啥会有这条呢?我们来看看地址是什么,修改代码区域如下:
case EXCEPTION_DEBUG_EVENT:
    printf("EXCEPTION_DEBUG_EVENT:0x%X\n",dbgEvent.u.Exception.ExceptionRecord.ExceptionAddress);
    break;
再次编译运行,结果如下:
CREATE_PROCESS_DEBUG_EVENT
LOAD_DLL_DEBUG_EVENT
LOAD_DLL_DEBUG_EVENT
LOAD_DLL_DEBUG_EVENT
LOAD_DLL_DEBUG_EVENT
LOAD_DLL_DEBUG_EVENT
LOAD_DLL_DEBUG_EVENT
LOAD_DLL_DEBUG_EVENT
LOAD_DLL_DEBUG_EVENT
LOAD_DLL_DEBUG_EVENT
LOAD_DLL_DEBUG_EVENT
LOAD_DLL_DEBUG_EVENT
LOAD_DLL_DEBUG_EVENT
LOAD_DLL_DEBUG_EVENT
EXCEPTION_DEBUG_EVENT:0x7C92120E
LOAD_DLL_DEBUG_EVENT
LOAD_DLL_DEBUG_EVENT
LOAD_DLL_DEBUG_EVENT
LOAD_DLL_DEBUG_EVENT
LOAD_DLL_DEBUG_EVENT
LOAD_DLL_DEBUG_EVENT
LOAD_DLL_DEBUG_EVENT
LOAD_DLL_DEBUG_EVENT
LOAD_DLL_DEBUG_EVENT
LOAD_DLL_DEBUG_EVENT
LOAD_DLL_DEBUG_EVENT
LOAD_DLL_DEBUG_EVENT
LOAD_DLL_DEBUG_EVENT
LOAD_DLL_DEBUG_EVENT
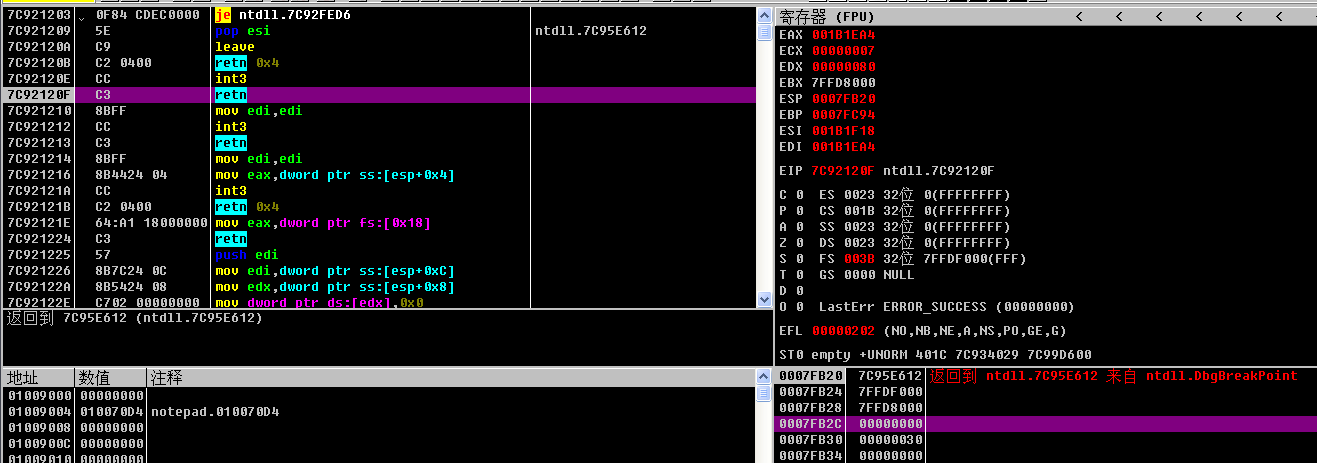
0x7C92120E这个地址一定在Dll里面,这个就是所谓的系统断点,它在LdrpInitializeProcess函数实现的,如下是关键伪代码:
if ( peb->BeingDebugged )
{
  DbgBreakPoint();
  ShowSnaps = (peb->NtGlobalFlag & 2) != 0;
}
我们回顾一下进程的创建过程:
- 映射
EXE文件 - 创建内核对象
EPROCESS - 映射
ntdll.dll - 创建线程内核对象
ETHREAD - 系统启动线程,映射
DLL(ntdll.LdrInitializeThunk)线程开始执行
LdrInitializeThunk会判断这个是不是创建的第一个线程,如果是就会调用LdrpInitializeProcess,然后判断PEB的BeingDebugged成员来决定是否下系统断点。与此同时,我们可以通过这个实现反调试。
我们再看看调试器是如何到系统断点的:
接下来,我们通过附加的形式进行,实验代码如下:
#include "stdafx.h"
#include
#include

int main(int argc, char* argv[])
{
    bool isContinue = true;
    DEBUG_EVENT dbgEvent;
    int pid;

    puts("请输入调试进程的 PID:");
    scanf("%d",&pid);

    BOOL ret =DebugActiveProcess(pid);

    if (ret)
    {
        while (isContinue)
        {
            ret = WaitForDebugEvent(&dbgEvent,INFINITE);
            if (!ret)
            {
                printf("WaitForDebugEvent 出错:%d",GetLastError());
                break;
            }

            switch (dbgEvent.dwDebugEventCode)
            {
            case EXCEPTION_DEBUG_EVENT:
                puts("EXCEPTION_DEBUG_EVENT");
                break;
            case CREATE_THREAD_DEBUG_EVENT:
                puts("CREATE_THREAD_DEBUG_EVENT");
                break;
            case CREATE_PROCESS_DEBUG_EVENT:
                puts("CREATE_PROCESS_DEBUG_EVENT");
                break;
            case EXIT_THREAD_DEBUG_EVENT:
                puts("EXIT_THREAD_DEBUG_EVENT");
                break;
            case EXIT_PROCESS_DEBUG_EVENT:
                puts("EXIT_PROCESS_DEBUG_EVENT");
                break;
            case LOAD_DLL_DEBUG_EVENT:
                puts("LOAD_DLL_DEBUG_EVENT");
                break;
            case UNLOAD_DLL_DEBUG_EVENT:
                puts("UNLOAD_DLL_DEBUG_EVENT");
                break;
            case OUTPUT_DEBUG_STRING_EVENT:
                puts("OUTPUT_DEBUG_STRING_EVENT");
                break;
            default:
                break;
            }

            ret = ContinueDebugEvent(dbgEvent.dwProcessId,dbgEvent.dwThreadId,DBG_CONTINUE);

        }
    }
    else
    {
        printf("DebugActiveProcess 失败:%d\n",GetLastError());
    }

    system("pause");
    return 0;
}
这次调试打开的记事本,结果如下:
请输入调试进程的 PID:
1088
CREATE_PROCESS_DEBUG_EVENT
LOAD_DLL_DEBUG_EVENT
LOAD_DLL_DEBUG_EVENT
LOAD_DLL_DEBUG_EVENT
LOAD_DLL_DEBUG_EVENT
LOAD_DLL_DEBUG_EVENT
LOAD_DLL_DEBUG_EVENT
LOAD_DLL_DEBUG_EVENT
LOAD_DLL_DEBUG_EVENT
LOAD_DLL_DEBUG_EVENT
LOAD_DLL_DEBUG_EVENT
LOAD_DLL_DEBUG_EVENT
LOAD_DLL_DEBUG_EVENT
LOAD_DLL_DEBUG_EVENT
LOAD_DLL_DEBUG_EVENT
LOAD_DLL_DEBUG_EVENT
LOAD_DLL_DEBUG_EVENT
LOAD_DLL_DEBUG_EVENT
LOAD_DLL_DEBUG_EVENT
LOAD_DLL_DEBUG_EVENT
LOAD_DLL_DEBUG_EVENT
LOAD_DLL_DEBUG_EVENT
LOAD_DLL_DEBUG_EVENT
LOAD_DLL_DEBUG_EVENT
LOAD_DLL_DEBUG_EVENT
LOAD_DLL_DEBUG_EVENT
LOAD_DLL_DEBUG_EVENT
LOAD_DLL_DEBUG_EVENT
CREATE_THREAD_DEBUG_EVENT
EXCEPTION_DEBUG_EVENT:0x7C92120E
EXIT_THREAD_DEBUG_EVENT
这次你会奇怪的发现,既然我们都是已经创建好的线程了,为啥还有加载DLL,创建线程,系统断点的消息呢?因为这些消息都是假的。这个功能是通过DbgkpPostFakeProcessCreateMessages实现的:
iNTSTATUS
DbgkpPostFakeProcessCreateMessages (
    IN PEPROCESS Process,
    IN PDEBUG_OBJECT DebugObject,
    IN PETHREAD *pLastThread
    )
/*++

Routine Description:

    This routine posts the faked initial process create, thread create and mudule load messages

Arguments:

    ProcessHandle     - Handle to a process to be debugged
    DebugObjectHandle - Handle to a debug object

Return Value:

    None.

--*/
{
    NTSTATUS Status;
    KAPC_STATE ApcState;
    PETHREAD Thread;
    PETHREAD LastThread;

    PAGED_CODE ();

    //
    // Attach to the process so we can touch its address space
    //
    KeStackAttachProcess(&Process->Pcb, &ApcState);

    Status = DbgkpPostFakeThreadMessages (Process,
                                          DebugObject,
                                          NULL,
                                          &Thread,
                                          &LastThread);

    if (NT_SUCCESS (Status)) {
        Status = DbgkpPostFakeModuleMessages (Process, Thread, DebugObject);
        if (!NT_SUCCESS (Status)) {
            ObDereferenceObject (LastThread);
            LastThread = NULL;
        }
        ObDereferenceObject (Thread);
    } else {
        LastThread = NULL;
    }

    KeUnstackDetachProcess(&ApcState);

    *pLastThread = LastThread;

    return Status;
}
具体的我就不赘述了,有关本篇文章就介绍这么多。
下一篇
调试篇——断点与单步


