yolov5-realsense深度信息目标检测(构建自己的数据集模型)
yolov5-realsense深度信息目标检测(构建自己的数据集模型)
训练准备:
1.安装运行yolov5代码
略
2.制作训练数据集
目标训练数据集,应大于50张图片以上
(1)使用OpenCV拍摄640X480(32倍数)(相机尺寸)的图片并保存
import cv2

cap=cv2.VideoCapture(0)
width = 640  #定义摄像头获取图像宽度
height = 480   #定义摄像头获取图像长度

cap.set(cv2.CAP_PROP_FRAME_WIDTH, width)  #设置宽度
cap.set(cv2.CAP_PROP_FRAME_HEIGHT, height)  #设置长度

i=0
while(1):
    ret ,frame = cap.read()
    k=cv2.waitKey(1)
    if k==27:
        break
    elif k==ord('s'):
        cv2.imwrite('/home/user/cxking/project/yolo/yolov5训练数据及/img/'+str(i)+'.jpg',frame)
        i+=1
    cv2.imshow("capture", frame)
cap.release()
cv2.destroyAllWindows()
选取等宽高图片:
square (w==h)
  如 输入为 [b, c, 640, 640], 可以使用mosic数据增强方式增强图像
rect(scale):
  如 输入为 [b, c, 640, 512], 其中512为短边放缩以后的尺寸(补充到32的倍数)
  但是不支持mosic数据增强方式
32倍数:
yolov5s第一层结构FOCUS切片操作最后使用了32个卷积核的卷积操作
数据集展示:
(2)安装图片标注工具LabelImg
# https://github.com/tzutalin/labelImg
pip3 install labelImg
labelImg
labelImg [IMAGE_PATH] [PRE-DEFINED CLASS FILE]
操作快捷键:
Ctrl + u  加载目录中的所有图像,鼠标点击Open dir同功能
Ctrl + r  更改默认注释目标目录(xml文件保存的地址)
Ctrl + s  保存
Ctrl + d  复制当前标签和矩形框
space     将当前图像标记为已验证
w         创建一个矩形框
d         下一张图片
a         上一张图片
del       删除选定的矩形框
Ctrl++    放大
Ctrl--    缩小
↑→↓←        键盘箭头移动选定的矩形框
标注操作:
生成图片 xlm 文件:

标签解析:
<annotation>	##Annotations:里面存放的是每张图片打完标签所对应的XML文件
<folder>all_imagesfolder>
<filename>0.jpgfilename>			##图片名
<path>/home/user/cxking/project/yolo/yolov5/mytrain/all_images/0.jpgpath>
<source>
<database>Unknowndatabase>
source>
<size>					##图片尺寸
<width>640width>
<height>480height>
<depth>3depth>		#RGB3色
size>
<segmented>0segmented>
<object>					##图片标注目标
<name>insulatorname>		#标注目标类别
<pose>Unspecifiedpose>	 #物体的姿态
<truncated>0truncated>		#物体是否被部分遮挡(>15%)
<difficult>0difficult>			#是否为难以辨识的物体,主要指要结体背景才能判断出类别的物体。虽有标注, 															# 但一般忽略这类物体
<bndbox>		##标注的bbox左上角和右下角坐标
<xmin>229xmin>
<ymin>212ymin>
<xmax>341xmax>
<ymax>366ymax>
bndbox>
object>
<object>
<name>wirename>	#第二个标注类别名
<pose>Unspecifiedpose>
<truncated>1truncated>	##被遮挡超过15%
<difficult>0difficult>
<bndbox>
<xmin>1xmin>
<ymin>204ymin>
<xmax>563xmax>
<ymax>302ymax>
bndbox>
object>
<object>
<name>binding wirename>	#第三个标记类别
<pose>Unspecifiedpose>
<truncated>0truncated>
<difficult>0difficult>
<bndbox>
<xmin>202xmin>
<ymin>201ymin>
<xmax>341xmax>
<ymax>248ymax>
bndbox>
object>
annotation>
注意:若存在同类别多个标注,则每个类别的独立标注都会有一个
(3)生成训练数据集
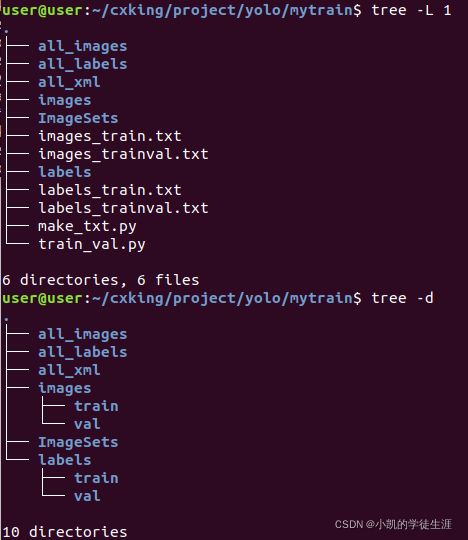
- 构建训练集文件结构:
其中:
mytrain
├── all_images:存放所有图片;
├── all_xml:放置生成的所有与训练图片对应的xml文件;
├── all_labels:由文件train_val.py生成,将all_xml中xml文件转为txt文件存于all_labels文件夹中,并生成训练需要的架构;
├── make_txt.py:用来划分数据集,生成四个只包含图片名称的txt文件;
└── train_val.py:该文件一方面将all_xml中xml文件转为txt文件存于all_labels文件夹中,另一方面生成训练所需数据存放架构;
-
设定数据集中训练和测试比例并进行划分:(make_txt.py)
import os	#路径处理包
import random	#随机数包
trainval_percent = 0.1  	#所有数据中测试用数据比例10%
train_percent = 0.9    			#训练数据比例90%
#├── train                  占90%
#└── trainval               占10%
#   ├── test               占90%*10%
#   └── val                占10%*10%
xmlfilepath = 'all_images'	#图片所在路径
txtsavepath = 'ImageSets'	#生成txt文件路径
total_xml = os.listdir(xmlfilepath)
num = len(total_xml)	#所有图片数
list = range(num)
#计算各类数据实际量
tv = int(num * trainval_percent)
tr = int(tv * train_percent)
#随机生成固定个数序列
trainval = random.sample(list, tv) #从所有list中返回tv个数量的项目
train = random.sample(trainval, tr)
if not os.path.exists('ImageSets/'):
    os.makedirs('ImageSets/')
ftrainval = open('ImageSets/trainval.txt', 'w')
ftest = open('ImageSets/test.txt', 'w')
ftrain = open('ImageSets/train.txt', 'w')
fval = open('ImageSets/val.txt', 'w')
for i in list:
    name = total_xml[i][:-4] + '\n'
    if i in trainval:
        ftrainval.write(name)
        if i in train:
            ftest.write(name)
        else:
            fval.write(name)
    else:
        ftrain.write(name)
ftrainval.close()
ftrain.close()
fval.close()
ftest.close()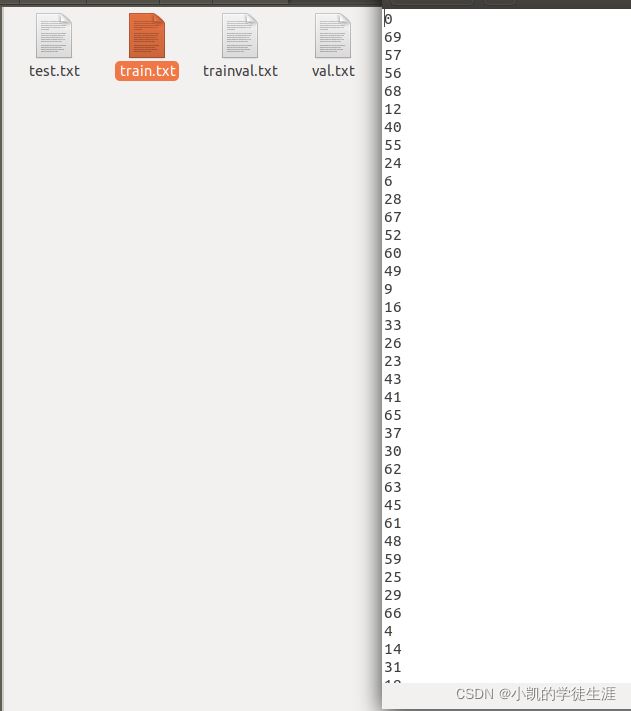
-
生成模型需要的数据集存放架构:(train_val.py)
该文件一方面将all_xml中xml文件转为txt文件存于all_labels文件夹中,另一方面生成训练所需数据存放架构
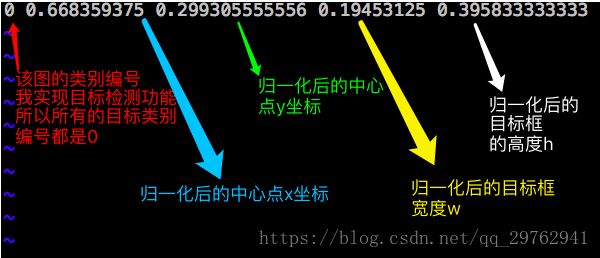
import xml.etree.ElementTree as ET	#Python标准库中处理xml的API
import pickle	   # 可以将对象以文件的形式存放在磁盘上。
import os			   # 路径处理包
import shutil		# python高级文件操作模块(例如复制文件内容,创建文件的新副本并进行归档)
from os import listdir, getcwd
from os.path import join
sets = ['train', 'trainval']	#数据集名称
classes = ['binding wire','wire','insulator']		#类别名称
# xyxy -> xywh########################
# 返回值为ROI中心点相对于图片大小的比例坐标,和ROI的w、h相对于图片大小的比例
# box里保存的是ROI感兴趣区域的坐标(xyxy)
def convert(size, box):
    dw = 1. / size[0]	#浮点数除法则执行精确除法
    dh = 1. / size[1]
    x = (box[0] + box[1]) / 2.0
    y = (box[2] + box[3]) / 2.0
    w = box[1] - box[0]
    h = box[3] - box[2]
    x = x * dw
    w = w * dw
    y = y * dh
    h = h * dh
    return (x, y, w, h)

# 对于单个xml的处理
def convert_annotation(image_id):
    in_file = open('all_xml/%s.xml' % (image_id))
    out_file = open('all_labels/%s.txt' % (image_id), 'w')
    tree = ET.parse(in_file)
    root = tree.getroot()
    size = root.find('size')
    w = int(size.find('width').text)
    h = int(size.find('height').text)
    for obj in root.iter('object'):
        difficult = obj.find('difficult').text
        cls = obj.find('name').text
        if cls not in classes or int(difficult) == 1:
            continue
        cls_id = classes.index(cls)
        xmlbox = obj.find('bndbox')
        b = (float(xmlbox.find('xmin').text), float(xmlbox.find('xmax').text), float(xmlbox.find('ymin').text),
             float(xmlbox.find('ymax').text))
        bb = convert((w, h), b)	#生成ROI
        out_file.write(str(cls_id) + " " + " ".join([str(a) for a in bb]) + '\n')
#打印当前路径
wd = getcwd()
print(wd)
#遍历所有数据集和类别,对每个数据进行处理并按结构保存
for image_set in sets:
    if not os.path.exists('all_labels/'):
        os.makedirs('all_labels/')
    image_ids = open('ImageSets/%s.txt' % (image_set)).read().strip().split()
    image_list_file = open('images_%s.txt' % (image_set), 'w')
    labels_list_file=open('labels_%s.txt'%(image_set),'w')
    for image_id in image_ids:
        image_list_file.write('%s.jpg\n' % (image_id))
        labels_list_file.write('%s.txt\n'%(image_id))
        convert_annotation(image_id) #如果标签已经是txt格式,将此行注释掉,所有的txt存放到all_labels文件夹。
    image_list_file.close()
    labels_list_file.close()

#创建yolo训练格式新路径
def copy_file(new_path,path_txt,search_path):#参数1:存放新文件的位置  参数2:为上一步建立好的train,val训练数据的路径txt文件  参数3:为搜索的文件位置
    if not os.path.exists(new_path):
        os.makedirs(new_path)
    with open(path_txt, 'r') as lines:
        filenames_to_copy = set(line.rstrip() for line in lines)
        # print('filenames_to_copy:',filenames_to_copy)
        # print(len(filenames_to_copy))
    for root, _, filenames in os.walk(search_path):
        # print('root',root)
        # print(_)
        # print(filenames)
        for filename in filenames:
            if filename in filenames_to_copy:
                shutil.copy(os.path.join(root, filename), new_path)

#按照划分好的训练文件的路径搜索目标,并将其复制到yolo格式下的新路径
copy_file('./images/train/','./images_train.txt','./all_images')
copy_file('./images/val/','./images_trainval.txt','./all_images')
copy_file('./labels/train/','./labels_train.txt','./all_labels')
copy_file('./labels/val/','./labels_trainval.txt','./all_labels')
该文件将每个xml标注提取为bbox信息为txt格式(这种数据集格式成为yolo_txt格式),每个图像对应一个txt文件,文件每一行为一个目标的信息
训练文件格式:

将制作好的mytrain文件夹与下载好的yolov5文件夹放入同一级文件夹中。
-
制作自定义数据集的yaml文件:(mytrain.yaml)
接着按照yolov5-master/data/coco128.yaml文件,制作mytrain.yaml文件(与coco128.yaml文件同目录):
(YAML是一种标记语言,也可称为资源清单文件。可以实现对大量的资源对象进行编排部署,是一种基于Unicode容易阅读,容易和脚本语言交互的,用来表达资料序列的编程语言。)
# Default dataset location is next to /yolov5:
#   /parent_folder
#     /mycoco
#     /yolov5

# train and val data as 1) directory: path/images/, 2) file: path/images.txt, or 3) list: [path1/images/, path2/images/]
train: ../mytrain/images/train/  	# 训练集路径
val: ../mytrain/images/val/  			# 测试集路径

# number of classes
nc: 3		# 数据类别

# class names
names: ['binding wire','wire','insulator']	# 类别名称
训练数据集:(train.py)
更改train.py文件相应的参数(预训练模型,训练的数据集),这里使用yolov5s.pt为预训练模型,更改yolov5s.yaml文件中的参数(自己的类别数):
def parse_opt(known=False):
    parser = argparse.ArgumentParser()
    parser.add_argument('--weights', type=str, default=ROOT / 'yolov5s.pt', help='initial weights path')###### 预训练模型
    parser.add_argument('--cfg', type=str, default='', help='model.yaml path')	# 模型默认值
    parser.add_argument('--data', type=str, default=ROOT / 'data/mytrain.yaml', help='dataset.yaml path')####### 数据集yaml文件
    parser.add_argument('--hyp', type=str, default=ROOT / 'data/hyps/hyp.scratch.yaml', help='hyperparameters path')	#超参数
    parser.add_argument('--epochs', type=int, default=300)	#向前和向后传播中所有批次的单次训练迭代300次
    parser.add_argument('--batch-size', type=int, default=16, help='total batch size for all GPUs, -1 for autobatch')	#每批数据量的大小,及每多少个样本iteration一次
    parser.add_argument('--imgsz', '--img', '--img-size', type=int, default=640, help='train, val image size (pixels)')	#数据图像默认尺寸
- 训练结果分析:(/yolov5/runs/train/)
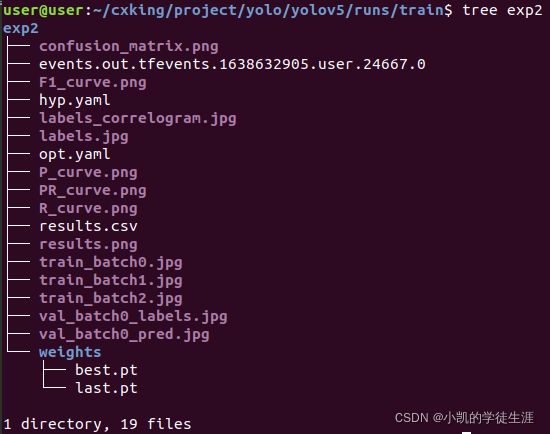
训练完以后可以看到在runs/train/exp/weights下生成了训练好的权重文件包含best.pt(做detect时用这个)和last.pt(最后一次训练模型),其中last.pt主要是用来在上次程序中断之后,下次可以继续接着进行训练。
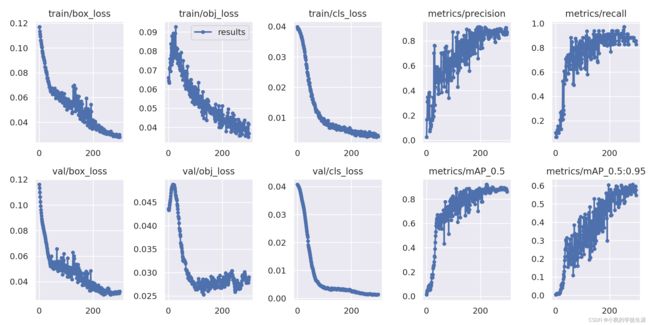
方法:大体观察个损失是否收敛稳定,主要观察precision精度和recall召回率;
- GIoU:推测为GIoU损失函数均值,越小方框越准;
- Objectness:推测为目标检测loss均值,越小目标检测越准;
- Classification:推测为分类loss均值,越小分类越准;
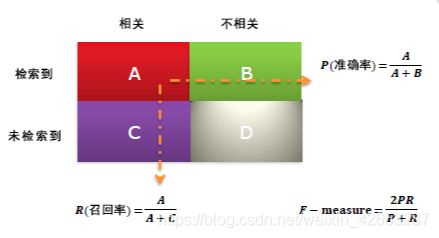
- Precision:精度(找对的正类/所有找到的正类);
![]()
- Recall:召回率(找对的正类/所有本应该被找对的正类);
![]()
- [email protected] & [email protected]:0.95:就是mAP是用Precision和Recall作为两轴作图后围成的面积,m表示平均,@后面的数表示判定iou为正负样本的阈值,@0.5:0.95表示阈值取0.5:0.05:0.95后取均值。
- F-measure:F值定义为‘精度’和‘召回率’的调和平均,F值较高的时候说明试验方法有效,结果比较符合预期;
测试训练模型:(detect.py)
用训练好的权重文件进行测试,修改detect.py文件,修改权重文件路径和输入测试文件,然后run:
def parse_opt():
    parser = argparse.ArgumentParser()
    parser.add_argument('--weights', nargs='+', type=str, default=ROOT / '/home/user/cxking/project/yolo/yolov5/runs/train/exp2/weights/best.pt', help='model path(s)')########
    parser.add_argument('--source', type=str, default=ROOT / 'data/images', help='file/dir/URL/glob, 0 for webcam')
    parser.add_argument('--imgsz', '--img', '--img-size', nargs='+', type=int, default=[640], help='inference size h,w')
执行:python detect.py --source 0
应用:结合realsense相机的sdk实现目标检测加测距(realsensedetect.py)
结合源码的detect.py文件改编:
分别对一下模块进行修改和添加:
#from utils.general import plot_one_box,set_logging
###########################################################################
# 按要求在图像img上绘制一个边界框
def plot_one_box(x, img, color=None, label=None, line_thickness=None):
    tl = line_thickness or round(0.002 * (img.shape[0] + img.shape[1]) / 2) + 1  # 字体大小
    color = color or [random.randint(0, 255) for _ in range(3)]	#随机颜色
    c1, c2 = (int(x[0]), int(x[1])), (int(x[2]), int(x[3]))
    cv2.rectangle(img, c1, c2, color, thickness=tl, lineType=cv2.LINE_AA)   #通过确定对角线位置来画矩形框
    if label:
        tf = max(tl - 1, 1)  # font thickness字体粗细
        t_size = cv2.getTextSize(label, 0, fontScale=tl / 3, thickness=tf)[0]
        c2 = c1[0] + t_size[0], c1[1] - t_size[1] - 3
        cv2.rectangle(img, c1, c2, color, -1, cv2.LINE_AA)  # filled
        cv2.putText(img, label, (c1[0], c1[1] - 2), 0, tl / 3, [225, 255, 255], thickness=tf, lineType=cv2.LINE_AA)
                    #(图片img,“文本内容”,(左下角坐标),字体,字体大小,(颜色),线条粗细,线条类型)

def set_logging(name=None, verbose=True):
	# 设置级别并返回记录器
    rank = int(os.getenv('RANK', -1))  # rank in world for Multi-GPU trainings
    logging.basicConfig(format="%(message)s", level=logging.INFO if (verbose and rank in (-1, 0)) else logging.WARNING)
    return logging.getLogger(name)


LOGGER = set_logging(__name__)  # define globally (used in train.py, val.py, detect.py, etc.)


# from utils.torch_utils import load_classifier, time_synchronized
########################################
 # 加载预训练的模型重塑为n类输出
def load_classifier(name='resnet101', n=2):
    model = torchvision.models.__dict__[name](pretrained=True)

    # ResNet model properties
    # input_size = [3, 224, 224]
    # input_space = 'RGB'
    # input_range = [0, 1]
    # mean = [0.485, 0.456, 0.406]
    # std = [0.229, 0.224, 0.225]

    # Reshape output to n classes
    filters = model.fc.weight.shape[1]
    model.fc.bias = nn.Parameter(torch.zeros(n), requires_grad=True)
    model.fc.weight = nn.Parameter(torch.zeros(n, filters), requires_grad=True)
    model.fc.out_features = n
    return model

def time_synchronized():
    torch.cuda.synchronize() if torch.cuda.is_available() else None
    return time.time()
###########################################################################
import argparse  # python的命令行解析的标准模块  可以让我们直接在命令行中就可以向程序中传入参数并让程序运行
import os
import shutil
import time
from pathlib import Path  # Path将str转换为Path对象 使字符串路径易于操作的模块

import cv2
import torch
import torch.backends.cudnn as cudnn # cuda模块
from numpy import random
import numpy as np
import pyrealsense2 as rs	#导入realsense的sdk模块

from models.experimental import attempt_load
from utils.general import (
    check_img_size, non_max_suppression, apply_classifier, scale_coords,
    xyxy2xywh, plot_one_box, strip_optimizer, set_logging)
from utils.torch_utils import select_device, load_classifier, time_synchronized
from utils.datasets import letterbox

def detect(save_img=False):
    # 加载参数
    out, source, weights, view_img, save_txt, imgsz = \
        opt.save_dir, opt.source, opt.weights, opt.view_img, opt.save_txt, opt.img_size
    webcam = source == '0' or source.startswith(('rtsp://', 'rtmp://', 'http://')) or source.endswith('.txt')

    # 初始化
    set_logging()	#生成日志
    device = select_device(opt.device) # 获取当前主机可用的设备
    if os.path.exists(out):  # output dir
        shutil.rmtree(out)  # delete dir
    os.makedirs(out)  # make new dir
    # 如果设配是GPU 就使用half(float16)  包括模型半精度和输入图片半精度
    half = device.type != 'cpu'  # half precision only supported on CUDA


    # 载入模型和模型参数并调整模型
    model = attempt_load(weights, map_location=device)  # 加载Float32模型
    imgsz = check_img_size(imgsz, s=model.stride.max())  # 确保输入图片的尺寸imgsz能整除stride=32 如果不能则调整为能被整除并返回
    if half:    # 是否将模型从float32 -> float16  加速推理
        model.half()  # to FP16


    # 加载推理数据
    vid_path, vid_writer = None, None
    #采用webcam数据源
    view_img = True
    cudnn.benchmark = True  # 加快常量图像大小推断
    #dataset = LoadStreams(source, img_size=imgsz)  #load 文件夹中视频流

    # 获取每个类别的名字和随机生成类别颜色
    names = model.module.names if hasattr(model, 'module') else model.names
    colors = [[random.randint(0, 255) for _ in range(3)] for _ in range(len(names))]

    # 正式推理
    t0 = time.time()    #记录时间
    # 初始化一个全0tensor进行一次正向推理
    img = torch.zeros((1, 3, imgsz, imgsz), device=device)
    _ = model(img.half() if half else img) if device.type != 'cpu' else None  # run once

    #实例化realsense模块
    #https://www.rs-online.com/designspark/intelpython2-nvidia-jetson-nanorealsense-d435-cn
    pipeline = rs.pipeline()
    # 创建 config 对象:
    config = rs.config()
    #声明RGB和深度视频流
    # config.enable_stream(rs.stream.depth, 640, 480, rs.format.z16, 30)
    config.enable_stream(rs.stream.depth, 640, 480, rs.format.z16,30)
    config.enable_stream(rs.stream.color, 640, 480, rs.format.bgr8,30)

    # 启动数据流
    pipeline.start(config)
    align_to_color = rs.align(rs.stream.color)  #对齐rgb和深度图
    while True:
        start = time.time()
        # Wait for a coherent pair of frames(一对连贯的帧): depth and color
        frames = pipeline.wait_for_frames() #等待最新的影像,wait_for_frames返回的是一個合成的影像
        frames = align_to_color.process(frames) #将上图获取视频帧对齐
                                                            # 使用 process 來實現剛剛宣告的 align 對齊功能
        #将合成帧分开
        depth_frame = frames.get_depth_frame()
        color_frame = frames.get_color_frame()
        # 转换成 numpy 数据
        color_image = np.asanyarray(color_frame.get_data())
        depth_image = np.asanyarray(depth_frame.get_data())
        mask = np.zeros([color_image.shape[0], color_image.shape[1]], dtype=np.uint8)
        mask[0:480, 320:640] = 255

        #对RGB的img进行处理,送入预测模型
        sources = [source]  #数据源
        imgs = [None]
        path = sources  # path: 图片/视频的路径
        imgs[0] = color_image
        im0s = imgs.copy()  # img0s: 原尺寸的图片
        img = [letterbox(x, new_shape=imgsz)[0] for x in im0s]  # img: 进行resize + pad之后的图片
        img = np.stack(img, 0)  #沿着0dim进行堆叠
        img = img[:, :, :, ::-1].transpose(0, 3, 1, 2)  # BGR to RGB, to 3x416x416, uint8 to float32
        img = np.ascontiguousarray(img, dtype=np.float16 if half else np.float32)
                        # ascontiguousarray函数将一个内存不连续存储的数组转换为内存连续存储的数组,使得运行速度更快。
        img /= 255.0  # 0 - 255 to 0.0 - 1.0

        # 处理每一张图片的数据格式
        img = torch.from_numpy(img).to(device) #将numpy转为pytorch的tensor,并转移到运算设备上计算
        # 如果图片是3维(RGB) 就在前面添加一个维度1当中batch_size=1
        # 因为输入网络的图片需要是4为的 [batch_size, channel, w, h]
        if img.ndimension() == 3:
            img = img.unsqueeze(0) #在dim0位置添加维度1,[channel, w, h] -> [batch_size, channel, w, h]
        t1 = time_synchronized() #精确计算当前时间  并返回当前时间
        # 对每张图片/视频进行前向推理
        pred = model(img, augment=opt.augment)[0]


        # 进行NMS
        # conf_thres: 置信度阈值
        # iou_thres: iou阈值
        # classes: 是否只保留特定的类别 默认为None
        # agnostic_nms: 进行nms是否也去除不同类别之间的框 默认False
        # max_det: 每张图片的最大目标个数 默认1000
        # pred: [num_obj, 6] = [5, 6]   这里的预测信息pred还是相对于 img_size(640) 的
        pred = non_max_suppression(pred, opt.conf_thres, opt.iou_thres, classes=opt.classes, agnostic=opt.agnostic_nms)
        t2 = time_synchronized()


        #后续保存或者打印预测信息
        for i, det in enumerate(pred):  # detections per image
            p, s, im0 = path[i], '%g: ' % i, im0s[i].copy()
            s += '%gx%g ' % img.shape[2:]  # print string
            gn = torch.tensor(im0.shape)[[1, 0, 1, 0]]  # normalization gain whwh
            if det is not None and len(det):
                # Rescale boxes from img_size to im0 size
                det[:, :4] = scale_coords(img.shape[2:], det[:, :4], im0.shape).round()

                # Print results
                for c in det[:, -1].unique():
                    n = (det[:, -1] == c).sum()  # detections per class
                    s += '%g %ss, ' % (n, names[int(c)])  # add to string

                # Write results
                for *xyxy, conf, cls in reversed(det):
                    xywh = (xyxy2xywh(torch.tensor(xyxy).view(1, 4)) / gn).view(-1).tolist()  # 归一化为 xywh
                    line = (cls, conf, *xywh) if opt.save_conf else (cls, *xywh)  # label format
                    #获取距离信息
                    distance_list = []
                    mid_pos = [int((int(xyxy[0]) + int(xyxy[2])) / 2), int((int(xyxy[1]) + int(xyxy[3])) / 2)]  # 获得预测框的中心像素位置
                    min_val = min(abs(int(xyxy[2]) - int(xyxy[0])), abs(int(xyxy[3]) - int(xyxy[1])))  # 确定偏差搜索范围
                    # print(box,)
                    #声明一个num为40的随机序列,同一目标预测框每个序号生成一个深度值
                    randnum = 40
                    for i in range(randnum):
                        bias = random.randint(-min_val // 4, min_val // 4)  #生成固定范围内的随机整数为偏差,'//'整数除法
                        dist = depth_frame.get_distance(int(mid_pos[0] + bias), int(mid_pos[1] + bias)) #从深度视频帧中获得目标点的深度信息
                        # print(int(mid_pos[1] + bias), int(mid_pos[0] + bias))
                        if dist:
                            distance_list.append(dist)  #添加到列表
                    #将40个深度数据进行处理
                    distance_list = np.array(distance_list)
                    distance_list = np.sort(distance_list)[
                                    randnum // 2 - randnum // 4:randnum // 2 + randnum // 4]  # 冒泡排序实现中值滤波

                    label = '%s %.2f%s' % (names[int(cls)], np.mean(distance_list), 'm')    #最后取平均值为目标深度
                    plot_one_box(xyxy, im0, label=label, color=colors[int(cls)], line_thickness=3)  #将结果框打印回原图

            # Print time (inference + NMS)
            print('%sDone. (%.3fs)' % (s, t2 - t1))

            # Stream results
            if view_img:
                cv2.imshow(p, im0)
                if cv2.waitKey(1) == ord('q'):  # q to quit
                    raise StopIteration
    print('Done. (%.3fs)' % (time.time() - t0))


if __name__ == '__main__':
    parser = argparse.ArgumentParser()
    # parser.add_argument('--weights', nargs='+', type=str, default='yolov5m.pt', help='model.pt path(s)')
    parser.add_argument('--weights', nargs='+', type=str, default='/home/user/cxking/project/yolo/yolov5/runs/train/exp2/weights/best.pt', help='model.pt path(s)')
    parser.add_argument('--source', type=str, default='inference/images', help='source')  # file/folder, 0 for webcam
    parser.add_argument('--img-size', type=int, default=640, help='inference size (pixels)')
    parser.add_argument('--conf-thres', type=float, default=0.25, help='object confidence threshold')
    parser.add_argument('--iou-thres', type=float, default=0.45, help='IOU threshold for NMS')
    parser.add_argument('--device', default='', help='cuda device, i.e. 0 or 0,1,2,3 or cpu')
    parser.add_argument('--view-img', action='store_true', help='display results')
    parser.add_argument('--save-txt', action='store_true', help='save results to *.txt')
    parser.add_argument('--save-conf', action='store_true', help='save confidences in --save-txt labels')
    parser.add_argument('--save-dir', type=str, default='inference/output', help='directory to save results')
    parser.add_argument('--classes', nargs='+', type=int, help='filter by class: --class 0, or --class 0 2 3')
    parser.add_argument('--agnostic-nms', action='store_true', help='class-agnostic NMS')
    parser.add_argument('--augment', action='store_true', help='augmented inference')
    parser.add_argument('--update', action='store_true', help='update all models')
    opt = parser.parse_args()
    print(opt)

    with torch.no_grad(): # 一个上下文管理器,被该语句wrap起来的部分将不会track梯度
        detect()
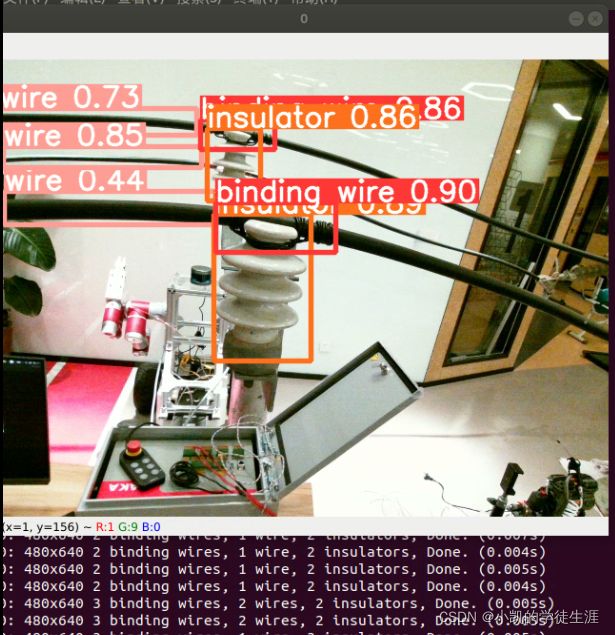
效果展示:
