手把手学爬虫第一弹——数据获取和解析
文章目录
- 前言
- 一、爬虫是什么?
- 二、爬取数据(resquests模块)
-
- 1.简单GET请求
- 2.简单POST请求
- 3.复杂的网络请求
-
- (1). 添加请求头headers
- (2). 验证Cookies
- (3). 会话请求
- (4). 验证请求
- (5). 请求超时与异常捕获
- 4.代理服务
-
- (1). 在代码中写入多个ip
- (2). 获取免费ip存储后使用
-
-
- a. 获取ip
- b. 读取ip并判断是否可用
- c.通过专门的API接口获取ip
-
- 二、解析数据
-
- 1. 正则表达式
-
- (1). 正则表达式基础
-
-
- a. 行定位符
- b.元字符
- c. 限定符
- d.字符类
- e. 排除字符
- f. 选择字符
- g. 转义字符
- h. python中的正则表达式
-
- (2). match() 匹配
- (3). search() 匹配
- (4). findall()匹配
- (5). 字符串处理
- 2. Xpath解析
- 3. BeautifulSoup解析
-
- (1). BeautifulSoup的简单应用
- (2). 获取节点内容
- (3). 方法获取内容
- (4). CSS选择器
- 三、爬虫项目实战
- 总结
前言
Python作为一门人尽皆知的编程语言,其适用范围广泛,今天我就带着大家一起快速入门Python的爬虫,本文我们主要以requests第三方模块的请求为主,其他urllib或者是urllib自行了解,另外我也会带着大家一起对获取到的数据利用正则(re)、xpath、BeautifulSoup进行解析。文章篇幅较长,请耐心看完呦
学爬虫不要忘了爬虫祖师爷,有问题可以去他的网站看看。崔庆才个人站点
一、爬虫是什么?
爬虫,顾名思义,利用代码代替人手动获取网络上的信息的操作,爬虫加快了我们获取互联网海量信息的速度。
二、爬取数据(resquests模块)
1.简单GET请求
对于部分网页我们只需要通过get请求就可以获取到网页信息,对于这部分网页我们只需要使用requests的get请求即可获取到网页信息,下面以百度首页为例:
import requests	#导入requests模块

response = requests.get('https://www.baidu.com')    #发起get请求
result = response.content.decode('utf-8')		#对请求内容进行编码
print('响应状态码:', response.status_code)		#打印响应状态码
print('请求内容为:', result)			#打印请求结果
2.简单POST请求
post请求方式也叫作提交表单,表单中的数据就是请求参数。请求参数可以是列表、元组或者是JSON格式。
import requests    # 导入模块
import json

data = {                    # 请求参数
    '1': '能力是有限的,而努力是无限的。',
    '2': '星光不问赶路人,时光不负有心人。'
}
response = requests.post('http://httpbin.org/post', data=data)          # 发起请求
result = json.loads(response.text)        # 数据格式化
print(result)
3.复杂的网络请求
(1). 添加请求头headers
部分网页为了保护数据会对访问者身份进行校验,如果我们的程序代码直接发起请求的话会被服务器拒绝访问,针对这种情况我们需要为我们的请求添加请求头,这样就可以对我们的请求进行伪装,从而成功访问网页内容。
import requests    # 导入模块
import json

url = 'https://www.baidu.com'
headers = {'User-Agent': 'Mozilla/5.0 (Windows NT 10.0; WOW64) AppleWebKit/537.36 (KHTML, like Gecko) Chrome/92.0.4515.159 Safari/537.36'}
response = requests.get(url=url, headers=headers)
result = response.content.decode('utf-8')
print('响应状态码:', response.status_code)
print('请求内容为:', result)
(2). 验证Cookies
有些需要登录的网页通常会通过Cookies进行登录验证,对于这类网页我们需要获取到登录时的Cookies,这样就可以获取到登录后才可以查看的数据了,下面我们以豆瓣为例。
import requests

url = "https://www.douban.com/"
cookies = 'll="118254"; bid=zIWp62M93rc; apiKey=; __utma=30149280.1537777336.1631262226.1631262226.1631262226.1; __utmc=30149280; __utmz=30149280.1631262226.1.1.utmcsr=baidu|utmccn=(organic)|utmcmd=organic; __utmt=1; user_data={"area_code":"+86","number":"15071579625","code":"8567"}; last_login_way=phone; ap_v=0,6.0; __gads=ID=9daaafc881690f95:T=1631262281:S=ALNI_MaICBMAwA7Z3TFZJ92H_KR2rzdLpA; push_noty_num=0; push_doumail_num=0; __utmv=30149280.23665; __utmb=30149280.6.10.1631262226; vtoken=phone_reset_password 9c00c1cb111d496eb620336328857dd6; _pk_id.100001.2fad=d0329b8128734456.1631262400.1.1631262400.1631262400.; _pk_ses.100001.2fad=*; login_start_time=1631262407870'
headers = {
    "User-Agent": "Mozilla/5.0 (Windows NT 10.0; WOW64) AppleWebKit/537.36 (KHTML, like Gecko) Chrome/75.0.3770.100 Safari/537.36"
}

# 创建RequestsCookieJar对象,用于设置Cookies信息
cookies_jar = requests.cookies.RequestsCookieJar()
for cookie in cookies.split(';'):
    key, value = cookie.split('=', 1)
    cookies_jar.set(key, value)

# 发起请求
response = requests.get(url, headers=headers, cookies=cookies_jar)
result = response.text
print('响应状态码:', response.status_code)
print('请求内容为:', result)
(3). 会话请求
前面我们利用Cookies实现了模拟登陆,但这样不仅操作麻烦,而且部分网页的Cookies会有时间限制,一段时间以后Cookies就会过期,为了解决这一问题我们可以使用requests提供的session对象。
import requests  # 导入模块

s = requests.Session()  # 创建一个会话对象
data = {'username': 'mrsoft', 'password': 'mrsoft'}
response_1 = s.post('http://site2.rjkflm.com:666/index/index/chklogin.html', data=data)  # 发送登录请求
response_2 = s.get('http://site2.rjkflm.com:666')  # 获取登陆后的页面
print('登录信息:', response_1.text)
print('登录后页面:', response_2.text)
(4). 验证请求
我们在访问某些页面的时候会弹出验证,要求我们输入用户名和密码,这时就可以使用requests自带的验证功能,只需要在请求方法中填写auth参数,该参数的值是一个HTTPBasicAuth对象。
import requests  # 导入模块
from requests.auth import HTTPBasicAuth   # 导入HTTPBasicAuth类

url = 'http://site2.rjkflm.com:666/spider/auth/'
auth = HTTPBasicAuth('admin', 'admin')
response = requests.get(url=url, auth=auth)
print(response.text)
(5). 请求超时与异常捕获
我们在访问一个网页时可能会由于网络原因或者是服务器原因导致请求超时或者产生异常,这时候我们就可以为请求设置超时时间和异常捕获。
import requests    # 导入模块

try:
    url = 'https://www.baidu.com'
    response = requests.get(url=url, timeout=0.01)   # 超时时间为0.01秒
    print('响应状态码:', response.status_code)
except Exception as e:
    print('异常为:', str(e))
4.代理服务
在爬取一些网页时我们肯那个会遇到一种情况,频繁访问后网页无法继续爬取了,这时候一般是我们的行为被服务器认定为恶意爬取,对我们的访问ip进行了屏蔽。针对于这种情况我们需要采用代理IP的形式访问。
(1). 在代码中写入多个ip
import requests      # 导入网络请求模块
# 头部信息
headers = {'User-Agent': 'Mozilla/5.0 (Windows NT 10.0; Win64; x64) '
                         'AppleWebKit/537.36 (KHTML, like Gecko) '
                         'Chrome/72.0.3626.121 Safari/537.36'}
proxy = {'http': 'http://117.88.176.38:3000',
         'https': 'https://117.88.176.38:3000'}  # 设置代理ip与对应的端口号
try:
    # 对需要爬取的网页发送请求,verify=False不验证服务器的SSL证书
    response = requests.get('http://2020.ip138.com', headers=headers, proxies=proxy, verify=False, timeout=3)
    print(response.status_code)  # 打印响应状态码
except Exception as e:
    print('错误异常信息为:',e)    # 打印异常信息
(2). 获取免费ip存储后使用
出现上面的情况多半是我们选择的ip为无效ip,针对这种情况我们一般会统一获取免费的代理ip,然后保存至文件,每次请求时都换一个新的IP.
a. 获取ip
import requests  # 导入网络请求模块
from lxml import etree  # 导入HTML解析模块
import pandas as pd  # 导入pandas模块
import time

# 头部信息
headers = {'User-Agent': 'Mozilla/5.0 (Windows NT 10.0; WOW64) AppleWebKit/537.36 (KHTML, like Gecko) Chrome/92.0.4515.159 Safari/537.36'}
ip_list = []
ip_table = pd.DataFrame(columns=['ip'])  # 创建临时表格数据
for i in range(1, 11):
    print("正在爬取第{}页".format(i))
    url = 'http://www.ip3366.net/?stype=1&page={}'.format(i)
    # 发送网络请求
    response = requests.get(url=url, headers=headers)
    response.encoding = 'gb2312'  # 设置编码方式
    if response.status_code == 200:  # 判断请求是否成功
        html = etree.HTML(response.text)  # 解析HTML
        ip = html.xpath('//*[@id="list"]/table/tbody/tr/td[1]/text()')  # 获取ip内容
        port = html.xpath('//*[@id="list"]/table/tbody/tr/td[2]/text()')  # 获取端口号
        for j in range(0, 10):
            my_ip = ip[j] + ':' + port[j]
            print('代理ip为:', ip[j], '对应端口为:', port[j])
            ip_list.append(my_ip)
    time.sleep(1)
ip_table['ip'] = ip_list  # 将提取的ip保存至excel文件中的ip列
# 生成xlsx文件
ip_table.to_excel('E:/python/pythonProject3/venv/Include/ip.xlsx', sheet_name='data')
b. 读取ip并判断是否可用
这种方式存在的问题就是免费网站获取的ip有国内的有国外的,有可用的有不可用的,所以存在ip是失效的问题,解决办法就是掏钱买专门的api接口。
import time
import requests  # 导入网络请求模块
import pandas    # 导入pandas模块
from lxml import etree  # 导入HTML解析模块

ip_table = pandas.read_excel('E:/python/pythonProject3/venv/Include/ip.xlsx')  # 读取代理IP文件内容
ip = ip_table['ip']                      # 获取代理ip列信息
# 头部信息
headers = {'User-Agent': 'Mozilla/5.0 (Windows NT 10.0; WOW64) AppleWebKit/537.36 (KHTML, like Gecko) Chrome/92.0.4515.159 Safari/537.36',
           'Accept-Language': 'zh-CN,zh;q=0.9'}
# 循环遍历代理IP并通过代理发送网络请求
for i in ip:
    proxies = {'http': 'http://{}'.format(i),
               'https': 'https://{}'.format(i)}
    try:
            # verify=False不验证服务器的SSL证书
        response = requests.get('http://2021.ip138.com/', headers=headers, proxies=proxies, verify=False, timeout=10)
        if response.status_code == 200:   # 判断请求是否成功,请求成功说明代理IP可用
            response.encoding = 'utf-8'     # 进行编码
            html = etree.HTML(response.text)  # 解析HTML
            info_1 = str(html.xpath('/html/body/p[1]/text()[1]')).replace("['\n", "").replace("[']", "")
            info_2 = str(html.xpath('/html/body/p[1]/a/text()')).replace("['", "").replace("']", "")
            info_3 = str(html.xpath('/html/body/p[1]/text()[2]')).replace("['] ", "").replace("\n']", "")
            print(info_1 + info_2 + info_3)                # 输出当前ip匿名信息
            time.sleep(3)
    except Exception as e:
        # pass
        print('错误异常信息为:', e)    # 打印异常信息
c.通过专门的API接口获取ip
import requests  # 导入网络请求模块
from lxml import etree  # 导入HTML解析模块
import time

url = 'api接口'
headers = {'User-Agent': 'Mozilla/5.0 (Windows NT 10.0; WOW64) AppleWebKit/537.36 (KHTML, like Gecko) Chrome/92.0.4515.159 Safari/537.36'}
response = requests.get(url=url, headers=headers)
ip = str(response.text).replace("\r", "").replace("\n", "")
proxies = {'http': 'http://{}'.format(ip),
           'https': 'https://{}'.format(ip)}
print(proxies)
try:
    # verify=False不验证服务器的SSL证书
    response = requests.get('http://2021.ip138.com/', headers=headers, proxies=proxies, verify=False, timeout=10)
    if response.status_code == 200:  # 判断请求是否成功,请求成功说明代理IP可用
        response.encoding = 'utf-8'  # 进行编码
        html = etree.HTML(response.text)  # 解析HTML
        info_1 = str(html.xpath('/html/body/p[1]/text()[1]')).replace("['\n", "").replace("[']", "")
        info_2 = str(html.xpath('/html/body/p[1]/a/text()')).replace("['", "").replace("']", "")
        info_3 = str(html.xpath('/html/body/p[1]/text()[2]')).replace("['] ", "").replace("\n']", "")
        print(info_1 + info_2 + info_3)  # 输出当前ip匿名信息
        time.sleep(3)
except Exception as e:
    # pass
    print('错误异常信息为:', e)  # 打印异常信息
二、解析数据
当我们使用爬虫的时候大多数是为了爬取我们需要的部分数据,但直接获取到的往往不是我们需要的,这时候就需要我们对于爬取到的数据进行解析,进而在数据中找到我们需要的数据,接下来我将和大家一起使用正则(re)、Xpath、Beautiful Soup进行数据解析工作。
1. 正则表达式
正则表达式顾名思义就是由字符组成的表达式,这些表达式根据不同的组合可以匹配字符串中需要的部分。
(1). 正则表达式基础
a. 行定位符
行定位符用于描述字符串的边界。
| 符号 | 作用 |
|---|---|
| ^ | 表示行的开始 |
| $ | 表示行的结尾 |
b.元字符
元字符使用:
\bmr\w*\b

\b表示单词的边界
mr表示匹配开头是mr的字串
\e*表示匹配任意数量的字母或数字
# 该表达式可以匹配mrsoft、mrsbook、mr1234等字符串
| 代码 | 说明 |
|---|---|
| . | 匹配除换行符以外的任意字符 |
| \w | 匹配字母、数字、下划线、汉字 |
| \W | 匹配除了字母、数字、下划线、汉字以外的字符(与\w相反) |
| \s | 匹配任意空白符 |
| \S | 匹配除单个空白符(包括Tab和换行符)以外所有字符 |
| \d | 匹配数字 |
| \D | 匹配任意非数字 |
| \A | 从字符串开始处匹配 |
| \Z | 从字符串结束处匹配 |
| \b | 匹配一个单词的边界,单词分界符通常是空格、标点或者换行 |
| \B | 匹配非单词边界 |
| ^ | 匹配字符串的开始 |
| $ | 匹配字符串的结束 |
| () | 被括起来的表达式将作为分组 |
c. 限定符
上面提到"\w*"可以匹配任意数量的字母或数字。如果我们要匹配一定数量的数字,比如11位数的手机号?这时候就可以用限定符来实现。
^\d{11}$
# 匹配11位数的电话号码
| 符号 | 说明 | 举例 |
|---|---|---|
| ? | 匹配前面的字符零次或一次 | colour?r 可以匹配到colour和color |
| + | 匹配前面的字符一次或多次 | go+gle 可以匹配gogle到goooo…gle |
| * | 匹配前面的字符零次或多次 | go*gle 可以匹配ggle到goooo…gle |
| {n} | 匹配前面的字符串n次 | go{2}gle 只可以匹配google |
| {n,} | 匹配前面的字符最少n次 | go{2,}gle 可以匹配从google到goooo…gle |
| {n,m} | 匹配前面的字符最少n次,最多m次 | employe{0,2} 可以匹配employ、employe\employee |
d.字符类
假如我们要匹配所有大小写字母和数字,你会怎么做?列举所有的可能?显然不是,这时候我们可以使用正则表达式提供的字符类,将我们的条件放在中括号里面,例如:
[a-z0-9A-Z] # 可以匹配所有字母和数字
e. 排除字符
上面我们可以利用字符类获取我们想要的字符,那如何排除我们不需要的字符呢,很简单,在上面的表达式前面加一个^就可以了,例如:
[^a-zA-Z] # 可以匹配一个不是字母的字符
f. 选择字符
如果我们要在一堆字符里面找出所有的手机号码或者是身份证号码,如何运用正则表达式呢?分析一下身份证号码的组成,一共18位,前17位位数字,最后一位为数字或者是X,根据这一描述,我们显然可以得出如下的表达式:
[^\d{18}$|(^\d{17}(\d|X|x)$)
g. 转义字符
正则表达式的转义字符和python的转义字符基本没什么区别,例如当我们需要匹配的是个ip地址时,192.168.1.1中的.如何匹配呢?前面我们说到正则里面的点可以匹配一个任意字符,那这里就需要对其进行转义.
[1-9]{1,3}\.[0-9]{1,3}\.[0-9]{1,3}\.[0-9]{1,3} # 匹配ip地址
h. python中的正则表达式
在python里面我们一般不会写模式字符串,即在转义的地方加上\,这样会导致表达式中有大量的\,取而代之的是原生表达式,在表达式前面加上 R 或 r.
(2). match() 匹配
match()从字符串的开始位置匹配,如果在起始位置匹配成功就直接返回结果,反之返回None.
re.match(‘正则表达式’, ‘待匹配字符串’, ‘修饰符’)
例如:
re.match(‘mr_\w+’, ‘MR_SHOPmr_shop’, re.I)
I 表示不区分大小写
| 表达式 | 匹配效果 | 匹配结果 |
|---|---|---|
| re.match(‘mr_\w+’, ‘MR_SHOPmr_shop’, re.I) | 匹配以指定字符串开头 | |
| re,match(".ello", “hello”) | 匹配任意开头的字符串 |
(3). search() 匹配
search()方法不同于match()方法,search()会在整个字符串搜索第一匹配的值,匹配成功就返回,否则返回None。
re,search(“mr_\w+”, “MR_SHOP”, re.I)
re,search(“mr_\w+”, “项目名称 MR_SHOP”, re.I)
两个表示匹配结果一样
| 表达式 | 匹配效果 |
|---|---|
| \d? | 匹配多个数字,可有可无 |
| \b | 表示字符串的边界,可以是开头、结尾、空格以及换行 |
(4). findall()匹配
findall()方法会搜索整个字符串寻找符合要求的字符,并以列表的形式返回,如果没有匹配到就会返回空列表。
| 表达式 | 匹配效果 |
|---|---|
| re.findall(‘mr_\w+’, ‘MR_SHOP mr_shop’, re.I) | 所有指定字符开头的字符串 |
| re.findall(‘https://(.*)/’, ‘http://www.hao123.com/’) | 贪婪匹配,获取//开始到/前面的所有字符 |
| re.findall(‘https://(.*?)/’, ‘http://www.hao123.com/’) | 非贪婪匹配,这样可能匹配不到任何字符,因为匹配结果会尽可能少 |
(5). 字符串处理
- 替换字符串
re.sub(‘正则表达式’, ‘要替换的字符串’, ‘要被替换的字符串’, ‘替换的最大次数,默认为0’, 修饰符)
import re
str = r'1[34578]\d{9}'
string = '中奖号码为3867363546 联系电话为:15071567345'
result = re.sub(str, '1**********', string)
print(result)
# 输出结果为: 中奖号码为3867363546 联系电话为:1**********
- 分割字符串
re.split(‘正则表达式’, ‘要匹配的字符串’, 最大拆分次数, 修饰符)
import re
str = r'[?|&]'
url = 'http://www.baidu.com?a=12&b=3'
result = re.split(str, url)
print(result)
# 输出结果为: ['http://www.baidu.com', 'a=12', 'b=3']
2. Xpath解析
上一节我们学了正则表达式清洗数据,这一节我们学习一种更加便捷的数据清洗解析方式,XPath。这是一种基于XML的路径语言。
Xpath常用的路径表示:
| 表达式 | 描述 |
|---|---|
| nodename | 此节点的所有子节点 |
| / | 从当前节点选取子节点 |
| // | 从当前节点选取子孙节点 |
| . | 选取当前节点 |
| … | 选取当前节点的父节点 |
| @ | 选取属性class |
| * | 选取所有节点 |
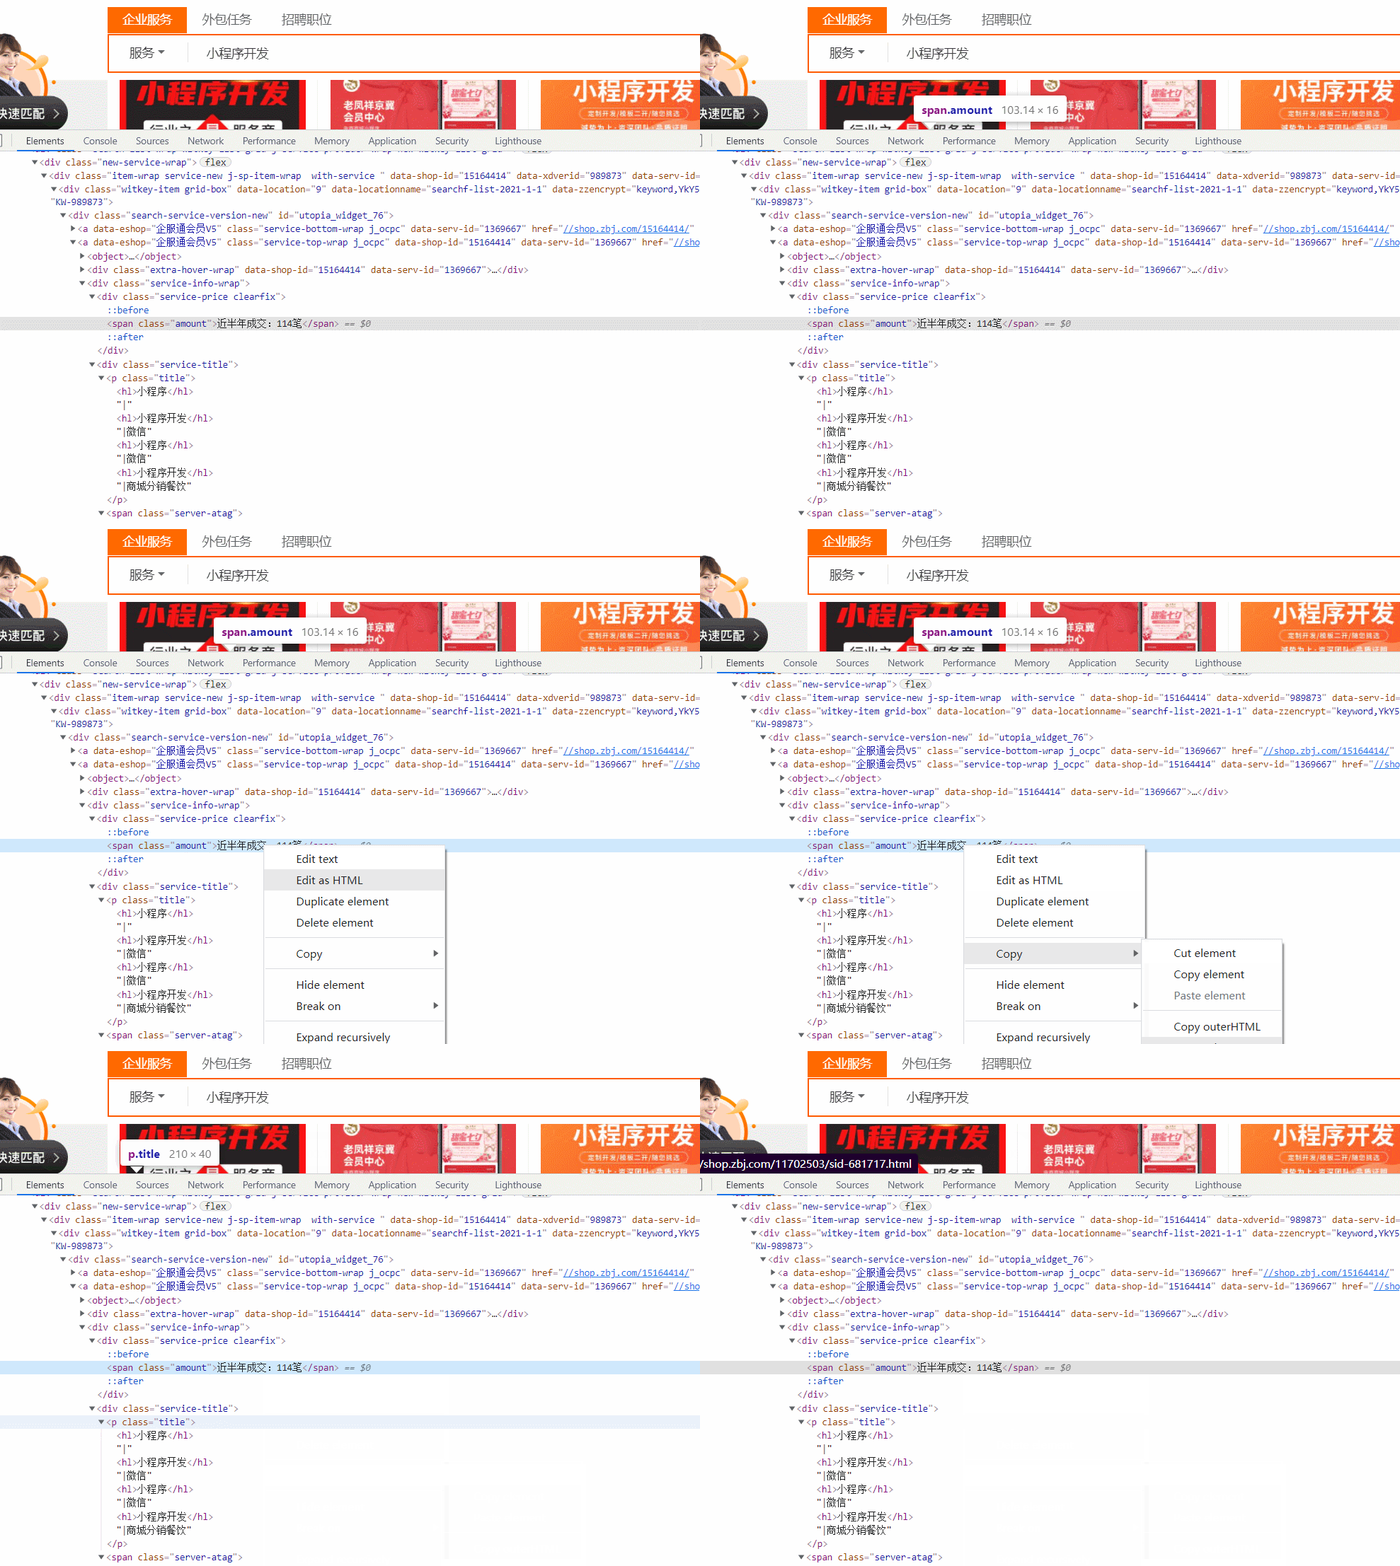
这种解析方式主要熟悉网页结构,利用上面的路径表达式选取对应的路径。浏览器也提供了直接复制的Xpath路径,使用如下:

这里我就不再详细介绍这种解析方法,大家可以参考这位博主的文章,写的很详细了!Xpath解析数据
from lxml import etree
import requests

url = "https://wuhan.zbj.com/search/f/?type=new&kw=%E5%B0%8F%E7%A8%8B%E5%BA%8F%E5%BC%80%E5%8F%91"

resp = requests.get(url)
xml = resp.text
tree = etree.HTML(xml)
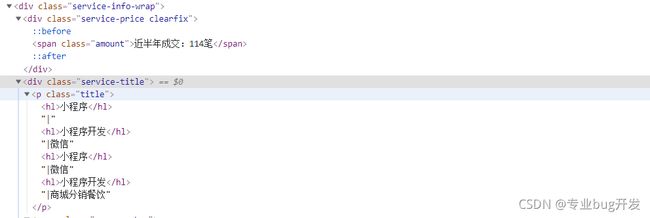
res = tree.xpath('//div[@class="service-info-wrap"]')
# print(res)
for item in res:
    price = item.xpath('./div[@class="service-price clearfix"]/span/text()')
    title = item.xpath('./div[@class="service-title"]/p/text()')
    result = {
        "price": ''.join(price),
        "title": ''.join(title)
    }
    print(result)
3. BeautifulSoup解析
BeautifulSoup是一个用于从HTML和XML中提取数据的Python库。
(1). BeautifulSoup的简单应用
使用第一步先导入bs4库,然后创建一个BeautifulSoup对象指定选用的解析器。
from bs4 import BeautifulSoup  # 导入BeautifulSoup库

# 创建模拟HTML代码的字符串
html_doc = """


第一个 HTML 页面


body 元素的内容会显示在浏览器中。
title 元素的内容会显示在浏览器的标题栏中。


"""
# 创建一个BeautifulSoup对象,获取页面正文
soup = BeautifulSoup(html_doc, features="lxml")
print(soup)                  # 打印解析的HTML代码
print(type(soup))            # 打印数据类型
# 这样我们就完成了数据的第一步处理工作
(2). 获取节点内容
下面以一个例子加代码注释解释如何获取节点内容。
- 获取节点源代码
from bs4 import BeautifulSoup  # 导入BeautifulSoup库

# 创建模拟HTML代码的字符串
html_doc = """


第一个 HTML 页面


body 元素的内容会显示在浏览器中。
title 元素的内容会显示在浏览器的标题栏中。


"""

# 创建一个BeautifulSoup对象,获取页面正文
soup = BeautifulSoup(html_doc, features="lxml")
"""
    获取节点内容
"""
print('head节点内容为:\n', soup.head)               # 打印head节点
- 获取节点属性
在已选择的节点后面加上.attrs即可
# 创建模拟HTML代码的字符串
html_doc = """


    横排响应式登录


"""
# 创建一个BeautifulSoup对象,获取页面正文
soup = BeautifulSoup(html_doc, features="lxml")
print('meta节点中属性如下:\n',soup.meta.attrs)
print('link节点中属性如下:\n',soup.link.attrs)
- 获取节点的文本内容
在已获取的节点后面加上.string即可。
from bs4 import BeautifulSoup  # 导入BeautifulSoup库

# 创建模拟HTML代码的字符串
html_doc = """


    横排响应式登录


"""
# 创建一个BeautifulSoup对象,获取页面正文
soup = BeautifulSoup(html_doc, features="lxml")
print('titlt节点中的文本如为:', soup.title.string)
(3). 方法获取内容
- find_all()方法——获取所有符合条件的节点
find_all(name=None, attrs={}, recursive=True, text=None, limit=None, **kwaigs)
- find_all(name)
通过节点名称获取内容。
soup.find_all(name=‘标签名’)
- find_all(attrs)
通过指定属性获取内容
soup.find_all(class=‘newslist’)
- fina_all(tetx)
获取指定文本内容。
soup.find_all(text=‘文本内容’)
- find()——获取第一个匹配的节点
find()的各项参数和find_all一样,不同的是前者可以匹配所有符合匹配条件的字符,后者只能匹配第一个符合条件的字符
tip:还有很多其他不常用的方法,自行查阅了解。
(4). CSS选择器
- 通过标签查找
print soup.select('title') # 查找title标签
- 通过类名查找
print soup.select('.sister') # 通过class类名查找
- 通过id名查找
print soup.select('#link1') # 通过id="link2"查找
- 组合查找
print soup.select('p #link1')
# 查找p标签下id="link1"的内容

print soup.select("head > title")
# 查找head标签下的title标签的内容
- 属性查找
print soup.select('a[class="sister"]')
# 查找a便签而且class="sister"的内容
三、爬虫项目实战
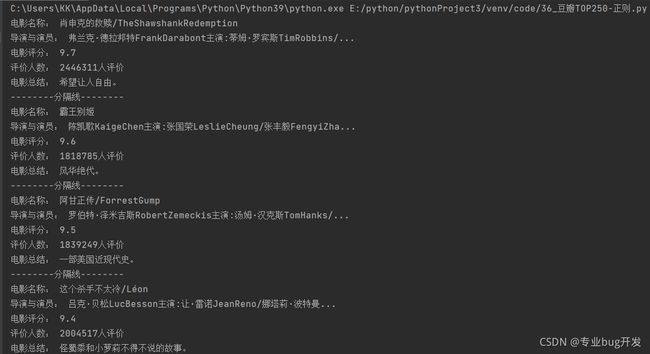
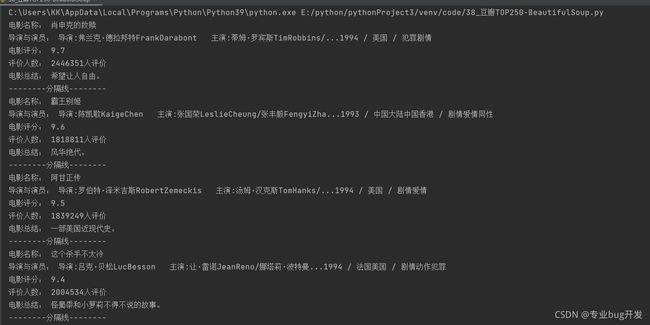
目标:爬取豆瓣电影top250的相关信息
第二页url: https://movie.douban.com/top250?start=25&filter=
第三页url: https://movie.douban.com/top250?start=50&filter=
正则表达式:
import re # 导入re模块
import time # 导入时间模块
import random # 导入随机模块
import requests # 导入网络请求模块
header = {'User-Agent': 'Mozilla/5.0 (Windows NT 10.0; WOW64) AppleWebKit/537.36 (KHTML, like Gecko) Chrome/92.0.4515.159 Safari/537.36'}
# 处理字符串中的空白符,并拼接字符串
def processing(strs):
s = '' # 定义保存内容的字符串
for n in strs:
n = ''.join(n.split()) # 去除空字符
n = n.replace(" ", "")
s = s + n # 拼接字符串
return s # 返回拼接后的字符串
# 获取电影信息
def get_movie_info(url):
response = requests.get(url, headers=header) # 发送网络请求
result = response.text
li_all = re.findall(r'[\s\S]*? ', result)
# print(li_all[0])
for item in li_all:
names = re.findall(r'(.*)', item) # 获取电影名字相关信息
name = processing(names) # 处理电影名称信息
infos = re.findall(r'导演:(.*?)
', item) # 获取导演、主演等信息
info = processing(infos) # 处理导演、主演等信息
scores = re.findall(r'', item) # 获取电影评分
score = processing(scores)
evaluations = re.findall(r'(.*)', item) # 获取评分人数
evaluation = processing(evaluations)
summarys = re.findall(r'(.*)', item) # 获取评分人数
summary = processing(summarys)
print('电影名称:', name)
print('导演与演员:', info)
print('电影评分:', score)
print('评价人数:', evaluation)
print('电影总结:', summary)
print('--------分隔线--------')
if __name__ == '__main__':
for i in range(0, 25, 25): # 每页25为间隔,实现循环,只爬取前5页
# 通过format替换切换页码的url地址
url = 'https://movie.douban.com/top250?start={page}&filter='.format(page=i)
get_movie_info(url) # 调用爬虫方法,获取电影信息
time.sleep(random.randint(1, 3)) # 等待1至3秒随机时间
Xpath:
from lxml import etree  # 导入etree子模块
import time  # 导入时间模块
import random  # 导入随机模块
import requests  # 导入网络请求模块

header = {'User-Agent': 'Mozilla/5.0 (Windows NT 10.0; WOW64) AppleWebKit/537.36 (KHTML, like Gecko) Chrome/92.0.4515.159 Safari/537.36'}


# 处理字符串中的空白符,并拼接字符串
def processing(strs):
    s = ''  # 定义保存内容的字符串
    for n in strs:
        n = ''.join(n.split())  # 去除空字符
        s = s + n  # 拼接字符串
    return s  # 返回拼接后的字符串


# 获取电影信息
def get_movie_info(url):
    response = requests.get(url, headers=header)  # 发送网络请求
    html = etree.HTML(response.text)  # 解析html字符串
    div_all = html.xpath('//div[@class="info"]')
    for div in div_all:
        names = div.xpath('./div[@class="hd"]/a//span/text()')  # 获取电影名字相关信息
        name = processing(names)  # 处理电影名称信息
        infos = div.xpath('./div[@class="bd"]/p/text()')  # 获取导演、主演等信息
        info = processing(infos)  # 处理导演、主演等信息
        score = div.xpath('./div[@class="bd"]/div/span[2]/text()')  # 获取电影评分
        evaluation = div.xpath('./div[@class="bd"]/div/span[4]/text()')  # 获取评价人数
        # 获取电影总结文字
        summary = div.xpath('./div[@class="bd"]/p[@class="quote"]/span/text()')
        print('电影名称:', name)
        print('导演与演员:', info)
        print('电影评分:', score)
        print('评价人数:', evaluation)
        print('电影总结:', summary)
        print('--------分隔线--------')


if __name__ == '__main__':
    for i in range(0, 125, 25):  # 每页25为间隔,实现循环,只爬取前5页
        # 通过format替换切换页码的url地址
        url = 'https://movie.douban.com/top250?start={page}&filter='.format(page=i)
        get_movie_info(url)  # 调用爬虫方法,获取电影信息
        time.sleep(random.randint(1, 3))  # 等待1至3秒随机时间
BeautifulSoup:
from bs4 import BeautifulSoup
import time  # 导入时间模块
import random  # 导入随机模块
import requests  # 导入网络请求模块

header = {'User-Agent': 'Mozilla/5.0 (Windows NT 10.0; WOW64) AppleWebKit/537.36 (KHTML, like Gecko) Chrome/92.0.4515.159 Safari/537.36'}


# 处理字符串中的空白符,并拼接字符串
def processing(strs):
    s = ''  # 定义保存内容的字符串
    for n in strs:
        s = s + n.get_text()  # 拼接字符串
        s = s.replace(' ', '').replace('\n', '')  # 去除空字符
    return s  # 返回拼接后的字符串


# 获取电影信息
def get_movie_info(url):
    response = requests.get(url, headers=header)  # 发送网络请求
    result = response.text
    soup = BeautifulSoup(result, 'lxml')
    # print(soup)
    li_all = soup.select('div[class="item"]')
    # print(li_all)
    for item in li_all:
        names = item.select('span[class="title"]')[0].get_text()  # 获取电影名字相关信息
        # name = processing(names)  # 处理电影名称信息
        infos = item.select('p[class=""]')  # 获取导演、主演等信息
        info = processing(infos)  # 处理导演、主演等信息
        scores = item.select('span[class="rating_num"]')# .get_text()  # 获取电影评分
        score = processing(scores)
        evaluations = item.select('span:nth-child(4)')# .get_text()  # 获取评分人数
        evaluation = processing(evaluations)
        summarys = item.select('span[class="inq"]')  # 获取简评
        summary = processing(summarys)
        print('电影名称:', names)
        print('导演与演员:', info)
        print('电影评分:', score)
        print('评价人数:', evaluation)
        print('电影总结:', summary)
        print('--------分隔线--------')


if __name__ == '__main__':
    for i in range(0, 25, 25):  # 每页25为间隔,实现循环,只爬取前5页
        # 通过format替换切换页码的url地址
        url = 'https://movie.douban.com/top250?start={page}&filter='.format(page=i)
        get_movie_info(url)  # 调用爬虫方法,获取电影信息
        time.sleep(random.randint(1, 3))  # 等待1至3秒随机时间
总结
爬虫真正说起来并不难,难就难在于如何正确解析网页数据,上面我给大家讲述了常用的三种方法,几乎每一种都有例子,希望大家可以认真看完这篇文章,一边看一边跟这些,相信你也可以很快掌握基础的数据爬取和数据解析。
后面我将会继续分享如何使用爬虫框架、如何爬去动态网页、如何应对网站验证码反爬等一系列操作,一起期待呦~
文章整理历时较长,全文20000多字,如有不做或错误,欢迎指正
author: KK
time :2021年9月16日00:14:06
flag:3/30


