Python大数据分析之实时疫情数据可视化(含代码)
文章目录
- 一.Python实时数据爬取
- 二.Matplotlib绘制全国各地区柱状图
- 三.数据存储及Seaborn绘制全国各地区柱状图
- 四.Seaborn绘制全国各地区对比柱状图
一.Python实时数据爬取
目标网站是腾讯新闻网实时数据,其原理主要是通过Requests获取Json请求,从而得到各省、各市的疫情数据。
爬虫目标网站:
https://news.qq.com/zt2020/page/feiyan.htm
第一步 分析网站
通过浏览器“审查元素”查看源代码及“网络”反馈的消息,如下图所示:

第二步 发送请求并获取Json数据
通过分析url地址、请求方法、参数及响应格式,可以获取Json数据,注意url需要增加一个时间戳。下面代码展示了获取数据的键值及34个省份。
# -*- coding: utf-8 -*-
#------------------------------------------------------------------------------
# 第一步:抓取数据
#------------------------------------------------------------------------------
import time, json, requests
# 抓取腾讯疫情实时json数据
url = 'https://view.inews.qq.com/g2/getOnsInfo?name=disease_h5&callback=&_=%d'%int(time.time()*1000)
data = json.loads(requests.get(url=url).json()['data'])
#print(data)
print(data.keys())

# 统计省份信息(34个省份 湖北 广东 河南 浙江 湖南 安徽....)
num = data['areaTree'][0]['children']
print(len(num))
for item in num:
    print(item['name'],end=" ")   # 不换行
else:
    print("\n")                     # 换行
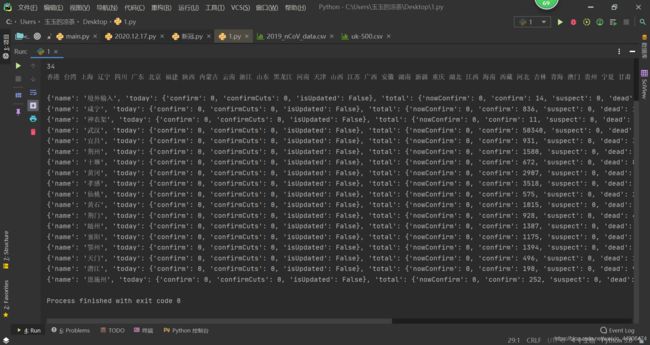
输出结果如下图所示,其顺序按照确诊人数排序。

第三步 获取湖北省疫情数据
接着通过 num[23][‘children’] 获取湖北省的疫情数据,代码如下:
# ------------------------------------------------------------------------------
# 第一步:抓取数据
# ------------------------------------------------------------------------------
import time, json, requests

# 抓取腾讯疫情实时json数据
url = 'https://view.inews.qq.com/g2/getOnsInfo?name=disease_h5&callback=&_=%d' % int(time.time() * 1000)
data = json.loads(requests.get(url=url).json()['data'])
#print(data)
#print(data.keys())

# 统计省份信息(34个省份 湖北 广东 河南 浙江 湖南 安徽....)
num = data['areaTree'][0]['children']
print(len(num))
for item in num:
    print(item['name'], end=" ")  # 不换行
else:
    print("\n")  # 换行

# 显示湖北省数据
hubei = num[23]['children']
for data in hubei:
    print(data)
同样的方法可以获取各省份的数据,比如 num[7][‘children’] 表示北京疫情数据,我们设置循环就能获取所有数据。其数据包括当日数据(today)和累计数据(total),confirm表示确诊、suspect表示疑似、dead表示死亡、heal表示治愈。
第四步 获取各省确诊人数
注意,初始化每个省份人数为0,然后循环累加该省所有城市的确诊人数,调用 city_data[‘total’][‘confirm’] 获取各城市的确诊数据。
# -*- coding: utf-8 -*-

#------------------------------------------------------------------------------
# 第一步:抓取数据
#------------------------------------------------------------------------------
import time, json, requests
# 抓取腾讯疫情实时json数据
url = 'https://view.inews.qq.com/g2/getOnsInfo?name=disease_h5&callback=&_=%d'%int(time.time()*1000)
data = json.loads(requests.get(url=url).json()['data'])
print(data)
print(data.keys())

# 统计省份信息(34个省份 湖北 广东 河南 浙江 湖南 安徽....)
num = data['areaTree'][0]['children']
print(len(num))
for item in num:
    print(item['name'],end=" ")   # 不换行
else:
    print("\n")                     # 换行

# 显示湖北省数据
hubei = num[23]['children']
for item in hubei:
    print(item)
else:
    print("\n")

# 解析数据(确诊 疑似 死亡 治愈)
total_data = {}
for item in num:
    if item['name'] not in total_data:
        total_data.update({item['name']:0})
    for city_data in item['children']:
        total_data[item['name']] +=int(city_data['total']['confirm'])
print(total_data)
二.Matplotlib绘制全国各地区柱状图
首先,我们调用Matplotlib绘制全国各地区的确诊人数柱状图,帮助大家回忆其基本用法。total_data为字典变量键值对,比如{‘湖北’: 68149, ‘广东’:2038,…}
# ------------------------------------------------------------------------------
# 第二步:绘制柱状图
# ------------------------------------------------------------------------------
import matplotlib.pyplot as plt
import numpy as np

plt.rcParams['font.sans-serif'] = ['SimHei']  # 用来正常显示中文标签
plt.rcParams['axes.unicode_minus'] = False  # 用来正常显示负号

# 获取数据
names = total_data.keys()
nums = total_data.values()
print(names)
print(nums)

# 绘图
plt.figure(figsize=[10, 6])
plt.bar(names, nums, width=0.3, color='green')

# 设置标题
plt.xlabel("地区", fontproperties='SimHei', size=12)
plt.ylabel("人数", fontproperties='SimHei', rotation=90, size=12)
plt.title("全国疫情确诊数对比图", fontproperties='SimHei', size=16)
plt.xticks(list(names), fontproperties='SimHei', rotation=-45, size=10)
# 显示数字
for a, b in zip(list(names), list(nums)):
    plt.text(a, b, b, ha='center', va='bottom', size=6)
plt.show()
输出结果:
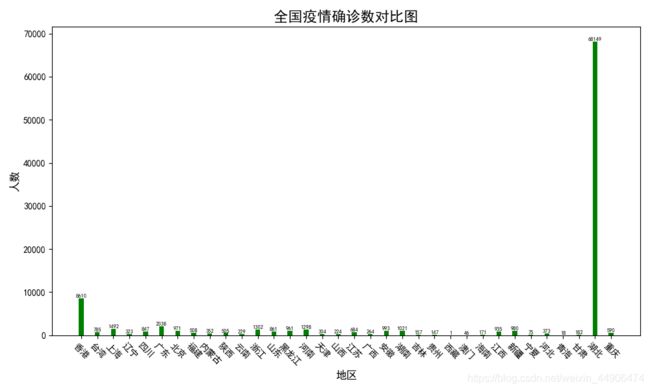
那么,如果我想获取累计确诊人数、新增确诊人数、死亡人数和治愈人数,并进行可视化展示,怎么办呢?只需要简单替换参数即可。
city_data[‘total’][‘confirm’] 确诊人数
city_data[‘total’][‘suspect’] 疑似人数
city_data[‘total’][‘dead’] 死亡人数
city_data[‘total’][‘heal’] 治愈人数
city_data[‘today’][‘confirm’] 新增确诊人数
# ------------------------------------------------------------------------------
# 第一步:抓取数据
# ------------------------------------------------------------------------------
import time, json, requests

# 抓取腾讯疫情实时json数据
url = 'https://view.inews.qq.com/g2/getOnsInfo?name=disease_h5&callback=&_=%d' % int(time.time() * 1000)
data = json.loads(requests.get(url=url).json()['data'])
print(data)
print(data.keys())

# 统计省份信息(34个省份 湖北 广东 河南 浙江 湖南 安徽....)
num = data['areaTree'][0]['children']
print(len(num))
for item in num:
    print(item['name'], end=" ")  # 不换行
else:
    print("\n")  # 换行

# 显示湖北省数据
hubei = num[23]['children']
for item in hubei:
    print(item)
else:
    print("\n")

# 解析确诊数据
total_data = {}
for item in num:
    if item['name'] not in total_data:
        total_data.update({item['name']: 0})
    for city_data in item['children']:
        total_data[item['name']] += int(city_data['total']['confirm'])
print(total_data)
# {'湖北': 48206, '广东': 1241, '河南': 1169, '浙江': 1145, '湖南': 968, ...,  '澳门': 10, '西藏': 1}

# 解析疑似数据
total_suspect_data = {}
for item in num:
    if item['name'] not in total_suspect_data:
        total_suspect_data.update({item['name']: 0})
    for city_data in item['children']:
        total_suspect_data[item['name']] += int(city_data['total']['suspect'])
print(total_suspect_data)

# 解析死亡数据
total_dead_data = {}
for item in num:
    if item['name'] not in total_dead_data:
        total_dead_data.update({item['name']: 0})
    for city_data in item['children']:
        total_dead_data[item['name']] += int(city_data['total']['dead'])
print(total_dead_data)

# 解析治愈数据
total_heal_data = {}
for item in num:
    if item['name'] not in total_heal_data:
        total_heal_data.update({item['name']: 0})
    for city_data in item['children']:
        total_heal_data[item['name']] += int(city_data['total']['heal'])
print(total_heal_data)

# 解析新增确诊数据
total_new_data = {}
for item in num:
    if item['name'] not in total_new_data:
        total_new_data.update({item['name']: 0})
    for city_data in item['children']:
        total_new_data[item['name']] += int(city_data['today']['confirm'])  # today
print(total_new_data)

# ------------------------------------------------------------------------------
# 第二步:绘制柱状图
# ------------------------------------------------------------------------------
import matplotlib.pyplot as plt
import numpy as np

plt.figure(figsize=[10, 6])
plt.rcParams['font.sans-serif'] = ['SimHei']  # 用来正常显示中文标签
plt.rcParams['axes.unicode_minus'] = False  # 用来正常显示负号

# -----------------------------1.绘制确诊数据-----------------------------------
p1 = plt.subplot(221)

# 获取数据
names = total_data.keys()
nums = total_data.values()
print(names)
print(nums)
print(total_data)
plt.bar(names, nums, width=0.3, color='green')

# 设置标题
plt.ylabel("确诊人数", rotation=90)
plt.xticks(list(names), rotation=-60, size=8)
# 显示数字
for a, b in zip(list(names), list(nums)):
    plt.text(a, b, b, ha='center', va='bottom', size=6)
plt.sca(p1)

# -----------------------------2.绘制新增确诊数据-----------------------------------
p2 = plt.subplot(222)
names = total_new_data.keys()
nums = total_new_data.values()
print(names)
print(nums)
plt.bar(names, nums, width=0.3, color='yellow')
plt.ylabel("新增确诊人数", rotation=90)
plt.xticks(list(names), rotation=-60, size=8)
# 显示数字
for a, b in zip(list(names), list(nums)):
    plt.text(a, b, b, ha='center', va='bottom', size=6)
plt.sca(p2)

# -----------------------------3.绘制死亡数据-----------------------------------
p3 = plt.subplot(223)
names = total_dead_data.keys()
nums = total_dead_data.values()
print(names)
print(nums)
plt.bar(names, nums, width=0.3, color='blue')
plt.xlabel("地区")
plt.ylabel("死亡人数", rotation=90)
plt.xticks(list(names), rotation=-60, size=8)
for a, b in zip(list(names), list(nums)):
    plt.text(a, b, b, ha='center', va='bottom', size=6)
plt.sca(p3)

# -----------------------------4.绘制治愈数据-----------------------------------
p4 = plt.subplot(224)
names = total_heal_data.keys()
nums = total_heal_data.values()
print(names)
print(nums)
plt.bar(names, nums, width=0.3, color='red')
plt.xlabel("地区")
plt.ylabel("治愈人数", rotation=90)
plt.xticks(list(names), rotation=-60, size=8)
for a, b in zip(list(names), list(nums)):
    plt.text(a, b, b, ha='center', va='bottom', size=6)
plt.sca(p4)
plt.show()
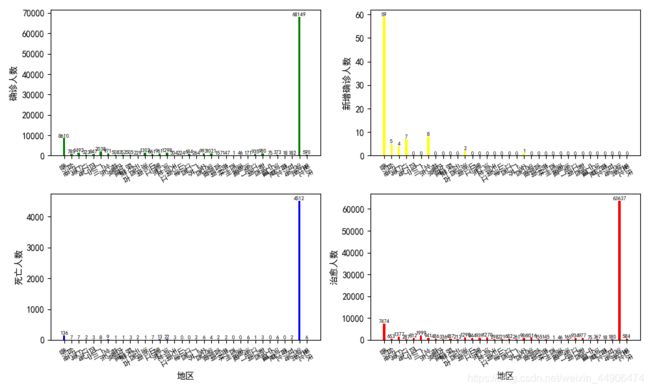
输出如下图所示,但是Matplotlib画图不太美观,接下来分享Seaborn可视化。
三.数据存储及Seaborn绘制全国各地区柱状图
Seaborn是在Matplotlib的基础上进行了更高级的API封装,从而使得作图更加容易,在大多数情况下使用seaborn能做出很具有吸引力的图,而使用matplotlib就能制作具有更多特色的图。
1.文件写入
# -*- coding: utf-8 -*-
# ------------------------------------------------------------------------------
# 第一步:抓取数据
# ------------------------------------------------------------------------------
import time, json, requests

# 抓取腾讯疫情实时json数据
url = 'https://view.inews.qq.com/g2/getOnsInfo?name=disease_h5&callback=&_=%d' % int(time.time() * 1000)
data = json.loads(requests.get(url=url).json()['data'])
print(data)
print(data.keys())

# 统计省份信息(34个省份 湖北 广东 河南 浙江 湖南 安徽....)
num = data['areaTree'][0]['children']
print(len(num))
for item in num:
    print(item['name'], end=" ")  # 不换行
else:
    print("\n")  # 换行

# 显示湖北省数据
hubei = num[23]['children']
for item in hubei:
    print(item)
else:
    print("\n")

# 解析确诊数据
total_data = {}
for item in num:
    if item['name'] not in total_data:
        total_data.update({item['name']: 0})
    for city_data in item['children']:
        total_data[item['name']] += int(city_data['total']['confirm'])
print(total_data)


# 解析疑似数据
total_suspect_data = {}
for item in num:
    if item['name'] not in total_suspect_data:
        total_suspect_data.update({item['name']: 0})
    for city_data in item['children']:
        total_suspect_data[item['name']] += int(city_data['total']['suspect'])
print(total_suspect_data)

# 解析死亡数据
total_dead_data = {}
for item in num:
    if item['name'] not in total_dead_data:
        total_dead_data.update({item['name']: 0})
    for city_data in item['children']:
        total_dead_data[item['name']] += int(city_data['total']['dead'])
print(total_dead_data)

# 解析治愈数据
total_heal_data = {}
for item in num:
    if item['name'] not in total_heal_data:
        total_heal_data.update({item['name']: 0})
    for city_data in item['children']:
        total_heal_data[item['name']] += int(city_data['total']['heal'])
print(total_heal_data)

# 解析新增确诊数据
total_new_data = {}
for item in num:
    if item['name'] not in total_new_data:
        total_new_data.update({item['name']: 0})
    for city_data in item['children']:
        total_new_data[item['name']] += int(city_data['today']['confirm'])  # today
print(total_new_data)

# ------------------------------------------------------------------------------
# 第二步:存储数据至CSV文件
# ------------------------------------------------------------------------------
names = list(total_data.keys())  # 省份名称
num1 = list(total_data.values())  # 确诊数据
num2 = list(total_suspect_data.values())  # 疑似数据(全为0)
num3 = list(total_dead_data.values())  # 死亡数据
num4 = list(total_heal_data.values())  # 治愈数据
num5 = list(total_new_data.values())  # 新增确诊病例
print(names)
print(num1)
print(num2)
print(num3)
print(num4)
print(num5)

# 获取当前日期命名(2020-12-27-all.csv)
n = time.strftime("%Y-%m-%d") + "-all.csv"
fw = open(n, 'w', encoding='utf-8')
fw.write('province,confirm,dead,heal,new_confirm\n')
i = 0
while i < len(names):
    fw.write(names[i] + ',' + str(num1[i]) + ',' + str(num3[i]) + ',' + str(num4[i]) + ',' + str(num5[i]) + '\n')
    i = i + 1
else:
    print("Over write file!")
    fw.close()
存储成功之后,如下图所示。

对应腾讯的数据,如下图所示:

2.Seaborn绘制柱状图
# -*- coding: utf-8 -*-
#------------------------------------------------------------------------------
# 第三步:调用Seaborn绘制柱状图
#------------------------------------------------------------------------------
import time
import matplotlib
import numpy as np
import seaborn as sns
import pandas as pd
import matplotlib.pyplot as plt

# 读取数据
n = time.strftime("%Y-%m-%d") + "-all.csv"
data = pd.read_csv(n)

# 设置窗口
fig, ax = plt.subplots(1,1)
print(data['province'])

# 设置绘图风格及字体
sns.set_style("whitegrid",{'font.sans-serif':['simhei','Arial']})

# 绘制柱状图
g = sns.barplot(x="province", y="confirm", data=data, ax=ax,
            palette=sns.color_palette("hls", 8))

# 在柱状图上显示数字
i = 0
for index, b in zip(list(data['province']), list(data['confirm'])):
    g.text(i+0.05, b+0.05, b, color="black", ha="center", va='bottom', size=6)
    i = i + 1

# 设置Axes的标题
ax.set_title('全国疫情最新情况')

# 设置坐标轴文字方向
ax.set_xticklabels(ax.get_xticklabels(), rotation=-60)

# 设置坐标轴刻度的字体大小
ax.tick_params(axis='x',labelsize=8)
ax.tick_params(axis='y',labelsize=8)

plt.show()
显示结果:
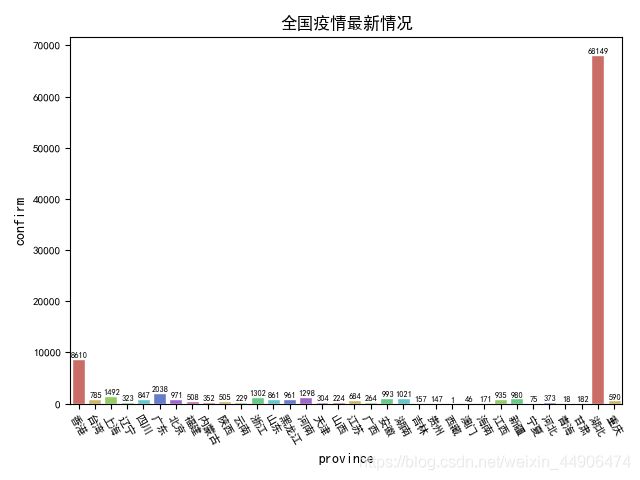
3.根据CSV的信息观察各省的确诊,死亡,治愈和新增的数量,下面附张词云图更直观。
import wordcloud
import jieba
f=open('C:/Users/玉玉的凉茶/Desktop/2021-12-27-all.csv',encoding='utf-8')
t=f.read()
f.close()
l=jieba.lcut(t)
string=' '.join(l)
w=wordcloud.WordCloud(background_color='white',font_path='C:/Windows/Fonts/STKAITI.TTF',width=1000,height=900,)#font_path是字体,
w.generate(string)#向wordcloud对象w中加载文本txt
w.to_file(r"新冠.png")#将词云输出为图像文件
四.Seaborn绘制全国各地区对比柱状图
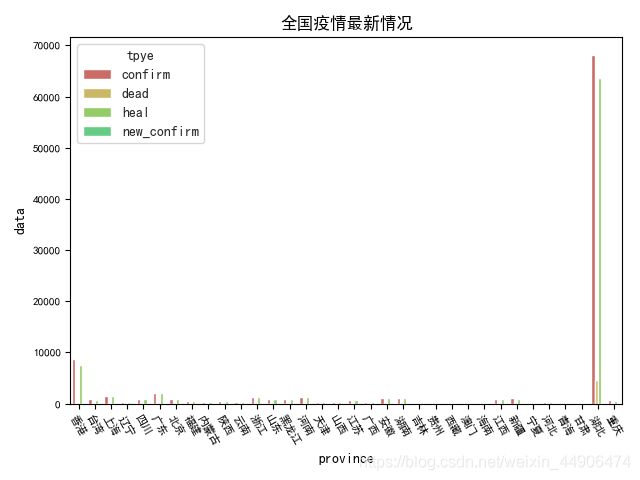
如果需要显示多个数据对比,则需要使用下面的代码。由于Seaborn能够进行按类别分组绘图,我们需要将抓取的数据存储为如下图所示的文件,才能将数据绘制在同一张图中。

# -*- coding: utf-8 -*-
# ------------------------------------------------------------------------------
# 第一步:抓取数据
# ------------------------------------------------------------------------------
import time, json, requests

# 抓取腾讯疫情实时json数据
url = 'https://view.inews.qq.com/g2/getOnsInfo?name=disease_h5&callback=&_=%d' % int(time.time() * 1000)
data = json.loads(requests.get(url=url).json()['data'])
print(data)
print(data.keys())

# 统计省份信息(34个省份 湖北 广东 河南 浙江 湖南 安徽....)
num = data['areaTree'][0]['children']
print(len(num))
for item in num:
    print(item['name'], end=" ")  # 不换行
else:
    print("\n")  # 换行

# 显示湖北省数据
hubei = num[23]['children']
for item in hubei:
    print(item)
else:
    print("\n")

# 解析确诊数据
total_data = {}
for item in num:
    if item['name'] not in total_data:
        total_data.update({item['name']: 0})
    for city_data in item['children']:
        total_data[item['name']] += int(city_data['total']['confirm'])
print(total_data)

# 解析疑似数据
total_suspect_data = {}
for item in num:
    if item['name'] not in total_suspect_data:
        total_suspect_data.update({item['name']: 0})
    for city_data in item['children']:
        total_suspect_data[item['name']] += int(city_data['total']['suspect'])
print(total_suspect_data)

# 解析死亡数据
total_dead_data = {}
for item in num:
    if item['name'] not in total_dead_data:
        total_dead_data.update({item['name']: 0})
    for city_data in item['children']:
        total_dead_data[item['name']] += int(city_data['total']['dead'])
print(total_dead_data)

# 解析治愈数据
total_heal_data = {}
for item in num:
    if item['name'] not in total_heal_data:
        total_heal_data.update({item['name']: 0})
    for city_data in item['children']:
        total_heal_data[item['name']] += int(city_data['total']['heal'])
print(total_heal_data)

# 解析新增确诊数据
total_new_data = {}
for item in num:
    if item['name'] not in total_new_data:
        total_new_data.update({item['name']: 0})
    for city_data in item['children']:
        total_new_data[item['name']] += int(city_data['today']['confirm'])  # today
print(total_new_data)

# ------------------------------------------------------------------------------
# 第二步:存储数据至CSV文件
# ------------------------------------------------------------------------------
names = list(total_data.keys())  # 省份名称
num1 = list(total_data.values())  # 确诊数据
num2 = list(total_suspect_data.values())  # 疑似数据(全为0)
num3 = list(total_dead_data.values())  # 死亡数据
num4 = list(total_heal_data.values())  # 治愈数据
num5 = list(total_new_data.values())  # 新增确诊病例
print(names)
print(num1)
print(num2)
print(num3)
print(num4)
print(num5)

# 获取当前日期命名(2020-12-27-all.csv)
n = time.strftime("%Y-%m-%d") + "-all-4db.csv"
fw = open(n, 'w', encoding='utf-8')
fw.write('province,tpye,data\n')
i = 0
while i < len(names):
    fw.write(names[i] + ',confirm,' + str(num1[i]) + '\n')
    fw.write(names[i] + ',dead,' + str(num3[i]) + '\n')
    fw.write(names[i] + ',heal,' + str(num4[i]) + '\n')
    fw.write(names[i] + ',new_confirm,' + str(num5[i]) + '\n')
    i = i + 1
else:
    print("Over write file!")
    fw.close()

# ------------------------------------------------------------------------------
# 第三步:调用Seaborn绘制柱状图
# ------------------------------------------------------------------------------
import time
import matplotlib
import numpy as np
import seaborn as sns
import pandas as pd
import matplotlib.pyplot as plt

# 读取数据
n = time.strftime("%Y-%m-%d") + "-all-4db.csv"
data = pd.read_csv(n)

# 设置窗口
fig, ax = plt.subplots(1, 1)
print(data['province'])

# 设置绘图风格及字体
sns.set_style("whitegrid", {'font.sans-serif': ['simhei', 'Arial']})

# 绘制柱状图
g = sns.barplot(x="province", y="data", hue="tpye", data=data, ax=ax,
                palette=sns.color_palette("hls", 8))

# 设置Axes的标题
ax.set_title('全国疫情最新情况')

# 设置坐标轴文字方向
ax.set_xticklabels(ax.get_xticklabels(), rotation=-60)

# 设置坐标轴刻度的字体大小
ax.tick_params(axis='x', labelsize=8)
ax.tick_params(axis='y', labelsize=8)

plt.show()

