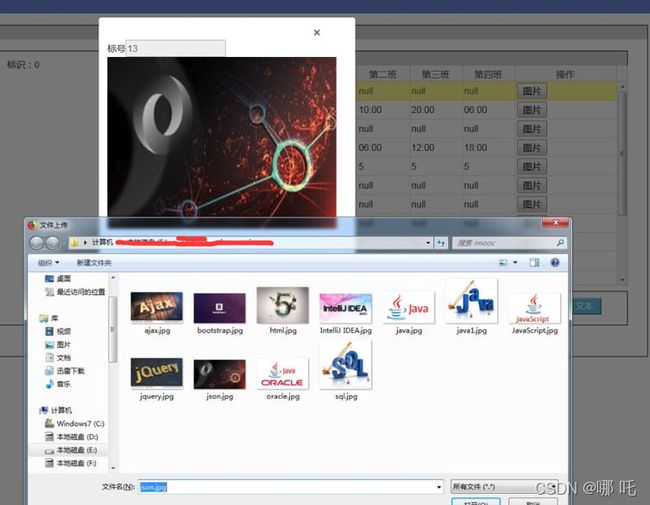
一、前端界面是通过jqgrid展示的
jqgrid是典型的B/C架构(浏览器/服务器模式),服务器端只需提供数据管理,浏览器只需负责数据显示。
jqGrid是用ajax实现对请求和响应的处理,支持局部实时刷新。
二、jqgrid特性
- 通过配置url地址数据显示格式
- 支持行编辑,列搜索过滤
- 支持分页
- 添加表单支持文件上传
- 链式调用
三、代码实例
1、jqgrid页面展示
$(document).ready(function () {
$("#gridTable").jqGrid({
colNames:['标号','班次', '第一班', '第二班', '第三班', '第四班','操作'],
colModel:[{
name:'mark',
index:'mark',
width: 100,
},{
name:'division',
index:'division',
width: 100,
},{
name:'first_class',
index:'first_class',
width: 100,
}, {
name:'second_class',
index:'second_class',
width: 100,
},{
name:'third_class',
index:'third_class',
width: 100,
}, {
name: 'fouth_class',
index: 'fouth_class',
width: 100,
}, {
name: 'operate',
index: 'operate',
width: 200,
search: false,
formatter : function(cellvalue,options,rowObject){
var id = rowObject.mark
var str = '';
return str;
},
}
],
sortname : "mark",
sortorder : "desc",
viewrecords : true,
width: 747,
height: 355,
rowNum: 10,
datatype: 'text',
pager: "#gridPager",
onSelectRow:function(rowid){
grid_selectRow = $("#gridTable").jqGrid("getRowData",rowid);
$("#modal_picture").pictureLoading({});
},
ondblClickRow: function(rowid) {
grid_selectRow = $("#gridTable").jqGrid("getRowData",rowid);
$("#edit").trigger("click");
},
});
jf_initJqgrid();
jf_click();
function jf_initJqgrid(){
$.ajax({
url:"DivisiondefineServlet",
async:true, //是否为异步请求
cache:false, //是否缓存结果
type:"GET",
dataType:"json",
success : function(data){
$("#gridTable").jqGrid("clearGridData");
for(var i=0;i<=data.length;i++){
$("#gridTable").jqGrid('addRowData',i+1,data[i]);
}
}
})
}
$('[id^=jqgh_gridTable_]').css("height","20px");
function jf_click() {
$("#add").click(function () {
$("#modal-divisionAdd").divisionAdd({});
})
$("#edit").click(function () {
$("#modal-divisionEdit").divisionEdit({});
})
$("#delete").click(function () {
jf_delete();
jf_initJqgrid();
})
}
function jf_delete() {
$.ajax({
url:"DivisiondefineServlet?action=delete",
async:true, //是否为异步请求
cache:false, //是否缓存结果
type:"POST",
dataType:"text",
data :{
"mark1" : grid_selectRow.mark,
},
})
}
});
2、模块页面
;(function($){
$.fn.pictureLoading = function(options){
var el = this;
var opts = {
}
var param = $.extend(opts,options);
var or = new Order(el, param);
}
var Order = function(el,param){
this.el=el;
this.param=param;
this.orderContent();
this.bindEvent();
this.orderSetValue();
}
Order.prototype = {
orderContent : function(){
//创建模态窗体
this.el.addClass("modal").attr("tabindex","-1").attr("data-backdrop","static");
html= ''+
''+
'';
this.el.html("");
this.el.append(html);
this.el.modal("show");
},
orderSetValue : function(){
$("#mark").val(grid_selectRow.mark);
$.ajax({
url:"PictureServlet",
async:true, //是否为异步请求
cache:false, //是否缓存结果
type:"GET",
dataType:"json",
data :{
"mark" : $("#mark").val()
},
success : function(data){
$('#viewImg').attr('src', "../../../picture/" + data);
},
error:function () {
alert("error");
}
})
},
//自定义JS点击事件
bindEvent : function(){
},
}
})(jQuery)
3、ajax实现异步请求
function loadfile(){
    var picName = $("#IronMan").val().replace("C:\fakepath\","");
    $.ajax({
        url:"PictureServlet",
        async:true,   //是否为异步请求
        cache:false,  //是否缓存结果
        type:"POST",
        dataType:"json",
        data :{
            "mark" : $("#mark").val(),
            "picName":picName,
        },
    })
    $('#viewImg').attr('src', "../../../picture/" + picName);
}
4、servlet存储并在本地存储图片文件
protected void doPost(HttpServletRequest request, HttpServletResponse response) throws  IOException {
        System.out.println("servlet");
        response.setContentType("text/html");
        request.setCharacterEncoding("utf-8");
        response.setCharacterEncoding("utf-8");
        int mark = Integer.parseInt(request.getParameter("mark"));
        String picName = request.getParameter("picName");
        service.insertPic(mark,picName);

        String directory = "E:/GDKJ/others/imooc_pic";
        File file = new File(directory,picName);
        if(file.exists()) {
            System.out.println(file.getAbsolutePath());
            System.out.println(file.getName());
            System.out.println(file.length());
        } else {
            file.getParentFile().mkdirs();
            try {
                file.createNewFile();
            } catch (IOException e) {
                System.out.println("创建新文件时出现了错误。。。");
                e.printStackTrace();
            }
        }
    }
五、效果展示
总结
到此这篇关于JavaScript图片上传并预览的文章就介绍到这了,更多相关JavaScript图片上传并预览内容请搜索脚本之家以前的文章或继续浏览下面的相关文章希望大家以后多多支持脚本之家!

