【27】grad-cam的简单逻辑实现以及效果展示
如有错误,恳请指出。
文章目录
- 1. grad-cam的简单实现
- 2. grad-cam的效果展示
- 3. Debug
1. grad-cam的简单实现
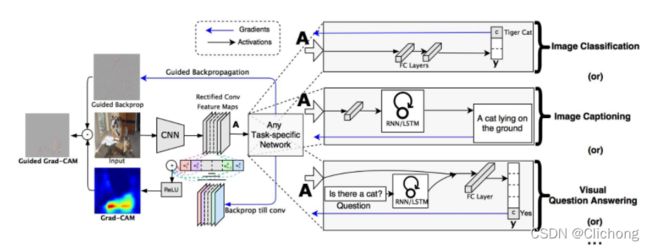
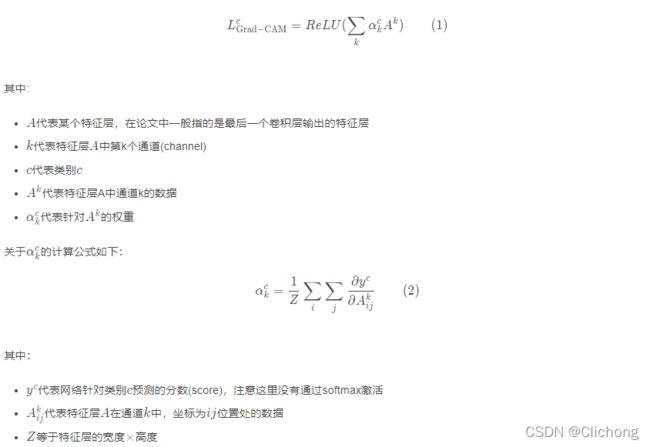
grad-cam通过对类别c最后的预测值yc进行方向传播,得到回传的特征层A的梯度信息A‘,此时A’其实就是yc对A所求得的偏导。我们认为,梯度信息比较大的部分其对于当前的这个类别信息是比较重要的,所以在grad-cam中,对于梯度信息A‘会在通道上进行一个平均处理,这样就可以得到每个channel上的一个重要程度,然后再与每个channels进行相乘,也就是进行一个简单的加权求和,然后通过ReLU函数来剔除负梯度信息,最后所得到的就是grad-cam的热力图。不过,这当然会涉及一些后处理,插值等方法来达到最后的可视化效果。

大概的实现流程主要有两个问题:
- 1)获取中间过程的梯度信息
- 2)选择输出某一层的特征图
对于问题1,可以选择特定的卷积层来捕获通过其的信息流,核心代码如下:
input_grad = []
output_grad = []

def save_gradient(module, grad_input, grad_output):
    input_grad.append(grad_input)
    # print(f"{module.__class__.__name__} input grad:\n{grad_input}\n")
    output_grad.append(grad_output)
    # print(f"{module.__class__.__name__} output grad:\n{grad_output}\n")

last_layer = model.layer4[-1]
last_layer.conv3.register_full_backward_hook(save_gradient)
output[0][0].backward()
对于问题2,由于这里是保留了模型原有的预训练参数的,也就是只是一个推理过程,不需要训练,所以我使用了以下方法实现:
import torch
from torchvision.models import resnet50

def get_feature_map(model, input_tensor):

    x = model.conv1(input_tensor)
    x = model.bn1(x)
    x = model.relu(x)
    x = model.maxpool(x)

    x = model.layer1(x)
    x = model.layer2(x)
    x = model.layer3(x)
    x = model.layer4(x)
    return x

# get output and feature
model = resnet50(pretrained=True)
input = torch.rand([8, 3, 224, 224], dtype=torch.float, requires_grad=True)
feature = get_feature_map(model, input)
完整代码如下所示:
import cv2
import numpy as np
import einops
import torch
import torch.nn as nn
import torch.nn.functional as F
from torchvision.models import resnet50
from torchvision.transforms import Compose, Normalize, ToTensor


input_grad = []
output_grad = []

def save_gradient(module, grad_input, grad_output):
    input_grad.append(grad_input)
    # print(f"{module.__class__.__name__} input grad:\n{grad_input}\n")
    output_grad.append(grad_output)
    # print(f"{module.__class__.__name__} output grad:\n{grad_output}\n")


def preprocess_image(img: np.ndarray, mean=[0.5, 0.5, 0.5], std=[0.5, 0.5, 0.5]) -> torch.Tensor:
    preprocessing = Compose([
        ToTensor(),
        Normalize(mean=mean, std=std)
    ])
    return preprocessing(img.copy()).unsqueeze(0)


def show_cam_on_image(img: np.ndarray,
                      mask: np.ndarray,
                      use_rgb: bool = False,
                      colormap: int = cv2.COLORMAP_JET) -> np.ndarray:
    """ This function overlays the cam mask on the image as an heatmap.
    By default the heatmap is in BGR format.
    :param img: The base image in RGB or BGR format.
    :param mask: The cam mask.
    :param use_rgb: Whether to use an RGB or BGR heatmap, this should be set to True if 'img' is in RGB format.
    :param colormap: The OpenCV colormap to be used.
    :returns: The default image with the cam overlay.
    """
    heatmap = cv2.applyColorMap(np.uint8(255 * mask), colormap)
    if use_rgb:
        heatmap = cv2.cvtColor(heatmap, cv2.COLOR_BGR2RGB)
    heatmap = np.float32(heatmap) / 255

    if np.max(img) > 1:
        raise Exception(
            "The input image should np.float32 in the range [0, 1]")

    cam = heatmap + img
    cam = cam / np.max(cam)
    return np.uint8(255 * cam)


def get_feature_map(model, input_tensor):

    x = model.conv1(input_tensor)
    x = model.bn1(x)
    x = model.relu(x)
    x = model.maxpool(x)

    x = model.layer1(x)
    x = model.layer2(x)
    x = model.layer3(x)
    x = model.layer4(x)
    return x


# prepare image
image_path = './photo/cow.jpg'
rgb_img = cv2.imread(image_path, 1)[:, :, ::-1]
rgb_img = cv2.resize(rgb_img, (224, 224))
rgb_img = np.float32(rgb_img) / 255
input = preprocess_image(rgb_img, mean=[0.5, 0.5, 0.5], std=[0.5, 0.5, 0.5])
# input = torch.rand([8, 3, 224, 224], dtype=torch.float, requires_grad=True)

model = resnet50(pretrained=True)
last_layer = model.layer4[-1]
last_layer.conv3.register_full_backward_hook(save_gradient)
# print(model)

# get output and feature
feature = get_feature_map(model, input)
output = model(input)
# print("feature.shape:", feature.shape)  # torch.Size([8, 2048, 7, 7])
# print("output.shape:", output.shape)    # torch.Size([8, 1000])

# cal grad
output[0][0].backward()
gard_info = input.grad
# print("gard_info.shape: ", gard_info.shape)     # torch.Size([8, 3, 224, 224])

# print("input_grad.shape:", input_grad[0][0].shape)      # torch.Size([8, 512, 7, 7])
# print("output_grad.shape:", output_grad[0][0].shape)    # torch.Size([8, 2048, 7, 7])

feature_grad = output_grad[0][0]
feature_weight = einops.reduce(feature_grad, 'b c h w -> b c', 'mean')
grad_cam = feature * feature_weight.unsqueeze(-1).unsqueeze(-1)     # (b c h w) * (b c 1 1) -> (b c h w)
grad_cam = F.relu(torch.sum(grad_cam, dim=1)).unsqueeze(dim=1)      # (b c h w) -> (b h w) -> (b 1 h w)
grad_cam = F.interpolate(grad_cam, size=(224, 224), mode='bilinear')    # (b 1 h w) -> (b 1 224 224) -> (224 224)
grad_cam = grad_cam[0, 0, :]
# print(grad_cam.shape)    # torch.Size([224, 224])

cam_image = show_cam_on_image(rgb_img, grad_cam.detach().numpy())
cv2.imwrite('./result/test.jpg', cam_image)
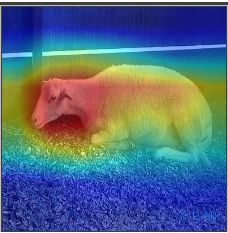
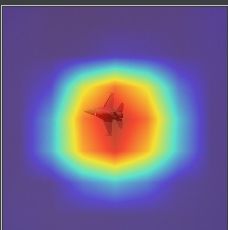
2. grad-cam的效果展示
这里使用了github的一个cam开源库,获取图片的热力图,参考代码如下,更多的介绍与使用方法可以见参考资料1.
from pytorch_grad_cam import GradCAM, ScoreCAM, GradCAMPlusPlus, AblationCAM, XGradCAM, EigenCAM, FullGrad
from pytorch_grad_cam.utils.model_targets import ClassifierOutputTarget
from pytorch_grad_cam.utils.image import show_cam_on_image, preprocess_image
from torchvision.models import resnet50
import torch
import argparse
import cv2
import numpy as np

def get_args():
    parser = argparse.ArgumentParser()
    parser.add_argument('--use-cuda', action='store_true', default=False,
                        help='Use NVIDIA GPU acceleration')
    parser.add_argument('--image-path',type=str,default='./photo/cow.jpg',
                        help='Input image path')
    parser.add_argument('--method', type=str, default='gradcam',
                        help='Can be gradcam/gradcam++/scorecam/xgradcam/ablationcam')
    parser.add_argument('--eigen_smooth',action='store_true',
                        help='Reduce noise by taking the first principle componenet' 'of cam_weights*activations')
    parser.add_argument('--aug_smooth', action='store_true',
                        help='Apply test time augmentation to smooth the CAM')

    args = parser.parse_args()
    args.use_cuda = args.use_cuda and torch.cuda.is_available()
    if args.use_cuda:
        print('Using GPU for acceleration')
    else:
        print('Using CPU for computation')

    return args


if __name__ == '__main__':

    args = get_args()
    model = resnet50(pretrained=True)

    target_layers = [model.layer4[-1]]

    rgb_img = cv2.imread(args.image_path, 1)[:, :, ::-1]
    rgb_img = cv2.resize(rgb_img, (224, 224))
    rgb_img = np.float32(rgb_img) / 255
    input_tensor = preprocess_image(rgb_img, mean=[0.5, 0.5, 0.5], std=[0.5, 0.5, 0.5])

    # Construct the CAM object once, and then re-use it on many images:
    cam = GradCAM(model=model, target_layers=target_layers, use_cuda=args.use_cuda)

    # targets = [e.g ClassifierOutputTarget(281)]
    targets = None

    # You can also pass aug_smooth=True and eigen_smooth=True, to apply smoothing.
    grayscale_cam = cam(input_tensor=input_tensor,
                        targets=targets,
                        eigen_smooth=args.eigen_smooth,
                        aug_smooth=args.aug_smooth)

    # In this example grayscale_cam has only one image in the batch:
    grayscale_cam = grayscale_cam[0, :]
    # visualization = show_cam_on_image(rgb_img, grayscale_cam, use_rgb=True)

    cam_image = show_cam_on_image(rgb_img, grayscale_cam)
    cv2.imwrite('result.jpg', cam_image)
3. Debug
补充,在代码编写过程中出现过一些错误,这里顺便记录下来:
- 问题1:RuntimeError: element 0 of tensors does not require grad and does not have a grad_fn
这个问题的出现是因为输入变量没有设置梯度,增加requires_grad=True即可
# x = torch.tensor([2], dtype=torch.float)
x = torch.tensor([2], dtype=torch.float, requires_grad=True)
- 问题2:The .grad attribute of a Tensor that is not a leaf Tensor is being accessed.
/tmp/ipykernel_76011/1698254930.py:27: UserWarning: The .grad
attribute of a Tensor that is not a leaf Tensor is being accessed. Its
.grad attribute won’t be populated during autograd.backward(). If you
indeed want the gradient for a non-leaf Tensor, use .retain_grad() on
the non-leaf Tensor. If you access the non-leaf Tensor by mistake,
make sure you access the leaf Tensor instead. See
github.com/pytorch/pytorch/pull/30531 for more information
这里我需要计算输出关于输入x的反向梯度信息,由于x需要是可求导的,于是我只是简单的设定了requires_grad=True,此时在运行到x.grad,想要输出其反向的梯度信息时出现了问题,如上所示。
这里显示,正在访问不是叶张量的张量的 .grad 属性。 在 autograd.backward() 期间不会填充其 .grad 属性。 如果您确实想要非叶张量的梯度,请在非叶张量上使用 .retain_grad(),为此,还需要增加以下一行代码:
x = torch.tensor([1, 2, 3, 1, 1, 2, 2, 1, 2],
                 dtype=torch.float32, requires_grad=True).reshape(1,1,3,3)
x.retain_grad()
然后,后来看见其他的博主的代码,以下代码也可以运行:
x = torch.tensor([1, 2, 3, 1, 1, 2, 2, 1, 2],
                 dtype=torch.float32, requires_grad=True).reshape(1,1,3,3)
x = torch.autograd.Variable(x, requires_grad=True)
# x.retain_grad()
- 问题3:Trying to backward through the graph a second time (or directly access saved variables after they have already been freed).
RuntimeError: Trying to backward through the graph a second time (or
directly access saved variables after they have already been freed).
Saved intermediate values of the graph are freed when you call
.backward() or autograd.grad(). Specify retain_graph=True if you need
to backward through the graph a second time or if you need to access
saved variables after calling backward.
这个错误是我想要同时查看y[0]与y[1]的方向梯度信息,但是这里是第二次遍历的时候变量已经释放掉了,所以需要保存中间参数,请指定 retain_graph=True,对此我的解决方法如下所示:
fc_out[0][0].backward()
x.grad

fc_out[0][1].backward()
x.grad
由以上代码改为;
torch.autograd.backward(fc_out[0][0], retain_graph=True)
print("fc_out[0][0].backward:\n",x.grad)

torch.autograd.backward(fc_out[0][1], retain_graph=True)
print("fc_out[0][1].backward:\n",x.grad)
参考资料:
- https://github.com/jacobgil/pytorch-grad-cam
- https://blog.csdn.net/qq_37541097/article/details/123089851


