前端第七篇笔记(p92~106)
文章目录
- 雪碧图(p92)
- 线性渐变(p93)
- 径向线变(p94)
- 表格的简介(p96)
- 长表格(p97)
- 表格的样式(p98)
-
- border-spacing
- border-collspacing
- table-cell
- 表单简介(p99 p100)
-
- 文本框 text
- 密码框 password
- 单选按钮 radio
- 多选框 checkbox
- 下拉列表 select
- 项目搭建(p101~p106)
雪碧图(p92)
雪碧图的使用步骤
1.确定要使用的图标
2.测量图标的大小
3.根据测量结果创建一个元素
4.将雪碧图设置为元素的背景图片
5.设置一个偏移量以显示正确的图片
    雪碧图的特点:
        一次性将多个图片放入,提高访问速度
<style>
a:link{
            display: block;
            width: 206px;
            height: 175px;
            background-image: url("/img/按钮.jpg");
            background-position: 0px 0px ;
            background-repeat: no-repeat;
            background-position: -25px -5px;

        }
        a:hover{
           background-position: -235px -5px;

        }
        a:active{
            background-position: -445px -5px;
        }
        style>


线性渐变(p93)
 <style>
        .box1{
            width: 200px;
            height: 200px;

            /*
              通过渐变设置一些复杂的背景颜色,实现从一个颜色过度到其他颜色
              !!渐变是图片,需要通过background-image 来设置
            */
            /*

                线性渐变,颜色沿着一条直线发生变化
                linear-gradient(颜色,颜色,颜色……)默认从上往下
                deg 旋转多少度.
                repeating-linear-gradient(red 0px,yellow 50px);
        }

            */
            /* background-image: linear-gradient(180deg,red 100px ,yellow,green,orange); */
            background-image:repeating-linear-gradient(red 0px,yellow 50px);
        }
        .box2{
            width: 200px;
            height: 200px;
            /* linear-gradient(to right 颜色,颜色,颜色……)往右变
            to bottom */
            background-image: linear-gradient(to right ,red,yellow,green
            );
        }
    style>
head>
<body>
    <div class="box1">div>
    <div class="box2">div>
径向线变(p94)
<style>

        .box1{
            width: 300px;
            height: 500px;
            background-color: aquamarine;
            background-image: repeating-radial-gradient(100px 100px at 10px 10px,red,yellow);
            /*
                 radial-gradient(red,yellow) 默认情况下径向渐变根据元素形状改变,也可以手动设定渐变的大小
                 circle
                 ellipse
                 radial-gradient

                 - 也可以指定渐变的位置

                 radial-gradient(大小 at 位置,颜色 位置,颜色 位置,颜色 位置)
            */

        }
    style>
head>
<body>
    <div class="box1">div>
body>

表格的简介(p96)
table 创建表格
tr 创建一行
td 创建一个单元格
colspan 横向合并单元格
rowspan 纵向合并单元格
<body>

    <table border="1" width="50%" align="center">

        <tr>


            <td rowspan="2">A1td>
            <td>A2td>
            <td>A3td>
            <td>A4td>
        tr>
        <tr>
            <td>B1td>
            <td>B2td>
            <td>B3td>

        tr>
        <tr><td>c1td>
            <td>c2td>
            <td>c3td>
            <td>c4td>
        tr>
        <tr><td>D1td>
            <td>D2td>
            <td colspan="2">D3td>


        tr>
    table>

长表格(p97)
可以将表格分为三部分
头部 thead
主体 tbody
底部 tfoot
th 可以用来代替td,表示头部的单元格
 <table border="1" width="50%" align="center">
 <thead>
        <tr>
            <td>日期td>
            <td>收入td>
            <td>支出td>
            <td>合计td>
        tr>
    thead>
    <tbody>
        <tr>
            <td>2000.1.1td>
            <td>2000td>
            <td>2000td>
            <td>0td>
        tr>
        <tr>
            <td>2000.1.1td>
            <td>2000td>
            <td>2000td>
            <td>0td>
        tr>
        <tr>
            <td>2000.1.1td>
            <td>2000td>
            <td>2000td>
            <td>0td>
        tr>
    tbody>
        <tfoot>
            <tr>
                <td>td>
                <td>td>
                <td>合计td>
                <td>0td>
            tr>
        tfoot>
     table>
表格的样式(p98)
border-spacing
指定边边块之间的距离
border-spacing: 0px;
border-collspacing
设置边框的合并
table-cell
display: table-cell;
<style>
table{
            width: 50%;
            border: 1px solid red;
            margin:0 auto;
               border-spacing: 0ch;
        }
        td{
            border: 1px solid red;
            height: 100px;
              }
       tbody tr:nth-child(2n){
           /* tr 是 tbody的子元素 */
            background-color: aqua;
        }
        style>

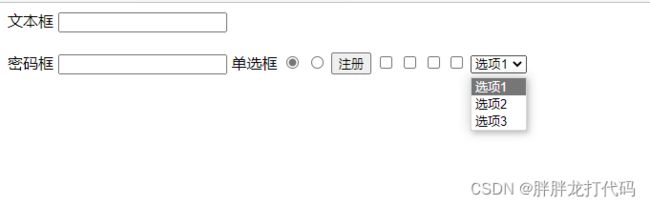
表单简介(p99 p100)
文本框 text
密码框 password
单选按钮 radio
多选框 checkbox
下拉列表 select
<form action="target.html">
 文本框 <input type="text" name=""><br><br>
            密码框 <input type="password" name="提交给服务器">
            单选框 <input type="radio" name="1">
            <input type="radio" name="1" checked>

            <input type="submit" value="注册">
            <input type="checkbox" name="2">
            <input type="checkbox" name="2">
            <input type="checkbox" name="2">
            <input type="checkbox" name="2">


            <select name="3" id="">
                <option value="">选项1option>
                <option value="">选项2option>
                <option value="">选项3option>
            select>
      form>
在text中
autocomplete=“off” 关闭自动补全
readonly 将表单设置为只读,数据会提交
disabled 将表单设置为禁用,数据不会提交
autofocus 设置表单项自动获取焦点
<input type="text" name="username" value="" autocomplete="off" readonly autofocus><br><br>
项目搭建(p101~p106)
/* 主页的index.html的样式表 */
/* -------------顶部导航条容器-------------- */
.topbar-wrapper{
    /* 设置宽度全屏 */
    width: 100%;
    background-color: #333;
    height: 40px;
    line-height: 40px;
}
/* 设置超链接颜色 */
.topbar a{
    font-size: 12px;
    color: #b0b0b0;
    /* 生成块元素,让a的一个区域可以点击 */
    display: block;
}
/* --------设置左侧导航栏 -----------*/
.service{
    float: left;
}
/* --------设置右侧导航条------------ */
.shop-cart ,.user-info{
    float: right;
}
.topbar li{
    float: left;
}
/* 设置超链接移入的效果 */
.topbar a:hover{
    color: aliceblue;
}
/* 设置中间的分割线 */
.topbar .line{
    color: #424242;
    margin: 0 8px;
}
/* 设置购物车的样式 */
.shop-cart1{
    width: 120px;
    background-color: #424242;
    text-align: center;
}
i{
    margin-right: 2px;
}
.shop-cart:hover a{
    background-color:white ;
    color: orange;
}
/* ------------设置下载app 的下拉二维码------------- */
.app .qrcode{
    display: none;
    position: relative;
    width: 124px;
    height: 148px;
    background-color: #ffffff;
    text-align: center;
    box-shadow: 0 0 10px rgba(0, 0, 0 ,0.3);
    left: -30px;
}
.app:hover .qrcode{
    display: block;

}
.app{
    width: 46px;
}
/* 设置app的小三角 */
.app::after{
    content:" ";
    width: 0px;
    height: 0px;
    position:relative;
    border: 10px  transparent solid;
      /* 去除上边框 */
    border-top: none;
    /* 单独设置下边框颜色 */
    border-bottom-color: rgb(255, 255, 255);
    left: 20px;
    top: -186px;
}
/* -------------设置购物车下拉框--------------- */
.shop-cart2{
    content: "购物车中还没有商品,赶紧选购啊!";
    background-color:white;
    display: none;
}
.shop-cart:hover .shop-cart2{
    display: block;
    width: 350px;
    height: 200px;
    background-color: #ffffff;
    box-shadow:  0 0 10px rgba(0, 0, 0 ,0.3);
    position: relative;
    right: 230px;
}
/* -----------------头部logo------------------- */
.header{
    height: 100px;

}
.header .logo{
   margin-top: 22px;
}
.header .logo a{
   display:block;
   width: 60px;
   height: 55px;
   background-position: center;
   background-image: url(/img/logo.png);
   background-position: center;
}


```html

    <link rel="stylesheet" href="/reset.css">

    <link rel="stylesheet" href="/06.font&background/font/css/all.css">

    <link rel="stylesheet" href="/mi/css/index.css">

    <link rel="stylesheet" href="/mi/css/base.css">
    <style>

    style>
head>

<body>


    <div class="topbar-wrapper">

        <div class="topbar w clear-fix">

            <ul class="service">
                <li><a href="#">小米商城a>li>
                <li class="line">|li>
                <li><a href="#">MIUIa>li>
                <li class="line">|li>
                <li><a href="#">loTa>li>
                <li class="line">|li>
                <li><a href="#">云服务a>li>
                <li class="line">|li>
                <li><a href="#">金融a>li>
                <li class="line">|li>
                <li><a href="#">有品a>li>
                <li class="line">|li>
                <li><a href="#">小爱开放平台a>li>
                <li class="line">|li>
                <li><a href="#">企业团购a>li>
                <li class="line">|li>
                <li><a href="#">资质证照a>li>
                <li class="line">|li>
                <li><a href="#">协议规则a>li>
                <li class="line">|li>
                <li>
                    <a href="#" class="app">下载app

                        <div class="qrcode">
                            <div class="app1">div>
                            <img src="/img/小米二维码.png" alt="">
                        div>
                    a>
                li>
                <li class="line">|li>
                <li><a href="#">select locationa>li>
                <li class="line select">|li>

            ul>

            <ul class="shop-cart">
                <li><a href="#" class="shop-cart1" >
                        <i class="fas fa-shopping-cart">
                        i>
                        购物车(0)<div class="shop-cart2">div>a>
                li>
            ul>

            <ul class="user-info">
                <li><a href="#">登入a>li>
                <li class="line">|li>
                <li><a href="#">注册a>li>
                <li class="line">|li>
                <li><a href="#">消息通知a>li>
                <li class="line">|li>
            ul>

        div>
    div>

    <div class="header-wrapper">
        <div class="header w">

            <h1 class="logo">
                <a href="#">

                a>
            h1>
        div>
    div>
body>
