原文由alex发表于TesterHome社区网站,点击原文链接可与作者直接交流
本文将介绍下 UI 自动化的页面对象管理工具PO-Manager之实现思路:
更多PO-Manager的介绍,可查看上篇《UI 自动化的页面对象管理神器 PO-Manager》
基本架构
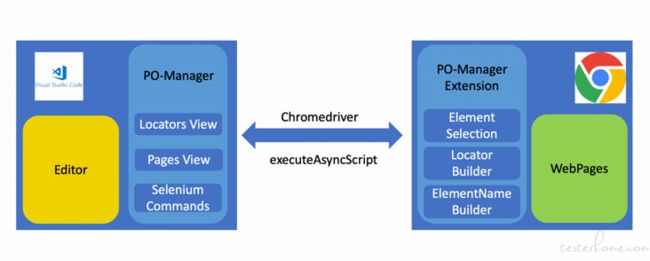
如图所示,该工具作为vscode 插件,因为要跟webpage的dom 进行双向沟通,我们将借用webdriver 里的js 执行器来进行通讯。
加载插件
我们需要启动一个chromedriver session, 同时加载一个chrome插件, 这插件其是基于selenium IDE recorder的一个改造版本,
    //driver = new Builder().forBrowser('chrome').build();
    const builder = new Builder().withCapabilities({
        browserName: 'chrome',
        'goog:chromeOptions': {
        // Don't set it to headless as extensions dont work in general
        // when used in headless mode
        args: [`load-extension=${path.join(__dirname + '../../build')}`],
        },
    })
    driver = await builder.build()
然后在每个dom 里会有下面几个方法:
//在dom中我们将通过给window 对象绑定新函数的方式注入我们需要调用的方法
window.__side.selectElement = async callback => {
  await window.__side.postMessage(window, {
    action: 'select',
  }).then(callback)
}

window.__side.generateElement = async (callback, options) => {
  await window.__side.postMessage(window, {
    action: 'generateElement',
    builderOptions: options
  }).then(callback)
}

window.__side.generateElements = async (callback, options) => {
  await window.__side.postMessage(window, {
    action: 'generateElements',
    builderOptions: options
  }).then(callback)
}

window.__side.generateAllElements = async (callback, options) => {
  await window.__side.postMessage(window, {
    action: 'generateAllElements',
    builderOptions: options
  }).then(callback)
}
vscode 调用
在PO-Manager 中我们将通过jsExecutor 去向对应的web页面中执行js脚本,你可能会好奇这里为啥要用executeAsyncScript 而不是executeScript, 并且还有个callback,这个其实是因为我们选择页面元素是一个异步过程,所以需要callback 来保证正确的返回。
executeAsyncScript的用法可以参考这里:
    async selectElement(): Promise  {
        await this.showBrowser()
        return this.driver.executeAsyncScript(`var callback = arguments[arguments.length - 1];
                                                window.__side.selectElement(callback);`)
                    .then(value => {
                        return value
                    })
    }

    async generateElement(): Promise  {
        await this.showBrowser()
        let options = {pascalCase: this.pascalCase, preserveConsecutiveUppercase: this.preserveConsecutiveUppercase}
        return this.driver.executeAsyncScript(`var callback = arguments[arguments.length - 1];
                                                window.__side.generateElement(callback, arguments[0]);`, options)
                    .then(value => {
                        return value
                    })
    }

    async generateElements(): Promise  {
        await this.showBrowser()
        let options = {pascalCase: this.pascalCase, preserveConsecutiveUppercase: this.preserveConsecutiveUppercase}
        return this.driver.executeAsyncScript(`var callback = arguments[arguments.length - 1];
                                                window.__side.generateElements(callback, arguments[0]);`, options)
                    .then(value => {
                        return value
                    })
    }

    async generateAllElements(): Promise  {
        let options = {pascalCase: this.pascalCase, preserveConsecutiveUppercase: this.preserveConsecutiveUppercase}
        return this.driver.executeAsyncScript(`var callback = arguments[arguments.length - 1];
                                                window.__side.generateAllElements(callback, arguments[0]);`, options)
                    .then(value => {
                        return value
                    })
    }
选中元素
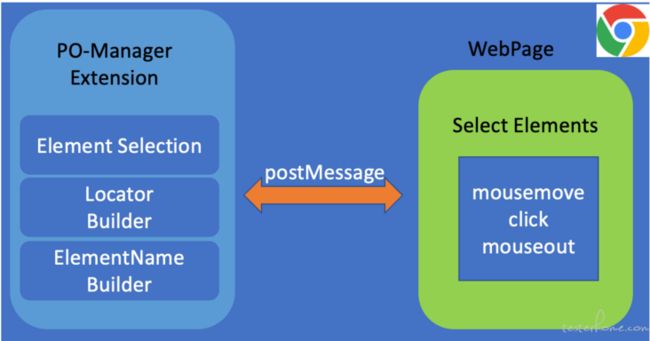
从上图中我们可以看到,当我们想添加元素对象的时候,我们要去选择一个页面元素,我们得要想页面注入mousemove, click, mouseout的事件监听,并且要有highlight的效果显示我们focus 元素:
注入监听
//TargetSelector
  constructor(callback, cleanupCallback) {
    this.callback = callback
    this.cleanupCallback = cleanupCallback

    // Instead, we simply assign global content window to this.win
    this.win = window
    const doc = this.win.document
    const div = doc.createElement('div')
    div.setAttribute('style', 'display: none;')
    //doc.body.insertBefore(div, doc.body.firstChild)
    doc.body.appendChild(div)
    this.div = div
    this.e = null
    this.r = null
    if (window === window.top) {
      this.showBanner(doc)
      doc.body.insertBefore(this.banner, div)
    }
    doc.addEventListener('mousemove', this, true)
    doc.addEventListener('click', this, true)
    doc.addEventListener('mouseout', this, true)
  }
处理mouseover和click事件
handleEvent(evt) {
    switch (evt.type) {
      case 'mousemove':
        this.highlight(evt.target.ownerDocument, evt.clientX, evt.clientY)
        break
      case 'click':
        if (evt.button == 0 && this.e && this.callback) {
          this.callback(this.e, this.win)
        } //Right click would cancel the select
        evt.preventDefault()
        evt.stopPropagation()
        this.cleanup()
        break
      case 'mouseout':
        this.removeHighlight()
        this.e = null
        break
    }
  }
上面部分的js都是以content-script的形式注入的,但我们调用js executor的时候只能去执行在dom 底下的 function,这时候在里dom 就只能通过postMessage 的方式了来调用content-script的方法了。
content-script介绍具体可以参考chrome插件开发
如何生成一个元素对象
"新闻Link": {
        "type": "xpath",
        "locator": "(//a[contains(text(),'新闻')])[1]"
    }
当我们选中一个元素后,要生成上面一个对象,我们需要处理2个部分
- 定位器
下面的代码是按照以找到id 为唯一标识,然后生成相对路径的xpath, 这是最通用的策略,当然对于link或者button 我们也可以以文字显示为标识。
更多的定位器生成方法,可以查看这里的 源码:
LocatorBuilders.add('xpath:idRelative', function xpathIdRelative(e) {
  let path = ''
  let current = e
  while (current != null) {
    if (current.parentNode != null) {
      path = this.relativeXPathFromParent(current) + path
      if (
        1 == current.parentNode.nodeType && // ELEMENT_NODE
        current.parentNode.getAttribute('id')
      ) {
        return this.preciseXPath(
          '//' +
            this.xpathHtmlElement(current.parentNode.nodeName.toLowerCase()) +
            '[@id=' +
            this.attributeValue(current.parentNode.getAttribute('id')) +
            ']' +
            path,
          e
        )
      }
      else if(current.parentNode.nodeName.toLowerCase() == 'body'){
        return this.preciseXPath(
          '//body' + path,
          e
        )
      }
    } else {
      return null
    }
    current = current.parentNode
  }
  return null
})- 生成元素名
基本上选择了所见即所得的策略,优先选择显示文字,然后id, class次之, 这个当然在设定中可以配置
  buildName(element){
    if(element.tagName == "svg") {
      element = element.parentElement
    }
    let attrList = ["id", "text", "class"]
    let originalText = this.nameCandidate(element, attrList)
    let name = ""
    let nameArr = (typeof originalText == "string" && originalText.match(/[a-zA-Z0-9\u4e00-\u9fa5]+/g)) || ["DefaultElement"]
    for(const n of nameArr){
      if(name.length >= 30) break
      name += n + ' '
    }
    name = camelcase(name, this.options)
    name = this.append(element, name)
    return name
  }
元素筛选
上面是针对单个元素,如果我们要选择批量添加元素或者整个页面添加的时候,我们会遇到一个问题,dom 元素太多,那我们该如何筛选呢?
通过对dom 的研究发现,我们大部分时候,只需要包含文字的叶节点,而且table select 之类的复杂元素,我们也只需要加入这个父节点就行。
所以针对这个,我用xpath 做了如下的过滤规则
xpath=.//*[not(ancestor::table)][normalize-space(translate(text(),' ',' '))][not(ancestor::select)][not(self::sup)][not(self::iframe)][not(self::frame)][not(self::script)]|.//input[not(ancestor::table)][@type!='hidden']|(.//img|.//select|.//i|.//a|.//h1|.//h2|.//h3|.//h4)[not(ancestor::table)]然后再对元素进行可见性筛选,基本就能满足大部分的需求了。
最后对每个元素生成定位器和元素名,然后返回到PO-Manager 插件并转化成json 插入到编辑器就行了
function generateElements(options){
  return new Promise(res => {
    new TargetSelector(function(element, win) {
      if (element && win) {
        //TODO: generateElements
        let elements = {}
        let xpathFilter = `xpath=.//*[not(ancestor::table)][normalize-space(translate(text(),' ',' '))][not(ancestor::select)][not(self::sup)][not(self::iframe)][not(self::frame)][not(self::script)]|.//input[not(ancestor::table)][@type!='hidden']|(.//img|.//select|.//i|.//a|.//h1|.//h2|.//h3|.//h4)[not(ancestor::table)]`
        let elementList = locatorBuilders.findElements(xpathFilter, element)
        for(const ele of elementList){
          if(!isDisplayed(ele)) continue
          const target = locatorBuilders.build(ele)
          nameBuilder.setBuilderOptions(options)
          const elementName = nameBuilder.buildName(ele)
          elements[elementName] = {
            type: target.slice(0,target.indexOf('=')),
            locator: target.slice(target.indexOf('=') + 1)
          }
        }
        if (elements) {
          res(JSON.stringify(elements))
        }
      }
    })
  })
}
下面是一个添加选中区域内元素的例子: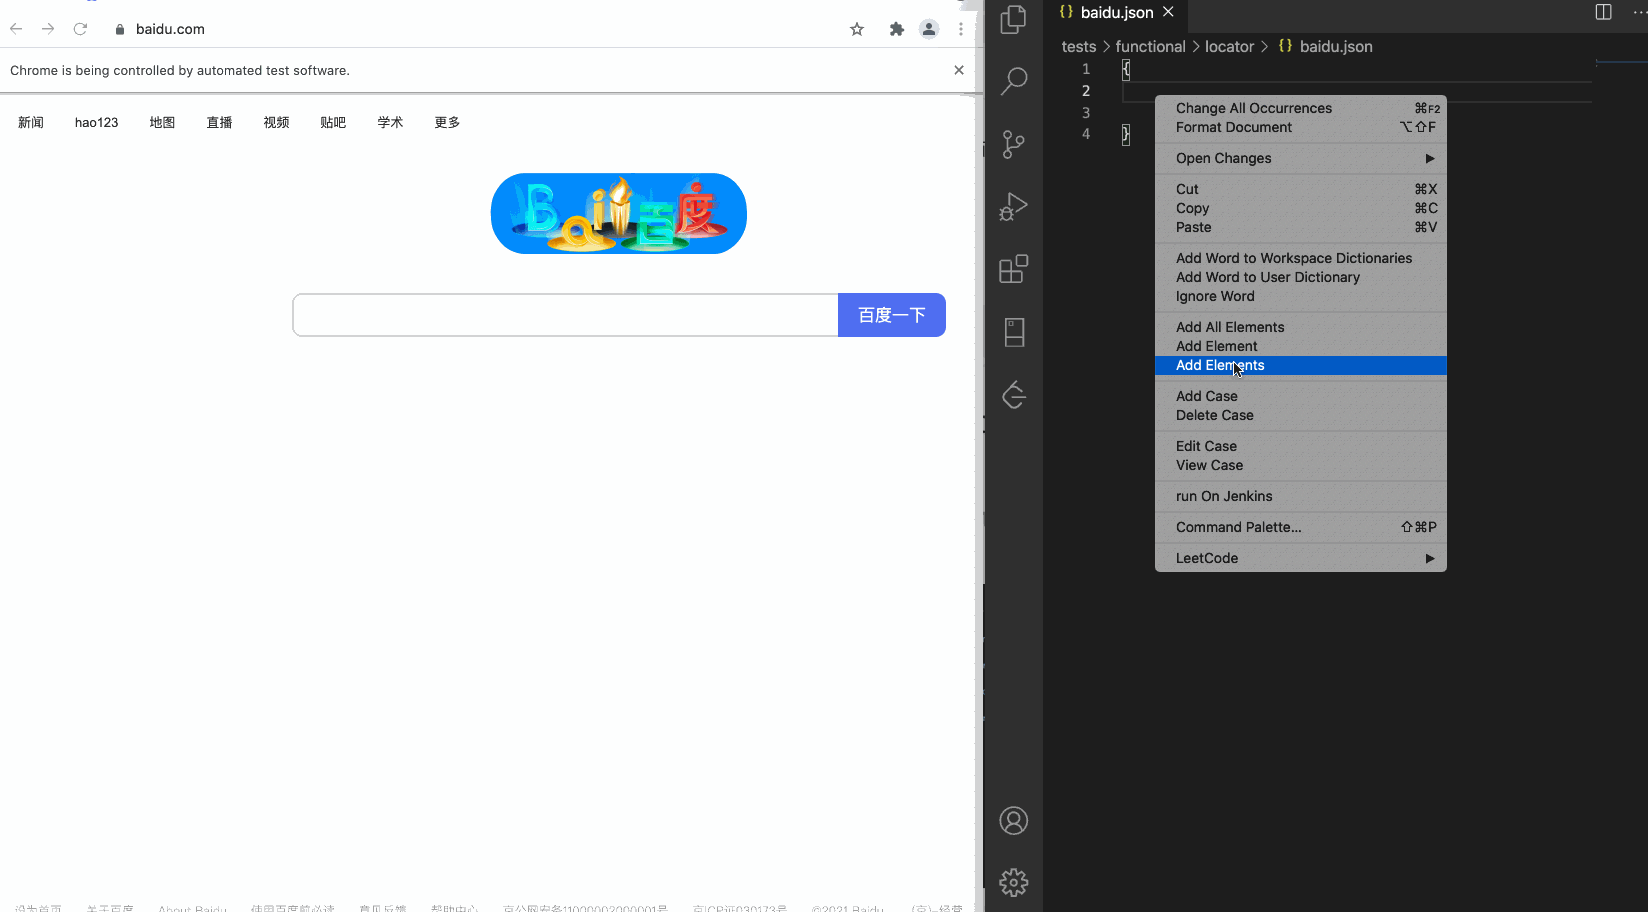
总结一下:
- selenium 启动browser的时候加载了一个插件,存放一些常驻的js 方法(比如元素选择,生成定位器,元素名称等等)
- 当用户选择元素时,通过driver.executeAsyncScript这个方法调用后台js
- new TargetSelector 这个方法会网页注入js mouseover 和click的监听, 当用户click的时候,选择的元素然后通过locatorBuilders.build(element) 生成对应的定位器
- 生成定位器的方式主要是基于当前元素和一些固定属性之间的反推,判定某些属性可以唯一定位到该元素即可
- 然后给元素生成合适的名称,最后组成json 返回给vscode 插件,生成json 插入到编辑器中
最后欢迎大家star 和 fork,一起来改进。
https://github.com/zzhengjian...
原文由alex发表于TesterHome社区网站,点击原文链接可与作者直接交流

想了解更多关开源工具,与更多开源项目作者直接交流?
欢迎关注第十届中国互联网测试开发大会(MTSC 2002 上海)· 开源专场 >>>