Linux -- 基本指令操作 --- (中篇)
目录
1、cp 指令
2、mv 指令
3、cat 指令
4、more 指令和 less 指令
5、head 指令
6、tail 指令
7、标准输出、标准输入、重定向
8、 管道
9、date 相关指令
撸起袖子继续整...
1、cp 指令
语法:cp [选项] src dst
拷贝普通文件
// 当前目录下拷贝文件 test.c 到 cp.c
[xxp@VM-24-3-centos ~]$ cp test.c cp.c
[xxp@VM-24-3-centos ~]$ ll
total 36
-rwxrwxr-x 1 xxp xxp 8360 Mar  6 23:59 a.out
-rw-rw-r-- 1 xxp xxp   77 Mar  9 22:46 cp.c
drwxrwxr-x 2 xxp xxp 4096 Mar  9 17:00 evil
drwxrwxr-x 4 xxp xxp 4096 Mar  9 16:54 learn
-rw-rw-r-- 1 xxp xxp    0 Mar  9 16:20 myfile.txt
-rw-rw-r-- 1 xxp xxp    5 Mar  6 23:00 study
-rw-rw-r-- 1 xxp xxp   77 Mar  6 23:58 test.c
drwxrwxr-x 2 xxp xxp 4096 Mar  9 22:40 wow
[xxp@VM-24-3-centos ~]$ cat cp.c  // 检查是否拷贝成功
#include

int main()
{
    printf("hello linux\n");
    return 0;
}
相对路径拷贝
例如:拷贝当前目录的文件给上级目录,如果目标文件未命名则默认与源文件名字相同。
[xxp@VM-24-3-centos ~]$ ll
total 36
drwxrwxr-x 4 xxp xxp 4096 Mar  9 16:54 learn
[xxp@VM-24-3-centos ~]$ cd ./learn
[xxp@VM-24-3-centos learn]$ ll
total 24
-rwxrwxr-x 1 xxp xxp 8968 Mar  7 22:33 a.out
drwxrwxr-x 3 xxp xxp 4096 Mar  9 16:54 linux
-rw-rw-r-- 1 xxp xxp  105 Mar  7 22:33 test1.c
drwxrwxr-x 2 xxp xxp 4096 Mar  9 15:17 wow
[xxp@VM-24-3-centos learn]$ cp test1.c ../        //默认与源文件名字相同
[xxp@VM-24-3-centos learn]$ cp test1.c ../test2.c //将test1.c拷贝到上级目录并重命名为test2.c
[xxp@VM-24-3-centos learn]$ cd ..
[xxp@VM-24-3-centos ~]$ ll
total 44
drwxrwxr-x 4 xxp xxp 4096 Mar  9 16:54 learn
-rw-rw-r-- 1 xxp xxp  105 Mar  9 22:48 test1.c
-rw-rw-r-- 1 xxp xxp  105 Mar  9 22:50 test2.c
拷贝目录文件
cp -r 指令 表示递归拷贝,当目录下有不属于其的文件时,有可能会出现提问信息,如果想要避免则需要使用指令 cp -rf 强制拷贝
[xxp@VM-24-3-centos ~]$ ll
total 44
drwxrwxr-x 2 xxp xxp 4096 Mar  9 17:00 evil
drwxrwxr-x 4 xxp xxp 4096 Mar  9 16:54 learn
[xxp@VM-24-3-centos ~]$ cp -rf learn learn_back  // 强制拷贝
[xxp@VM-24-3-centos ~]$ cp -r evil evil_back     // 递归拷贝
[xxp@VM-24-3-centos ~]$ ll
total 48
drwxrwxr-x 4 xxp xxp 4096 Mar  9 23:09 learn_back
drwxrwxr-x 2 xxp xxp 4096 Mar  9 23:10 evil_back
总结:1、cp 普通文件拷贝
2、cp -rf 强制拷贝(目录文件)
2、mv 指令
语法:mv [选项] src dst
下面这个指令呢等同于Windows系统里的文件剪切功能
将目录learn下的test.c文件剪切到上级目录当中去
[nice@VM-24-3-centos ~]$ ll
total 4
drwxrwxr-x 3 nice nice 4096 Mar  9 23:21 learn
-rw-rw-r-- 1 nice nice    0 Mar  9 23:19 p1
-rw-rw-r-- 1 nice nice    0 Mar  9 23:19 p2
[nice@VM-24-3-centos ~]$ cd ./learn
[nice@VM-24-3-centos learn]$ ll
total 20
-rwxrwxr-x 1 nice nice 8360 Mar  9 23:21 a.out
drwxrwxr-x 2 nice nice 4096 Mar  9 23:19 linux
-rw-rw-r-- 1 nice nice   76 Mar  9 23:21 test.c
[nice@VM-24-3-centos learn]$ mv test.c ..
[nice@VM-24-3-centos learn]$ ll ..
total 8
drwxrwxr-x 3 nice nice 4096 Mar  9 23:23 learn
-rw-rw-r-- 1 nice nice    0 Mar  9 23:19 p1
-rw-rw-r-- 1 nice nice    0 Mar  9 23:19 p2
-rw-rw-r-- 1 nice nice   76 Mar  9 23:21 test.c
[nice@VM-24-3-centos learn]$ ll
total 16
-rwxrwxr-x 1 nice nice 8360 Mar  9 23:21 a.out
drwxrwxr-x 2 nice nice 4096 Mar  9 23:19 linux
同样的我们可以将一整个目录剪切到另一个目录当中去
[nice@VM-24-3-centos ~]$ ll
total 12
drwxrwxr-x 3 nice nice 4096 Mar  9 23:23 learn
-rw-rw-r-- 1 nice nice    0 Mar  9 23:19 p1
-rw-rw-r-- 1 nice nice    0 Mar  9 23:19 p2
-rw-rw-r-- 1 nice nice   76 Mar  9 23:21 test.c
drwxrwxr-x 2 nice nice 4096 Mar  9 23:28 wow
[nice@VM-24-3-centos ~]$ mv learn wow
[nice@VM-24-3-centos ~]$ ll
total 8
-rw-rw-r-- 1 nice nice    0 Mar  9 23:19 p1
-rw-rw-r-- 1 nice nice    0 Mar  9 23:19 p2
-rw-rw-r-- 1 nice nice   76 Mar  9 23:21 test.c
drwxrwxr-x 3 nice nice 4096 Mar  9 23:29 wow
[nice@VM-24-3-centos ~]$ ll ./wow
total 4
drwxrwxr-x 3 nice nice 4096 Mar  9 23:23 learn
mv 除了可以剪切还可以对文件进行重命名
[nice@VM-24-3-centos ~]$ ll
total 8
-rw-rw-r-- 1 nice nice    0 Mar  9 23:19 p1
-rw-rw-r-- 1 nice nice    0 Mar  9 23:19 p2
-rw-rw-r-- 1 nice nice   76 Mar  9 23:21 test.c
drwxrwxr-x 3 nice nice 4096 Mar  9 23:29 wow
[nice@VM-24-3-centos ~]$ mv p1 p3
[nice@VM-24-3-centos ~]$ ll
total 8
-rw-rw-r-- 1 nice nice    0 Mar  9 23:19 p2
-rw-rw-r-- 1 nice nice    0 Mar  9 23:19 p3
-rw-rw-r-- 1 nice nice   76 Mar  9 23:21 test.c
drwxrwxr-x 3 nice nice 4096 Mar  9 23:29 wow
[nice@VM-24-3-centos ~]$ mv wow apple
[nice@VM-24-3-centos ~]$ ll
total 8
drwxrwxr-x 3 nice nice 4096 Mar  9 23:29 apple
-rw-rw-r-- 1 nice nice    0 Mar  9 23:19 p2
-rw-rw-r-- 1 nice nice    0 Mar  9 23:19 p3
-rw-rw-r-- 1 nice nice   76 Mar  9 23:21 test.c
总结:1、mv 剪切功能,将目录或是普通文件剪切到对应路径。
2、对指定文件进行重命名。
3、cat 指令
语法:cat [选项] [文件]
功能: 查看文件内容 (正序输出)
[xxp@VM-24-3-centos ~]$ cat test.c
#include

int main()
{
    printf("hello linux\n");
    return 0;
}
cat -b [文件] 对非空文件输出行编号
[xxp@VM-24-3-centos ~]$ cat -b test.c
     1	#include

     2	int main()
     3	{
     4	    printf("hello linux\n");
     5	    return 0;
     6	}
cat -n [文件] 对输出所有行编号
[xxp@VM-24-3-centos ~]$ cat -n test.c
     1	#include
     2
     3	int main()
     4	{
     5	    printf("hello linux\n");
     6	    return 0;
     7	}
cat -s [文件] 对于有多个空行的文件输出一个空行

★ tac 逆序输出文件内容
[xxp@VM-24-3-centos ~]$ tac test.c
}
    return 0;
    printf("hello linux\n");
{
int main()

#include
4、more 指令和 less 指令
语法: more [选项] [文件]
功能: 类似于cat 指令
上面我们提到的 cat 指令,功能是查看文件内容,这里会它会将文件里的所有内容输出出来。试想一下如果查看的文件内容太大的话,当文件内容输出后我们将看到文件末端内容,这样并不方便从头开始阅读,这里的more指令将会改善这一情况。
more指令执行结果如下:会在你的工作台尽可能多的显示文件内容,并且底端会表明你当前已查看内容所占比例。按enter向下继续查看内容,按q退出。
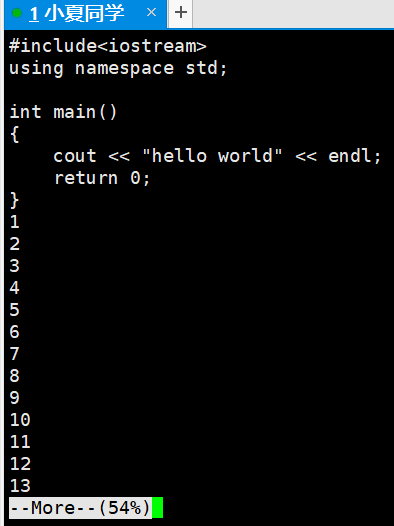
less 指令类似于 more指令,不再赘述,自己验证试试即可。
5、head 指令
head 与 tail 就像它的名字一样的浅显易懂,它是用来显示开头或结尾某个数量的文字区块, head 用来显示档案的开头至标准输出中,而 tail 想当然就是看档案的结尾。
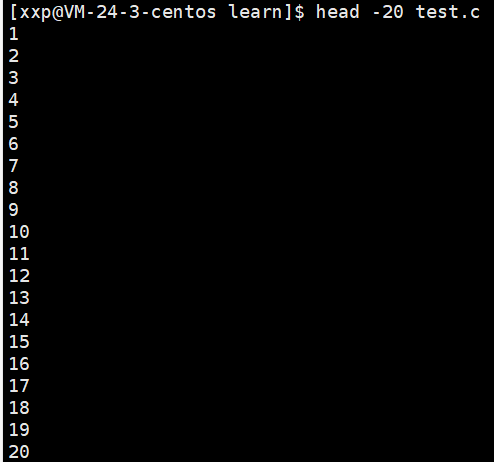
语法: head [参数] [文件]
功能:head 用来显示档案的开头至标准输出中,默认head命令打印其相应文件的开头10行。
选项:
-n<行数> 显示的行数
默认情况下:
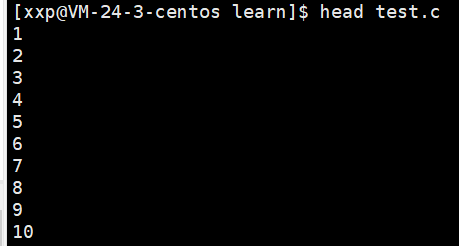
加上选项后 即想要查看的行数。
tail 用法和 head 相同,唯一区别在于 head 显示文件头的内容,而 tail 显示文件尾的内容。默认情况如下:

在 tail 指令后添加 选项参数后

6、tail 指令
tail 命令从指定点开始将文件写到标准输出.使用tail命令的-f选项可以方便的查阅正在改变的日志文件,tail -f filename会把filename里最尾部的内容显示在屏幕上,并且不但刷新,使你看到最新的文件内容。
选项: -f 循环读取
-n 读取的行数
head -20 test.c > tmp 将test.c 文件的前 20 行存放到新文件 tmp 当中。
7、标准输出、标准输入、重定向
[xxp@VM-24-3-centos learn]$ echo "hello world"    //将输出字符串,显示到标准输出
hello world
[xxp@VM-24-3-centos learn]$ echo "hello world" > log.txt  // 重定向
[xxp@VM-24-3-centos learn]$ cat log.txt
hello world
重定向: 本应该标准输出到屏幕上的内容重定向到文件当中。如果目标文件不存在,则自动创建。
★ 输出重定向,会清空原始文件内容,重新写入。
>> 追加重定向
[xxp@VM-24-3-centos learn]$ echo "linux" > log.txt
[xxp@VM-24-3-centos learn]$ echo "linux" >> log.txt
[xxp@VM-24-3-centos learn]$ cat log.txt
linux
linux
★ 输入重定向
[xxp@VM-24-3-centos learn]$ cat < log.txt
linux
linux
cat 标准输入 默认从键盘读入
[xxp@VM-24-3-centos learn]$ cat
hello
hello
8、 管道
符号 |
其表示流水线式的数据处理,例如查看 test.c 文件的 6-10 行的数据
[xxp@VM-24-3-centos learn]$ head -10 test.c | tail -5
6
7
8
9
10
9、date 相关指令
date显示
date 指定格式显示时间: date +%Y:%m:%d
date 用法: date [OPTION]... [+FORMAT]
1.在显示方面,使用者可以设定欲显示的格式,格式设定为一个加号后接数个标记,其中常用的标记列表如下
%H : 小时(00..23)
%M : 分钟(00..59)
%S : 秒(00..61)
%X : 相当于 %H:%M:%S
%d : 日 (01..31)
%m : 月份 (01..12)
%Y : 完整年份 (0000..9999)
%F : 相当于 %Y-%m-%d
[xxp@VM-24-3-centos learn]$ date +%y:%m:%d
22:03:11
[xxp@VM-24-3-centos learn]$ date +%X
10:16:44 PM
[xxp@VM-24-3-centos learn]$ date +%H:%M:%S
22:17:08
2.在设定时间方面
date -s //设置当前时间,只有root权限才能设置,其他只能查看。
date -s 20080523 //设置成20080523,这样会把具体时间设置成空00:00:00
date -s 01:01:01 //设置具体时间,不会对日期做更改
date -s “01:01:01 2008-05-23″ //这样可以设置全部时间
date -s “01:01:01 20080523″ //这样可以设置全部时间
date -s “2008-05-23 01:01:01″ //这样可以设置全部时间
date -s “20080523 01:01:01″ //这样可以设置全部时间
3.时间戳
时间->时间戳: date +%s
时间戳->时间: date -d@1508749502
Unix时间戳(英文为Unix epoch, Unix time, POSIX time 或 Unix timestamp)是从1970年1月(UTC/GMT的午夜)开始所经过的秒数,不考虑闰秒。
★★★★★ 感谢阅读!!!