背景
最近突然接到了一个产品的需求,有点特别,在这里给大家分享一下,需求如下
- 提交表单,同时要上传模型资源
- 模型文件是大文件,要显示上传进度,同时可以删除
- 模型文件要上传到服务器,表单数据同步到数据库
- 同时要同步上传后的模型地址到数据库
- 后端使用Minio做文件管理
设计图如下

一开始以为是一个简单的表单上传,发现并不是,这是大文件上传啊,但很快又发现,不单单是上传大文件,还有将文件信息关联到表单。
基于这个奇葩的情况,我和后端兄弟商量了一下,决定使用如下方案
实现方案
分2步走
- 点击上传时,先提交表单信息到数据库,接着后端返回一个表单的id给我
- 当所有文件上传完成后,再调用另外一个服务,将上传完成后的地址和表单id发送给后端
如此,便完成了上面的需求
了解一下Mino
这里大家先了解一下Minio的js SDK文档
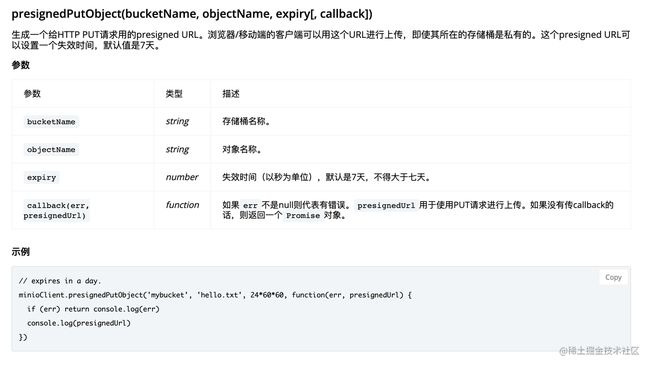
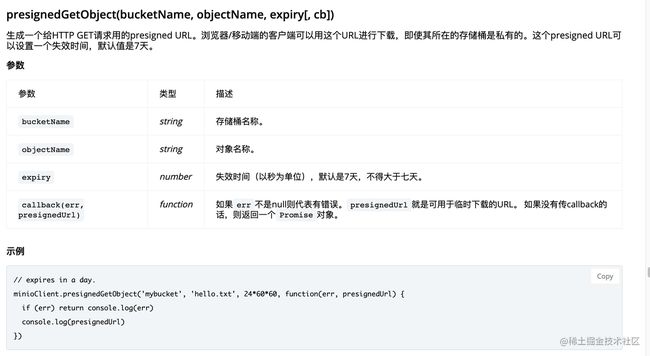
里面有2个很重要的接口,今天要用到
| 一个是给文件生成用于put方法上传的地址 |
|---|
 |
| 一个是获取已经上传完成后的文件的get下载地址 |
|---|
实现步骤
这里是使用原生的 ajax请求进行上传的,至于为什么,后面会有说到
1.创建存储桶
创建一个Minio上传实例
var Minio = require('minio')

this.minioClient = new Minio.Client({
    endPoint: '192.168.172.162', //后端提供
    port: 9000, //端口号默认9000
    useSSL: true,
    accessKey: 'Q3AM3UQ867SPQQA43P2F', //后端提供
    secretKey: 'zuf+tfteSlswRu7BJ86wekitnifILbZam1KYY3TG'
});

this.userBucket = 'yourBucketName' //这里后端需要提供给你,一个存储桶名字
2.选择文件
这里使用input标签选择文件,点击选择文件的时候,调用一下input的click方法,就可以打开本地文件夹
  选择文件

  仅支持.gbl、.gltf、.fbx、.obj、.mtl、.hdr、.png、.jpg格式的文件
  单个文件的大小限制为128MB
selectFile() {
    let inputDOM = this.$refs.uploadInput
    inputDOM.click();
},
接着就是对文件进行格式化
//格式化文件并创建上传队列
  getAndFormatFile(){
    let files = this.$refs.uploadInput.files
    const userBucket = this.userBucket
    if(files.length > 6) {
      this.$message({
        message: `最大只能上传6个文件`,
        type: 'warning'
      })
      return
    }
    files.forEach((file, index) => {
      if ((file.size / 1024 / 1024).toFixed(2) > 128) { //单个文件限制大小为128MB
        this.$message({
          message: `文件大小不能超过128MB`,
          type: 'warning'
        })
        return
      }
      //创建文件的put方法的url
      this.minioClient.presignedPutObject(userBucket, file.name, 24 * 60 * 60, (err, presignedUrl) => {
        if (err) {
          this.$message({
            message: `服务器连接超时`,
            type: 'error'
          })
          return err
        }
        let fileIcon = this.getFileIcon(file)
        let fileUploadProgress = '0%' //文件上传进度
        this.fileInfoList.push({
          file, //文件
          fileIcon, //文件对应的图标 className
          fileUploadProgress, //文件上传进度
          filePutUrl: presignedUrl, //文件上传put方法的url
          fileGetUrl: '', //文件下载的url
        })
      })
    })
    this.fileList = [...this.fileInfoList]
  },
3.创建上传队列
这里定义了一个创建文件上传请求的方法,使用原生的XMLHttpRequest,它接受以下参数
- file:要上传的文件
- filePutUrl:文件上传的put方法地址
- customHeader: 自定义的头信息
- onUploadProgress:文件上传的进度监听函数
- onUploaded:文件上传完成的监听函数
- onError:文件上传出错的监听函数
 //创建上传文件的http
  createUploadHttp(config){
    const {file, filePutUrl, customHeader, onUploadProgress, onUploaded, onError} = config
    let fileName = file.name
    let http = new XMLHttpRequest();
    http.upload.addEventListener("progress", (e) => { //监听http的进度。并执行进度监听函数
      onUploadProgress({
        progressEvent: e,
        uploadingFile: file
      })
    }, false)

    http.onload = () => {
      if (http.status === 200 && http.status < 300 || http.status === 304) {
        try {
        //监听http的完成事件,并执行上传完成的监听函数
          const result = http.responseURL
          onUploaded({ result, uploadedFile: file})
        } catch(error) {
        //监听错误
          onError({ error, errorFile: file})
        }
      }
    }

    http.open("PUT", filePutUrl, true);
    //加入头信息
    Object.keys(customHeader).forEach((key, index) =>{
      http.setRequestHeader(key, customHeader[key])
    })
    http.send(file);
    return http //返回该http实例
  }
4.开始上传
//上传文件到存储桶
  async handleUplaod(){
    let _this = this
    if(this.fileInfoList.length < 1) {
      this.$message({
        message: `请先选择文件`,
        type: 'warning'
      })
      return
    }
    //先上传文件的基本表单信息,获取表单信息的id
    try{
      const {remark, alias} = _this.uploadFormData
      let res = await uploadModelSourceInfo({remark, serviceName: alias})
      _this.modelSourceInfoId = res.message
    }catch(error){
      if(error) {
        _this.$message({
          message: `上传失败,请检查服务`,
          type: 'error'
        })
        return
      }
    }

    //开始将模型资源上传到远程的存储桶
    this.fileList.forEach((item, index) => {
      const {file, filePutUrl} = item
      let config = {
        file,
        filePutUrl,
        customHeader:{
          "X-FILENAME": encodeURIComponent(file.name),
          "X-Access-Token": getToken()
        },
        onUploadProgress: ({progressEvent, uploadingFile}) => {
          let progress = (progressEvent.loaded / progressEvent.total).toFixed(2)
          this.updateFileUploadProgress(uploadingFile, progress)
        },
        onUploaded: ({result, uploadedFile}) => {
          this.updateFileDownloadUrl(uploadedFile)
        },
        onError: ({error, errorFile}) => {

        }
      }

      let httpInstance = this.createUploadHttp(config) //创建http请求实例
      this.httpQueue.push(httpInstance) //将http请求保存到队列中
    })
  },


//更新对应文件的上传进度
updateFileUploadProgress(uploadingFile, progress) {
this.fileInfoList.forEach((item, index) => {
  if(item.file.name === uploadingFile.name){
    item.fileUploadProgress = (Number(progress)*100).toFixed(2) + '%'
  }
})
},

//更新上传完成文件的下载地址
updateFileDownloadUrl(uploadedFile){
const userBucket = this.userBucket
this.fileInfoList.forEach((item, index) => {
  if(item.file.name === uploadedFile.name){
    this.minioClient.presignedGetObject(userBucket, uploadedFile.name, 24*60*60, (err, presignedUrl) => {
      if (err) return console.log(err)
      item.fileGetUrl = presignedUrl
    })
  }
})
},
5 上传完成后,同步文件地址给后端
在watch里监听文件列表,当所有的文件进度都是100%时,表示上传完成,接着就可以同步文件信息
watch:{
  fileInfoList: {
    handler(val){
      //1.3所有文件都上传到存储桶后,将上传完成后的文件地址、文件名字同步后端
      if(val.length < 1) return
      let allFileHasUpload = val.every((item, index) => {
        return item.fileGetUrl.length > 1
      })
     if(allFileHasUpload) {
       this.allFileHasUpload = allFileHasUpload
       const {modelSourceInfoId} = this
       if(modelSourceInfoId.length < 1) {
         return
       }
       const url = process.env.VUE_APP_BASE_API + "/vector-map/threeDimensionalModelService/invokeMapService"
       const files = val.map((ite, idx) => {
         return {
            fileName: ite.file.name,
            fileUrl: ite.fileGetUrl
         }
       })
       this.syncAllUploadedFile(url, files, modelSourceInfoId)
     }

    },
    deep: true
  }
},


//同步已上传的文件到后端
syncAllUploadedFile(url, files, modelSourceInfoId){
    let xhr = new XMLHttpRequest()
    xhr.onload = () => {
      if (xhr.status === 200 && xhr.status < 300 || xhr.status === 304) {
        try {
         const res = JSON.parse(xhr.responseText)
         if(res && res.code === 200){
           this.$message({
             message: '上传完成',
             type: 'success'
           })
             this.$emit('close')
             this.fileInfoList = []
             this.fileList = []
             this.httpQueue = []
         }
        } catch(error) {
         this.$message({
           message: '上传失败,请检查服务',
           type: 'error'
         })
        }
      }
    }
    xhr.open("post", url, true)
    xhr.setRequestHeader('Content-Type', 'application/json')
    xhr.setRequestHeader('X-Access-Token', getToken())
    //将前面1.1获取文件信息的id作为头信息传递到后端
    xhr.setRequestHeader('ThreeDimensionalModel-ServiceID', modelSourceInfoId)
    xhr.send(JSON.stringify(files))
},
6.删除文件
删除文件时要注意
- 删除本地的文件缓存
- 删除存储桶里面的文件
- 停止当前文件对应的http请求
//删除文件,并取消正在文件的上传
  deleteFile(fileInfo, index){
    this.httpQueue[index] && this.httpQueue[index].abort()
    this.httpQueue[index] && this.httpQueue.splice(index, 1)
    this.fileInfoList.splice(index, 1)
    this.fileList.splice(index, 1)
    this.removeRemoteFile(fileInfo)
  },

  //清空文件并取消上传队列
  clearFile() {
    this.fileInfoList.forEach((item, index) => {
      this.httpQueue[index] && this.httpQueue[index].abort()
      this.httpQueue[index] && this.httpQueue.splice(index, 1)
      this.removeRemoteFile(item)
    })
    this.fileInfoList = []
    this.httpQueue = []
    this.fileList = []
  },
  //删除远程文件
  removeRemoteFile(fileInfo){
    const userBucket = this.userBucket
    const { fileUploadProgress, file} = fileInfo
    const fileName = file.name
    const complete = fileUploadProgress === '100.00%' ? true : false
    if(complete){
     this. minioClient.removeObject(userBucket, fileName, function(err) {
        if (err) {
          return console.log('Unable to remove object', err)
        }
        console.log('Removed the object')
      })
    }else{
      this.minioClient.removeIncompleteUpload(userBucket, fileName, function(err) {
        if (err) {
          return console.log('Unable to remove incomplete object', err)
        }
        console.log('Incomplete object removed successfully.')
      })
    }
  },
完整代码
这里的完整代码是我直接从工程里拷贝出来的,里面用到了一些自己封装的服务和方法 比如 后端的接口、AES解密、获取Token、表单验证等
import{uploadModelSourceInfo, uploadModelSource, getMinioConfig} from '@/api/map'
import AES from '@/utils/AES.js'
import { getToken } from '@/utils/auth'
import * as myValiDate from "@/utils/formValidate";
/**
* 文件说明
* @Author: zhuds
* @Description: 模型资源上传弹窗
分为3个步骤
1.先将文件的基本表单信息上传给后端,获取文件信息的ID
2.然后将文件上传存储桶
3.等所有文件都上传完成后,再将上传完成后的文件信息传递给后端,注意,此时的请求头要戴上第1步获取的文件信息id
* @Date: 2/28/2022, 1:13:20 PM
* @LastEditDate: 2/28/2022, 1:13:20 PM
* @LastEditor:
*/
上传模型资源
选择文件
仅支持.gbl、.gltf、.fbx、.obj、.mtl、.hdr、.png、.jpg格式的文件
单个文件的大小限制为128MB
{{item.file.name}}
{{(item.file.size/1024/1024).toFixed(2)}}MB
{{item.fileUploadProgress}}
x
源码分享
其实一开始我是想提供一个demo的,发现这个东西与产品功能强绑定,没有测试的服务地址和存储桶,也无法做出一个开放的案例
所以上面的代码只是给大家提供一种实现方式和思路,里面具体的细节处理我做的比较复杂
总结
到此这篇关于vue+Minio实现多文件进度上传的文章就介绍到这了,更多相关vue+Minio多文件进度上传内容请搜索脚本之家以前的文章或继续浏览下面的相关文章希望大家以后多多支持脚本之家!