使用EasyPoi导出Word文件,使用@Excel注释导出实体对象图片的解决方案
目录
一、问题介绍
二、解决方案展示
1.准备Word模板文件
2.部分实体对象
3.重写EasyPoi中ExcelEntityParse类的createCells方法
4.导出Word文件的主逻辑
4.执行效果
三、原理解释
1.官方文档中的图片导出方式适用场景
2.使用EasyPoi中的ExcelEntityParse对象,调用它的parseNextRowAndAddRow()方法实现Entity对象的自动填充
四、结束语
一、问题介绍
使用EasyPoi导出Excel时,遇到有图片的情况,EasyPoi还是非常友好的,在实体Entity对应的属性上设置@Excel(name="图片", type = 2)即可在正常导出图片到Excel文件中了。在EasyPoi的官方文档中对这部分也有介绍,详细的使用过程就不多赘述了,具体的方法请移步官方文档-->EasyPoi教程
    /**
     * 图片
     */
    @Excel(name = "图片", width = 20, height = 12, type = 2)
    @TableField("picture")
    private String picture;
在导出到Word文件时,查看官方文档的案例非常少,整个导出为Word的介绍只有两个案例(这里吐槽一下,官方的使用文档太少了,交流的圈子也小),并且导出的图片是通过创建ImageEntity对象,放入创建好的Map参数的形式进行注入的,这显然对于Entity对象是非常不友好,并且经过测试Entity对象使用导出为Excel的方法也是行不通的,将Entity对象放入Map中EasyPoi不会对表格的标题进行检索并装配。
后续查看资料以及自己写Demo测试发现Entity中的图片不管使用什么方法都写入不到Word文件中去。最后经过调试,查看源码,找到问题所在,重写了部分的源码实现了:【实体对象中使用@Excel注释 】 + 【调用EasyPoi中的ExcelEntityParse对象,使用它的parseNextRowAndAddRow()方法】 实现实体对象列表的填充
主要参考的文章:参考文章链接
二、解决方案展示
1.准备Word模板文件
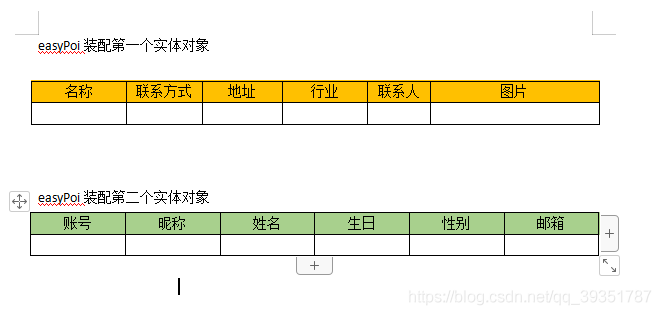
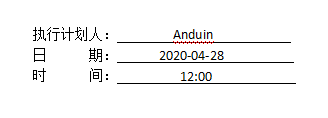
以下使用到的Word模板文件(template.docx)的样式
2.部分实体对象
@Data
@EqualsAndHashCode(callSuper = true)
@TableName("sys_member")
public class SysMember {

    /**
     * 主键
     */
    @TableId(value = "id", type = IdType.ASSIGN_ID)
    private Long id;

    /**
     * 名称
     */
    @Excel(name = "名称")
    @TableField("name")
    private String name;

    /**
     * 会员电话
     */
    @Excel(name = "联系方式", width = 20)
    @TableField("tel")
    private String tel;

    /**
     * 地址
     */
    @Excel(name = "地址", width = 30)
    @TableField("address")
    private String address;

    /**
     * 联系人姓名
     */
    @Excel(name = "联系人")
    @TableField("contacts_name")
    private String contactsName;

    /**
     * 联系人电话
     */
    @Excel(name = "联系电话", width = 20)
    @TableField("contacts_phone")
    private String contactsPhone;

    /**
     * 图片
     */
    @Excel(name = "图片", width = 20, height = 12, type = 2)
    @TableField(exist = false)
    private String picture;

}
3.重写EasyPoi中ExcelEntityParse类的createCells方法
为什么要修改这一个函数,具体的详解在文章的下一个部分
package cn.afterturn.easypoi.word.parse.excel;

import cn.afterturn.easypoi.entity.ImageEntity;
import cn.afterturn.easypoi.excel.annotation.ExcelTarget;
import cn.afterturn.easypoi.excel.entity.params.ExcelExportEntity;
import cn.afterturn.easypoi.excel.export.base.ExportCommonService;
import cn.afterturn.easypoi.exception.excel.ExcelExportException;
import cn.afterturn.easypoi.exception.excel.enums.ExcelExportEnum;
import cn.afterturn.easypoi.exception.word.WordExportException;
import cn.afterturn.easypoi.exception.word.enmus.WordExportEnum;
import cn.afterturn.easypoi.util.PoiPublicUtil;
import cn.afterturn.easypoi.word.entity.params.ExcelListEntity;
import org.apache.commons.lang3.StringUtils;
import org.apache.commons.lang3.builder.ReflectionToStringBuilder;
import org.apache.poi.xwpf.usermodel.*;
import org.slf4j.Logger;
import org.slf4j.LoggerFactory;

import java.io.ByteArrayOutputStream;
import java.io.File;
import java.io.FileInputStream;
import java.io.IOException;
import java.lang.reflect.Field;
import java.util.*;

/**
 * @Description 重写EasyPoi的方法 解决Word导出的时候 实体对象图片导出失败的问题
 * @Date 2021/4/28 15:43
 * @Author huangwanbing
 */
public class ExcelEntityParse extends ExportCommonService {
    private static final Logger LOGGER = LoggerFactory.getLogger(ExcelEntityParse.class);

    private static void checkExcelParams(ExcelListEntity entity) {
        if (entity.getList() == null || entity.getClazz() == null) {
            throw new WordExportException(WordExportEnum.EXCEL_PARAMS_ERROR);
        }

    }

    private int createCells(int index, Object t, List excelParams,
                            XWPFTable table, short rowHeight) {
        try {
            ExcelExportEntity entity;
            XWPFTableRow row = table.insertNewTableRow(index);
            if (rowHeight != -1) {
                row.setHeight(rowHeight);
            }
            int maxHeight = 1, cellNum = 0;
            for (int k = 0, paramSize = excelParams.size(); k < paramSize; k++) {
                entity = excelParams.get(k);
                if (entity.getList() != null) {
                    Collection list  = (Collection) entity.getMethod().invoke(t, new Object[]{});
                    int           listC = 0;
                    for (Object obj : list) {
                        createListCells(index + listC, cellNum, obj, entity.getList(), table, rowHeight);
                        listC++;
                    }
                    cellNum += entity.getList().size();
                    if (list != null && list.size() > maxHeight) {
                        maxHeight = list.size();
                    }
                } else {
                    Object value = getCellValue(entity, t);
                    if (entity.getType() == 1) {
                        setCellValue(row, value, cellNum++);
                        //********************修改的部分 用于设置Word中的图片
                    }else if (entity.getType() == 2) {
                        int width = (int) entity.getWidth();
                        int height = (int) entity.getHeight();
                        setCellImageValue(row, value, width, height);
                    }
                }
            }
            // 合并需要合并的单元格
            cellNum = 0;
            for (int k = 0, paramSize = excelParams.size(); k < paramSize; k++) {
                entity = excelParams.get(k);
                if (entity.getList() != null) {
                    cellNum += entity.getList().size();
                } else if (entity.isNeedMerge() && maxHeight > 1) {
                    table.setCellMargins(index, index + maxHeight - 1, cellNum, cellNum);
                    cellNum++;
                }
            }
            return maxHeight;
        } catch (Exception e) {
            LOGGER.error("excel cell export error ,data is :{}", ReflectionToStringBuilder.toString(t));
            throw new ExcelExportException(ExcelExportEnum.EXPORT_ERROR, e);
        }
    }

    //********************添加的方法  创建ImageEntity对象,设置Word中的图片主要代码
    private void setCellImageValue(XWPFTableRow row, Object value, int width, int height) {
        XWPFTableCell       cell       = row.createCell();
        List paragraphs = cell.getParagraphs();
        XWPFParagraph       paragraph  = null;
        XWPFRun run        = null;
        if (paragraphs != null && paragraphs.size() > 0) {
            paragraph = paragraphs.get(0);
        } else {
            paragraph = row.createCell().addParagraph();
        }
        List runs = paragraph.getRuns();
        if (runs != null && runs.size() > 0) {
            run = runs.get(0);
        } else {
            run = paragraph.createRun();
        }
        //创建图片对象
        ImageEntity image = new ImageEntity();
        image.setHeight(height * 8);//设置高度 由于@Excel中设置的Width和Height是表格的长宽,这里设置的是图片长宽
        image.setWidth(width * 8);//设置宽度    经过测试获取到设置表格的长宽后 x8 后的效果最佳
        image.setType(ImageEntity.URL);
        image.setUrl(value.toString());//设置图片的链接地址或本地地址
        //设置图片
        ExcelMapParse.addAnImage(image, run);
    }

    /**
     * 创建List之后的各个Cells
     *
     * @param index
     * @param cellNum
     * @param obj         当前对象
     * @param excelParams 列参数信息
     * @param table       当前表格
     * @param rowHeight   行高
     * @throws Exception
     */
    public void createListCells(int index, int cellNum, Object obj, List excelParams, XWPFTable table, short rowHeight) throws Exception {
        ExcelExportEntity entity;
        XWPFTableRow      row;
        if (table.getRow(index) == null) {
            row = table.createRow();
            row.setHeight(rowHeight);
        } else {
            row = table.getRow(index);
        }
        for (int k = 0, paramSize = excelParams.size(); k < paramSize; k++) {
            entity = excelParams.get(k);
            Object value = getCellValue(entity, obj);
            if (entity.getType() == 1) {
                setCellValue(row, value, cellNum++);
            }
        }
    }

    /**
     * 获取表头数据
     *
     * @param table
     * @param index
     * @return
     */
    private Map getTitleMap(XWPFTable table, int index, int headRows) {
        if (index < headRows) {
            throw new WordExportException(WordExportEnum.EXCEL_NO_HEAD);
        }
        Map map = new HashMap();
        String               text;
        for (int j = 0; j < headRows; j++) {
            List cells = table.getRow(index - j - 1).getTableCells();
            for (int i = 0; i < cells.size(); i++) {
                text = cells.get(i).getText();
                if (StringUtils.isEmpty(text)) {
                    throw new WordExportException(WordExportEnum.EXCEL_HEAD_HAVA_NULL);
                }
                map.put(text, i);
            }
        }
        return map;
    }

    /**
     * 解析上一行并生成更多行
     *
     * @param table
     * @param index
     * @param entity
     */
    public void parseNextRowAndAddRow(XWPFTable table, int index, ExcelListEntity entity) {
        // 删除这一行
        table.removeRow(index);
        checkExcelParams(entity);
        // 获取表头数据
        Map titlemap = getTitleMap(table, index, entity.getHeadRows());
        try {
            // 得到所有字段
            Field[]     fileds   = PoiPublicUtil.getClassFields(entity.getClazz());
            ExcelTarget etarget  = entity.getClazz().getAnnotation(ExcelTarget.class);
            String      targetId = null;
            if (etarget != null) {
                targetId = etarget.value();
            }
            // 获取实体对象的导出数据
            List excelParams = new ArrayList();
            getAllExcelField(null, targetId, fileds, excelParams, entity.getClazz(), null, null);
            // 根据表头进行筛选排序
            sortAndFilterExportField(excelParams, titlemap);
            short       rowHeight = getRowHeight(excelParams);
            Iterator its       = entity.getList().iterator();
            while (its.hasNext()) {
                Object t = its.next();
                index += createCells(index, t, excelParams, table, rowHeight);
            }
        } catch (Exception e) {
            LOGGER.error(e.getMessage(), e);
        }
    }

    private void setCellValue(XWPFTableRow row, Object value, int cellNum) {
        if (row.getCell(cellNum++) != null) {
            row.getCell(cellNum - 1).setText(value == null ? "" : value.toString());
        }
        setWordText(row, value);
    }


    public byte[] image2byte(String path) throws IOException {
        byte[] data = null;
        File file = new File(path);
        FileInputStream input = new FileInputStream(file);
        ByteArrayOutputStream output = new ByteArrayOutputStream();
        byte[] buf = new byte[1024];
        int numBytesRead = 0;
        while ((numBytesRead = input.read(buf)) != -1) {
            output.write(buf, 0, numBytesRead);
        }
        data = output.toByteArray();
        output.close();
        input.close();
        return data;
    }

    /**
     * 解决word导出表格多出的换行符问题
     *
     * @param row
     * @param value
     */
    private void setWordText(XWPFTableRow row, Object value) {
        XWPFTableCell       cell       = row.createCell();
        List paragraphs = cell.getParagraphs();
        XWPFParagraph       paragraph  = null;
        XWPFRun run        = null;
        if (paragraphs != null && paragraphs.size() > 0) {
            paragraph = paragraphs.get(0);
        } else {
            paragraph = row.createCell().addParagraph();
        }
        List runs = paragraph.getRuns();
        if (runs != null && runs.size() > 0) {
            run = runs.get(0);
        } else {
            run = paragraph.createRun();
        }
        if (value instanceof ImageEntity){
            ExcelMapParse.addAnImage((ImageEntity) value, run);
        }else{
            PoiPublicUtil.setWordText(run, value == null ? "" : value.toString());
        }
    }

    /**
     * 对导出序列进行排序和塞选
     *
     * @param excelParams
     * @param titlemap
     */
    private void sortAndFilterExportField(List excelParams,
                                          Map titlemap) {
        for (int i = excelParams.size() - 1; i >= 0; i--) {
            if (excelParams.get(i).getList() != null && excelParams.get(i).getList().size() > 0) {
                sortAndFilterExportField(excelParams.get(i).getList(), titlemap);
                if (excelParams.get(i).getList().size() == 0) {
                    excelParams.remove(i);
                } else {
                    excelParams.get(i).setOrderNum(i);
                }
            } else {
                if (titlemap.containsKey(excelParams.get(i).getName())) {
                    excelParams.get(i).setOrderNum(i);
                } else {
                    excelParams.remove(i);
                }
            }
        }
        sortAllParams(excelParams);
    }
}
4.导出Word文件的主逻辑
public class WordExportTest extends BaseJunit {

    private static final String TEMPLATE_FILE_NAME = "D:/test/Excel IO/template.docx";

    @Test
    public void exportWord() {
        // 填充参数
        Map map = new HashMap<>(3);
        map.put("date", "2020-04-28");
        map.put("time", "12:00");
        map.put("signature", "Anduin");

        //创建Word对象并使用注入符注入Map对象的值
        XWPFDocument document = WordExportUtil.exportWord07(TEMPLATE_FILE_NAME, map);

        //获取实体对象列表
        LambdaQueryWrapper queryWrapper = new LambdaQueryWrapper<>();
        List list = sysMemberService.list(queryWrapper);
        LambdaQueryWrapper queryWrapper2 = new LambdaQueryWrapper<>();
        List list2 = sysUserService.list(queryWrapper2);

        // 导出批量数据 第1个表格
        ExcelEntityParse excelEntityParse = new ExcelEntityParse();
        ExcelListEntity excelListEntity = new ExcelListEntity(list, SysMember.class);
        excelEntityParse.parseNextRowAndAddRow(document.getTableArray(1), 1, excelListEntity);

        //导出批量数据 第2个表格
        ExcelEntityParse excelEntityParse2 = new ExcelEntityParse();
        ExcelListEntity excelListEntity2 = new ExcelListEntity(list2, SysUser.class);
        // document.getTableArray(2)  中设置的2为寻找Word文件中的第2个表格
        //第二个参数1 表示设置数据从表格的第几行进行插入,标题栏为0,所以设置为1,从第二行开始写数据
        excelEntityParse2.parseNextRowAndAddRow(document.getTableArray(2), 1, excelListEntity2);


        String fileName = System.currentTimeMillis() + ".docx";
        try {
            //输出Word文件
            FileOutputStream fos = new FileOutputStream("D:/test/EasyPoi Word Output/" + fileName);
            document.write(fos);
            fos.close();
        } catch (Exception e) {
            e.printStackTrace();
        }
    }

}
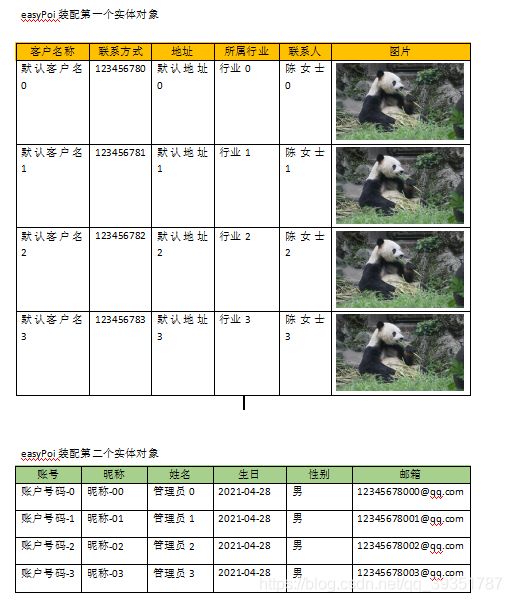
4.执行效果
三、原理解释
1.官方文档中的图片导出方式适用场景
XWPFDocument document = WordExportUtil.exportWord07(TEMPLATE_FILE_NAME,map);
这种方式仅用于导出少量的图片,导出的图片文件要创建ImageEntity对象放入到map中去,这样的方式不适合导出成批的图片(需要自己一个个手写),同样不适合导出在Entity对象中的图片文件(Entity对象的装配无法使用这个方法注入)。
2.使用EasyPoi中的ExcelEntityParse对象,调用它的parseNextRowAndAddRow()方法实现Entity对象的自动填充
以下介绍parseNextRowAndAddRow()函数源代码的实现过程,以及如何定位问题,修改源码的一个过程。首先附上EasyPoi源码的一个地址:EasyPoi源码Gitee地址
1.parseNextRowAndAddRow()函数的代码逻辑
 /**
     * 解析上一行并生成更多行
     *
     * @param table
     * @param index
     * @param entity
     */
    public void parseNextRowAndAddRow(XWPFTable table, int index, ExcelListEntity entity) {
        // 删除这一行
        table.removeRow(index);
        checkExcelParams(entity);
        // 获取表头数据
        Map titlemap = getTitleMap(table, index, entity.getHeadRows());
        try {
            // 得到所有字段
            Field[]     fileds   = PoiPublicUtil.getClassFields(entity.getClazz());
            ExcelTarget etarget  = entity.getClazz().getAnnotation(ExcelTarget.class);
            String      targetId = null;
            if (etarget != null) {
                targetId = etarget.value();
            }
            // 获取实体对象的导出数据
            List excelParams = new ArrayList();
            getAllExcelField(null, targetId, fileds, excelParams, entity.getClazz(), null, null);
            // 根据表头进行筛选排序
            sortAndFilterExportField(excelParams, titlemap);
            short       rowHeight = getRowHeight(excelParams);
            Iterator its       = entity.getList().iterator();
            while (its.hasNext()) {
                Object t = its.next();
                index += createCells(index, t, excelParams, table, rowHeight);
            }
        } catch (Exception e) {
            LOGGER.error(e.getMessage(), e);
        }
    }
以上源码中各部分的功能均有注释也比较好理解,于是定位到While循环中的createCells()函数
2.createCells()函数的代码逻辑
private int createCells(int index, Object t, List excelParams,
                            XWPFTable table, short rowHeight) {
        try {
            ExcelExportEntity entity;
            XWPFTableRow      row = table.insertNewTableRow(index);
            if (rowHeight != -1) {
                row.setHeight(rowHeight);
            }
            int maxHeight = 1, cellNum = 0;
            for (int k = 0, paramSize = excelParams.size(); k < paramSize; k++) {
                entity = excelParams.get(k);
                if (entity.getList() != null) {
                    Collection list  = (Collection) entity.getMethod().invoke(t, new Object[]{});
                    int           listC = 0;
                    for (Object obj : list) {
                        createListCells(index + listC, cellNum, obj, entity.getList(), table, rowHeight);
                        listC++;
                    }
                    cellNum += entity.getList().size();
                    if (list != null && list.size() > maxHeight) {
                        maxHeight = list.size();
                    }
                } else {
                    Object value = getCellValue(entity, t);
                    if (entity.getType() == 1) {
                        setCellValue(row, value, cellNum++);
                    }
                }
            }
            // 合并需要合并的单元格
            cellNum = 0;
            for (int k = 0, paramSize = excelParams.size(); k < paramSize; k++) {
                entity = excelParams.get(k);
                if (entity.getList() != null) {
                    cellNum += entity.getList().size();
                } else if (entity.isNeedMerge() && maxHeight > 1) {
                    table.setCellMargins(index, index + maxHeight - 1, cellNum, cellNum);
                    cellNum++;
                }
            }
            return maxHeight;
        } catch (Exception e) {
            LOGGER.error("excel cell export error ,data is :{}", ReflectionToStringBuilder.toString(t));
            throw new ExcelExportException(ExcelExportEnum.EXPORT_ERROR, e);
        }
    }
代码中的第一个for循环中,遍历传进来的一个Entity实体对象,遍历出里面的属性值,并设置单元格的内容,其中 if (entity.getType() == 1) 这个判断吸引了我的注意,Type字段不正是@Excel中设置用来标记属性的类型的吗,1-表示文本 2-表示图片 3-表示函数 10-表示数字 type字段默认为1即表示文本类型。经过Debug发现,正是这里出的问题,因为图片类型在@Excel注释中设置的type为2,因此永远不会执行填充图片对象的逻辑,这也就是为什么图片在Word导出的时候一直无效的原因。
代码中各参数的解释如下
至此,问题找到了原因,接下来就是修改源码补充填充图片对象的逻辑了,修改源码的部分,代码如下:
else {
          Object value = getCellValue(entity, t);
          if (entity.getType() == 1) {
               setCellValue(row, value, cellNum++);
           //********************重写 用于设置Word中的图片
          }else if (entity.getType() == 2) {
               int width = (int) entity.getWidth();
               int height = (int) entity.getHeight();
               setCellImageValue(row, value, width, height);
          }
     }
//********************添加创建ImageEntity对象,设置Word中的图片主要代码
private void setCellImageValue(XWPFTableRow row, Object value, int width, int height) {
XWPFTableCell cell = row.createCell();
List paragraphs = cell.getParagraphs();
XWPFParagraph paragraph = null;
XWPFRun run = null;
if (paragraphs != null && paragraphs.size() > 0) {
paragraph = paragraphs.get(0);
} else {
paragraph = row.createCell().addParagraph();
}
List runs = paragraph.getRuns();
if (runs != null && runs.size() > 0) {
run = runs.get(0);
} else {
run = paragraph.createRun();
}
//创建图片对象
ImageEntity image = new ImageEntity();
image.setHeight(height * 8);//设置高度 由于@Excel中设置的Width和Height是表格的长宽,这里设置的是图片长宽
image.setWidth(width * 8);//设置宽度 经过测试获取到设置表格的长宽后 x8 后的效果最佳
image.setType(ImageEntity.URL);
image.setUrl(value.toString());//设置图片的链接地址或本地地址
//设置图片
ExcelMapParse.addAnImage(image, run);
} 四、结束语
修改源码的过程还是蛮有意思的,一步步Debug下去观察数据流的走向,看别人书写的代码逻辑,看这种清晰明了的代码真是一种非常享受的事情,同时也能学习到别人的开发经验。这或许就是敲代码的乐趣了吧。另外,特别庆幸在查资料的过程中看到这样一个修改EasyPoi源码的帖子,激起了我的兴趣去自己动手改改看的冲动,在此谢过了Easypoi_4.2.0源码修改,支持导入一个表头多列数据
最后,在此致谢EasyPoi的开发团队,使用这样一套封装好的工具类真的非常方便,省去了许多开发的时间,特别安利大家使用这样一套工具类来完成Excel的导入导出工作。


