Pytorch入门教程
Pytorch学习总结:
Pytorch学习笔记总结_大数据与人工智能技术分享-CSDN博客
Pytorch实战总结:
pytorch实战教学(一篇管够)
B站深度学习Pytorch实战总结
PyTorchB站刘二大人学习笔记
Pytorch简介
- 概念:由Facebook人工智能研究小组开发的一种基于Lua编写的Torch库的Python实现的深度学习库。
- 优势:简洁、上手快、具有良好的文档和社区支持、项目开源、支持代码调试、丰富的扩展库
Pytorch基础知识
1.张量Tensor
- 分类:0维张量(标量)、1维张量(向量)、2维张量(矩阵)、3维张量(时间序列)、4维张量(图像)、5维张量(视频)
- 概念:一个数据容器,可以包含数据、字符串等
张量是一种特殊的数据结构,与数组和矩阵非常相似。在PyTorch中,我们使用张量对模型的输入和输出以及模型的参数进行编码。
张量类似于NumPy的ndarray,除了张量可以在 GPU 或其他硬件加速器上运行。事实上,张量和NumPy数组通常可以共享相同的底层内存,从而无需复制数据。
# 引入相关的包
import torch
import numpy as np
1.1 初始化张量
直接从数据创建:
张量可以直接从数据中创建。数据类型是自动推断的。
data = [[1, 2], [3, 4]]
x_data = torch.tensor(data)
print(f"Tensor from Data:\n {x_data} \n")

# Tensor from Data:
#  tensor([[1, 2],
#         [3, 4]])
从 NumPy 数组创建:
np_array = np.array(data)
x_np = torch.from_numpy(np_array)
print(f"Tensor from Numpy:\n {x_np} \n")

# Tensor from Numpy:
#  tensor([[1, 2],
#         [3, 4]], dtype=torch.int32)
根据另一个张量创建:
新张量保留参数张量的属性(形状、数据类型),除非显式覆盖。
x_ones = torch.ones_like(x_data) # 保留原有张量的形状和数据类型
print(f"Ones Tensor: \n {x_ones} \n")

x_rand = torch.rand_like(x_data, dtype=torch.float) # 显式更改张量的数据类型
print(f"Random Tensor: \n {x_rand} \n")

# Ones Tensor:
#  tensor([[1, 1],
#         [1, 1]])
#
# Random Tensor:
#  tensor([[0.5890, 0.7234],
#         [0.7145, 0.5141]])
使用随机或恒定值创建:
shape是张量维度的元组,它决定了输出张量的形状。
shape = (2,3,) # 创建2行3列的张量
rand_tensor = torch.rand(shape)
ones_tensor = torch.ones(shape)
zeros_tensor = torch.zeros(shape)

print(f"Random Tensor: \n {rand_tensor} \n")
print(f"Ones Tensor: \n {ones_tensor} \n")
print(f"Zeros Tensor: \n {zeros_tensor}")

# Random Tensor:
#  tensor([[0.4492, 0.6411, 0.9363],
#         [0.0917, 0.1566, 0.1965]])
#
# Ones Tensor:
#  tensor([[1., 1., 1.],
#         [1., 1., 1.]])
#
# Zeros Tensor:
#  tensor([[0., 0., 0.],
#         [0., 0., 0.]])
1.2 张量的属性
张量属性包括形状、数据类型和存储设备等。
tensor = torch.rand(3,4)

print(f"Shape of tensor: {tensor.shape}")
print(f"Datatype of tensor: {tensor.dtype}")
print(f"Device tensor is stored on: {tensor.device}")

# Shape of tensor: torch.Size([3, 4])
# Datatype of tensor: torch.float32
# Device tensor is stored on: cpu
1.3 张量的操作
PyTorch中有100 多种张量运算,包括算术、线性代数、矩阵操作(转置、索引、切片)、采样等,而且这些操作中都可以在 GPU 上运行(通常以比 CPU 更高的速度)。
默认情况下,张量是在 CPU 上创建的。我们需要使用 .to方法明确地将张量移动到 GPU(在检查 GPU 可用性之后)。
# 将张量移动到GPU上
if torch.cuda.is_available():
    tensor = tensor.to("cuda")
类似 numpy 的索引和切片:
tensor = torch.ones(4, 4)
print(f"First row: {tensor[0]}")
print(f"First column: {tensor[:, 0]}")
print(f"Last column: {tensor[..., -1]}")
tensor[:,1] = 0
print(tensor)

# First row: tensor([1., 1., 1., 1.])
# First column: tensor([1., 1., 1., 1.])
# Last column: tensor([1., 1., 1., 1.])
# tensor([[1., 0., 1., 1.],
#         [1., 0., 1., 1.],
#         [1., 0., 1., 1.],
#         [1., 0., 1., 1.]])
连接张量:
可以用torch.cat或torch.stack来拼接张量。
t1 = torch.cat([tensor, tensor, tensor], dim=1) # 在第1个维度拼接,即水平方向
print(t1)

# tensor([[1., 0., 1., 1., 1., 0., 1., 1., 1., 0., 1., 1.],
#         [1., 0., 1., 1., 1., 0., 1., 1., 1., 0., 1., 1.],
#         [1., 0., 1., 1., 1., 0., 1., 1., 1., 0., 1., 1.],
#         [1., 0., 1., 1., 1., 0., 1., 1., 1., 0., 1., 1.]])
算术运算:
# 矩阵相乘,y1、y2和y3的值相同
y1 = tensor @ tensor.T
y2 = tensor.matmul(tensor.T)

y3 = torch.rand_like(tensor)
torch.matmul(tensor, tensor.T, out=y3)
print(y1)

# tensor([[3., 3., 3., 3.],
#         [3., 3., 3., 3.],
#         [3., 3., 3., 3.],
#         [3., 3., 3., 3.]])
# 矩阵逐元素相乘,z1、z2和z3的值相同
z1 = tensor * tensor
z2 = tensor.mul(tensor)

z3 = torch.rand_like(tensor)
torch.mul(tensor, tensor, out=z3)
print(z1)
# tensor([[1., 0., 1., 1.],
#         [1., 0., 1., 1.],
#         [1., 0., 1., 1.],
#         [1., 0., 1., 1.]])
单元素张量:
只有一个值的张量,可以通过item属性转换为数值。
agg = tensor.sum()
agg_item = agg.item()
print(agg_item, type(agg_item))

# 12.0
就地操作:
将结果存储到操作数中的操作称为就地操作。它们由_后缀表示。例如:x.copy_(y), x.t_(), 会变x的值。
print(f"{tensor} \n")
tensor.add_(5)
print(tensor)

# tensor([[1., 0., 1., 1.],
#         [1., 0., 1., 1.],
#         [1., 0., 1., 1.],
#         [1., 0., 1., 1.]])
#
# tensor([[6., 5., 6., 6.],
#         [6., 5., 6., 6.],
#         [6., 5., 6., 6.],
#         [6., 5., 6., 6.]])
就地操作可以节省一些内存,但在计算导数时可能会出现问题,因为会立即丢失历史记录。因此不建议使用。
1.4 张量与Numpy
在CPU上的张量和NumPy数组共享它们的内存位置,改变一个会改变另一个。
张量转换为NumPy数组:
t = torch.ones(5)
print(f"t: {t}")
n = t.numpy()
print(f"n: {n}")

# t: tensor([1., 1., 1., 1., 1.])
# n: [1. 1. 1. 1. 1.]
改变张量的值,numpy数组的值也随之更改。
t.add_(1)
print(f"t: {t}")
print(f"n: {n}")

# t: tensor([2., 2., 2., 2., 2.])
# n: [2. 2. 2. 2. 2.]
NumPy数组转换为张量:
n = np.ones(5)
print(f"n: {n}")
t = torch.from_numpy(n)
print(f"t: {t}")

# n: [1. 1. 1. 1. 1.]
# t: tensor([1., 1., 1., 1., 1.], dtype=torch.float64)
改变numpy数组的值,张量的值也随之更改。
np.add(n, 2, out=n)
print(f"t: {t}")
print(f"n: {n}")

# t: tensor([3., 3., 3., 3., 3.], dtype=torch.float64)
# n: [3. 3. 3. 3. 3.]
2.数据集和数据加载器
在PyTorch中,torch.utils.data.DataLoader和torch.utils.data.Dataset 可以让我们方便使用预加载的数据集或者自己的数据集。Dataset存储数据样本及其对应的标签,而DataLoader将Dataset包裹起来,生成一个可迭代对象,以便轻松访问数据样本。
PyTorch提供了很多预加载好的数据集(例如FashionMNIST),它们都继承自torch.utils.data.Dataset这个类。
2.1 加载数据集
我们从TorchVision加载Fashion-MNIST数据集,Fashion-MNIST是Zalando文章图像的一个数据集,包含60000个训练样本和10000 个测试样本。每个样本都包含28×28的灰度图和对应的标签(共10个类别)。
我们使用以下参数加载FashionMNIST数据集:
root是存储训练/测试数据的路径;train指定训练或测试数据集;download=True如果本机没有该数据集,则会下载数据到root路径下;transform对样本数据进行相应的处理;target_transform对标签进行相应的处理。
import torch
from torch.utils.data import Dataset
from torchvision import datasets
from torchvision.transforms import ToTensor
import matplotlib.pyplot as plt

# 训练数据集
training_data = datasets.FashionMNIST(
    root="data", # 数据集下载路径
    train=True, # True为训练集,False为测试集
    download=True, # 是否要下载
    transform=ToTensor() # 对样本数据进行处理,转换为张量数据
)
# 测试数据集
test_data = datasets.FashionMNIST(
    root="data",
    train=False,
    download=True,
    transform=ToTensor()
)
2.2 可视化数据集
我们可以根据索引在Dataset中找到某一样本,比如training_data[index]。我们用matplotlib来可视化训练数据中的一些样本。
# 标签字典,一个key键对应一个label
labels_map = {
    0: "T-Shirt",
    1: "Trouser",
    2: "Pullover",
    3: "Dress",
    4: "Coat",
    5: "Sandal",
    6: "Shirt",
    7: "Sneaker",
    8: "Bag",
    9: "Ankle Boot",
}
# 设置画布大小
figure = plt.figure(figsize=(8, 8))
cols, rows = 3, 3
for i in range(1, cols * rows + 1):
    # 随机生成一个索引
    sample_idx = torch.randint(len(training_data), size=(1,)).item()
    # 获取样本及其对应的标签
    img, label = training_data[sample_idx]
    # 添加子图
    figure.add_subplot(rows, cols, i)
    # 设置标题
    plt.title(labels_map[label])
    # 不显示坐标轴
    plt.axis("off")
    # 显示灰度图
    plt.imshow(img.squeeze(), cmap="gray")
plt.show()
2.3 自定义数据集
在定义自己的数据集时,需要继承Dataset类,并实现三个函数:__init__、__len__和__getitem__。
__init__:实例化Dataset对象时运行,完成初始化工作。__len__:返回数据集的大小。__getitem__:根据索引返回一个样本(数据和标签)。
import os
import pandas as pd
from torchvision.io import read_image

class CustomImageDataset(Dataset):
    def __init__(self, annotations_file, img_dir, transform=None, target_transform=None):
        # 读取标签文件
        self.img_labels = pd.read_csv(annotations_file)
        # 读取图片存储路径
        self.img_dir = img_dir
        # 数据处理方法
        self.transform = transform
        # 标签处理方法
        self.target_transform = target_transform

    def __len__(self):
        return len(self.img_labels)

    def __getitem__(self, idx):
        # 单张图片路径
        img_path = os.path.join(self.img_dir, self.img_labels.iloc[idx, 0])
        # 读取图片
        image = read_image(img_path)
        # 获得对应的标签
        label = self.img_labels.iloc[idx, 1]
        if self.transform:
            image = self.transform(image)
        if self.target_transform:
            label = self.target_transform(label)
        # 返回一个元组
        return image, label
labels.csv 文件如下所示:
tshirt1.jpg, 0
tshirt2.jpg, 0
......
ankleboot999.jpg, 9
2.4 数据加载器
2.4.1 torch.utils.data.DataLoader
根据数据集生成一个可迭代的对象,用于模型训练。
常用参数:
dataset (Dataset):定义好的数据集。batch_size (int, optional):每次放入网络训练的批次大小,默认为1.shuffle (bool, optional):是否打乱数据的顺序,默认为False。一般训练集设置为True,测试集设置为False。num_workers (int, optional):线程数,默认为0。在Windows下设置大于0的数可能会报错。drop_last (bool, optional):是否丢弃最后一个批次的数据,默认为False。
两个工具包,可配合DataLoader使用:
- enumerate(iterable, start=0):输入是一个可迭代的对象和下标索引开始值;返回可迭代对象的下标索引和数据本身。
- tqdm(iterable):进度条可视化工具包
from torch.utils.data import DataLoader

data_loader = DataLoader(
    dataset=MyDataset,
    batch_size=16,
    shuffle=True,
    num_workers=0,
    drop_last=False,
)
2.4.2 加载数据
在训练模型时,我们通常希望以小批量的形式传递样本,这样可以减少模型的过拟合。
from torch.utils.data import DataLoader

train_dataloader = DataLoader(
    dataset=training_data,
    # 设置批量大小
    batch_size=64,
    # 打乱样本的顺序
    shuffle=True)
test_dataloader = DataLoader(
    dataset=test_data,
    batch_size=64,
    shuffle=True)
2.4.3 遍历DataLoader
将数据加载到DataLoader后,每次迭代一批样本数据和标签(这里批量大小为64),且样本顺序是被打乱的。
# 展示图片和标签
train_features, train_labels = next(iter(train_dataloader))
# (B,N,H,W)
print(f"Feature batch shape: {train_features.size()}")
print(f"Labels batch shape: {train_labels.size()}")
# 获取第一张图片,去除第一个批量维度
img = train_features[0].squeeze()
label = train_labels[0]
plt.imshow(img, cmap="gray")
plt.show()
print(f"Label: {label}")

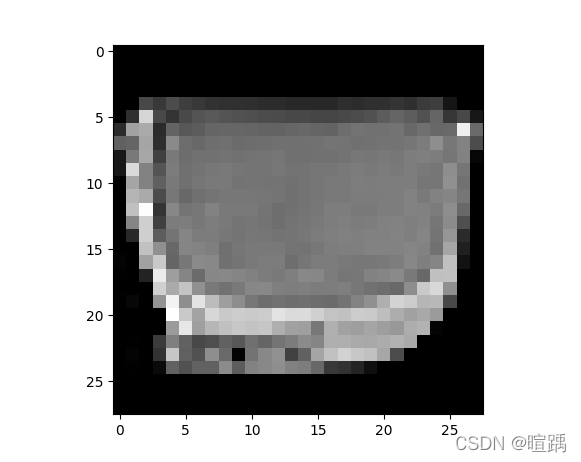
# Feature batch shape: torch.Size([64, 1, 28, 28])
# Labels batch shape: torch.Size([64])
# Label: 8
3.torchvision.transforms图片处理
原始的数据格式不一定符合模型训练所要求的输入格式,我们使用torchvision.transforms来对数据进行一些操作并使其适合训练。
PyTorch官方的例子如下:
import torch
from torchvision import datasets
from torchvision.transforms import ToTensor, Lambda

ds = datasets.FashionMNIST(
    root="data",
    train=True,
    download=True,
    transform=ToTensor(),
    # Lambda变换,定义了一个函数来将整数转换为one-hot编码张量
    # 它首先创建一个大小为10的零张量(数据集中的标签数量)并调用scatter_,根据索引y将值更改为1
    target_transform = Lambda(lambda y: torch.zeros(10, dtype=torch.float).scatter_(dim=0, index=torch.tensor(y), value=1))
)
3.1 transfroms.ToTensor()
将PIL Image或者numpy.ndarray格式的数据转换为tensor格式,像素值大小缩放至区间[0., 1.]。
3.2 transforms.Normalize()
对输入进行标准化,传入均值(mean[1],…,mean[n])和标准差(std[1],…,std[n]),n与输入的维度相同。结果计算公式如下:
output[channel] = (input[channel] - mean[channel]) / std[channel]
3.3 transforms.ToPILImage()
将tensor或者numpy.ndarray格式的数据转换为PIL Image图片格式。
以下操作传入的输入格式可以为PIL Image或者tensor
3.4 transforms.Resize()
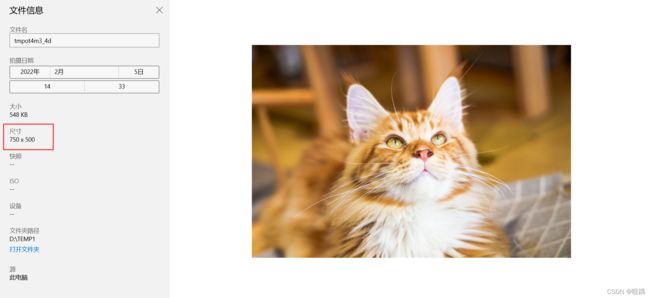
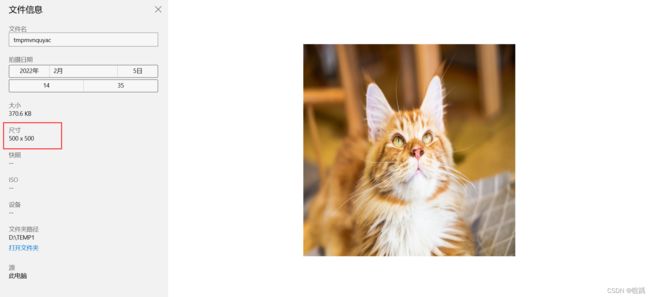
修改图片的尺寸。参数size可以是序列也可以是整数,如果传入序列,则修改后的图片尺寸和序列一致;如果传入整数,则等比例缩放图片。
原图:
from PIL import Image
from torchvision import transforms

img = Image.open('./images/cat.png')
resize = transforms.Resize(500) #  height < width, ouput size:(size, size * width / height)
img_resize=resize(img)
img_resize.show()
from PIL import Image
from torchvision import transforms

img = Image.open('./images/cat.png')
resize = transforms.Resize((500, 500)) # (Height,Width)
img_resize=resize(img)
img_resize.show()
3.5 transforms.CenterCrop()
中心裁剪图片。参数size可以是序列也可以是整数,如果传入序列,则裁剪后的图片尺寸和序列一致;如果传入整数,则裁剪尺寸长宽都为size的正方形。
from PIL import Image
from torchvision import transforms

img = Image.open('./images/cat.png')
centercrop = transforms.CenterCrop((400, 1000)) # (Height,Width)
img_centercrop=centercrop(img)
img_centercrop.show()
from PIL import Image
from torchvision import transforms

img = Image.open('./images/cat.png')
centercrop = transforms.CenterCrop(400)
img_centercrop=centercrop(img)
img_centercrop.show()
3.6 transforms.RandomCrop()
随机裁剪。参数size可以是序列也可以是整数,如果传入序列,则裁剪后的图片尺寸和序列一致;如果传入整数,则裁剪尺寸长宽都为size的正方形。
from PIL import Image
from torchvision import transforms

img = Image.open('./images/cat.png')
randomcrop = transforms.RandomCrop((400,500))
for i in range(5):
    img_randomcrop=randomcrop(img)
    img_randomcrop.show()
3.7 transforms.RandomResizedCrop()
将给定图像随机裁剪为不同的大小和宽高比,然后缩放所裁剪得到的图像为制定的大小。(即先随机采集,然后对裁剪得到的图像缩放为同一大小)
3.8 transforms.RandomHorizontalFlip()
有一定概率将图片水平翻转,默认概率为0.5。
3.9 transforms.RandomVerticalFlip()
有一定概率将图片垂直翻转,默认概率为0.5。
3.10 transforms.RandomRotation()
将图片旋转。参数degrees可以为序列或者数值,如果为序列,则旋转角度为(min_degree, max_degree);如果为数值,则旋转角度为(-degrees, +degrees)。
4.模型定义
torch.nn提供了构建神经网络所需的全部模块。
在接下来的部分中,我们将构建一个神经网络来对FashionMNIST数据集中的图像进行分类。
# 导包
import os
import torch
from torch import nn
from torch.utils.data import DataLoader
from torchvision import datasets, transforms
4.1 训练设备
在GPU或CPU上训练我们的模型。
device = "cuda" if torch.cuda.is_available() else "cpu"
print(f"Using {device} device")

# Using cuda device
4.2 定义模型
模型的定义需要继承基类torch.nn.Module。__init__函数初始化网络模型中的各种层;forward函数对输入数据进行相应的操作。
class NeuralNetwork(nn.Module):
    def __init__(self):
        super(NeuralNetwork, self).__init__()
        self.flatten = nn.Flatten()
        self.linear_relu_stack = nn.Sequential(
            nn.Linear(in_features=28 * 28, out_features=512),
            nn.ReLU(),
            nn.Linear(in_features=512, out_features=512),
            nn.ReLU(),
            nn.Linear(in_features=512, out_features=10),
        )

    def forward(self, x):
        x = self.flatten(x)
        logits = self.linear_relu_stack(x)
        return logits
实例化NeuralNetwork类,并将其移动到device上。
model = NeuralNetwork().to(device)
print(model)

# NeuralNetwork(
#   (flatten): Flatten(start_dim=1, end_dim=-1)
#   (linear_relu_stack): Sequential(
#     (0): Linear(in_features=784, out_features=512, bias=True)
#     (1): ReLU()
#     (2): Linear(in_features=512, out_features=512, bias=True)
#     (3): ReLU()
#     (4): Linear(in_features=512, out_features=10, bias=True)
#   )
# )
#
我们可以将输入数据传入模型,会自动调用forward函数。模型会返回一个10维张量,其中包含每个类的原始预测值。我们使用nn.Softmax函数来预测类别的概率。
X = torch.rand(1, 28, 28, device=device)
logits = model(X) # 调用forward函数
# 在第一个维度应用Softmax函数
pred_probab = nn.Softmax(dim=1)(logits)
# 最大概率值对应的下标
y_pred = pred_probab.argmax(1)
print(f"Predicted class: {y_pred}")

# Predicted class: tensor([6], device='cuda:0')
4.3 网络模型中的各种层
我们随机生成3张大小为 28x28 的图像的小批量样本,观察每一层对输入数据处理的结果。
input_image = torch.rand(3,28,28)
print(input_image.size())

# torch.Size([3, 28, 28])
4.3.1 nn.Flatten
nn.Flatten层以将每个大小为28x28的图像转换为784个像素值的连续数组(保持批量维度(dim=0))。
flatten = nn.Flatten()
flat_image = flatten(input_image)
print(flat_image.size())

# torch.Size([3, 784])
4.3.2 nn.Linear
线性层使用其存储的权重w和偏差b对输入应用线性变换。
layer1 = nn.Linear(in_features=28*28, out_features=20)
hidden1 = layer1(flat_image)
print(hidden1.size())

# torch.Size([3, 20])
4.3.3 nn.ReLU
在线性变换后应用以引入非线性,帮助神经网络学习各种现象。(为什么要非线性激活?)
在这个模型中,我们在线性层之间使用nn.ReLU,但是还有其他非线性激活函数。
print(f"Before ReLU: {hidden1}\n\n")
hidden1 = nn.ReLU()(hidden1)
print(f"After ReLU: {hidden1}")

# # Before ReLU: tensor([[-0.3507, -0.6369, -0.5940, -0.0117, -0.3082, -0.1038, -0.3883,  0.2571,
#          -0.1133, -0.2097,  0.0790,  0.5428,  0.1568, -0.0711,  0.2261, -0.1539,
#          -0.1647,  0.3561, -0.4815,  0.1023],
#         [-0.3312, -0.5616, -0.4370, -0.1231, -0.3780, -0.1435, -0.0156,  0.1988,
#           0.1918, -0.0118,  0.2887,  0.4736,  0.1734, -0.2748, -0.2104, -0.3475,
#          -0.3081,  0.2804, -0.3496, -0.2153],
#         [-0.3788, -0.5419, -0.3950, -0.2872, -0.3738, -0.1630, -0.4928,  0.1045,
#          -0.0048,  0.0190,  0.1196,  0.5370,  0.1651, -0.0557,  0.0320, -0.2687,
#          -0.2733,  0.0873, -0.4730, -0.1157]], grad_fn=)
#
#
# After ReLU: tensor([[0.0000, 0.0000, 0.0000, 0.0000, 0.0000, 0.0000, 0.0000, 0.2571, 0.0000,
#          0.0000, 0.0790, 0.5428, 0.1568, 0.0000, 0.2261, 0.0000, 0.0000, 0.3561,
#          0.0000, 0.1023],
#         [0.0000, 0.0000, 0.0000, 0.0000, 0.0000, 0.0000, 0.0000, 0.1988, 0.1918,
#          0.0000, 0.2887, 0.4736, 0.1734, 0.0000, 0.0000, 0.0000, 0.0000, 0.2804,
#          0.0000, 0.0000],
#         [0.0000, 0.0000, 0.0000, 0.0000, 0.0000, 0.0000, 0.0000, 0.1045, 0.0000,
#          0.0190, 0.1196, 0.5370, 0.1651, 0.0000, 0.0320, 0.0000, 0.0000, 0.0873,
#          0.0000, 0.0000]], grad_fn=)
引入非线性激活函数的原因:
非线性激活函数可以使神经网络逼近复杂函数。没有激活函数带来的非线性,多层神经网络和单层神经网络没有差别。
4.3.4 nn.Sequential
nn.Sequential可以理解为网络层的容器,在其中我们定义各种网络层,数据会按照我们设置的顺序经过所有网络层。
seq_modules = nn.Sequential(
    flatten,
    layer1,
    nn.ReLU(),
    nn.Linear(20, 10)
)
input_image = torch.rand(3,28,28)
logits = seq_modules(input_image)
4.3.5 nn.Softmax
神经网络的最后一个线性层返回的logits,取值为[-infty, infty] 。在经过nn.Softmax函数后,logits的值收敛到[0, 1],表示模型对每个类别的预测概率。dim参数指示值必须总和为 1 的维度。
softmax = nn.Softmax(dim=1)
pred_probab = softmax(logits)
4.4 模型参数
使用parameters()或named_parameters()方法可以查看模型的参数。
print(f"Model structure: {model}\n\n")

for name, param in model.named_parameters():
    print(f"Layer: {name} | Size: {param.size()} | Values : {param[:2]} \n")

# Model structure: NeuralNetwork(
#   (flatten): Flatten(start_dim=1, end_dim=-1)
#   (linear_relu_stack): Sequential(
#     (0): Linear(in_features=784, out_features=512, bias=True)
#     (1): ReLU()
#     (2): Linear(in_features=512, out_features=512, bias=True)
#     (3): ReLU()
#     (4): Linear(in_features=512, out_features=10, bias=True)
#   )
# )
#
#
# Layer: linear_relu_stack.0.weight | Size: torch.Size([512, 784]) | Values : tensor([[-0.0288,  0.0188,  0.0250,  ...,  0.0046, -0.0274,  0.0146],
#         [-0.0206, -0.0101,  0.0202,  ..., -0.0311,  0.0117, -0.0185]],
#        device='cuda:0', grad_fn=)
#
# Layer: linear_relu_stack.0.bias | Size: torch.Size([512]) | Values : tensor([ 0.0138, -0.0163], device='cuda:0', grad_fn=)
#
# Layer: linear_relu_stack.2.weight | Size: torch.Size([512, 512]) | Values : tensor([[-0.0135,  0.0426, -0.0293,  ..., -0.0370,  0.0320, -0.0346],
#         [ 0.0127, -0.0163,  0.0221,  ...,  0.0236,  0.0304, -0.0343]],
#        device='cuda:0', grad_fn=)
#
# Layer: linear_relu_stack.2.bias | Size: torch.Size([512]) | Values : tensor([0.0144, 0.0258], device='cuda:0', grad_fn=)
#
# Layer: linear_relu_stack.4.weight | Size: torch.Size([10, 512]) | Values : tensor([[ 0.0431,  0.0326,  0.0083,  ...,  0.0208, -0.0148,  0.0081],
#         [ 0.0027,  0.0393, -0.0123,  ..., -0.0282, -0.0144, -0.0176]],
#        device='cuda:0', grad_fn=)
#
# Layer: linear_relu_stack.4.bias | Size: torch.Size([10]) | Values : tensor([ 0.0229, -0.0096], device='cuda:0', grad_fn=)
5.自动微分
在训练神经网络时,最常用的算法是反向传播算法,模型参数会根据损失函数回传的梯度进行调整。为了计算这些梯度,PyTorch 有一个内置的微分引擎,称为torch.autograd. 它支持任何计算图的梯度自动计算。
下面定义了最简单的一层神经网络,具有输入x、参数w和b以及一些损失函数。
import torch

x = torch.ones(5)  # input tensor
y = torch.zeros(3)  # expected output
w = torch.randn(5, 3, requires_grad=True)
b = torch.randn(3, requires_grad=True)
z = torch.matmul(x, w)+b
loss = torch.nn.functional.binary_cross_entropy_with_logits(z, y)
5.1 计算图
上方代码的计算图如下:
在这个网络中,w和b是我们需要优化的参数,设置了requires_grad=True属性。(可以在创建张量时设置该属性,也可以使用x.requires_grad_(True)来设置)
构建计算图的函数是Function类的一个对象。这个对象知道如何计算正向的函数*,*以及如何在反向传播步骤中计算导数,可以通过张量的grad_fn属性查看。
print(f"Gradient function for z = {z.grad_fn}")
print(f"Gradient function for loss = {loss.grad_fn}")

# Gradient function for z =
# Gradient function for loss =
5.2 计算梯度
为了优化神经网络中参数的权重,我们需要计算损失函数对参数的导数。我们可以调用 loss.backward()来完成这一操作,在w.grad和 b.grad中可以查看相应的导数值。
loss.backward()
print(w.grad)
print(b.grad)

# tensor([[0.0342, 0.1329, 0.2091],
#         [0.0342, 0.1329, 0.2091],
#         [0.0342, 0.1329, 0.2091],
#         [0.0342, 0.1329, 0.2091],
#         [0.0342, 0.1329, 0.2091]])
# tensor([0.0342, 0.1329, 0.2091])
5.3 不使用梯度跟踪
默认情况下,所有张量的属性都设置为requires_grad=True,用来跟踪它们的计算历史并支持梯度计算。但是,在某些情况下我们不需要这样做,例如,模型训练完成后将其用于预测时,只需要前向计算即可。具体操作如下:
z = torch.matmul(x, w)+b
print(z.requires_grad)

with torch.no_grad():
    z = torch.matmul(x, w)+b
print(z.requires_grad)

# True
# False
另一种方法是使用detach()方法:
z = torch.matmul(x, w)+b
z_det = z.detach()
print(z_det.requires_grad)

# False
6.优化模型参数
训练模型是一个迭代过程;在每次迭代(epoch)中,模型对输出进行预测,首先计算猜测值与真实值的误差(损失),然后计算误差关于其参数的导数,最后使用梯度下降法优化这些参数。
将2.数据集和数据加载器和4.定义模型的代码整合如下:
import torch
from torch import nn
from torch.utils.data import DataLoader
from torchvision import datasets
from torchvision.transforms import ToTensor, Lambda

training_data = datasets.FashionMNIST(
    root="data",
    train=True,
    download=True,
    transform=ToTensor()
)

test_data = datasets.FashionMNIST(
    root="data",
    train=False,
    download=True,
    transform=ToTensor()
)

train_dataloader = DataLoader(training_data, batch_size=64)
test_dataloader = DataLoader(test_data, batch_size=64)

class NeuralNetwork(nn.Module):
    def __init__(self):
        super(NeuralNetwork, self).__init__()
        self.flatten = nn.Flatten()
        self.linear_relu_stack = nn.Sequential(
            nn.Linear(28*28, 512),
            nn.ReLU(),
            nn.Linear(512, 512),
            nn.ReLU(),
            nn.Linear(512, 10),
        )

    def forward(self, x):
        x = self.flatten(x)
        logits = self.linear_relu_stack(x)
        return logits

model = NeuralNetwork()
6.1 超参数
超参数是可调整的参数,不同的超参数值会影响模型训练和收敛速度。
这次训练,我们定义了以下超参数:
- 训练次数epochs:迭代数据集的次数。
- 批处理大小batch_size:每次传入网络中的样本数量。
- 学习率learning_rate:在每个批次更新模型参数的程度。较小的值会产生较慢的学习速度,而较大的值可能会导致训练期间出现不可预测的行为。
learning_rate = 1e-3
batch_size = 64
epochs = 5
6.2 优化循环
设置好超参数后,我们就可以使用优化循环来训练和优化我们的模型。
每个epoch包括以下两个循环:
- 训练循环:迭代训练数据集并尝试收敛到最佳参数。
- 验证/测试循环:迭代测试数据集以检查模型性能是否正在改善。
6.2.1 损失函数
损失函数用来衡量模型预测得到的结果与真实值的差异程度,损失值越小越好。
常见的损失函数包括用于回归任务的nn.MSELoss(均方误差)和用于分类的nn.NLLLoss(负对数似然)。 nn.CrossEntropyLoss结合nn.LogSoftmax和nn.NLLLoss。
这里我们将模型的输出logits传递给nn.CrossEntropyLoss,进行归一化并计算预测误差。
# 初始化损失函数
loss_fn = nn.CrossEntropyLoss()
6.2.2 优化器
优化是在每个训练步骤中调整模型参数以减少模型误差的过程。在这里,我们使用SGD优化器;torch,optim中提供了很多优化器,
例如ADAM和RMSProp。
# 传入需要优化的参数和学习率
optimizer = torch.optim.SGD(model.parameters(), lr=learning_rate)
6.2.3 实践
在训练循环中,优化分三个步骤进行:
- 调用
optimizer.zero_grad()将模型参数的梯度归零。默认情况下梯度会累加。 - 调用
loss.backward()来反向传播预测损失。PyTorch存储每个参数的损失梯度。 - 计算梯度完成后,调用
optimizer.step()来调整参数。
# 优化模型参数
def train_loop(dataloader, model, loss_fn, optimizer, device):
    size = len(dataloader.dataset)
    for batch, (X, y) in enumerate(dataloader):
        X = X.to(device)
        y = y.to(device)
        # 前向传播,计算预测值
        pred = model(X)
        # 计算损失
        loss = loss_fn(pred, y)
        # 反向传播,优化参数
        optimizer.zero_grad()
        loss.backward()
        optimizer.step()

        if batch % 100 == 0:
            loss, current = loss.item(), batch * len(X)
            print(f"loss: {loss:>7f}  [{current:>5d}/{size:>5d}]")

# 测试模型性能
def test_loop(dataloader, model, loss_fn, device):
    size = len(dataloader.dataset)
    num_batches = len(dataloader)
    test_loss, correct = 0, 0
    with torch.no_grad():
        for X, y in dataloader:
            X = X.to(device)
            y = y.to(device)
            # 前向传播,计算预测值
            pred = model(X)
            # 计算损失
            test_loss += loss_fn(pred, y).item()
            # 计算准确率
            correct += (pred.argmax(1) == y).type(torch.float).sum().item()

    test_loss /= num_batches
    correct /= size
    print(f"Test Error: \n Accuracy: {(100 * correct):>0.1f}%, Avg loss: {test_loss:>8f} \n")
我们初始化损失函数和优化器,并将其传递给train_loop和test_loop。
loss_fn = nn.CrossEntropyLoss()
optimizer = torch.optim.SGD(params=model.parameters(), lr=learning_rate)

epochs = 10
for t in range(epochs):
    print(f"Epoch {t+1}\n-------------------------------")
    train_loop(train_dataloader, model, loss_fn, optimizer, device)
    test_loop(test_dataloader, model, loss_fn, device)
print("Done!")

# ...
# Epoch 5
# -------------------------------
# loss: 1.214354  [    0/60000]
# loss: 1.228768  [ 6400/60000]
# loss: 1.314466  [12800/60000]
# loss: 1.234377  [19200/60000]
# loss: 1.242174  [25600/60000]
# loss: 1.027974  [32000/60000]
# loss: 1.062843  [38400/60000]
# loss: 1.157571  [44800/60000]
# loss: 1.091189  [51200/60000]
# loss: 1.143303  [57600/60000]
# Test Error:
#  Accuracy: 64.6%, Avg loss: 1.092479
#
# Done!
7.保存和加载模型
# 导包
import torch
import torchvision.models as models
7.1 保存和加载模型权重
PyTorch模型将学习到的参数存储在内部状态字典中,称为state_dict。
可以通过torch.save 方法保存:torch.save(model.state_dict(),model_path)
加载模型分为两步:
- 先加载模型中的state_dict参数,
state_dict=torch.load(model_path) - 然后加载state_dict到定义好的模型中,
model.load_state_dict(state_dict,strict=True/False),strict表示是否严格加载模型参数,load_state_dict()会返回missing_keys和unexpected_keys两个参数
# 样例代码如下
model = models.vgg16(pretrained=True) # pretrained=True加载预训练好的参数
torch.save(model.state_dict(), 'model_weights.pth')

# 要加载模型权重,首先需要创建一个相同模型的实例,然后使用load_state_dict()方法加载参数。
model = models.vgg16() # 不加载预训练好的参数
model.load_state_dict(torch.load('model_weights.pth'))
model.eval() # 将模型设置为测试模式,避免dropout和batch normalization对预测结果造成的影响
7.2 保存和加载整个模型
保存模型的结构和参数:
torch.save(model, 'model.pth')
加载模型:
model = torch.load('model.pth')
注:这种方法在序列化模型时使用Python pickle模块。
8.样例代码
目录结构
code/
    data/
    	FashionMNIST/
    		processed/
    		raw/
    example.py
import os
import matplotlib.pyplot as plt
from torchvision.transforms import ToTensor
import torch
from torch import nn
from torch.utils.data import DataLoader
from torchvision import datasets, transforms

# 训练数据集
training_data = datasets.FashionMNIST(
    root="data",
    train=True,
    download=True,
    transform=ToTensor()  # 对样本数据进行处理,转换为张量数据
)
# 测试数据集
test_data = datasets.FashionMNIST(
    root="data",
    train=False,
    download=True,
    transform=ToTensor()  # 对样本数据进行处理,转换为张量数据
)
# 标签字典,一个key键对应一个label
labels_map = {
    0: "T-Shirt",
    1: "Trouser",
    2: "Pullover",
    3: "Dress",
    4: "Coat",
    5: "Sandal",
    6: "Shirt",
    7: "Sneaker",
    8: "Bag",
    9: "Ankle Boot",
}
# 设置画布大小
# figure = plt.figure(figsize=(8, 8))
# cols, rows = 3, 3
# for i in range(1, cols * rows + 1):
#     # 随机生成一个索引
#     sample_idx = torch.randint(len(training_data), size=(1,)).item()
#     # 获取样本及其对应的标签
#     img, label = training_data[sample_idx]
#     figure.add_subplot(rows, cols, i)
#     # 设置标题
#     plt.title(labels_map[label])
#     # 不显示坐标轴
#     plt.axis("off")
#     # 显示灰度图
#     plt.imshow(img.squeeze(), cmap="gray")
# plt.show()

# 训练数据加载器
train_dataloader = DataLoader(
    dataset=training_data,
    # 设置批量大小
    batch_size=64,
    # 打乱样本的顺序
    shuffle=True)
# 测试数据加载器
test_dataloader = DataLoader(
    dataset=test_data,
    batch_size=64,
    shuffle=True)
# 展示图片和标签
# train_features, train_labels = next(iter(train_dataloader))
# print(f"Feature batch shape: {train_features.size()}")
# print(f"Labels batch shape: {train_labels.size()}")
# img = train_features[0].squeeze()
# label = train_labels[0]
# plt.imshow(img, cmap="gray")
# plt.show()
# print(f"Label: {label}")

# 模型定义
class NeuralNetwork(nn.Module):
    def __init__(self):
        super(NeuralNetwork, self).__init__()
        self.flatten = nn.Flatten()
        self.linear_relu_stack = nn.Sequential(
            nn.Linear(in_features=28 * 28, out_features=512),
            nn.ReLU(),
            nn.Linear(in_features=512, out_features=512),
            nn.ReLU(),
            nn.Linear(in_features=512, out_features=10),
        )

    def forward(self, x):
        x = self.flatten(x)
        logits = self.linear_relu_stack(x)
        return logits


# 优化模型参数
def train_loop(dataloader, model, loss_fn, optimizer, device):
    size = len(dataloader.dataset)
    for batch, (X, y) in enumerate(dataloader):
        X = X.to(device)
        y = y.to(device)
        # 前向传播,计算预测值
        pred = model(X)
        # 计算损失
        loss = loss_fn(pred, y)
        # 反向传播,优化参数
        optimizer.zero_grad()
        loss.backward()
        optimizer.step()

        if batch % 100 == 0:
            loss, current = loss.item(), batch * len(X)
            print(f"loss: {loss:>7f}  [{current:>5d}/{size:>5d}]")


# 测试模型性能
def test_loop(dataloader, model, loss_fn, device):
    size = len(dataloader.dataset)
    num_batches = len(dataloader)
    test_loss, correct = 0, 0

    with torch.no_grad():
        for X, y in dataloader:
            X = X.to(device)
            y = y.to(device)
            # 前向传播,计算预测值
            pred = model(X)
            # 计算损失
            test_loss += loss_fn(pred, y).item()
            # 计算准确率
            correct += (pred.argmax(1) == y).type(torch.float).sum().item()

    test_loss /= num_batches
    correct /= size
    print(f"Test Error: \n Accuracy: {(100 * correct):>0.1f}%, Avg loss: {test_loss:>8f} \n")


if __name__ == '__main__':
    device = "cuda" if torch.cuda.is_available() else "cpu"
    print(f"Using {device} device")
    # 定义模型
    model = NeuralNetwork().to(device)
    # 设置超参数
    learning_rate = 1e-3
    batch_size = 64
    epochs = 5
    # 定义损失函数和优化器
    loss_fn = nn.CrossEntropyLoss()
    optimizer = torch.optim.SGD(params=model.parameters(), lr=learning_rate)
    # 训练模型
    for t in range(epochs):
        print(f"Epoch {t + 1}\n-------------------------------")
        train_loop(train_dataloader, model, loss_fn, optimizer, device)
        test_loop(test_dataloader, model, loss_fn, device)
    print("Done!")
    # 保存模型
    torch.save(model.state_dict(), 'model_weights.pth')
本文参考:PyTorch入门学习教程_Kint的博客
pytorch基础入门教程/一小时学会pytorch_李弘宇的博客


