搭建实验室3d slam 移动小车 4.1jackal小车+镭神32线激光雷达lego-loam建图
搭建实验室3d slam 移动小车 4.1.1jackal小车+镭神32线激光雷达lego-loam建图
镭神32线 lego-loam建图 视频链接
镭神32线 lego-loam建图
参考博客:
LeGO-LOAM初探:原理,安装和测试
32线镭神雷达跑LeGO-LOAM:3D 激光SLAM
lego loam 跑镭神32线激光雷达
前言:
目前平台为 jackal移动小车、镭神智能32线激光雷达、jackal底盘内置(三轴IMU)、ubuntu16.04,
本次实验主要跑 lego loam,通过查看lego loam原作者的论文,发现lego loam使用的平台正是目前实验室拥有的小车平台,原作者的雷达的 vp16 ,我们是镭神C32。
在此十分感谢,以上提到的参考博客,及镭神智能的黄工和谢工、何工的帮忙。这次只是一次内容的整合。
Lego-loam 熟悉
原博客:LeGO-LOAM初探:原理,安装和测试
安装gtsam
环境
sudo apt-get install libboost-all-dev
sudo apt-get install cmake
下载gtsam
cd ~
git clone https://bitbucket.org/gtborg/gtsam.git
编译
cd ~/gtsam
mkdir build
cd build
cmake ..
make check   #可选的,运行单元测试
sudo  make install
下载并编译LeGO-LOAM
mkdir -p ~/catkin_ws/src
cd ~/catkin_ws/src
git clone https://github.com/RobustFieldAutonomyLab/LeGO-LOAM.git
cd ..
catkin_make -j1
运行
1.运行launch 文件
roslaunch lego_loam run.launch
注意:参数“/ use_sim_time”,对于模拟则设置为“true”,对于使用真实机器人则设置为“false”。
<launch>

    <!--- Sim Time -->
    <param name="/use_sim_time" value="true" />

    <!--- Run Rviz-->
    <node pkg="rviz" type="rviz" name="rviz" args="-d $(find lego_loam)/launch/test.rviz" />

    <!--- TF -->
    <node pkg="tf" type="static_transform_publisher" name="camera_init_to_map"  args="0 0 0 1.570795   0        1.570795 /map    /camera_init 10" />
    <node pkg="tf" type="static_transform_publisher" name="base_link_to_camera" args="0 0 0 -1.570795 -1.570795 0        /camera /base_link   10" />

    <!--- LeGO-LOAM -->
    <node pkg="lego_loam" type="imageProjection"    name="imageProjection"    output="screen"/>
    <node pkg="lego_loam" type="featureAssociation" name="featureAssociation" output="screen"/>
    <node pkg="lego_loam" type="mapOptmization"     name="mapOptmization"     output="screen"/>
    <node pkg="lego_loam" type="transformFusion"    name="transformFusion"    output="screen"/>

</launch>
3.播放bag文件
rosbag play *.bag --clock --topic /velodyne_points /imu/data
注意:虽然 /imu/data 是可选的,但如果提供的话,它可以大大提高估计的准确性。
如果你的 IMU 帧与 Velodyne 帧不对齐,使用 IMU 数据将导致明显漂移。
如果对 ”–clock“ 有疑惑,可以参考:https://answers.ros.org/question/12577/when-should-i-need-clock-parameter-on-rosbag-play/ 。

32线镭神雷达跑LeGO-LOAM
摘自原博客:32线镭神雷达跑LeGO-LOAM:3D 激光SLAM
镭神雷达的相关修改
首先LeGO-LOAM默认的接受的topic name是velodyne_points,点云的frame_id是velodyne,镭神驱动发布的topic name为lslidar_point_cloud,frame_id为laser_link,这里需要修改一下lslidar_c32.launch文件,remap一下topic name,再修改frame_id为velodyne。这是我搞的最简单的方法,其他写程序转也可以。
launch文件:
<launch>
  <!--原雷达的ip地址为 192.168.1.200   修改雷达的 target ip为 192.168.80.2-->
  <arg name="device_ip" default="192.168.80.2" />
  <arg name="msop_port" default="2368" />
  <arg name="difop_port" default="2369" />
  <arg name="return_mode" default="1" />
  <arg name="degree_mode" value="1"/>
  <arg name="time_synchronization" default="true" />

  <node pkg="lslidar_c32_driver" type="lslidar_c32_driver_node" name="lslidar_c32_driver_node" output="screen">
    <param name="device_ip" value="$(arg device_ip)" />
    <param name="msop_port" value="$(arg msop_port)" />
    <param name="difop_port" value="$(arg difop_port)"/>
    <!--lego loam frame id 为 velodyne -->
    <!--<param name="frame_id" value="laser_link"/>-->
    <param name="frame_id" value="velodyne"/>
    <param name="add_multicast" value="false"/>
    <param name="group_ip" value="224.1.1.2"/>
    <param name="rpm" value="600"/>
    <param name="return_mode" value="$(arg return_mode)"/>
    <param name="degree_mode" value="$(arg degree_mode)"/>
    <param name="time_synchronization" value="$(arg time_synchronization)"/>
  </node>

  <node pkg="lslidar_c32_decoder" type="lslidar_c32_decoder_node" name="lslidar_c32_decoder_node" output="screen">
    <param name="min_range" value="0.15"/>
    <param name="max_range" value="150.0"/>
    <param name="degree_mode" value="$(arg degree_mode)"/>
    <param name="distance_unit" value="0.4"/>
    <param name="return_mode" value="$(arg return_mode)"/>
    <param name="config_vert" value="true"/>
    <param name="print_vert" value="false"/>
    <param name="scan_frame_id" value="laser_link"/>
    <param name="scan_num" value="15"/>
    <param name="publish_scan" value="true"/>
    <param name="time_synchronization" value="$(arg time_synchronization)"/>
    <!--lego loam 点云话题改为 /velodyne_points-->
    <remap from="lslidar_point_cloud" to="/velodyne_points" />
  </node>


  <!--node name="rviz" pkg="rviz" type="rviz" args="-d $(find lslidar_c32_decoder)/launch/lslidar_c32.rviz" output="screen"/-->

</launch>
修改完以后LeGO-LOAM就能接收到雷达的点云数据了。
LeGO-LOAM的修改
这主要需要修改utility.h以及imageProjection.cpp
看一眼源作者告诉大家需要修改的地方:
New Lidar:The key thing to adapt the code to a new sensor is making sure the point cloud can be properly projected to an range image and ground can be correctly detected. For example, VLP-16 has a angular resolution of 0.2° and 2° along two directions. It has 16 beams. The angle of the bottom beam is -15°. Thus, the parameters in “utility.h” are listed as below. When you implement new sensor, make sure that the ground_cloud has enough points for matching. Before you post any issues, please read this.
新雷达:使代码适应新的传感器的关键是确保点云可以正确地投影到距离图像和地面可以正确地检测。例如,VLP-16沿两个方向的角分辨率分别为0.2和2。它有16根光束。底部横梁的角度是-15。因此,在“实用程序”中的参数。h”列出如下。在实现新传感器时,请确保地面云具有足够的匹配点。在你发布任何问题之前,请阅读这篇文章。
New: a new useCloudRing flag has been added to help with point cloud projection. Velodyne point cloud has “ring” channel that directly gives the point row id in a range image. Other lidars may have a same type of channel, i.e., “r” in Ouster. If you are using a non-Velodyne lidar but it has a similar “ring” channel, you can change the PointXYZIR definition in utility.h and the corresponding code in imageProjection.cpp.
新的:增加了一个新的useCloudRing标志来帮助点云投影。Velodyne点云有“环”通道,直接给点行id在一个范围内的图像。其他lidars可能具有相同类型的通道,即"r"是财产侵占。如果您使用的是非velodyne激光雷达,但是它有一个类似的“环形”通道,您可以在utility.h中更改PointXYZIR定义,并在imageproject .cpp中更改相应的代码。
更多详情到源作者github上看吧
修改utility.h
雷达参数修改
这位前辈已经说的很清楚了,可以移步以下博客
https://www.cnblogs.com/hgl0417/p/11067660.html
// LeiShen-32C-5Hz
// extern const int N_SCAN = 32;
// extern const int Horizon_SCAN = 4000;
// extern const float ang_res_x = 360.0 / float(Horizon_SCAN);
// extern const float ang_res_y = 26 / float(N_SCAN-1);
// extern const float ang_bottom = 16.5;
// extern const int groundScanInd = 10; //地面的线扫条数

// LeiShen-32C-10Hz
extern const int N_SCAN = 32;//32线雷达
extern const int Horizon_SCAN = 2000;//每条线发射的点数
extern const float ang_res_x = 360.0 / float(Horizon_SCAN);//水平分辨率
extern const float ang_res_y = 26.0 / float(N_SCAN-1);//垂直分辨率
extern const float ang_bottom = 16.5;
extern const int groundScanInd = 10; //地面的线扫条数
参数一定要设置对,不然性能差别很大。确定自己的雷达设置的多少Hz,一般是默认10Hz。
useCloudRing修改
镭神好像是没有Velodyne雷达的ring channel功能,所以useCloudRing设置为false了。
extern const bool useCloudRing = false; // if true, ang_res_y and ang_bottom are not used
修改imageproject.cpp
src文件夹找到imageproject.cpp,因为原作者可能一直在更新代码,所以说改哪一行不科学,行数可能变,所以我还是把修改的代码贴一下:
找到copyPointCloud函数
    void copyPointCloud(const sensor_msgs::PointCloud2ConstPtr& laserCloudMsg){

        cloudHeader = laserCloudMsg->header;
        cloudHeader.stamp = ros::Time::now(); // Ouster lidar users may need to uncomment this line
        pcl::fromROSMsg(*laserCloudMsg, *laserCloudIn);
        // Remove Nan points
        std::vector<int> indices;
        pcl::removeNaNFromPointCloud(*laserCloudIn, *laserCloudIn, indices);
        // have "ring" channel in the cloud
        if (useCloudRing == true){
            pcl::fromROSMsg(*laserCloudMsg, *laserCloudInRing);
            if (laserCloudInRing->is_dense == false) {
                ROS_ERROR("Point cloud is not in dense format, please remove NaN points first!");
                ros::shutdown();
            }
        }
    }
这里是把cloudHeader.stamp = ros::Time::now();的注释去掉了。
实验
录制数据集
启动底盘
roslaunch jackal_base base.launch
启动相机
roslaunch axis_camera axis.launch
启动镭神激光雷达
roslaunch lslidar_c32_decoder lslidar_c32_lego_loam.launch
录制数据包 到 /rosbag_manual 目录下
rosbag record 参考博客 : ROS 中 rosbag 相关命令总结
cd /home/u16l/catkin_ws/rosbag_manual
rosbag record  -a
离线建图
运行 lego-loam
roslaunch lego_loam run.launch
播放 指定的rosbag
rosbag play *.bag --clock --topic /velodyne_points /imu_data /axis_camera/image_raw/compressed
实时在线建图
修改launch文件,其实就是这个,由true改为false.
<launch>

    <!--- Sim Time -->
    <param name="/use_sim_time" value="false" />

    <!--- Run Rviz-->
    <node pkg="rviz" type="rviz" name="rviz" args="-d $(find lego_loam)/launch/test.rviz" />

    <!--- TF -->
    <node pkg="tf" type="static_transform_publisher" name="camera_init_to_map"  args="0 0 0 1.570795   0        1.570795 /map    /camera_init 10" />
    <node pkg="tf" type="static_transform_publisher" name="base_link_to_camera" args="0 0 0 -1.570795 -1.570795 0        /camera /base_link   10" />

    <!--- LeGO-LOAM -->
    <node pkg="lego_loam" type="imageProjection"    name="imageProjection"    output="screen"/>
    <node pkg="lego_loam" type="featureAssociation" name="featureAssociation" output="screen"/>
    <node pkg="lego_loam" type="mapOptmization"     name="mapOptmization"     output="screen"/>
    <node pkg="lego_loam" type="transformFusion"    name="transformFusion"    output="screen"/>

</launch>
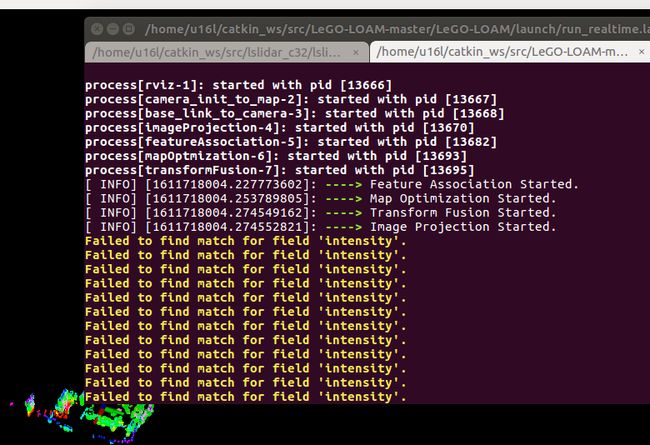
建图时出现 Failed to find match for field ‘intensity’.建立的模型的也有较大的漂移问题解决

在此感谢 广工大的黄同学与镭神智能的员工,帮忙解决。
通过查阅博客 【PCL】Failed to find match for field ‘intensity’.利用点云强度信息,与同行交流得知,出现这个报错的原因主要是雷达的输出的数据,激光强度信息类型不匹配。
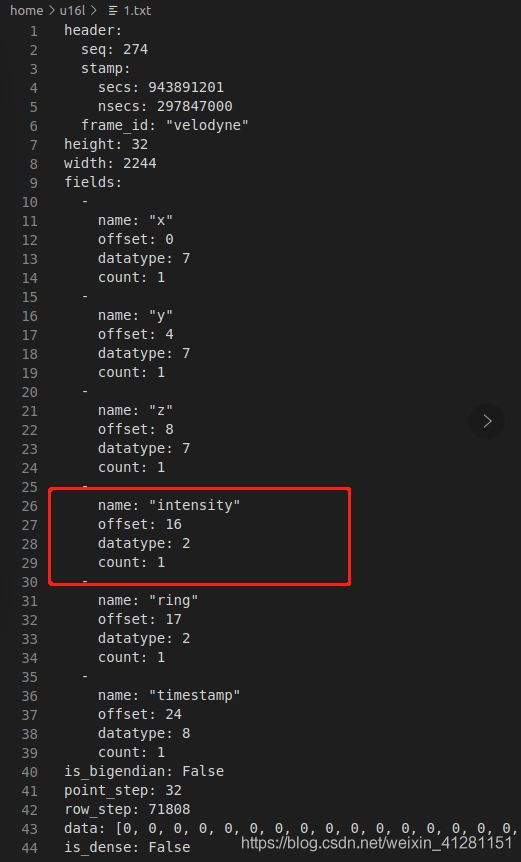
激光雷达的数据输出类型如下所示

通过对比得知,lego loam 需要的点云数据类型为, intensity dtype 为 float32

而镭神智能激光雷达输出的 点云数据 intensity dtype 为 uint8

因此解决思路就是,修改数据类型,通过阅读lslidar_c32/lslidar_c32_decoder/include/rawdata.h知道 ,镭神所用的输出data数据类型为 自定义数据类型 VPoint point,故此,将lslidar_c32/lslidar_c32_decoder/src/rawdata.cc 中的 数据类型修改为 PCL常用的点云处理数据类型 pcl::PointXYZI point 即可 ,修改后的注释了 雷达输出的 ring 和 timestamp的两个话题,有待修复。


代码下载
修改后的镭神32线适配lego loam建图 ROS驱动代码下载
