【深度学习】吴恩达深度学习-Course1神经网络与深度学习-第二周神经网络基础编程
2021年11月26日10:48:12更新1:
- 纠正了文章中的内容
- 改正了有问题的代码
完整的更新及其思想见Course1-第二周编程错误点更新与思考.pdf(免费下载),欢迎指正!
以下为文章内容
学习链接:[【中文】【吴恩达课后编程作业】Course 1 - 神经网络和深度学习 - 第二周作业](https://blog.csdn.net/u013733326/article/details/79639509)
文章目录
- 〇、作业目标
- 一、使用环境
-
- -资料包下载
- -使用Jupyter进行编码(此处仅提及打开方式)
- -使用Anaconda进行预先环境创建
- 二、库的安装
-
- -numpy的安装
- -h5py的安装
- -matplotlib的安装
- -lr_utils的安装
- 三、编程环境的创建
- 四、学习流程
-
- -lr_utils中内容解释
- -查看数据集中的图片
- -查看并处理数据集中的内容
- -构建神经网络
-
- 第一步:初始化参数W、b
- 第二步:建立sigmoid函数
- 第三步:为完成梯度下降做准备(计算出dw和db)
- 第四步:完成梯度下降(即不断更新w和b的值--调用propagate())
- 第五步:预测
- 第六步:整合
- 第七步:调用代码
- 五、补充(from 学习链接1)
- 六、完整代码
〇、作业目标
我们要做的事是搭建一个能够识别猫的简单的神经网络
一、使用环境
这里使用Anaconda进行环境配置,使用PyCharm进行编程,这两个都可以搜索官网进行下载。
-资料包下载
此处参考学习链接1中作者上传的百度网盘资源
资料下载,提取码:2u3w (若失效了请去上边学习链接中看看提取码是否已更新)
-使用Jupyter进行编码(此处仅提及打开方式)
安装好Anaconda后打开“开始”菜单,找到Anaconda的位置,可以发现里边内置Jupyter NoteBook,可以进行使用的,但是我感觉我不太会用,还是正正经经使用PyCharm来进行编码吧。这里不再多提及。
-使用Anaconda进行预先环境创建
安装好Anaconda后,打开Anaconda的控制台,我是在开始菜单中打开的。

第一步:创建环境
在刚刚打开的控制台中使用如下命令创建一个新环境:
conda create -n DeepLearning_wed python=3.8
其中,DeepLearning_wed是您可选的环境名称。
创建过程中需要进行Y/N的选择,输入y后回车即可。
再介绍一些常用命令,如下:
conda info -e	#查看当前拥有的环境
conda activate xxx	#激活名称为xxx的环境(激活后,后续操作在该环境下进行)
conda list	#查看当前环境下安装的东西
第二步:激活环境
使用如下命令激活:
conda activate DeepLearning_wed #如果您创建时环境名称与我不同,请修改最后一串字符为您的环境名称
二、库的安装
在开始之前,需要引入的库有(摘自学习链接1):
- numpy :是用Python进行科学计算的基本软件包。
- h5py:是与H5文件中存储的数据集进行交互的常用软件包。
- matplotlib:是一个著名的库,用于在Python中绘制图表。
- lr_utils:在本文的资料包里,一个加载资料包里面的数据的简单功能的库。
接下来逐个进行安装。一般先使用conda search xxx看看能不能搜到要安的软件,如果能搜到就输conda install xxx进行安装。
预说明:
如果需要进行y和n的选择,请一律选择y。请不要挂着梯子下载,会报错!!如果觉得下载速度实在太慢了,可以去网上搜一下挂镜像源的办法。
-numpy的安装
conda search numpy	#可选,如果您需要查看版本可以输入此命令查看
conda install numpy	#安装numpy,如果需要,可以使用“=”来指定版本号,不指定则安装最新的
-h5py的安装
conda search h5py	#可选,如果您需要查看版本可以输入此命令查看
conda install h5py	#安装h5py,如果需要,可以使用“=”来指定版本号,不指定则安装最新的
-matplotlib的安装
conda search matplotlib	#可选,如果您需要查看版本可以输入此命令查看
conda install matplotlib	#安装matplotlib,如果需要,可以使用“=”来指定版本号,不指定则安装最新的
-lr_utils的安装
这是给出的资料包中的工具,无法直接进行安装,其导入将会在接下来提到。
三、编程环境的创建
第一步:创建project
打开PyCharm,选择New project,然后如图进行操作:

选择Existing Interpreter,然后点右边三个点进行选择,选好之后按确定,这个Existing Interpreter会变成这样:

第二步:将百度云下载下来的文件夹放到project所在目录下
如图所示,被选中的那两个就是从百度云下载下来的

第三步:测试一下所有已经弄好的环境是否正常
你可以复制下边这段代码至main.py中,并跑一下试试看
import numpy as np
import matplotlib.pyplot as plt
import h5py
from lr_utils import load_dataset

print('Hello,DeepLearning!')
如果未能正常打印出Hello,DeepLearning的话,请你检查是哪一个环境配置的不正确。
这里解释一下,我们将lr_utils放置到我们所在的project下,方可在main.py下通过“from”进行引入。
四、学习流程
-lr_utils中内容解释
lr_utils中的内容如下:
import numpy as np
import h5py


def load_dataset():
    train_dataset = h5py.File('datasets/train_catvnoncat.h5', "r")
    train_set_x_orig = np.array(train_dataset["train_set_x"][:]) # your train set features
    train_set_y_orig = np.array(train_dataset["train_set_y"][:]) # your train set labels

    test_dataset = h5py.File('datasets/test_catvnoncat.h5', "r")
    test_set_x_orig = np.array(test_dataset["test_set_x"][:]) # your test set features
    test_set_y_orig = np.array(test_dataset["test_set_y"][:]) # your test set labels

    classes = np.array(test_dataset["list_classes"][:]) # the list of classes

    train_set_y_orig = train_set_y_orig.reshape((1, train_set_y_orig.shape[0]))
    test_set_y_orig = test_set_y_orig.reshape((1, test_set_y_orig.shape[0]))

    return train_set_x_orig, train_set_y_orig, test_set_x_orig, test_set_y_orig, classes
以下引用至学习链接1中的内容:
{
解释以下上面的load_dataset() 返回的值的含义:
train_set_x_orig :保存的是训练集里面的图像数据(本训练集有209张64x64的图像)。
train_set_y_orig :保存的是训练集的图像对应的分类值(【0 | 1】,0表示不是猫,1表示是猫)。
test_set_x_orig :保存的是测试集里面的图像数据(本训练集有50张64x64的图像)。
test_set_y_orig : 保存的是测试集的图像对应的分类值(【0 | 1】,0表示不是猫,1表示是猫)。
classes : 保存的是以bytes类型保存的两个字符串数据,数据为:[b’non-cat’ b’cat’]。
}
-查看数据集中的图片
通过上边介绍lr_utils,我们可以知道给出的函数的返回值是train_set_x_orig, train_set_y_orig, test_set_x_orig, test_set_y_orig, classes这些个变量。
我们尝试将图片打在屏幕上试一试。
import matplotlib.pyplot as plt
from lr_utils import load_dataset

#定义这些变量,由load_dataset()中返回
train_set_x_orig , train_set_y , test_set_x_orig , test_set_y , classes = load_dataset()
index = 25  #定义索引值为25
#我们知道train_set_x_orig存放的是图片,这是一个数组类型数据,我们就将图片展示出来看一看
plt.imshow(train_set_x_orig[index])
#我们打印一下train_set_y_orig看一看,这是否是一只猫
print("train_set_y=" + str(train_set_y[0][25]))
#下边这一行才是真正让图片展示在屏幕上的代码
plt.show()
运行后,结果如下:

通过图片可以看到是一只猫,对应的分类值是1,说明是猫。
我们将index换成26,得到结果如下:

说明这并不是一只猫。
-查看并处理数据集中的内容
这里代码均来自学习链接,在学习链接(会用{}标明)所给基础上加以个人理解。
{
第一步:打印train_set_y进行查看
接上边的内容,我们仍使用index=25
# 打印出当前的训练标签值
# 使用np.squeeze的目的是压缩维度,【未压缩】train_set_y[:,index]的值为[1] , 【压缩后】np.squeeze(train_set_y[:,index])的值为1
print("【使用np.squeeze:" + str(np.squeeze(train_set_y[:, index])) + ",不使用np.squeeze: " + str(train_set_y[:, index]) + "】")
# 只有压缩后的值才能进行解码操作
print("y=" + str(train_set_y[:, index]) + ", it's a " + classes[np.squeeze(train_set_y[:, index])].decode("utf-8") + " picture")
打印出的结果是:y=[1], it's a cat' picture
这里我留存一个疑问,我对于train_set_y[:, index]这种表示方式不太理解。
第二步:查看一下图像数据集具体情况
进行下一步,我们查看一下我们加载的图像数据集具体情况,我对以下参数做出解释:
- m_train :训练集里图片的数量。
- m_test :测试集里图片的数量。
- num_px :训练、测试集里面的图片的宽度和高度(均为64x64)。
请记住,train_set_x_orig 是一个维度为(m_train,num_px,num_px,3)的数组。这个维度通过下面的打印信息就可以看出来。通过这个维度我们可以理解为:(图片数量,图片宽,图片高,RGB3通道)
m_train = train_set_y.shape[1] #训练集里图片的数量。
m_test = test_set_y.shape[1] #测试集里图片的数量。
num_px = train_set_x_orig.shape[1] #训练、测试集里面的图片的宽度和高度(均为64x64)。

#现在看一看我们加载的东西的具体情况
print ("训练集的数量: m_train = " + str(m_train))
print ("测试集的数量 : m_test = " + str(m_test))
print ("每张图片的宽/高 : num_px = " + str(num_px))
print ("每张图片的大小 : (" + str(num_px) + ", " + str(num_px) + ", 3)")
print ("训练集_图片的维数 : " + str(train_set_x_orig.shape))
print ("训练集_标签的维数 : " + str(train_set_y.shape))
print ("测试集_图片的维数: " + str(test_set_x_orig.shape))
print ("测试集_标签的维数: " + str(test_set_y.shape))
得到的结果是:
训练集的数量: m_train = 209
测试集的数量 : m_test = 50
每张图片的宽/高 : num_px = 64
每张图片的大小 : (64, 64, 3)
训练集_图片的维数 : (209, 64, 64, 3)
训练集_标签的维数 : (1, 209)
测试集_图片的维数: (50, 64, 64, 3)
测试集_标签的维数: (1, 50)
通过打印出来的train_set_y.shape和test_set_y.shape,可以知道这个维度是(1,209)或(1,50),画出来表示就是下面这种情况:

第三步:降维
在这里可能会有一个疑问:为什么要降维?
对于train_set_x_orig和test_set_x_orig而言,我们现在拥有的维度(209,64,64,3)和(50,64,64,3)不是我们想要的。我们想要的是下面这样的:
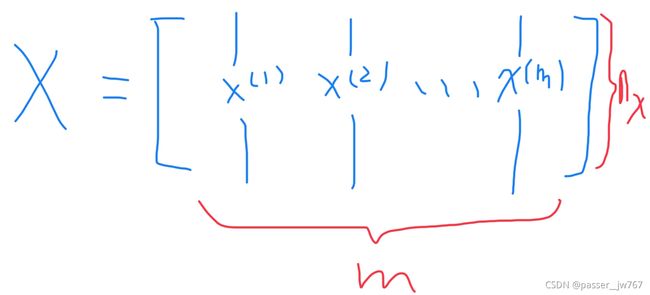
这样的维度就是:(所有的特征值n_x,m),而对于每一个列向量,其实应该有64 * 64 * 3这么多行。即n_x就应该是64 * 64 * 3。即我们需要维度是(64 * 64 * 3,209)和(64 * 64 * 3,50)。64 * 64 * 3的结果就是12288。
为了方便,我们要把维度为(64,64,3)的numpy数组重新构造为(64 x 64 x 3,1)的数组,要乘以3的原因是每张图片是由64x64像素构成的,而每个像素点由(R,G,B)三原色构成的,所以要乘以3。在此之后,我们的训练和测试数据集是一个numpy数组,每列代表一个平坦的图像,应该有m_train和m_test列。
当你想将形状(a,b,c,d)的矩阵X平铺成形状(b * c * d,a)的矩阵X_flatten时,可以使用以下代码:
# X_flatten = X.reshape(X.shape [0],-1).T #X.T是X的转置
# 将训练集的维度降低并转置。
train_set_x_flatten = train_set_x_orig.reshape(train_set_x_orig.shape[0], -1).T
# 将测试集的维度降低并转置。
test_set_x_flatten = test_set_x_orig.reshape(test_set_x_orig.shape[0], -1).T
这一段意思是指把数组变为209行的矩阵(因为训练集里有209张图片),但是我懒得算列有多少,于是我就用-1告诉程序你帮我算,最后程序算出来时12288列,我再最后用一个T表示转置,这就变成了12288行,209列。测试集亦如此。
这里给出的代码是reshape(train_set_x_orig.shape[0],-1),其实也就是得到(12288,209)这样的维度,所以需要进行转置。我认为代码应该也可以将train_set_x_orig.shape[0]和-1反过来。
test_set_x_orig同理。
通过打印,看看降维后的结果:
print ("训练集降维最后的维度: " + str(train_set_x_flatten.shape))
print ("训练集_标签的维数 : " + str(train_set_y.shape))
print ("测试集降维之后的维度: " + str(test_set_x_flatten.shape))
print ("测试集_标签的维数 : " + str(test_set_y.shape))
打印结果为:
训练集降维最后的维度: (12288, 209)
训练集_标签的维数 : (1, 209)
测试集降维之后的维度: (12288, 50)
测试集_标签的维数 : (1, 50)
为了表示彩色图像,必须为每个像素指定红色,绿色和蓝色通道(RGB),因此像素值实际上是从0到255范围内的三个数字的向量。机器学习中一个常见的预处理步骤是对数据集进行居中和标准化,这意味着可以减去每个示例中整个numpy数组的平均值,然后将每个示例除以整个numpy数组的标准偏差。但对于图片数据集,它更简单,更方便,几乎可以将数据集的每一行除以255(像素通道的最大值),因为在RGB中不存在比255大的数据,所以我们可以放心的除以255,让标准化的数据位于[0,1]之间,现在标准化我们的数据集:
train_set_x = train_set_x_flatten / 255
test_set_x = test_set_x_flatten / 255
}
这里个人对比较模糊的地方做点解释:
为什么要转置的问题:我们的目标矩阵是这样的(参见视频里老师讲过的):这里的n_x是一个样本的特征数量,m代表总的样本数。 
但是显然,在未转置之前,我们得到的是这样的:一行(n_x)是一个样本的所有特征,即第一列代表所有样本各自的第一个特征,第一列代表所有样本各自的第二个特征…以此类推。此时样本总数(m)是行数。
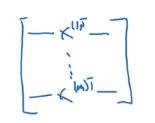
以下图源学习链接1的博主,我觉得描述得很好:
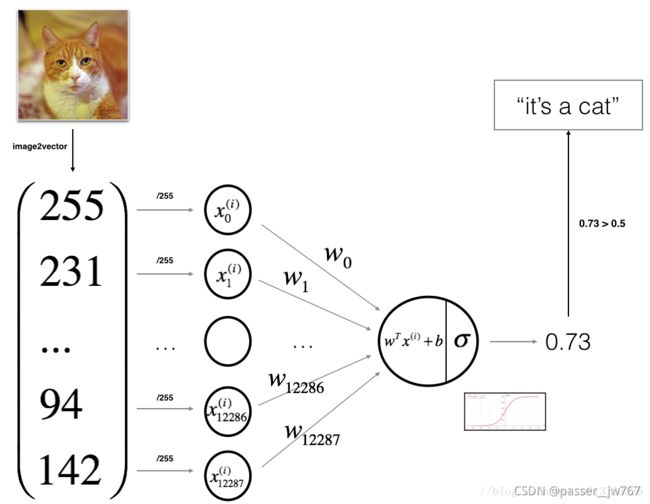
-构建神经网络
- 定义模型结构(例如输入特征的数量)
- 初始化模型的参数
- 循环:
3.1 计算当前损失(正向传播)
3.2 计算当前梯度(反向传播)
3.3 更新参数(梯度下降)
第一步:初始化参数W、b
{
def initialize_with_zeros(dim):
    """
        此函数为w创建一个维度为(dim,1)的0向量,并将b初始化为0。

        参数:
            dim  - 我们想要的w矢量的大小(或者这种情况下的参数数量)

        返回:
            w  - 维度为(dim,1)的初始化向量。
            b  - 初始化的标量(对应于偏差)
    """
    w = np.zeros(shape=(dim, 1))
    b = 0
    # 使用assert来确保我要的数据是正确的
    assert (w.shape == (dim, 1))  # w的维度是(dim,1)
    assert (isinstance(b, float) or isinstance(b, int))  # b的类型是float或者是int

    return (w, b)
}
第二步:建立sigmoid函数
{
def sigmoid(z):
    """
        参数:
            z  - 任何大小的标量或numpy数组。

        返回:
            s  -  sigmoid(z)
    """
    s = 1 / (1 + np.exp(-z))
    return s
这里原作者还做了测试,其实做测试更保险一些,但是我比较赶进度,此处就不做测试了。
}
第三步:为完成梯度下降做准备(计算出dw和db)
{
def propagate(w, b, X, Y):
    m = X.shape[1]

    Z = np.dot(w.T, X) + b
    A = sigmoid(Z)
    cost = -(1/m) * np.sum(np.dot(Y, np.log(A)) + np.dot(1 - Y, np.log(1 - A)))

    dz = A - Y
    dw = (1 / m) * np.dot(X, dz.T)
    db = (1 / m) * np.sum(dz)

    assert (dw.shape == w.shape)
    assert (db.type == float)
    cost = np.squeeze(cost)
    assert (cost.shape == ())

    grads = {
        "dw": dw,
        "db": db
    }

    return (grads, cost)
}
第四步:完成梯度下降(即不断更新w和b的值–调用propagate())
{
def optimize(w, b, X, Y, num_irerations, learning_rate, print_cost=False):
    """
        此函数通过运行梯度下降算法来优化w和b

        参数:
            w  - 权重,大小不等的数组(num_px * num_px * 3,1)
            b  - 偏差,一个标量
            X  - 维度为(num_px * num_px * 3,训练数据的数量)的数组。
            Y  - 真正的“标签”矢量(如果非猫则为0,如果是猫则为1),矩阵维度为(1,训练数据的数量)
            num_iterations  - 优化循环的迭代次数
            learning_rate  - 梯度下降更新规则的学习率
            print_cost  - 每100步打印一次损失值

        返回:
            params  - 包含权重w和偏差b的字典
            grads  - 包含权重和偏差相对于成本函数的梯度的字典
            成本 - 优化期间计算的所有成本列表,将用于绘制学习曲线。

        提示:
        我们需要写下两个步骤并遍历它们:
            1)计算当前参数的成本和梯度,使用propagate()。
            2)使用w和b的梯度下降法则更新参数。
    """
    costs = []

    for i in range(num_irerations):

        grads, cost = propagate(w, b, X, Y)

        dw = grads["dw"]
        db = grads["db"]

        w = w - learning_rate * dw
        b = b - learning_rate * db

        # 记录成本
        if i % 100 == 0:
            costs.append(cost)
        # 打印成本数据
        if (print_cost) and (i % 100 == 0):
            print("迭代的次数:%i ,   误差值:%f  " % (i, cost))

    params = {
        "w" : w,
        "b" : b
    }
    grads = {
        "dw" : dw,
        "db" : db
    }

    return (params, grads, costs)
}
第五步:预测
{
optimize函数会输出已学习的w和b的值,我们可以使用w和b来预测数据集X的标签。
现在我们要实现预测函数predict()。计算预测有两个步骤:

然后将预测值存储在向量Y_prediction中。
def predict(w, b, X):
    """
        使用学习逻辑回归参数logistic (w,b)预测标签是0还是1,

        参数:
            w  - 权重,大小不等的数组(num_px * num_px * 3,1)
            b  - 偏差,一个标量
            X  - 维度为(num_px * num_px * 3,训练数据的数量)的数据

        返回:
            Y_prediction  - 包含X中所有图片的所有预测【0 | 1】的一个numpy数组(向量)

    """
    m = X.shape[1]
    Y_prediction = np.zeros((1, m))
    w = w.reshape(X.shape[0], 1)

    # 计预测猫在图片中出现的概率
    A = sigmoid(np.dot(w.T, X) + b)
    for i in range(A.shape[1]):
        Y_prediction[0, i] = 1 if A[0, i] > 0.5 else 0
    assert(Y_prediction.shape == (1, m))

    return Y_prediction
}
第六步:整合
在一个函数内,完成所有的操作:
def model(X_train, Y_train, X_test, Y_test, num_iterations = 2000, learning_rate = 0.5, print_cost = False):
    """
        通过调用之前实现的函数来构建逻辑回归模型

        参数:
            X_train  - numpy的数组,维度为(num_px * num_px * 3,m_train)的训练集
            Y_train  - numpy的数组,维度为(1,m_train)(矢量)的训练标签集
            X_test   - numpy的数组,维度为(num_px * num_px * 3,m_test)的测试集
            Y_test   - numpy的数组,维度为(1,m_test)的(向量)的测试标签集
            num_iterations  - 表示用于优化参数的迭代次数的超参数
            learning_rate  - 表示optimize()更新规则中使用的学习速率的超参数
            print_cost  - 设置为true以每100次迭代打印成本

        返回:
            d  - 包含有关模型信息的字典。
    """
    w, b = initialize_with_zeros(X_train.shape[0])

    parameters, grads, costs = optimize(w, b, X_train, Y_train, num_iterations, learning_rate, print_cost)

    w, b = parameters["w"], parameters["b"]

    Y_prediction_test = predict(w, b, X_test)
    Y_prediction_train = predict(w, b, X_train)

    # 打印训练后的准确性
    print("训练集准确性:", format(100 - np.mean(np.abs(Y_prediction_train - Y_train)) * 100), "%")
    print("测试集准确性:", format(100 - np.mean(np.abs(Y_prediction_test - Y_test)) * 100), "%")

    d = {
        "costs": costs,
        "Y_prediction_test": Y_prediction_test,
        "Y_prediciton_train": Y_prediction_train,
        "w": w,
        "b": b,
        "learning_rate": learning_rate,
        "num_iterations": num_iterations}
    return d
第七步:调用代码
d = model(train_set_x, train_set_y, test_set_x, test_set_y, num_iterations = 2500, learning_rate = 0.005, print_cost = True)
五、补充(from 学习链接1)
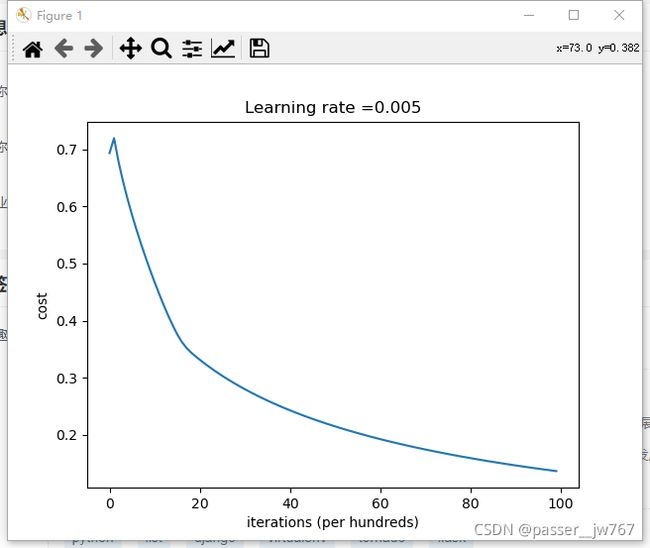
可以将成本函数的图打印出来查看
#绘制图
costs = np.squeeze(d['costs'])
plt.plot(costs)
plt.ylabel('cost')
plt.xlabel('iterations (per hundreds)')
plt.title("Learning rate =" + str(d["learning_rate"]))
plt.show()
六、完整代码
import numpy as np
import matplotlib.pyplot as plt
import h5py
from lr_utils import load_dataset

# 定义这些变量,由load_dataset()中返回
train_set_x_orig, train_set_y, test_set_x_orig, test_set_y, classes = load_dataset()
index = 25  # 定义索引值为25

# 打印出当前的训练标签值
# 使用np.squeeze的目的是压缩维度,【未压缩】train_set_y[:,index]的值为[1] , 【压缩后】np.squeeze(train_set_y[:,index])的值为1
# print("【使用np.squeeze:" + str(np.squeeze(train_set_y[:, index])) + ",不使用np.squeeze: " + str(train_set_y[:, index]) + "】")
# 只有压缩后的值才能进行解码操作
print("y=" + str(train_set_y[:, index]) + ", it's a " + classes[np.squeeze(train_set_y[:, index])].decode(
    "utf-8") + " picture")

m_train = train_set_y.shape[1]  # 训练集里图片的数量。
m_test = test_set_y.shape[1]  # 测试集里图片的数量。
num_px = train_set_x_orig.shape[1]  # 训练、测试集里面的图片的宽度和高度(均为64x64)。
# 现在看一看我们加载的东西的具体情况
print("训练集的数量: m_train = " + str(m_train))
print("测试集的数量 : m_test = " + str(m_test))
print("每张图片的宽/高 : num_px = " + str(num_px))
print("每张图片的大小 : (" + str(num_px) + ", " + str(num_px) + ", 3)")
print("训练集_图片的维数 : " + str(train_set_x_orig.shape))
print("训练集_标签的维数 : " + str(train_set_y.shape))
print("测试集_图片的维数: " + str(test_set_x_orig.shape))
print("测试集_标签的维数: " + str(test_set_y.shape))

# X_flatten = X.reshape(X.shape [0],-1).T #X.T是X的转置
# 将训练集的维度降低并转置。
train_set_x_flatten = train_set_x_orig.reshape(train_set_x_orig.shape[0], -1).T
# 将测试集的维度降低并转置。
test_set_x_flatten = test_set_x_orig.reshape(test_set_x_orig.shape[0], -1).T
print("训练集降维最后的维度: " + str(train_set_x_flatten.shape))
print("训练集_标签的维数 : " + str(train_set_y.shape))
print("测试集降维之后的维度: " + str(test_set_x_flatten.shape))
print("测试集_标签的维数 : " + str(test_set_y.shape))
train_set_x = train_set_x_flatten / 255
test_set_x = test_set_x_flatten / 255


def initialize_with_zeros(dim):
    """
        此函数为w创建一个维度为(dim,1)的0向量,并将b初始化为0。

        参数:
            dim  - 我们想要的w矢量的大小(或者这种情况下的参数数量)

        返回:
            w  - 维度为(dim,1)的初始化向量。
            b  - 初始化的标量(对应于偏差)
    """
    w = np.zeros(shape=(dim, 1))
    b = 0
    # 使用assert来确保我要的数据是正确的
    assert (w.shape == (dim, 1))  # w的维度是(dim,1)
    assert (isinstance(b, float) or isinstance(b, int))  # b的类型是float或者是int

    return (w, b)


def sigmoid(z):
    """
        参数:
            z  - 任何大小的标量或numpy数组。

        返回:
            s  -  sigmoid(z)
    """
    s = 1 / (1 + np.exp(-z))
    return s


def propagate(w, b, X, Y):
    m = X.shape[1]

    Z = np.dot(w.T , X) + b
    A = sigmoid(Z)
    cost = (- 1 / m) * np.sum(Y * np.log(A) + (1 - Y) * (np.log(1 - A)))

    dz = A - Y
    dw = (1 / m) * np.dot(X, dz.T)
    db = (1 / m) * np.sum(dz)

    assert (dw.shape == w.shape)
    # assert (db.type == float)
    cost = np.squeeze(cost)
    assert (cost.shape == ())

    grads = {
        "dw": dw,
        "db": db
    }

    return (grads, cost)


def optimize(w, b, X, Y, num_irerations, learning_rate, print_cost=False):
    """
        此函数通过运行梯度下降算法来优化w和b

        参数:
            w  - 权重,大小不等的数组(num_px * num_px * 3,1)
            b  - 偏差,一个标量
            X  - 维度为(num_px * num_px * 3,训练数据的数量)的数组。
            Y  - 真正的“标签”矢量(如果非猫则为0,如果是猫则为1),矩阵维度为(1,训练数据的数量)
            num_iterations  - 优化循环的迭代次数
            learning_rate  - 梯度下降更新规则的学习率
            print_cost  - 每100步打印一次损失值

        返回:
            params  - 包含权重w和偏差b的字典
            grads  - 包含权重和偏差相对于成本函数的梯度的字典
            成本 - 优化期间计算的所有成本列表,将用于绘制学习曲线。

        提示:
        我们需要写下两个步骤并遍历它们:
            1)计算当前参数的成本和梯度,使用propagate()。
            2)使用w和b的梯度下降法则更新参数。
    """
    costs = []

    for i in range(num_irerations):

        grads, cost = propagate(w, b, X, Y)

        dw = grads["dw"]
        db = grads["db"]

        w = w - learning_rate * dw
        b = b - learning_rate * db

        # 记录成本
        if i % 100 == 0:
            costs.append(cost)
        # 打印成本数据
        if (print_cost) and (i % 100 == 0):
            print("迭代的次数:%i ,   误差值:%f  " % (i, cost))

    params = {
        "w" : w,
        "b" : b
    }
    grads = {
        "dw" : dw,
        "db" : db
    }

    return (params, grads, costs)


def predict(w, b, X):
    """
        使用学习逻辑回归参数logistic (w,b)预测标签是0还是1,

        参数:
            w  - 权重,大小不等的数组(num_px * num_px * 3,1)
            b  - 偏差,一个标量
            X  - 维度为(num_px * num_px * 3,训练数据的数量)的数据

        返回:
            Y_prediction  - 包含X中所有图片的所有预测【0 | 1】的一个numpy数组(向量)

    """
    m = X.shape[1]
    Y_prediction = np.zeros((1, m))
    w = w.reshape(X.shape[0], 1)

    # 计预测猫在图片中出现的概率
    A = sigmoid(np.dot(w.T, X) + b)
    for i in range(A.shape[1]):
        Y_prediction[0, i] = 1 if A[0, i] > 0.5 else 0
    assert(Y_prediction.shape == (1, m))

    return Y_prediction


def model(X_train, Y_train, X_test, Y_test, num_iterations = 2000, learning_rate = 0.5, print_cost = False):
    """
        通过调用之前实现的函数来构建逻辑回归模型

        参数:
            X_train  - numpy的数组,维度为(num_px * num_px * 3,m_train)的训练集
            Y_train  - numpy的数组,维度为(1,m_train)(矢量)的训练标签集
            X_test   - numpy的数组,维度为(num_px * num_px * 3,m_test)的测试集
            Y_test   - numpy的数组,维度为(1,m_test)的(向量)的测试标签集
            num_iterations  - 表示用于优化参数的迭代次数的超参数
            learning_rate  - 表示optimize()更新规则中使用的学习速率的超参数
            print_cost  - 设置为true以每100次迭代打印成本

        返回:
            d  - 包含有关模型信息的字典。
    """
    w, b = initialize_with_zeros(X_train.shape[0])

    parameters, grads, costs = optimize(w, b, X_train, Y_train, num_iterations, learning_rate, print_cost)

    w, b = parameters["w"], parameters["b"]

    Y_prediction_test = predict(w, b, X_test)
    Y_prediction_train = predict(w, b, X_train)

    # 打印训练后的准确性
    print("训练集准确性:", format(100 - np.mean(np.abs(Y_prediction_train - Y_train)) * 100), "%")
    print("测试集准确性:", format(100 - np.mean(np.abs(Y_prediction_test - Y_test)) * 100), "%")

    d = {
        "costs": costs,
        "Y_prediction_test": Y_prediction_test,
        "Y_prediciton_train": Y_prediction_train,
        "w": w,
        "b": b,
        "learning_rate": learning_rate,
        "num_iterations": num_iterations}
    return d


d = model(train_set_x, train_set_y, test_set_x, test_set_y, num_iterations = 2000, learning_rate = 0.005, print_cost = True)

#绘制图
costs = np.squeeze(d['costs'])
plt.plot(costs)
plt.ylabel('cost')
plt.xlabel('iterations (per hundreds)')
plt.title("Learning rate =" + str(d["learning_rate"]))
plt.show()
更新1补充:
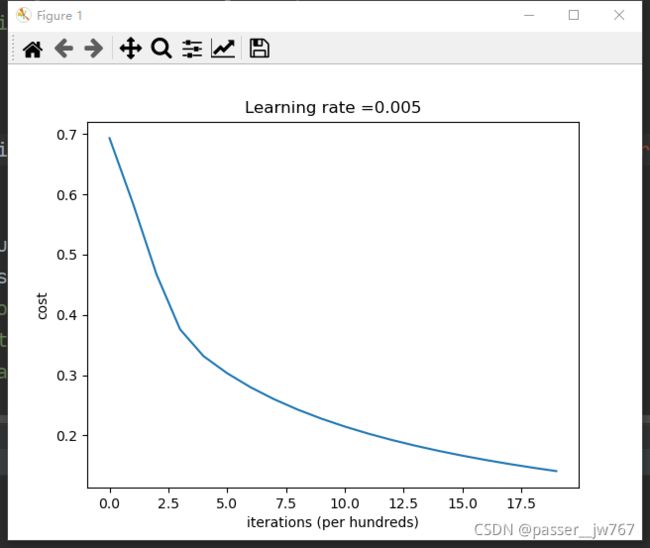
如果对记录cost的点进行修改,结果画出来的图会稍有差异
这是迭代100次记录一个点,可以看到中间有一段明显的直线
这是迭代20次记录一个点,曲线相较100个点时候更为平滑。
