Linux实战笔记-----k8s存储之configMap管理、Secret管理和Volumes管理
一、Configmap配置管理
简介:
• Configmap用于保存配置数据,以键值对形式存储。
• configMap 资源提供了向 Pod 注入配置数据的方法。
• 旨在让镜像和配置文件解耦,以便实现镜像的可移植性和可复用性。
典型的使用场景:
• 填充环境变量的值
• 设置容器内的命令行参数
• 填充卷的配置文件
创建ConfigMap的方式有4种:
• 使用字面值创建
• 使用文件创建
• 使用目录创建
• 编写configmap的yaml文件创建
1.使用字面值指定创建
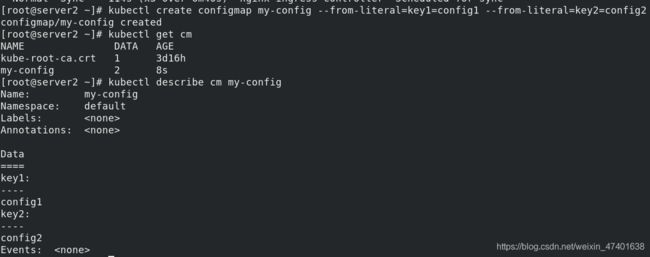
kubectl create configmap my-config --from-literal=key1=config1 --from-literal=key2=config2
kubectl get cm
kubectl describe cm my-config
2.使用文件创建
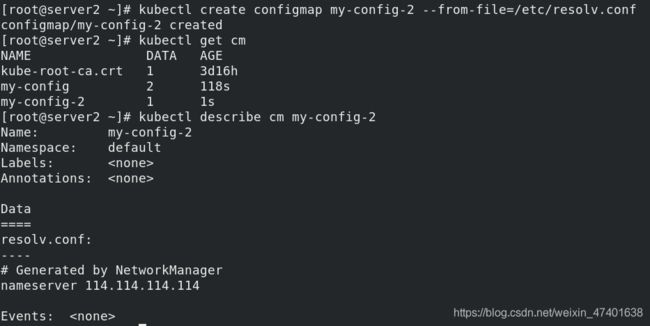
kubectl create configmap my-config-2 --from-file=/etc/resolv.conf
kubectl get cm
kubectl describe cm my-config-2
3.使用目录创建
mkdir configmap
cd configmap/
mkdir test
cp /etc/passwd test/
cp /etc/fstab test/
ls test/
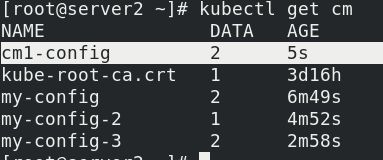
kubectl create configmap my-config-3 --from-file=test
kubectl get cm
kubectl describe cm my-config-3
4.编写yaml文件创建
vim cm1.yaml

apiVersion: v1
kind: ConfigMap
metadata:
  name: cm1-config
data:
  db_host: "172.25.0.250"
  db_port: "3306"

cat cm1.yaml
kubectl apply -f cm1.yaml
kubectl get cm
使用configmap
- 通过环境变量的方式直接传递给pod
- 通过在pod的命令行下运行的方式
- 作为volume的方式挂载到pod内
1.通过环境变量的方式直接传递给pod:
cd configmap/
vim pod.yaml

apiVersion: v1
kind: Pod
metadata:
  name: pod1
spec:
  containers:
    - name: pod1
      image: busyboxplus
      command: ["/bin/sh", "-c", "env"]
      env:
        - name: key1
          valueFrom:
            configMapKeyRef:
              name: cm1-config
              key: db_host
        - name: key2
          valueFrom:
            configMapKeyRef:
              name: cm1-config
              key: db_port
  restartPolicy: Never

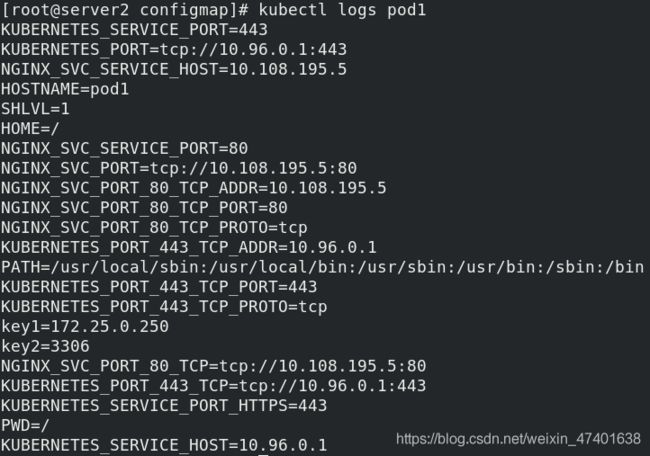
kubectl apply -f pod.yaml
kubectl get pod
kubectl logs pod1
vim pod2.yaml

apiVersion: v1
kind: Pod
metadata:
  name: pod2
spec:
  containers:
    - name: pod2
      image: busyboxplus
      command: ["/bin/sh", "-c", "env"]
      envFrom:
        - configMapRef:
            name: cm1-config
  restartPolicy: Never

kubectl apply -f pod2.yaml
kubectl get pod
vim pod3.yaml

apiVersion: v1
kind: Pod
metadata:
  name: pod3
spec:
  containers:
    - name: pod3
      image: busybox
      command: ["/bin/sh", "-c", "echo $(db_host) $(db_port)"]
      envFrom:
        - configMapRef:
            name: cm1-config
  restartPolicy: Never

kubectl apply -f pod3.yaml
kubectl get pod
kubectl logs pod3
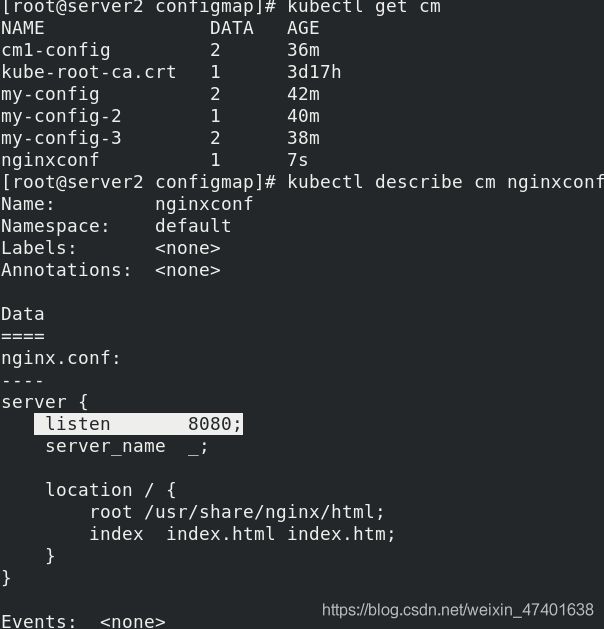
vim nginx.conf

server {
    listen       8080;
    server_name  _;

    location / {
        root /usr/share/nginx/html;
        index  index.html index.htm;
    }
}

kubectl create configmap nginxconf --from-file=nginx.conf
kubectl get cm
 vim nginx.yaml

apiVersion: apps/v1
kind: Deployment
metadata:
  name: my-nginx
spec:
  replicas: 1
  selector:
    matchLabels:
      app: nginx
  template:
    metadata:
      labels:
        app: nginx
    spec:
      containers:
        - name: nginx
          image: nginx
          volumeMounts:
          - name: config-volume
            mountPath: /etc/nginx/conf.d
      volumes:
        - name: config-volume
          configMap:
            name: nginxconf

kubectl apply -f nginx.yaml
查看端口,测试curl 10.244.1.56

修改端口为8000,刷新并访问
kubectl edit cm nginxconf
 kubectl patch deployments.apps my-nginx --patch '{"spec": {"template": {"metadata": {"annotations": {"version/config": "20200219"}}}}}'
curl 10.244.1.56
Secret配置管理
Secret 对象类型用来保存敏感信息,例如密码、OAuth 令牌和 ssh key。敏感信息放在 secret 中比放在 Pod 的定义或者容器镜像中来说更加安全和灵活。
Pod 可以用两种方式使用 secret:
- 作为 volume 中的文件被挂载到 pod 中的一个或者多个容器里
- 当 kubelet 为 pod 拉取镜像时使用
Secret的类型:
- Service Account:Kubernetes 自动创建包含访问 API 凭据的 secret,并自动修
改 pod 以使用此类型的 secret - Opaque:使用base64编码存储信息,可以通过base64 --decode解码获得原始数据,因此安全性弱。
- kubernetes.io/dockerconfigjson:用于存储docker registry的认证信息。
从文件创建secret
echo -n 'admin' > ./username.txt
echo -n 'westos' > ./password.txt
kubectl create secret generic db-user-pass --from-file=./username.txt --from-file=./password.txt
kubectl get secrets
echo d2VzdG9z | base64 -d
apiVersion: v1
kind: Secret
metadata:
  name: mysecret
type: Opaque
data:
  username: YWRtaW4=
  password: d2VzdG9z

kubectl apply -f secret.yaml
将Secret挂载到Volume中
apiVersion: v1
kind: Pod
metadata:
  name: mysecret
spec:
  containers:
  - name: nginx
    image: nginx
    volumeMounts:
    - name: secrets
      mountPath: "/secret"
      readOnly: true
  volumes:
  - name: secrets
    secret:
      secretName: mysecret
运行,查看
kubectl apply -f secret.yaml
kubectl get pod
kubectl exec -it mysecret -- bash
vim secret.yaml

apiVersion: v1
kind: Pod
metadata:
  name: mysecret
spec:
  containers:
  - name: nginx
    image: nginx
    volumeMounts:
    - name: secrets
      mountPath: "/secret"
      readOnly: true
  volumes:
  - name: secrets
    secret:
      secretName: mysecret
      items:
      - key: username
        path: my-group/my-username

kubectl apply -f secret.yaml
kubectl get pod
进入节点终端查看
kubectl exec -it mysecret -- bash

文件挂载在指定路径my-group/my-username下
将Secret设置为环境变量
vim secret.yaml

apiVersion: v1
kind: Pod
metadata:
  name: secret-env
spec:
  containers:
  - name: nginx
    image: nginx
    env:
      - name: SECRET_USERNAME
        valueFrom:
          secretKeyRef:
            name: mysecret
            key: username
      - name: SECRET_PASSWORD
        valueFrom:
          secretKeyRef:
            name: mysecret
            key: password

kubectl apply -f secret.yaml
kubectl get pod
进入pod查看
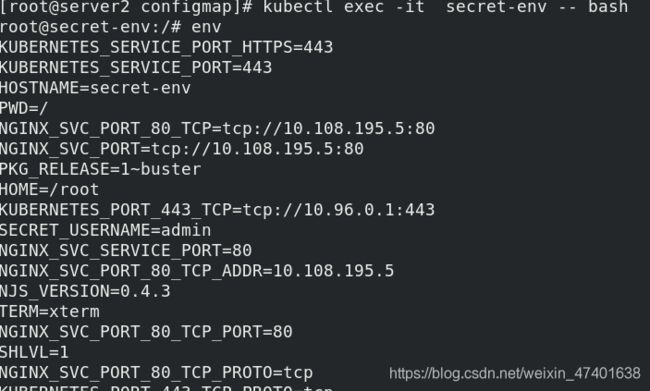
环境变量读取Secret很方便,但无法支撑Secret动态更新,即修改yaml文件后,容器内无法及时更改。
kubernetes.io/dockerconfigjson用于存储docker registry的认证信息。
创建secret的格式为docker-registry
kubectl create secret docker-registry myregistrykey --docker-server=reg.westos.org --docker-username=admin --docker-password=westos --docker-email=[email protected]

kubectl get secrets
vim registry.yaml

apiVersion: v1
kind: Pod
metadata:
  name: mypod
spec:
  containers:
    - name: mario
      image: reg.westos.org/library/mario
  imagePullSecrets:
    - name: myregistrykey

kubectl apply -f registry.yaml
kubectl describe pod mypod
三、Volumes配置管理
容器中的文件在磁盘上是临时存放的,这给容器中运行的特殊应用程序带来一些
问题。首先,当容器崩溃时,kubelet 将重新启动容器,容器中的文件将会丢失,
因为容器会以干净的状态重建。其次,当在一个 Pod 中同时运行多个容器时,
常常需要在这些容器之间共享文件。 Kubernetes 抽象出 Volume 对象来解决
这两个问题。
Kubernetes 卷具有明确的生命周期,与包裹它的 Pod 相同。 因此,卷比 Pod
中运行的任何容器的存活期都长,在容器重新启动时数据也会得到保留。 当然,
当一个 Pod 不再存在时,卷也将不再存在。也许更重要的是,Kubernetes 可以
支持许多类型的卷,Pod 也能同时使用任意数量的卷。
卷不能挂载到其他卷,也不能与其他卷有硬链接。 Pod 中的每个容器必须独立
地指定每个卷的挂载位置。
Kubernetes 支持下列类型的卷:
awsElasticBlockStore 、azureDisk、azureFile、cephfs、cinder、configMap、csi、gcePersistentDisk、gitRepo (deprecated)、glusterfs、hostPath、iscsi、local、nfs、persistentVolumeClaim、projected、portworxVolume、quobyte、rbd、scaleIO、secret、storageos、vsphereVolume
emptyDir卷:
当 Pod 指定到某个节点上时,首先创建的是一个 emptyDir 卷,并且只要 Pod
在该节点上运行,卷就一直存在。 就像它的名称表示的那样,卷最初是空的。
尽管 Pod 中的容器挂载 emptyDir 卷的路径可能相同也可能不同,但是这些容
器都可以读写 emptyDir 卷中相同的文件。 当 Pod 因为某些原因被从节点上删
除时,emptyDir 卷中的数据也会永久删除。
emptyDir卷创建
mkdir volumes
cd volumes/
 vim vol1.yaml

apiVersion: v1
kind: Pod
metadata:
  name: vol1
spec:
  containers:
  - image: busyboxplus
    name: vm1
    command: ["sleep", "300"]
    volumeMounts:
    - mountPath: /cache
      name: cache-volume
  - name: vm2
    image: nginx
    volumeMounts:
    - mountPath: /usr/share/nginx/html
      name: cache-volume
  volumes:
  - name: cache-volume
    emptyDir:
      medium: Memory
      sizeLimit: 100Mi

kubectl apply -f vol1.yaml
kubectl get pod -o wide
curl  10.244.4.24
kubectl exec -it  vol1 -- sh
cd cache/
echo www.westos.org > index.html
(创建大于设定100M大小的文件,节点会坏掉)
hostPath 卷能将主机节点文件系统上的文件或目录挂载到您的 Pod 中。注意:此处主机为分配的node节点主机,而不是k8smaster主机
vim host.yaml

apiVersion: v1
kind: Pod
metadata:
  name: test-pd
spec:
  containers:
  - image: nginx
    name: test-container
    volumeMounts:
    - mountPath: /test-pd
      name: test-volume
  volumes:
  - name: test-volume
    hostPath:
      path: /data
      type: DirectoryOrCreate
查看pod
kubectl apply -f host.yaml
kubectl get pod -o wide
kubectl exec -it  test-pd -- sh

cd test-pd
touch file1

在容器挂载目录中创建一个文件,受控node主机的相应目录也会自动生成相应文件。

共享文件系统nfs使用,首先在所有主机上安装nfs,在仓库结点上配置nfs
server1:
yum install -y nfs-utils
vim /etc/exports
systemctl start nfs
showmount -e
vim nfs.yaml

apiVersion: v1
kind: Pod
metadata:
  name: test-pd
spec:
  containers:
  - image: nginx
    name: test-container
    volumeMounts:
    - mountPath: /usr/share/nginx/html
      name: test-volume
  volumes:
  - name: test-volume
    nfs:
      server: 172.25.13.1
      path: /mnt/nfs
检测配置是否成功
showmount -e 172.25.13.1
kubectl apply -f nfs.yaml
kubectl get pod -o wide
cd /mnt/nfs
echo www.westos.org > index.html
进入server2容器,查看
kubectl exec -it test-pd -- sh

持久卷PV --静态
PersistentVolume(持久卷,简称PV)是集群内,由管理员提供的网络存储的一部分。就像集群中的节点一样,PV也是集群中的一种资源。它也像Volume一样,是一种volume插件,但是它的生命周期却是和使用它的Pod相互独立的。PV这个API对象,捕获了诸如NFS、ISCSI、或其他云存储系统的实现细节
PersistentVolumeClaim(持久卷声明,简称PVC)是用户的一种存储请求。它和Pod类似,Pod消耗Node资源,而PVC消耗PV资源。Pod能够请求特定的资源(如CPU和内存)。PVC能够请求指定的大小和访问的模式(可以被映射为一次读写或者多次只读)
两种PV提供的方式:静态和动态
- 静态PV:集群管理员创建多个PV,它们携带着真实存储的详细信息,这些存储对于集群用户是可用的。它们存在于Kubernetes API中,并可用于存储使用
- 动态PV:当管理员创建的静态PV都不匹配用户的PVC时,集群可能会尝试专门地供给volume给PVC。这种供给基于StorageClass
PVC与PV的绑定是一对一的映射。没找到匹配的PV,那么PVC会无限期得处于unbound未绑定状态
NFS PV 示例
vim pv.yaml

apiVersion: v1
kind: PersistentVolume
metadata:
  name: pv1
spec:
  capacity:
    storage: 5Gi
  volumeMode: Filesystem
  accessModes:
    - ReadWriteOnce
  persistentVolumeReclaimPolicy: Recycle
  storageClassName: nfs
  mountOptions:
    - hard
    - nfsvers=4.1
  nfs:
    path: /mnt/nfs
    server: 172.25.13.1
拉起容器查看pv, 此时状态为Available模式
kubectl apply -f pv.yaml
kubectl get pv
vim pvc.yaml

apiVersion: v1
kind: PersistentVolumeClaim
metadata:
  name: pvc1
spec:
  storageClassName: nfs
  accessModes:
    - ReadWriteOnce #ReadWriteMany 多点读写
  resources:
    requests:
      storage: 1Gi
拉起pvc容器,查看pvc和pv相关信息
vim pvc.yaml

apiVersion: v1
kind: PersistentVolumeClaim
metadata:
  name: pvc1
spec:
  storageClassName: nfs
  accessModes:
    - ReadWriteOnce #ReadWriteMany 多点读写
  resources:
    requests:
      storage: 1Gi
vim pod.yaml

apiVersion: v1
kind: Pod
metadata:
  name: test-pd
spec:
  containers:
  - image: nginx
    name: nginx
    volumeMounts:
    - mountPath: /usr/share/nginx/html
      name: pv1
  volumes:
  - name: pv1
    persistentVolumeClaim:
      claimName: pvc1
拉起并查看
kubectl apply -f pod.yaml
kubectl get pod
kubectl exec -it test-pd -- bash
kubectl get pod -o wide
curl 10.244.4.27
