使用OpenCV和MediaPipe实现基于深度学习的人体姿态估计
没有背景的姿态估计结果。
计算机视觉中最困难的任务之一是确定人体四肢、复杂的自遮挡、自相似部分以及由于服装、体型、照明、以及许多其他因素。人体姿态估计问题可以定义为预测各种人体关键点(关节和地标)位置的计算机视觉技术,例如肘部、膝盖、颈部、肩部、臀部、胸部等。
在今天的文章中,我们将了解使用 MediaPipe 和 OpenCV 库进行基于深度学习的人体姿态估计。
目录
什么是 MediaPipe?
姿态估计问题
实施解决方案
有用的链接
什么是 MediaPipe?
Mediapipe 是一个主要用于构建多模式音频、视频或任何时间序列数据的框架。在 MediaPipe 框架的帮助下,可以为 TensorFlow、TFLite 等推理模型以及媒体处理功能构建 ML 管道。
**注意:**你甚至不需要 GPU 来运行 MediaPipe 实验,因为今天的集成显卡和 CPU 非常适合此解决方案。从逻辑上讲,FPS 会比使用 GPU 低得多。
MediaPipe 提供可定制的 Python 解决方案作为PyPI上的预构建 Python 包,可以简单地使用pip install mediapipe. 它还为用户提供了构建自己的解决方案的工具。有关详细信息,请参阅:https://google.github.io/mediapipe/getting_started/python。
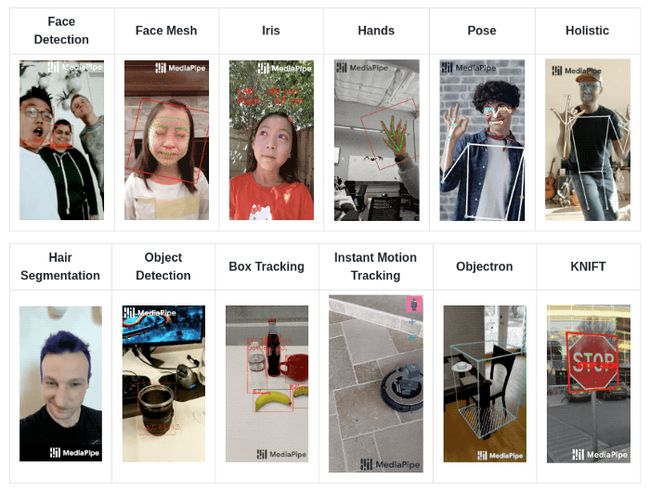
用于机器学习的 MediaPipe 解决方案:
姿态估计问题
从视频中估计人体姿势在各种应用中起着至关重要的作用,例如量化体育锻炼、手语识别和全身手势控制。
例如,它可以构成瑜伽、舞蹈和健身应用的基础。它还可以在增强现实中将数字内容和信息叠加在物理世界之上。
MediaPipe Pose 是一种用于高保真身体姿势跟踪的 ML 解决方案,利用我们的BlazePose研究从 RGB 视频帧推断出全身 33 个 3D 地标,该研究也为ML Kit 姿势检测 API 提供支持。
实施解决方案
要求
对于这个项目,我将 Python 与Anaconda Env 结合使用,并使用了以下库:
### Using conda
conda install -c conda-forge opencv

### Using pip
pip install mediapipe
创建姿势估计器类
让我们创建一个 Python 类来估计姿势,并且该类可用于与姿势估计相关的任何进一步项目。此外,你可以在网络摄像头的帮助下实时使用它
import cv2
import mediapipe as mp
import time


class PoseDetector:

    def __init__(self, mode = False, upBody = False, smooth=True, detectionCon = 0.5, trackCon = 0.5):

        self.mode = mode
        self.upBody = upBody
        self.smooth = smooth
        self.detectionCon = detectionCon
        self.trackCon = trackCon

        self.mpDraw = mp.solutions.drawing_utils
        self.mpPose = mp.solutions.pose
        self.pose = self.mpPose.Pose(self.mode, self.upBody, self.smooth, self.detectionCon, self.trackCon)

    def findPose(self, img, draw=True):
        imgRGB = cv2.cvtColor(img, cv2.COLOR_BGR2RGB)
        self.results = self.pose.process(imgRGB)
        if self.results.pose_landmarks:
            if draw:
                self.mpDraw.draw_landmarks(img, self.results.pose_landmarks, self.mpPose.POSE_CONNECTIONS)

        return img, self.results.pose_landmarks, self.mpPose.POSE_CONNECTIONS

    def getPosition(self, img, draw=True):
        lmList= []
        if self.results.pose_landmarks:
            for id, lm in enumerate(self.results.pose_landmarks.landmark):
                h, w, c = img.shape
                cx, cy = int(lm.x * w), int(lm.y * h)
                lmList.append([id, cx, cy])
                if draw:
                    cv2.circle(img, (cx, cy), 5, (255, 0, 0), cv2.FILLED)
        return lmList
做预测
由于我们在上面的文件中创建了一个类,我们将在另一个文件中使用它来对视频进行预测。
import cv2
import time
import pose_estimation_class as pm
import mediapipe as mp
import argparse


### construct the argument parser and parse the arguments
ap = argparse.ArgumentParser()
ap.add_argument("-i", "--input", required=True,
 help="path to our input video")
ap.add_argument("-o", "--output", required=True,
 help="path to our output video")
ap.add_argument("-s", "--fps", type=int, default=30,
 help="set fps of output video")
ap.add_argument("-b", "--black", type=str, default=False,
 help="set black background")
args = vars(ap.parse_args())


pTime = 0
black_flag = eval(args["black"])
cap = cv2.VideoCapture(args["input"])
out = cv2.VideoWriter(args["output"], cv2.VideoWriter_fourcc(*"MJPG"),
                      args["fps"], (int(cap.get(3)), int(cap.get(4))))

detector = pm.PoseDetector()

while(cap.isOpened()):
    success, img = cap.read()

    if success == False:
        break

    img, p_landmarks, p_connections = detector.findPose(img, False)

    ### use black background
    if black_flag:
        img = img * 0

    ### draw points
    mp.solutions.drawing_utils.draw_landmarks(img, p_landmarks, p_connections)
    lmList = detector.getPosition(img)

    cTime = time.time()
    fps = 1 / (cTime - pTime)
    pTime = cTime

    out.write(img)
    cv2.imshow("Image", img)
    cv2.waitKey(1)

cap.release()
out.release()
cv2.destroyAllWindows()
现在只需运行以下命令:
python detector.py -i videos/input_video.mp4 -o videos/output_video.mp4 -b False
注意:完整的代码和要求可以在我的 GitHub 上找到,它可以在有用的链接上找到。
结果
请查看视频:https://youtu.be/PBGm0VlCQF4
有用的链接
https://github.com/arthurfortes/pose_estimation
https://mediapipe.dev/
☆ END ☆
如果看到这里,说明你喜欢这篇文章,请转发、点赞。微信搜索「uncle_pn」,欢迎添加小编微信「 mthler」,每日朋友圈更新一篇高质量博文。
↓扫描二维码添加小编↓


