全新目标检测范式SparseR-CNN,超详细实战教学(附数据集)
作者:王浩 毕业于北京航空航天大学,人工智能领域优质创作者
编辑:3D视觉开发者社区
✨如果觉得文章内容不错,别忘了三连支持下哦~
文章目录
- 1、简介
- 2、Detectron2介绍
-
- 2.1 物体检测的BaseLine(COCO数据集)
- 2.2 使用 Mask R-CNN 的 COCO 实例分割BaseLine
- 3、搭建Sparse R-CNN测试环境
-
- 3.1 创建虚拟环境
- 3.2 安装apex库
-
- 3.2.1 下载apex库
- 3.2.2 安装apex库
- 3.3 安装fvcore库
- 3.4 安装Detectron2环境需要其他库
- 3.5 编译Sparse R-CNN
- 4、测试环境
- 5、制作数据集
- 6、配置训练环境
-
- 6.1 更改预训练模型的size
- 6.2 修改config参数
- 6.3 修改train_net.py
- 7、训练
- 8、测试
-
- 8.1 修改setup_cfg函数
- 8.2 修改显示类别
1、简介
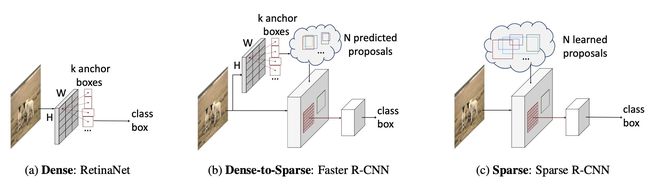
目前,目标检测领域中主流的两大类方法。
- 第一大类是 从非Deep时代就被广泛应用的dense detector ,例如DPM,YOLO,RetinaNet,FCOS。在dense detector中,大量的object candidates例如sliding-windows,anchor-boxes, reference-points等被提前预设在图像网格或者特征图网格上,然后直接预测这些candidates到gt的scaling/offest和物体类别。
- 第二大类是 dense-to-sparse detector ,例如R-CNN家族。这类方法的特点是对一组sparse的candidates预测回归和分类,而这组sparse的candidates来自于dense detector。
但是,dense属性的一些固有局限总让人难以满意,比如:
- NMS 后处理
- many-to-one 正负样本分配
- prior candidates的设计
Sparse R-CNN抛弃了anchor boxes或者reference point等dense概念,直接从a sparse set of learnable proposals出发,没有NMS后处理,整个网络异常干净和简洁,可以看做是在dense(单阶段),dense2sparse(二阶段)之外的一个全新的检测范式。
2、Detectron2介绍
Detectron2 是Facebook第二代检测工具箱,支持目标检测、实例分割、姿态估计、语义分割和全景分割等任务。
特点如下:
-
基于PyTorch平台
-
模块化、可扩展:从Detectron2开始,Facebook引入了模块化设计,允许用户将自定义模块插入目标检测系统的几乎任何部分。这意味着许多新的研究项目和核心Detectron2库可以完全分开。其可扩展性也使得Detectron2更加灵活。
-
速度更快和支持分布式训练:Detectron2比原始Detectron更快,而且可以更加方便进行GPU服务器的分布式训练。
-
Detectron2go:新增了将模型产品化部署的软件实现,包括标准的内部数据训练工作流实现、模型压缩量化、模型转化等。
我们使用Detectron2很方便的实现模型的训练、测试以及模型转换。所以现在很多的新模型都是在Detectron2开发。

2.1 物体检测的BaseLine(COCO数据集)
Faster R-CNN:
| Name | lr sched | train time (s/iter) | inference time (s/im) | train mem (GB) | box AP | model id | download |
|---|---|---|---|---|---|---|---|
| R50-C4 | 1x | 0.551 | 0.110 | 4.8 | 35.7 | 137257644 | model | metrics |
| R50-DC5 | 1x | 0.380 | 0.068 | 5.0 | 37.3 | 137847829 | model | metrics |
| R50-FPN | 1x | 0.210 | 0.055 | 3.0 | 37.9 | 137257794 | model | metrics |
| R50-C4 | 3x | 0.543 | 0.110 | 4.8 | 38.4 | 137849393 | model | metrics |
| R50-DC5 | 3x | 0.378 | 0.073 | 5.0 | 39.0 | 137849425 | model | metrics |
| R50-FPN | 3x | 0.209 | 0.047 | 3.0 | 40.2 | 137849458 | model | metrics |
| R101-C4 | 3x | 0.619 | 0.149 | 5.9 | 41.1 | 138204752 | model | metrics |
| R101-DC5 | 3x | 0.452 | 0.082 | 6.1 | 40.6 | 138204841 | model | metrics |
| R101-FPN | 3x | 0.286 | 0.063 | 4.1 | 42.0 | 137851257 | model | metrics |
| X101-FPN | 3x | 0.638 | 0.120 | 6.7 | 43.0 | 139173657 | model | metrics |
RetinaNet:
| Name | lr sched | train time (s/iter) | inference time (s/im) | train mem (GB) | box AP | model id | download |
|---|---|---|---|---|---|---|---|
| R50 | 1x | 0.200 | 0.062 | 3.9 | 36.5 | 137593951 | model | metrics |
| R50 | 3x | 0.201 | 0.063 | 3.9 | 37.9 | 137849486 | model | metrics |
| R101 | 3x | 0.280 | 0.080 | 5.1 | 39.9 | 138363263 | model | metrics |
RPN & Fast R-CNN:
| Name | lr sched | train time (s/iter) | inference time (s/im) | train mem (GB) | box AP | prop. AR | model id | download |
|---|---|---|---|---|---|---|---|---|
| RPN R50-C4 | 1x | 0.130 | 0.051 | 1.5 | 51.6 | 137258005 | model | metrics | |
| RPN R50-FPN | 1x | 0.186 | 0.045 | 2.7 | 58.0 | 137258492 | model | metrics | |
| Fast R-CNN R50-FPN | 1x | 0.140 | 0.035 | 2.6 | 37.8 | 137635226 | model | metrics |
2.2 使用 Mask R-CNN 的 COCO 实例分割BaseLine
| Name | lr sched | train time (s/iter) | inference time (s/im) | train mem (GB) | box AP | mask AP | model id | download |
|---|---|---|---|---|---|---|---|---|
| R50-C4 | 1x | 0.584 | 0.117 | 5.2 | 36.8 | 32.2 | 137259246 | model | metrics |
| R50-DC5 | 1x | 0.471 | 0.074 | 6.5 | 38.3 | 34.2 | 137260150 | model | metrics |
| R50-FPN | 1x | 0.261 | 0.053 | 3.4 | 38.6 | 35.2 | 137260431 | model | metrics |
| R50-C4 | 3x | 0.575 | 0.118 | 5.2 | 39.8 | 34.4 | 137849525 | model | metrics |
| R50-DC5 | 3x | 0.470 | 0.075 | 6.5 | 40.0 | 35.9 | 137849551 | model | metrics |
| R50-FPN | 3x | 0.261 | 0.055 | 3.4 | 41.0 | 37.2 | 137849600 | model | metrics |
| R101-C4 | 3x | 0.652 | 0.155 | 6.3 | 42.6 | 36.7 | 138363239 | model | metrics |
| R101-DC5 | 3x | 0.545 | 0.155 | 7.6 | 41.9 | 37.3 | 138363294 | model | metrics |
| R101-FPN | 3x | 0.340 | 0.070 | 4.6 | 42.9 | 38.6 | 138205316 | model | metrics |
| X101-FPN | 3x | 0.690 | 0.129 | 7.2 | 44.3 | 39.5 | 139653917 | model | metrics |
3、搭建Sparse R-CNN测试环境
我本地环境:
操作系统:win10、Cuda11.0。
3.1 创建虚拟环境
创建虚拟环境,并激活环境。
conda create --name sparsercnn python=3.7
activate sparsercnn
conda install pytorch==1.7.1 torchvision==0.8.2 torchaudio==0.7.2 cudatoolkit=11.0 -c pytorch
3.2 安装apex库
APEX是英伟达开源的,完美支持PyTorch框架,用于改变数据格式来减小模型显存占用的工具。其中最有价值的是amp(Automatic Mixed Precision),将模型的大部分操作都用Float16数据类型测试,一些特别操作仍然使用Float32。并且用户仅仅通过三行代码即可完美将自己的训练代码迁移到该模型。实验证明,使用Float16作为大部分操作的数据类型,并没有降低参数,在一些实验中,反而由于可以增大Batch size,带来精度上的提升,以及训练速度上的提升。
3.2.1 下载apex库
网址 https://github.com/NVIDIA/apex,下载到本地文件夹。解压后进入到apex的目录安装依赖。在执行命令;
cd C:\Users\WH\Downloads\apex-master #进入apex目录
pip install -r requirements.txt
3.2.2 安装apex库
依赖安装完后,打开cmd,cd进入到刚刚下载完的apex-master路径下,运行:
python setup.py install
然后跑了一堆东西,最后是这样的:

安装完成!
3.3 安装fvcore库
fvcore库的简介:
fvcore是一个轻量级的核心库,它提供了在各种计算机视觉框架(如Detectron2)中共享的最常见和最基本的功能。这个库基于Python 3.6+和PyTorch。这个库中的所有组件都经过了类型注释、测试和基准测试。Facebook 的人工智能实验室即FAIR的计算机视觉组负责维护这个库。
github地址:https://github.com/facebookresearch/fvcore
执行命令
conda install -c fvcore -c iopath -c conda-forge fvcore
3.4 安装Detectron2环境需要其他库
安装pycocotools
pip install pycocotools
安装cv2
pip install opencv-python
安装 antlr4
pip install antlr4-python3-runtime
安装future
pip install future
安装protobuf
pip install protobuf
安装absl
pip install absl-py
安装tensorboard
pip install tensorboard
安装pydot
pip install pydot
安装scipy
pip install scipy -i https://pypi.tuna.tsinghua.edu.cn/simple
3.5 编译Sparse R-CNN
进入Sparse R-CNN目录,目录根据自己的实际情况更改。
cd D:\SparseR-CNN-main
编译Detectron2和Sparse R-CNN
python setup.py build develop
看到如下信息,则表明安装完成,如果缺少库的情况,则需要安装库,再编译,直到编译成功!
4、测试环境
新建input_img和output_img文件夹,imgs文件夹存放待测试的图片。
图片如下:

下载模型“r50_100pro_3x_model.pth”(注:如果不能下载,关注我的公众号获取连接。),将其放到“projects/SparseRCNN”目录下面。
执行命令:
 python demo/demo.py --config-file
 projects/SparseRCNN/configs/sparsercnn.res50.100pro.3x.yaml --input imgs/*.jpg --output imgout --opts MODEL.WEIGHTS projects/SparseRCNN/r50_100pro_3x_model.pth
运行结果:

能够运行demo说明环境已经没有问题了。
5、制作数据集
本次采用的数据集是Labelme标注的数据集,地址:链接:https://pan.baidu.com/s/1nxo9-NpNWKK4PwDZqwKxGQ 提取码:kp4e,需要将其转为COCO格式的数据集。转换代码如下:
新建labelme2coco.py
import argparse
import json
import matplotlib.pyplot as plt
import skimage.io as io
import cv2
from labelme import utils
import numpy as np
import glob
import PIL.Image

REQUIRE_MASK = False
labels = {'aircraft': 1, 'oiltank': 2}


class labelme2coco(object):
    def __init__(self, labelme_json=[], save_json_path='./new.json'):
        '''
        :param labelme_json: the list of all labelme json file paths
        :param save_json_path: the path to save new json
        '''
        self.labelme_json = labelme_json
        self.save_json_path = save_json_path
        self.images = []
        self.categories = []
        self.annotations = []
        # self.data_coco = {}
        self.label = []
        self.annID = 1
        self.height = 0
        self.width = 0
        self.require_mask = REQUIRE_MASK
        self.save_json()

    def data_transfer(self):
        for num, json_file in enumerate(self.labelme_json):
            if not json_file == self.save_json_path:
                with open(json_file, 'r') as fp:
                    data = json.load(fp)
                    self.images.append(self.image(data, num))
                    for shapes in data['shapes']:
                        print("label is ")
                        print(shapes['label'])
                        label = shapes['label']
                        #                    if label[1] not in self.label:
                        if label not in self.label:
                            print("find new category: ")
                            self.categories.append(self.categorie(label))
                            print(self.categories)
                            # self.label.append(label[1])
                            self.label.append(label)
                        points = shapes['points']
                        self.annotations.append(self.annotation(points, label, num))
                        self.annID += 1

    def image(self, data, num):
        image = {}
        img = utils.img_b64_to_arr(data['imageData'])
        height, width = img.shape[:2]
        img = None
        image['height'] = height
        image['width'] = width
        image['id'] = num + 1
        image['file_name'] = data['imagePath'].split('/')[-1]
        self.height = height
        self.width = width
        return image

    def categorie(self, label):
        categorie = {}
        categorie['supercategory'] = label
        #        categorie['supercategory'] = label
        categorie['id'] = labels[label]  # 0 默认为背景
        categorie['name'] = label
        return categorie

    def annotation(self, points, label, num):
        annotation = {}
        print(points)
        x1 = points[0][0]
        y1 = points[0][1]
        x2 = points[1][0]
        y2 = points[1][1]
        contour = np.array([[x1, y1], [x2, y1], [x2, y2], [x1, y2]])  # points = [[x1, y1], [x2, y2]] for rectangle
        contour = contour.astype(int)
        area = cv2.contourArea(contour)
        print("contour is ", contour, " area = ", area)
        annotation['segmentation'] = [list(np.asarray([[x1, y1], [x2, y1], [x2, y2], [x1, y2]]).flatten())]
        # [list(np.asarray(contour).flatten())]
        annotation['iscrowd'] = 0
        annotation['area'] = area
        annotation['image_id'] = num + 1

        if self.require_mask:
            annotation['bbox'] = list(map(float, self.getbbox(points)))
        else:
            x1 = points[0][0]
            y1 = points[0][1]
            width = points[1][0] - x1
            height = points[1][1] - y1
            annotation['bbox'] = list(np.asarray([x1, y1, width, height]).flatten())

        annotation['category_id'] = self.getcatid(label)
        annotation['id'] = self.annID
        return annotation

    def getcatid(self, label):
        for categorie in self.categories:
            #            if label[1]==categorie['name']:
            if label == categorie['name']:
                return categorie['id']
        return -1

    def getbbox(self, points):
        polygons = points
        mask = self.polygons_to_mask([self.height, self.width], polygons)
        return self.mask2box(mask)

    def mask2box(self, mask):

        # np.where(mask==1)
        index = np.argwhere(mask == 1)
        rows = index[:, 0]
        clos = index[:, 1]

        left_top_r = np.min(rows)  # y
        left_top_c = np.min(clos)  # x
        right_bottom_r = np.max(rows)
        right_bottom_c = np.max(clos)
        return [left_top_c, left_top_r, right_bottom_c - left_top_c, right_bottom_r - left_top_r]

    def polygons_to_mask(self, img_shape, polygons):
        mask = np.zeros(img_shape, dtype=np.uint8)
        mask = PIL.Image.fromarray(mask)
        xy = list(map(tuple, polygons))
        PIL.ImageDraw.Draw(mask).polygon(xy=xy, outline=1, fill=1)
        mask = np.array(mask, dtype=bool)
        return mask

    def data2coco(self):
        data_coco = {}
        data_coco['images'] = self.images
        data_coco['categories'] = self.categories
        data_coco['annotations'] = self.annotations
        return data_coco

    def save_json(self):
        print("in save_json")
        self.data_transfer()
        self.data_coco = self.data2coco()

        print(self.save_json_path)
        json.dump(self.data_coco, open(self.save_json_path, 'w'), indent=4)


labelme_json = glob.glob('LabelmeData/*.json')
from sklearn.model_selection import train_test_split

trainval_files, test_files = train_test_split(labelme_json, test_size=0.2, random_state=55)
import os

if not os.path.exists("projects/SparseRCNN/datasets/coco/annotations"):
    os.makedirs("projects/SparseRCNN/datasets/coco/annotations/")
if not os.path.exists("projects/SparseRCNN/datasets/coco/train2017"):
    os.makedirs("projects/SparseRCNN/datasets/coco/train2017")
if not os.path.exists("projects/SparseRCNN/datasets/coco/val2017"):
    os.makedirs("projects/SparseRCNN/datasets/coco/val2017")
labelme2coco(trainval_files, 'projects/SparseRCNN/datasets/coco/annotations/instances_train2017.json')
labelme2coco(test_files, 'projects/SparseRCNN/datasets/coco/annotations/instances_val2017.json')
import shutil

for file in trainval_files:
    shutil.copy(os.path.splitext(file)[0] + ".jpg", "projects/SparseRCNN/datasets/coco/train2017/")
for file in test_files:
    shutil.copy(os.path.splitext(file)[0] + ".jpg", "projects/SparseRCNN/datasets/coco/val2017/")
6、配置训练环境
6.1 更改预训练模型的size
在projects/SparseRCNN目录,新建change_model_size.py文件
import torch
import numpy as np
import pickle
num_class = 2
pretrained_weights  = torch.load('r50_100pro_3x_model.pth')

pretrained_weights["head.head_series.0.class_logits.weight"].resize_(num_class,256)
pretrained_weights["head.head_series.0.class_logits.bias"].resize_(num_class)
pretrained_weights["head.head_series.1.class_logits.weight"].resize_(num_class,256)
pretrained_weights["head.head_series.1.class_logits.bias"].resize_(num_class)
pretrained_weights["head.head_series.2.class_logits.weight"].resize_(num_class,256)
pretrained_weights["head.head_series.2.class_logits.bias"].resize_(num_class)
pretrained_weights["head.head_series.3.class_logits.weight"].resize_(num_class,256)
pretrained_weights["head.head_series.3.class_logits.bias"].resize_(num_class)
pretrained_weights["head.head_series.4.class_logits.weight"].resize_(num_class,256)
pretrained_weights["head.head_series.4.class_logits.bias"].resize_(num_class)
pretrained_weights["head.head_series.5.class_logits.weight"].resize_(num_class,256)
pretrained_weights["head.head_series.5.class_logits.bias"].resize_(num_class)
torch.save(pretrained_weights, "model_%d.pth"%num_class)
这个文件的目的是修改模型输出的size,numclass按照本次打算训练的数据集的类别设置。
6.2 修改config参数
路径:“detectron2/engine/defaults.py”
–config-file:模型的配置文件,SparseRCNN的模型配置文件放在“projects/SparseRCNN/configs”下面。名字和预训练模型对应。
parser.add_argument("--config-file", default="./configs/sparsercnn.res50.100pro.3x.yaml", metavar="FILE", help="path to config file")
resume 是否再次,训练,如果设置为true,则接着上次训练的结果训练。所以第一次训练不用设置。
parser.add_argument(
    "--resume",
    action="store_true",
    help="Whether to attempt to resume from the checkpoint directory. "
    "See documentation of `DefaultTrainer.resume_or_load()` for what it means.",
)
–num-gpus,gpu的个数,如果只有一个设置为1,如果有多个,可以自己设置想用的个数。
parser.add_argument("--num-gpus", type=int, default=1, help="number of gpus *per machine*")
opts指的是yaml文件的参数。
上面的参数可以设置,也可以不设置,设置之后可以直接运行不用再考虑设置参数,如果不设置每次训练的时候配置一次参数。
修改类别,文件路径“projects/SparseRCNN/config.py”,
cfg.MODEL.SparseRCNN.NUM_CLASSES = 2

修改yaml文件参数
sparsercnn.res50.100pro.3x.yaml中修改预训练模型的路径。
WEIGHTS: "model_2.pth"
BASE_LR:设置学习率。
STEPS:设置训练多少步之后调整学习率。
MAX_ITER:最大迭代次数。
CHECKPOINT_PERIOD:设置迭代多少次保存一次模型
IMS_PER_BATCH:batchsize的大小,根据显存大小设置。
NUM_CLASSES:数据集中物体类别的种类。
NUM_PROPOSALS:提议框的个数。
BASE_LR: 0.00025 #在Base-SparseRCNN.yaml中
IMS_PER_BATCH: 2#在Base-SparseRCNN.yaml中
NUM_CLASSES:2
STEPS: (21000, 25000)
MAX_ITER: 54000
CHECKPOINT_PERIOD: 5000
6.3 修改train_net.py
主要修改该setup函数,增加数据集注册。
NUM_CLASSES=2
def setup(args):
    """
    Create configs and perform basic setups.
    """
    register_coco_instances("train", {}, "datasets/coco/annotations/instances_train2017.json",
                            "datasets/coco/train2017")
    register_coco_instances("test", {}, "datasets/coco/annotations/instances_val2017.json",
                            "datasets/coco/val2017")

    cfg = get_cfg()
    add_sparsercnn_config(cfg)
    cfg.merge_from_file(args.config_file)
    cfg.merge_from_list(args.opts)
    cfg.DATASETS.TRAIN = ("train",)
    cfg.DATASETS.TEST = ("test",)
    cfg.MODEL.SparseRCNN.NUM_CLASSES = NUM_CLASSES
    cfg.MODEL.ROI_HEADS.NUM_CLASSES=NUM_CLASSES
    cfg.freeze()
    default_setup(cfg, args)
    return cfg
还要修改detectron2/engine/launch.py,在launch函数下面增加一句
dist.init_process_group('gloo', init_method='file://tmp/somefile', rank=0, world_size=1)
如下图:
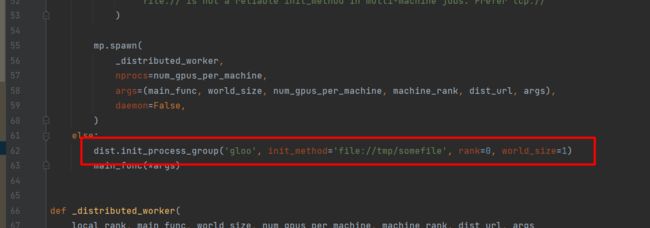
这句话的作用是初始化分布式训练,因为我们没有使用分布式,所以没有初始化,但是不初始化就会报错,所以加上这句。
7、训练
两种启动方式:
第一种,命令行:进入“projects/SparseRCNN/”目录下,执行:
python train_net.py
第二种,直接在pycharm 直接运行train_net.py.
训练结果:

从训练结果上看,效果确实不错,和CenterNet2的结果相差不大,不过模型很大,大约有1.2G,比CenterNet2的模型大了一倍多。

8、测试
修改demo/demo.py
8.1 修改setup_cfg函数

在红框的位置增加代码,详细如下面的代码。
NUM_CLASSES=2
def setup_cfg(args):
    # load config from file and command-line arguments
    cfg = get_cfg()
    from projects.SparseRCNN.sparsercnn import add_sparsercnn_config
    add_sparsercnn_config(cfg)
    cfg.MODEL.SparseRCNN.NUM_CLASSES = NUM_CLASSES
    cfg.MODEL.ROI_HEADS.NUM_CLASSES = NUM_CLASSES
    cfg.merge_from_file(args.config_file)
    cfg.merge_from_list(args.opts)
    # Set score_threshold for builtin models
    cfg.MODEL.RETINANET.SCORE_THRESH_TEST = args.confidence_threshold
    cfg.MODEL.ROI_HEADS.SCORE_THRESH_TEST = args.confidence_threshold
    cfg.MODEL.PANOPTIC_FPN.COMBINE.INSTANCES_CONFIDENCE_THRESH = args.confidence_threshold
    cfg.freeze()
    return cfg
8.2 修改显示类别
在demo/predictor.py

代码:
visualizer.metadata.thing_classes[:10] = ["aircraft", "oiltank"]
然后进入SparseR-CNN-main目录,执行如下命令:
python demo/demo.py --config-file projects/SparseRCNN/configs/sparsercnn.res50.100pro.3x.yaml --input img/*jpg --output out --opts MODEL.WEIGHTS projects/Spa
rseRCNN/output/model_final.pth
运行结果:

版权声明:本文为奥比中光3D视觉开发者社区特约作者授权原创发布,未经授权不得转载,本文仅做学术分享,版权归原作者所有,若涉及侵权内容请联系删文。
3D视觉开发者社区是由奥比中光给所有开发者打造的分享与交流平台,旨在将3D视觉技术开放给开发者。平台为开发者提供3D视觉领域免费课程、奥比中光独家资源与专业技术支持。点击加入3D视觉开发者社区,和开发者们一起讨论分享吧~
或可微信关注官方公众号 3D视觉开发者社区 ,获取更多干货知识哦。