斯坦福CS20SI:基于Tensorflow的深度学习研究课程笔记,Lecture note2:TensorFlow Ops
课程笔记2:Tensorflow Ops
CS20SI:深度学习研究中的Tensorflow(cs20si.stanford.edu)
由Chip Huyen编写([email protected])
评论者:Danijar Hafner,Jon Gautier,Minh-Thang Luong,Paul Warren
1 TensorBoard很有趣
Tensorflow是一个集常量,变量,操作为一体的平台。它不仅仅是一个软件库,是包括一系列Tensorflow,TensorBoard和TensorServing的一套软件。要想了解Tensorflow,我们应该知道如何使用上述所有的这些软件的结合。在这节课中,我们将首先介绍TensorBoard。
TensorBoard是一个可视化软件,任何一个标准的Tensorflow版本都能安装。用谷歌自己的话说“你要用Tensorflow去计算,例如训练一个大规模的深度神经网-可能会更加复杂和混乱。简单的去理解,就是要调试和优化TensorFlow的项目,需要用一套可视化的工作就是TensorBoard”。
完全配置TensorBoard以后,看起来如下图,图像来自TensorBoad的网站。
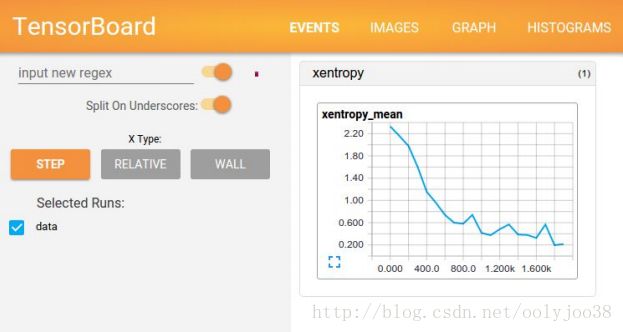
当用户在TensorBoard-avtivated上执行某些操作时,例如Tensorflow的项目,这些操作可以输出一个文件。TensorBoard能将这些文件转换成图片,从而分析一个模型的行为。早点学习TensorBoard并且结合Tensorflow去使用可以实现更加愉快和富有成效的合作。
让我们首先写出Tensorflow的程序并且使用TensorBoard让其可视化。
import tensorflow as tf
a = tf.constant(2)
b = tf.constant(3)
x = tf.add(a, b)
with tf.Session() as sess:
print sess.run(x)
运行循环训练之前,可以在创建图片后添加这些语句激活TensorBoard。
writer = tf.summary.FileWriter(logs_dir, sess.graph)上面那条语句是创建一个Writer去在event文件中写一些操作命令,保存在文件夹logs_dir中,你可以用文件路径‘./graphs’替代logs_dir如下:
import tensorflow as tf
a = tf.constant(2)
b = tf.constant(3)
x = tf.add(a, b)

with tf.Session() as sess:
       writer = tf.summary.FileWriter('./graphs', sess.graph)
       print sess.run(x)

# close the writer when you’re done using it
writer.close()
接下来,去终端运行程序。确保你当前的工作目录和跑你的Python代码时候的目录一样。
$ python [yourprogram.py]
$ tensorboard --logdir="./graphs"
打开浏览器键入地址http://localhost:6006/(或者是在运行完tensorboard命令之后你可以返回的那个链接)
在选项卡图中可以看到类似这种:

在选项卡图中我可以看这个图有3个节点:

a = tf.constant(2)
b = tf.constant(3)
x = tf.add(a, b)
“Const”和”Const_1”对应于a和b,节点add对应于x。a,b,x只是变量名,方便我们使用,和内部的Tensorflow毫无关系。TensorBoard中使用name给节点命名。如下:
a = tf.constant([2, 2], name="a")
b = tf.constant([3, 6], name="b")
x = tf.add(a, b, name="add")
现在如果再次运行TensorBoard,你可以看到如下图片:

这个图本身定义了ops和依赖库,但不显示值。它只在意我们运行会话的时候获取的一些值。如果你忘记了,运行下列语句可以快速提醒:
tf.Session.run(fetches,feed_dict=None,options=None,run_metadata=None)注意:如果你已经多次运行代码,将会有多个event文件在路径
‘~/dev/cs20si/graphs/lecture01’中,TF只显示最后的图形,出现多个event文件的警告,如果去除警告需要删除所有的你不再需要的event文件。
2 constant类型
文档链接
你可以创建标量或者张量值的常量。
tf.constant(value, dtype=None, shape=None, name='Const', verify_shape=False)
# constant of 1d tensor (vector)
a = tf.constant([2, 2], name="vector")
# constant of 2x2 tensor (matrix)
b = tf.constant([[0, 1], [2, 3]], name="b")你可以创建具有特定值的元素的张量。
类似numpy.zeros, numpy.zeros_like, numpy.ones, numpy.ones_like这些语句。
tf.zeros(shape, dtype=tf.float32, name=None)
# create a tensor of shape and all elements are zeros
tf.zeros([2, 3], tf.int32) ==> [[0, 0, 0], [0, 0, 0]]tf.zeros_like(input_tensor, dtype=None, name=None, optimize=True)
# create a tensor of shape and type (unless type is specified) as the input_tensor
but all elements are zeros.
# input_tensor is [0, 1], [2, 3], [4, 5]]
tf.zeros_like(input_tensor) ==> [[0, 0], [0, 0], [0, 0]]tf.ones(shape, dtype=tf.float32, name=None)
# create a tensor of shape and all elements are ones
tf.ones([2, 3], tf.int32) ==> [[1, 1, 1], [1, 1, 1]]tf.ones_like(input_tensor, dtype=None, name=None, optimize=True)
# create a tensor of shape and type (unless type is specified) as the input_tensor
but all elements are ones.
# input_tensor is [0, 1], [2, 3], [4, 5]]
tf.ones_like(input_tensor) ==> [[1, 1], [1, 1], [1, 1]]tf.fill(dims, value, name=None)
# create a tensor filled with a scalar value.
tf.ones([2, 3], 8) ==> [[8, 8, 8], [8, 8, 8]]你可以创建序列的常量:
tf.linspace(start, stop, num, name=None)
# create a sequence of num evenly-spaced values are generated beginning at start. If
num > 1, the values in the sequence increase by stop - start / num - 1, so that the
last one is exactly stop.
# start, stop, num must be scalars
# comparable to but slightly different from numpy.linspace
# numpy.linspace(start, stop, num=50, endpoint=True, retstep=False, dtype=None)
tf.linspace(10.0, 13.0, 4, name="linspace") ==> [10.0 11.0 12.0 13.0]tf.range(start, limit=None, delta=1, dtype=None, name='range')
# create a sequence of numbers that begins at start and extends by increments of
delta up to but not including limit
# slight different from range in Python
# 'start' is 3, 'limit' is 18, 'delta' is 3
tf.range(start, limit, delta) ==> [3, 6, 9, 12, 15]
# 'start' is 3, 'limit' is 1, 'delta' is -0.5
tf.range(start, limit, delta) ==> [3, 2.5, 2, 1.5]
# 'limit' is 5
tf.range(limit) ==> [0, 1, 2, 3, 4]注意和Numpy或者Python序列不一样,Tensorflow序列不可迭代。
for _ in np.linspace(0, 10, 4): # OK
for _ in tf.linspace(0, 10, 4): # TypeError("'Tensor' object is not iterable.")
for _ in range(4): # OK
for _ in tf.range(4): # TypeError("'Tensor' object is not iterable.")
你还可以生成特定分布的随机数。
tf.random_normal(shape, mean=0.0, stddev=1.0, dtype=tf.float32, seed=None, name=None)
tf.truncated_normal(shape, mean=0.0, stddev=1.0, dtype=tf.float32, seed=None,
name=None)
tf.random_uniform(shape, minval=0, maxval=None, dtype=tf.float32, seed=None,
name=None)
tf.random_shuffle(value, seed=None, name=None)
tf.random_crop(value, size, seed=None, name=None)
tf.multinomial(logits, num_samples, seed=None, name=None)
tf.random_gamma(shape, alpha, beta=None, dtype=tf.float32, seed=None, name=None)
3 数学操作
Tensorflow的数学操作很标准,类似于Numpy。
访问链接了解更多。因为列举数学操作是比较枯燥的。
a = tf.constant([3, 6])
b = tf.constant([2, 2])
tf.add(a, b) # >> [5 8]
tf.add_n([a, b, b]) # >> [7 10]. Equivalent to a + b + b
tf.mul(a, b) # >> [6 12] because mul is element wise
tf.matmul(a, b) # >> ValueError
tf.matmul(tf.reshape(a, shape=[1, 2]), tf.reshape(b, shape=[2, 1])) # >> [[18]]
tf.div(a, b) # >> [1 3]
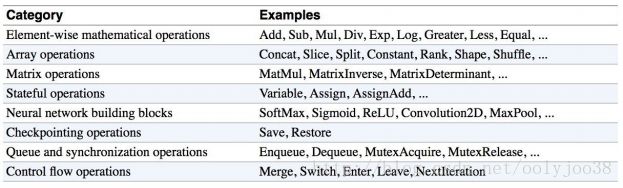
tf.mod(a, b) # >> [1 0]下面是Python中的ops表,由“深度学习基础”一书的作者提供。
4 数据类型
Python自身数据类型:
Tensorflow兼容Python本身的数据类型,类似Python boolean values,数值(整数,浮点数)和字符串。单个值将被看做0-d的张量(或标量),列表值将被转换成1-d个张量(向量),值列表将被转换为2-d个张量(矩阵)等。下面的例子是从“机器智能中的Tensorflow”这本书里改编修改的。
t_0 = 19 # Treated as a 0-d tensor, or "scalar"
tf.zeros_like(t_0) # ==> 0
tf.ones_like(t_0) # ==> 1
t_1 = [b"apple", b"peach", b"grape"] # treated as a 1-d tensor, or "vector"
tf.zeros_like(t_1) # ==> ['' '' '']
tf.ones_like(t_1) # ==> TypeError: Expected string, got 1 of type 'int' instead.
t_2 = [[True, False, False],
 [False, False, True],
 [False, True, False]] # treated as a 2-d tensor, or "matrix"
tf.zeros_like(t_2) # ==> 2x2 tensor, all elements are False
tf.ones_like(t_2) # ==> 2x2 tensor, all elements are True
Tensorflow自身数据类型:
类似Numpy,Tensorflow也有自己的数据类型,如你所见tf.int32,tf.float32.下面是当前一个Tensorflow的数据类型的列表,取自Tensorflow的官方文档。

Numpy自身数据类型
现在,你可能注意到了Numpy和Tensorflow之间的相似性,Tensorflow被设计为与Numpy无缝接合,这个平台已经成为数据科学的通用平台。
Tensorflow的数据类型基于Numpy的数据类型,事实上,np.32==tf.int32返回为True,可以用Numpy数据类型在Tensorflow里操作。
例如:
tf.ones([2, 2], np.float32) ==> [[1.0 1.0], [1.0 1.0]]还记得我们的老朋友tf.Session.run(fetches)吗?如果请求对象是Tensor,则输出为Numpy数组。
TL;DR:大多数时候,Tensorflow的数据类型和Numpy的数据类型是可以互相转换的。
注1:字符串数据类型有一个例外,数字和布尔类型Tensorflow和Numpy可以匹配的很好,然而由于Numpy管理数组的方式,tf.string没有一个确切的Numpy匹配, 但是你依然可以将Numpy的字符串数据导入到tf.string中,只要你不要在Numpy中声明一个确切的dtype。
注2:Numpy和Tensorflow都是n-d数组库,np提供ndarrar,但是不支持创建张量函数和自动计算导数的方法,也不支持GPU运算,所以Tensorflow更胜一筹。
注3:使用Python类型指定Tensorflow对象快速而且简单,对于示例代码这是一个好主意。然而这样做有一个重要的缺陷,Python类型缺少明确规定数据类型的能力,但Tensorflow类型更为具体,比如所有的整型都是相同类型,但是Tensorflow有8-bit,16-bit,64-bit等整型可用,因此,如果你使用Python类型,Tensorflow不得不推导你的数据具体类型。
当你将数据传递到Tensorflow时,可以将数据转换为适当的类型,但是某些数据类型仍然可能难以正确声明,例如复数。因为这是常见的创建者定义的作为NumPy数组的Tensor对象。 但是,如果可能的话还是要尽可能的使用TensorFlow类型,因为TensorFlow和NumPy若可以演变为一个点,这种兼容性不再存在。
5变量
常量很有趣,但我认为现在你已经足够熟悉变量了。他们的区别就是:
1 常量就是常量,而一个变量是可以被赋值和改变的。
2 常量的值被存储在图形中,并且其值可在图形的任何位置被复制加载。然而变量被单独存储,并且可能存在于参数服务器上。
第二点的意思是常量存储在图片的定义中。当常量占有的内存很大时,每次你要加载图片的时候就需要很久的时间。要查看图片的定义以及存储在图片定义中的内容,只需要输出图片的protobuf。protobuf代表协议缓冲区,“谷歌的语言中立,平台中立,可扩展用于序列化结构化的数据——像XML(可扩展标记语言),但是要更小,更快,更简单。”
import tensorflow as tf
my_const = tf.constant([1.0, 2.0], name="my_const")
print tf.get_default_graph().as_graph_def()
输出:
node {
 name: "my_const"
 op: "Const"
 attr {
 key: "dtype"
 value {
 type: DT_FLOAT
 }
 }
 attr {
 key: "value"
 value {
 tensor {
 dtype: DT_FLOAT
 tensor_shape {
 dim {
 size: 2
 }
 }
 tensor_content: "\000\000\200?\000\000\000@"
 }
 }
 }
}
versions {
 producer: 17
}
声明变量:
要声明一个变量,你需要创建一个类tf.Variable的实例。注意它是tf.constant而不是
tf.Variable也不是tf.variable,因为tf.constant是一个操作(节点),而tf.Variable是一个类。
#create variable a with scalar value
a = tf.Variable(2, name="scalar")
#create variable b as a vector
b = tf.Variable([2, 3], name="vector")
#create variable c as a 2x2 matrix
c = tf.Variable([[0, 1], [2, 3]], name="matrix")
# create variable W as 784 x 10 tensor, filled with zeros
W = tf.Variable(tf.zeros([784,10]))
tf.Variable可以有多种操作:
x = tf.Variable(...)
x.initializer # init
x.value() # read op
x.assign(...) # write op
x.assign_add(...)
# and more
你必须在使用变量之前初始化变量。如果你尝试使用变量,在初始化之前,你会遇到Failed Precondition Error:尝试使用未初始化的值张量。最简单的方法是使用以下命令tf.global_variables_initializer()初始化所有变量。
init = tf.global_variables_initializer()
with tf.Session() as sess:
tf.run(init)
注意,你使用tf.run()运行初始化变量,而不是获取任何值。如果要仅初始化部分变量,你可以使用 tf.variables_initializer()初始化变量列表。
init_ab = tf.variables_initializer([a, b], name="init_ab")
with tf.Session() as sess:
tf.run(init_ab)
你还可以使用tf.Variable.initializer分别初始化每个变量。
# create variable W as 784 x 10 tensor, filled with zeros
W = tf.Variable(tf.zeros([784,10]))
with tf.Session() as sess:
tf.run(W.initializer)
另一种初始化变量的方法是从保存的文件中恢复它。我们将在下面几周讨论此问题。
评估变量的值
如果我们输出初始化的变量,我们只能看到张量。
# W is a random 700 x 100 variable object
W = tf.Variable(tf.truncated_normal([700, 10]))
with tf.Session() as sess:
sess.run(W.initializer)
print W
>> Tensor("Variable/read:0", shape=(700, 10), dtype=float32)
要获取变量的值,我们需要使用eval()
# W is a random 700 x 100 variable object
W = tf.Variable(tf.truncated_normal([700, 10]))
with tf.Session() as sess:
sess.run(W.initializer)
print W.eval()
>> [[-0.76781619 -0.67020458 1.15333688 ..., -0.98434633 -1.25692499
 -0.90904623]
[-0.36763489 -0.65037876 -1.52936983 ..., 0.19320194 -0.38379928
 0.44387451]
[ 0.12510735 -0.82649058 0.4321366 ..., -0.3816964 0.70466036
 1.33211911]
...,
[ 0.9203397 -0.99590844 0.76853162 ..., -0.74290705 0.37568584
 0.64072722]
[-0.12753558 0.52571583 1.03265858 ..., 0.59978199 -0.91293705
 -0.02646019]
[ 0.19076447 -0.62968266 -1.97970271 ..., -1.48389161 0.68170643
 1.46369624]]
为变量赋值
我们可以使用tf.Variable.assign()为一个变量赋值
W = tf.Variable(10)
W.assign(100)
with tf.Session() as sess:
sess.run(W.initializer)
print W.eval() # >> 10
为什么10而不是100?W.assign(100)不是将值100分配给W,而是创建这个语句去指派op去做那个。为了使这个op生效,我们必须在会话中运行这个op。
W = tf.Variable(10)
assign_op = W.assign(100)
with tf.Session() as sess:
sess.run(assign_op)
print W.eval() # >> 100
注意,在这种情况下,我们没有初始化W,因为assign()为我们初始化了。事实上,initializer op是将变量的初始值赋给变量本身的assign op。
# in the source code
self._initializer_op = state_ops.assign(self._variable, self._initial_value,
 validate_shape=validate_shape).op
有趣的例子:
# create a variable whose original value is 2
a = tf.Variable(2, name="scalar")
# assign a * 2 to a and call that op a_times_two
a_times_two = a.assign(a * 2)
init = tf.global_variables_initializer()
with tf.Session() as sess:
sess.run(init)
 # have to initialize a, because a_times_two op depends on the value of a
sess.run(a_times_two) # >> 4
sess.run(a_times_two) # >> 8
sess.run(a_times_two) # >> 16
TensorFlow将a * 2分配给a这个操作为a_times_two。
对于简单的递增和递减变量,
TensorFlow有tf.Variable.assig_add()和tf.Variable.assign_sub()的方法。
与tf.Variable.assign()不同,tf.Variable.assign_add()和tf.Variable.assign_sub()不会初始化你的变量,因为这些操作取决于变量的初始值。
W = tf.Variable(10)
with tf.Session() as sess:
sess.run(W.initializer)
print sess.run(W.assign_add(10)) # >> 20
print sess.run(W.assign_sub(2)) # >> 18
由于Tensorflow的变量值分开存储,每个session都会有各自独立的变量值:
W = tf.Variable(10)
sess1 = tf.Session()
sess2 = tf.Session()
sess1.run(W.initializer)
sess2.run(W.initializer)
print sess1.run(W.assign_add(10)) # >> 20
print sess2.run(W.assign_sub(2)) # >> 8
print sess1.run(W.assign_add(100)) # >> 120
print sess2.run(W.assign_sub(50)) # >> -42
sess1.close()
sess2.close()
当然,你也可以声明一个依赖于其他变量的变量,假设你想声明U = W * 2
# W is a random 700 x 100 tensor
W = tf.Variable(tf.truncated_normal([700, 10]))
U = tf.Variable(W * 2)
在这种情况下,您应该确保W在使用之前用nitialized_value()初始化。
U = tf.Variable(W.intialized_value() * 2)6 InteractiveSession
有时您会看到InteractiveSession,而不是Session。它们的区别是IteractiveSession会把自己作为默认会话,使用run()或eval()等方法时不用指定调用特定session,在交互式shell或者ipython笔记本中是很方便的,但是在需要多个session的场景下可能会比较复杂。
sess = tf.InteractiveSession()
a = tf.constant(5.0)
b = tf.constant(6.0)
c = a * b
# We can just use 'c.eval()' without passing 'sess'
print(c.eval())
sess.close()
tf.InteractiveSession.close()是关闭InteractiveSession。
tf.get_default_session()是返回当前线程的默认会话。返回的会话将是一个Session或Session.as_default()最里面的会话输入。
7 控制依赖
有时,我们会有两个独立的操作,但是你想指定先运行哪个操作,然后你就可以使用tf.Graph.control_dependencies(control_inputs)。
举例说明:
# your graph g have 5 ops: a, b, c, d, e
with g.control_dependencies([a, b, c]):
 # `d` and `e` will only run after `a`, `b`, and `c` have executed.
 d = ...
 e = …
8 占位符和feed_dict
记得我们在第一个课程中提到ensorFlow程序通常有两个阶段:
阶段1:组装图
阶段2:使用会话在图中执行操作。
因此,我们可以在不知道需要的计算值的情况下首先组合图。这等同于限定的x,y的函数而不知道的x,y的值。
例如,f(x,y)= x * 2 + y。
x,y是实际值的占位符。
我们或我们的客户在以后提供自己的数据时需要用图形组合执行计算。
要定义占位符,我们使用:
tf.placeholder(dtype, shape=None, name=None)Dtype是指定占位符值的数据类型的必需参数。
Shape可接受为实际值的确定形状的张量占位符。shape = None表示将接受任何形状的张量。 使用shape = None很容易构建图形,但是调试比较难。你应该尽可能详细地定义占位符的形状。
你也可以给你的占位符一个名字,那样你就可以在TensorFlow中执行任何其他操作。
关于占位符的更多信息在官方文档中。
# create a placeholder of type float 32-bit, shape is a vector of 3 elements
a = tf.placeholder(tf.float32, shape=[3])
# create a constant of type float 32-bit, shape is a vector of 3 elements
b = tf.constant([5, 5, 5], tf.float32)
# use the placeholder as you would a constant or a variable
c = a + b # Short for tf.add(a, b)
If we try to fetch c, we will run into error.
with tf.Session() as sess:
print(sess.run(c))
>> NameError
这里有一个错误,因为要计算c,我们需要a的值,但a只是一个占位符,没有实际的值。 我们必须先将实际的值赋给a。
with tf.Session() as sess:
# feed [1, 2, 3] to placeholder a via the dict {a: [1, 2, 3]}
# fetch value of c
print(sess.run(c, {a: [1, 2, 3]}))
>> [6. 7. 8.]
让我们看一下在TensorBoard里如何显示,添加
writer = tf.summary.FileWriter('./my_graph', sess.graph)并且在终端键入:
$ tensorboard --logdir='my_graph'我们能看到,占位符是像其他操作一样处理的,3是占位符的形状。
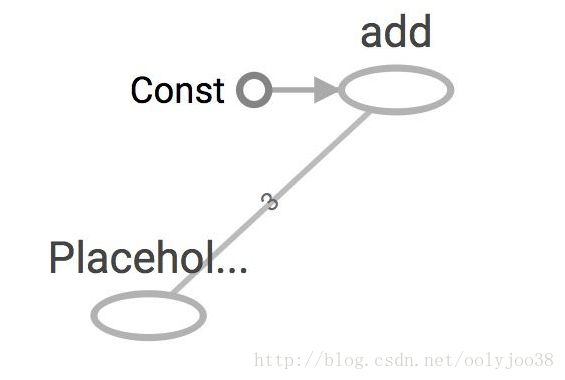
在前面的示例中,我们将一个值赋给占位符。如果我们想赋多个数据给占位符呢?这是一个合理的假设,因为我们经常要运行一些在我们训练或者测试集中的多个数据点进行计算。
我们可以通过遍历数据集去让任何数据点作为我们想要的占位符,并且一次只输入一个值。
with tf.Session() as sess:
for a_value in list_of_a_values:
print(sess.run(c, {a: a_value}))
你可以将值传递给不是占位符的张量。要检测张量是否可以被传递值:
tf.Graph.is_feedable(tensor)# create Operations, Tensors, etc (using the default graph)
a = tf.add(2, 5)
b = tf.mul(a, 3)
# start up a `Session` using the default graph
sess = tf.Session()
# define a dictionary that says to replace the value of `a` with 15
replace_dict = {a: 15}
# Run the session, passing in `replace_dict` as the value to `feed_dict`
sess.run(b, feed_dict=replace_dict) # returns 45feed_dict可以很好的测试你的模型。 当你有一个大图并且只是想要测试某些部分,你可以提供虚拟的值,TensorFlow不会浪费时间做不必要的计算。
9延迟加载的陷阱
在Tensorflow中最常见的非Bug错误我看到(以及我用来提交)的就是我朋友Danijar跟我说的,并且我称它为“延迟加载”。延迟加载是指一种编程的术语,意思是当你延迟声明/初始化一个对象直到它被加载的时候。在Tensorflow中,它意味着逆推迟创建一个操作,直到你需要计算它的时候。举个例子,这是一个正常的加载:当你组装图形时创建操作z。
x = tf.Variable(10, name='x')
y = tf.Variable(20, name='y')
z = tf.add(x, y)
with tf.Session() as sess:
sess.run(tf.global_variables_initializer())
for _ in range(10):
sess.run(z)
writer.close()
这是当有的人自认聪明决定使用延迟加载来保存一行数据会发生什么的代码:
x = tf.Variable(10, name='x')
y = tf.Variable(20, name='y')
with tf.Session() as sess:
sess.run(tf.global_variables_initializer())
for _ in range(10):
sess.run(tf.add(x, y)) # create the op add only when you need to compute it
writer.close()
让我们看看他们在TensorBoard上的图表。正常加载图看起来像我们的预期。
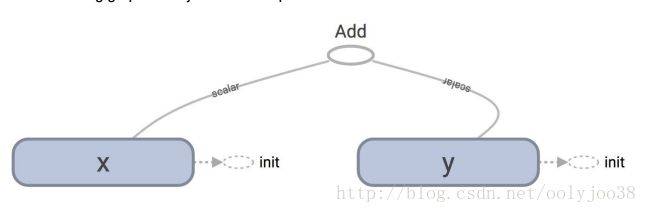
延迟加载:
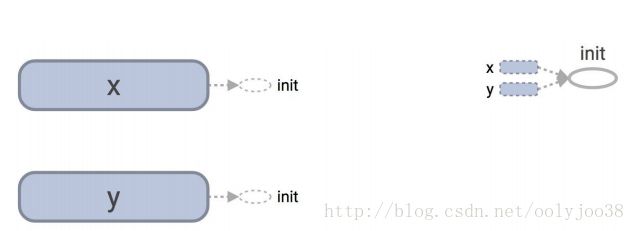
那么,节点“添加”消失了,这是可以理解的,因为我们在建立图之后运行时才添加的节点add(), 这使得它更难读取图,但它不是一个bug。
那么,什么是大事?
让我们来看看图形定义。 记住,要打印图形定义,我们使用:
print tf.get_default_graph().as_graph_def()在正常加载的图中的protobuf只有1个节点“Add”:
node {
 name: "Add"
 op: "Add"
 input: "x/read"
 input: "y/read"
 attr {
 key: "T"
 value {
 type: DT_INT32
 }
 }
}
另一方面,用于延迟加载的图的protobuf是有10个节点“Add”的。每次你想要计算z它都会添加一个新的节点“Add”!
node {
 name: "Add"
 op: "Add"
 ...
}
node {
 name: "Add_9"
 op: "Add"
 ...
}
你可能会想:“这很蠢。为什么我要计算相同的值超过一次?”并且认为这是一个没有人会提交的错误。它发生的频率会比你认为的多。例如,你可能想要计算相同的损失函数或进行一些一定数量的训练样本的预测。在你知道之前,你已经计算了数千的时间,并为您的图形添加了数千个不必要的节点。您的图形定义变得复杂冗长,载入缓慢并且运行一次要很久。
有两种方法可以避免这个bug。一种是避免使用延时加载,但是当你把相关节点组合分类的时候是没办法避免的,所以你可以利用python的特性确保你的函数在第一次调用的时候只加载一次,具体做法参考Danijar Hafner的博文。