介绍
开发中,页面头部为搜索样式的设计非常常见,为了可以像系统AppBar那样使用,这篇文章记录下在Flutter中自定义一个通用的搜索框AppBar记录。
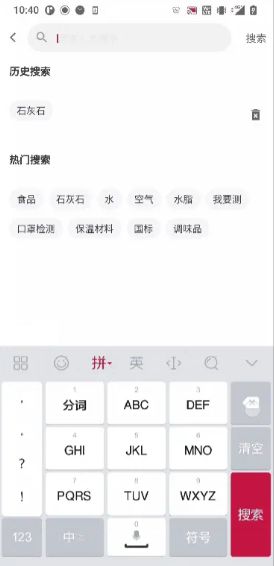
功能点: 搜索框、返回键、清除搜索内容功能、键盘处理。
效果图
实现步骤
首先我们先来看下AppBar的源码,实现了PreferredSizeWidget类,我们可以知道这个类主要是控制AppBar的高度的,Scaffold脚手架里的AppBar的参数类型就是PreferredSizeWidget类型。
class AppBar extends StatefulWidget implements PreferredSizeWidget{
...
preferredSize = _PreferredAppBarSize(toolbarHeight, bottom?.preferredSize.height),
...

/// {@template flutter.material.appbar.toolbarHeight}
/// Defines the height of the toolbar component of an [AppBar].
///
/// By default, the value of `toolbarHeight` is [kToolbarHeight].
/// {@endtemplate}
final double? toolbarHeight;

...
/// The height of the toolbar component of the [AppBar].
const double kToolbarHeight = 56.0;

}

abstract class PreferredSizeWidget implements Widget {
  // 设置在不受约束下希望的大小
  // 设置高度:Size.fromHeight(myAppBarHeight)
  Size get preferredSize;
}
为了方便扩展,可以在Scaffold里使用,我们需要创建AppBarSearch类继承有状态StatefulWidget类并实现PreferredSizeWidget类,实现preferredSize方法,并设置高度。
class AppBarSearch extends StatefulWidget implements PreferredSizeWidget {

@override
Size get preferredSize => Size.fromHeight(height);

}
因为Scaffold对AppBar实现了状态栏的适配,核心见下方源码:
//获取状态栏高度
MediaQuery.of(context).padding.top;
这里我们直接返回AppBar,并进行改造。(当然这里也可以不返回AppBar我们自己处理状态栏的高度也行)。
思路: AppBar title字段自定义输入框,主要通过文本框监听实现清除搜索内容和显示清除按钮的功能,通过输入框是否有焦点监听进行刷新布局,通过定义回调函数的方式来进行搜索内容的监听。
// 输入框控制
_controller = widget.controller ?? TextEditingController();
// 焦点控制
_focusNode = widget.focusNode ?? FocusNode();
// 焦点获取失去监听
_focusNode?.addListener(() => setState(() {}));
// 文本输入监听
_controller?.addListener(() => setState(() {}));
键盘搜素监听:
只需设置TextField的这两个属性即可。
textInputAction: TextInputAction.search,
onSubmitted: widget.onSearch, //输入框完成触发
键盘弹出收起处理:
在iOS中键盘的处理是需要我们自己来进行处理的,我们需要的功能是点击搜索框之外的地方失去焦点从而关闭键盘,这里我使用了处理键盘的一个插件:flutter_keyboard_visibility: ^5.1.0,在我们需要处理焦点事件页面根布局使用KeyboardDismissOnTap外部包裹即可,这个插件还可以主动控制键盘的弹出和收起,有兴趣的小伙伴可以了解下。
return KeyboardDismissOnTap(
    child: Material();
完整源码
/// 搜索AppBar
class AppBarSearch extends StatefulWidget implements PreferredSizeWidget {
  AppBarSearch({
    Key? key,
    this.borderRadius = 10,
    this.autoFocus = false,
    this.focusNode,
    this.controller,
    this.height = 40,
    this.value,
    this.leading,
    this.backgroundColor,
    this.suffix,
    this.actions = const [],
    this.hintText,
    this.onTap,
    this.onClear,
    this.onCancel,
    this.onChanged,
    this.onSearch,
    this.onRightTap,
  }) : super(key: key);
  final double? borderRadius;
  final bool? autoFocus;
  final FocusNode? focusNode;
  final TextEditingController? controller;

  // 输入框高度 默认40
  final double height;

  // 默认值
  final String? value;

  // 最前面的组件
  final Widget? leading;

  // 背景色
  final Color? backgroundColor;

  // 搜索框内部后缀组件
  final Widget? suffix;

  // 搜索框右侧组件
  final List actions;

  // 输入框提示文字
  final String? hintText;

  // 输入框点击回调
  final VoidCallback? onTap;

  // 清除输入框内容回调
  final VoidCallback? onClear;

  // 清除输入框内容并取消输入
  final VoidCallback? onCancel;

  // 输入框内容改变
  final ValueChanged? onChanged;

  // 点击键盘搜索
  final ValueChanged? onSearch;

  // 点击右边widget
  final VoidCallback? onRightTap;

  @override
  _AppBarSearchState createState() => _AppBarSearchState();

  @override
  Size get preferredSize => Size.fromHeight(height);
}

class _AppBarSearchState extends State {
  TextEditingController? _controller;
  FocusNode? _focusNode;

  bool get isFocus => _focusNode?.hasFocus ?? false; //是否获取焦点

  bool get isTextEmpty => _controller?.text.isEmpty ?? false; //输入框是否为空

  bool get isActionEmpty => widget.actions.isEmpty; // 右边布局是否为空

  bool isShowCancel = false;

  @override
  void initState() {
    _controller = widget.controller ?? TextEditingController();
    _focusNode = widget.focusNode ?? FocusNode();
    if (widget.value != null) _controller?.text = widget.value ?? "";
    // 焦点获取失去监听
    _focusNode?.addListener(() => setState(() {}));
    // 文本输入监听
    _controller?.addListener(() {
      setState(() {});
    });
    super.initState();
  }

  // 清除输入框内容
  void _onClearInput() {
    setState(() {
      _controller?.clear();
    });
    widget.onClear?.call();
  }

  // 取消输入框编辑失去焦点
  void _onCancelInput() {
    setState(() {
      _controller?.clear();
      _focusNode?.unfocus(); //失去焦点
    });
    // 执行onCancel
    widget.onCancel?.call();
  }

  Widget _suffix() {
    if (!isTextEmpty) {
      return InkWell(
        onTap: _onClearInput,
        child: SizedBox(
          width: widget.height,
          height: widget.height,
          child: Icon(Icons.cancel, size: 22, color: Color(0xFF999999)),
        ),
      );
    }
    return widget.suffix ?? SizedBox();
  }

  List _actions() {
    List list = [];
    if (isFocus || !isTextEmpty) {
      list.add(InkWell(
        onTap: widget.onRightTap ?? _onCancelInput,
        child: Container(
          constraints: BoxConstraints(minWidth: 48.w),
          alignment: Alignment.center,
          child: MyText(
            '搜索',
            fontColor: MyColors.color_666666,
            fontSize: 14.sp,
          ),
        ),
      ));
    } else if (!isActionEmpty) {
      list.addAll(widget.actions);
    }
    return list;
  }

  @override
  Widget build(BuildContext context) {
    return AppBar(
      backgroundColor: widget.backgroundColor,
      //阴影z轴
      elevation: 0,
      // 标题与其他控件的间隔
      titleSpacing: 0,
      leadingWidth: 40.w,
      leading: widget.leading ??
          InkWell(
            child: Icon(
              Icons.arrow_back_ios_outlined,
              color: MyColors.color_666666,
              size: 16.w,
            ),
            onTap: () {
              Routes.finish(context);
            },
          ),
      title: Container(
          margin: EdgeInsetsDirectional.only(end: 10.w),
          height: widget.height,
          decoration: BoxDecoration(
            color: Color(0xFFF2F2F2),
            borderRadius: BorderRadius.circular(widget.borderRadius ?? 0),
          ),
          child: Container(
            child: Row(
              children: [
                SizedBox(
                  width: widget.height,
                  height: widget.height,
                  child:
                      Icon(Icons.search, size: 20.w, color: Color(0xFF999999)),
                ),
                Expanded(
                  // 权重
                  flex: 1,
                  child: TextField(
                    autofocus: widget.autoFocus ?? false,
                    // 是否自动获取焦点
                    focusNode: _focusNode,
                    // 焦点控制
                    controller: _controller,
                    // 与输入框交互控制器
                    //装饰
                    decoration: InputDecoration(
                      isDense: true,
                      border: InputBorder.none,
                      hintText: widget.hintText ?? '请输入关键字',
                      hintStyle: TextStyle(
                          fontSize: 14.sp, color: MyColors.color_666666),
                    ),
                    style: TextStyle(
                      fontSize: 14.sp,
                      color: MyColors.color_333333,
                    ),
                    // 键盘动作右下角图标
                    textInputAction: TextInputAction.search,
                    onTap: widget.onTap,
                    // 输入框内容改变回调
                    onChanged: widget.onChanged,
                    onSubmitted: widget.onSearch, //输入框完成触发
                  ),
                ),
                _suffix(),
              ],
            ),
          )),
      actions: _actions(),
    );
  }

  @override
  void dispose() {
    _controller?.dispose();
    _focusNode?.dispose();
    super.dispose();
  }
}
总结
整体设计思路还是非常简单的,主要就是通过两个监听来控制我们想要达到的交互效果,还有就是对dart中函数Funcation作为对象的加深理解,通过自定义搜索AppBar可以了解系统到AppBar的一些设计思路,这里主要还是记录下我个人在做这个组件过程中的一个思路,希望对大家有所帮助~
到此这篇关于Flutter实现自定义搜索框AppBar的示例代码的文章就介绍到这了,更多相关Flutter搜索框内容请搜索脚本之家以前的文章或继续浏览下面的相关文章希望大家以后多多支持脚本之家!

