Pytorch学习笔记(3)——PyTorch神经网络工具箱+手写数字实战
第三章 PyTorch神经网络工具箱
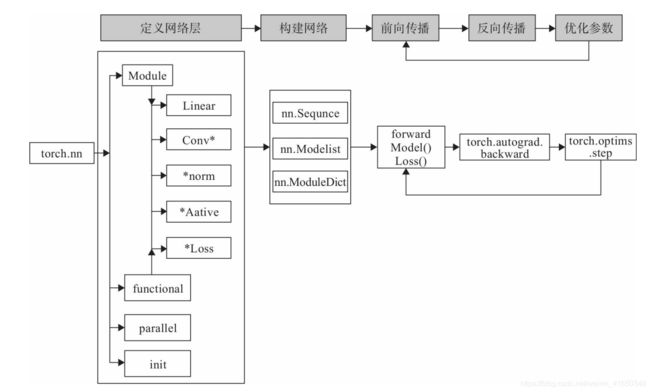
利用PyTorch的数据结构及自动求导机制可以大大提高我们的开发效率。本章将介绍PyTorch的另一利器:神经网络工具箱。利用这个工具箱,设计一个神经网络就像搭积木一样,可以极大简化我们构建模型的任务。
3.1 神经网络核心组件
神经网络看起来很复杂,节点很多,层数多,参数更多。但核心部分或组件不多,把这些组件确定后,这个神经网络基本就确定了。这些核心组件包括:
1)层:神经网络的基本结构,将输入张量转换为输出张量。
2)模型:层构成的网络。
3)损失函数:参数学习的目标函数,通过最小化损失函数来学习各种参数。
4)优化器:如何使损失函数最小,这就涉及优化器。
3.2 实现神经网络实例
像卷积层、全连接层、Dropout层等因含有可学习参数,一般使用nn.Module,而激活函数、池化层不含可学习参数,可以使用nn.functional中对应的函数。
3.2.1 背景说明
这节将利用神经网络完成对手写数字进行识别的实例,来说明如何借助nn工具箱来实现一个神经网络,并对神经网络有个直观了解。
主要步骤:
1)利用PyTorch内置函数mnist下载数据。
2)利用torchvision对数据进行预处理,调用torch.utils建立一个数据迭代器。
3)可视化源数据。
4)利用nn工具箱构建神经网络模型。
5)实例化模型,并定义损失函数及优化器。
6)训练模型。
7)可视化结果。
3.2.2 实现
1、导包
import numpy as np
import torch
#导入mnist数据集
import torchvision.datasets.mnist as mnist
#预处理模块
import torchvision.transforms as transforms
import torch.utils.data.dataloader as dataloader
#nn及优化器
import torch.nn.functional as F
import torch.optim as optim
import torch.nn as nn
print(torch.__version__)
1.7.0
2、定义超参数
train_batch_size = 64
test_batch_size = 128
lr = 0.01
num_epoch = 10
momentum = 0.5
3、下载数据并进行预处理
#定义与处理函数
#将2个函数组合在一起
#ToTensor将数据范围转换到[0,1],相当于除以255
#Normalize将数据范围转换到[-1,1],分别制定mean和std为0.5
transform = transforms.Compose([transforms.ToTensor(),
                                transforms.Normalize([0.5],[0.5])])
https://blog.csdn.net/jzwong/article/details/104272600
#下载训练集和测试集
#使用了之前定义好的transform预处理函数
train_dataset = mnist.MNIST('./data',
                            train=True,
                            transform=transform,
                            download=False)
test_dataset = mnist.MNIST('./data',
                           train=False,
                           transform=transform,
                           download=False)
print(train_dataset)
print(test_dataset)
Dataset MNIST
    Number of datapoints: 60000
    Root location: ./data
    Split: Train
    StandardTransform
Transform: Compose(
               ToTensor()
               Normalize(mean=[0.5], std=[0.5])
           )
Dataset MNIST
    Number of datapoints: 10000
    Root location: ./data
    Split: Test
    StandardTransform
Transform: Compose(
               ToTensor()
               Normalize(mean=[0.5], std=[0.5])
           )
#创建迭代器
train_loader = dataloader.DataLoader(train_dataset,
                                     batch_size=train_batch_size,
                                     shuffle=True)
test_loader = dataloader.DataLoader(test_dataset,
                                    batch_size=test_batch_size,
                                    shuffle=False)
print(train_loader)
print(test_loader)
4、可视化数据
查看数据形状和可视化数据,有助于我们后续网络的搭建。正常来说不需要这一步。
#查看训练数据的data和label大小
print(train_dataset.data.shape)
print(train_dataset.targets.shape)
print(train_dataset.data.type)
#查看测试数据的data和label大小
print(test_dataset.data.shape)
print(test_dataset.targets.shape)
torch.Size([60000, 28, 28])
torch.Size([60000])

torch.Size([10000, 28, 28])
torch.Size([10000])
import matplotlib.pyplot as plt
#数据
plt.imshow(train_dataset.data[0],cmap='gray')
plt.show()
#标签
print(train_dataset.targets[0])
tensor(5)
#使用loader可视化数据
train_batch = enumerate(train_loader)
batch_idx,(train_data,train_label) = next(train_batch)
#数据的形状加上了一个batch维度
print(train_data.shape)
print(train_label.shape)
torch.Size([64, 1, 28, 28])
torch.Size([64])
plt.imshow(train_data[0][0],cmap='gray')
plt.show()
print(train_label[0])
tensor(2)
for img,label in train_loader:
    break
print(img.shape)
img = img.view(img.shape[0],-1)
print(img.shape)
print(label.shape)
print(len(train_loader))
torch.Size([64, 1, 28, 28])
torch.Size([64, 784])
torch.Size([64])
938
5、构建网络并实例化
import collections
#定义网络结构
#继承了nn.Module类
class net(nn.Module):
    #重写__init__()函数
    def __init__(self,in_dim,h1,h2,out_dim):
        #继承父类
        super(net,self).__init__()
        #定义layer1
        #使用字典方式定义,用Sequential进行多层的组合
        #首先是一个全连接层Linear
        #然后是一个批标准化层BatchNorm
        self.layer1 = nn.Sequential(
            collections.OrderedDict(
                [
                    ('fn',nn.Linear(in_dim,h1)),
                    ('norm',nn.BatchNorm1d(h1))
                ]
            )
        )
        #定义layer2
        #首先是一个全连接层Linear
        #然后是一个批标准化层BatchNorm
        self.layer2 = nn.Sequential(
            collections.OrderedDict(
                [
                    ('fn',nn.Linear(h1,h2)),
                    ('norm',nn.BatchNorm1d(h2))
                ]
            )
        )
        #定义layer3
        #是一个全连接层Linear
        #用于改变输出的形状
        self.layer3 = nn.Sequential(
            collections.OrderedDict(
                [
                    ('fn',nn.Linear(h2,out_dim))
                ]
            )
        )

    #前向传播
    def forward(self,x):
        #layer1 + relu
        x = self.layer1(x)
        x = F.relu(x)
        #layer2 + relu
        x = self.layer2(x)
        x = F.relu(x)
        #layer3
        x = self.layer3(x)
        return x
print(net)
#检测是否有gpu
if torch.cuda.is_available():
    device = torch.device("cuda:0")
else:
    device = torch.device("cpu")

print(device)
cpu
#实例化模型之后才可以使用
model = net(28*28,300,100,10)
model.to(device)
net(
  (layer1): Sequential(
    (fn): Linear(in_features=784, out_features=300, bias=True)
    (norm): BatchNorm1d(300, eps=1e-05, momentum=0.1, affine=True, track_running_stats=True)
  )
  (layer2): Sequential(
    (fn): Linear(in_features=300, out_features=100, bias=True)
    (norm): BatchNorm1d(100, eps=1e-05, momentum=0.1, affine=True, track_running_stats=True)
  )
  (layer3): Sequential(
    (fn): Linear(in_features=100, out_features=10, bias=True)
  )
)
6、定义损失函数和优化器
#定义损失函数(交叉熵损失)
loss_func = nn.CrossEntropyLoss()
#定义优化器SGD
optimizer = optim.SGD(params=model.parameters(),
                      lr=lr,
                      momentum=momentum)
print(loss_func)
print(optimizer)
CrossEntropyLoss()
SGD (
Parameter Group 0
    dampening: 0
    lr: 0.01
    momentum: 0.5
    nesterov: False
    weight_decay: 0
)
7、训练+测试
#定义损失和准确率列表,以便后续可视化结果
train_losses = []
train_acces = []
test_losses = []
test_acces = []

#按照epoch进行训练和测试
#之前定义的超参数epoch=10
for epoch in range(num_epoch):
    #初始化训练损失和训练准确度
    train_loss = 0
    train_acc = 0
    #设置为训练模式
    #这样可以修改模型的参数
    model.train()
    #动态修改参数学习率
    if epoch%5==0:
        optimizer.param_groups[0]['lr'] *= 0.1

    #取出data和label进行训练
    #每一组的batch_size=64
    #组数为len(train_loader)/batch_size的上取整
    for train_data,train_label in train_loader:
        #装换为cpu或gpu格式的数据
        train_data = train_data.to(device)
        train_label = train_label.to(device)
        #将batch后面的维度展平
        train_data = train_data.view(train_data.shape[0],-1)
        #前向传播
        #计算损失
        out = model(train_data)
        loss = loss_func(out,train_label)
        #反向传播
        #更新参数
        optimizer.zero_grad()
        loss.backward()
        optimizer.step()
        #累加训练损失(所有的batch)
        train_loss += loss.item()
        #累加训练精度
        pred = out.argmax(dim=1)
        num_correct = (pred==train_label).sum().item()
        train_acc += num_correct/train_data.shape[0]

    #记录每个epoch的损失和精度
    #注意要除以组数(平均)
    train_losses.append(train_loss/len(train_loader))
    train_acces.append(train_acc/len(train_loader))

    #初始化测试损失和精确度
    test_loss = 0
    test_acc = 0
    #预测模式,不更新参数
    model.eval()

    #开始进行预测
    for test_data,test_label in test_loader:
        test_data = test_data.to(device)
        test_label = test_label.to(device)

        test_data = test_data.view(test_data.shape[0],-1)

        out = model(test_data)
        loss = loss_func(out,test_label)
        #
        #预测不需要更新参数
        #
        test_loss += loss.item()

        pred = out.argmax(dim=1)
        num_correct = (pred==test_label).sum().item()
        test_acc += num_correct/test_data.shape[0]

    #记录每个epoch的训练结果
    test_losses.append(test_loss/len(test_loader))
    test_acces.append(test_acc/len(test_loader))

    #打印每个epoch的训练和测试结果
    print('epoch:{},train_loss:{:.4f},train_acc:{:.4f},test_loss:{:.4f},test_acc:{:.4f}'.format(epoch,
                                                                                    train_loss/len(train_loader),
                                                                                    train_acc/len(train_loader),
                                                                                    test_loss/len(test_loader),
                                                                                    test_acc/len(test_loader)))
epoch:0,train_loss:1.0320,train_acc:0.7818,test_loss:0.5461,test_acc:0.9062
epoch:1,train_loss:0.4744,train_acc:0.9037,test_loss:0.3481,test_acc:0.9280
epoch:2,train_loss:0.3417,train_acc:0.9233,test_loss:0.2677,test_acc:0.9390
epoch:3,train_loss:0.2775,train_acc:0.9351,test_loss:0.2203,test_acc:0.9473
epoch:4,train_loss:0.2382,train_acc:0.9424,test_loss:0.1935,test_acc:0.9535
epoch:5,train_loss:0.2178,train_acc:0.9474,test_loss:0.1889,test_acc:0.9543
epoch:6,train_loss:0.2158,train_acc:0.9477,test_loss:0.1877,test_acc:0.9558
epoch:7,train_loss:0.2124,train_acc:0.9482,test_loss:0.1874,test_acc:0.9548
epoch:8,train_loss:0.2110,train_acc:0.9484,test_loss:0.1822,test_acc:0.9566
epoch:9,train_loss:0.2063,train_acc:0.9503,test_loss:0.1813,test_acc:0.9567
8、结果可视化
epoch = np.arange(0,num_epoch,1)
#画出训练结果
plt.plot(epoch,train_losses,'b',label='train_loss')
plt.plot(epoch,train_acces,'r',label='train_acc')
plt.legend()
plt.show()
#画出测试结果
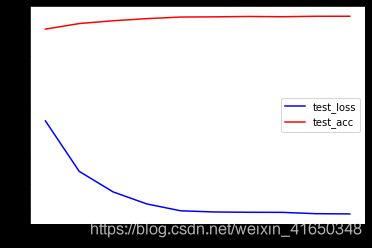
plt.plot(epoch,test_losses,'b',label='test_loss')
plt.plot(epoch,test_acces,'r',label='test_acc')
plt.legend()
plt.show()
9、单独预测某张手写数字图片
import random
pos = random.randint(0,len(train_dataset.data))
plt.imshow(train_dataset.data[pos],cmap='gray')
plt.show()
img = train_dataset.data[pos]
img = img.unsqueeze(0)
img = img.to(device)
img = img.view(img.shape[0],-1)
img = img.float() #一定要转换成float才可以进行预测
print(img.shape)
torch.Size([1, 784])
model.eval()
out = model(img)
pred = out.argmax(dim=1)
print('prediction is: {}'.format(pred.item()))
print('real is: {}'.format(train_dataset.targets[pos].item()))
prediction is: 3
real is: 3
总结
用gpu跑了20个epoch,因为用cpu跑很慢。。。10个epoch都要跑一会
貌似还是网络结构的问题,到95%之后就上不去了?
2020.12.26更新
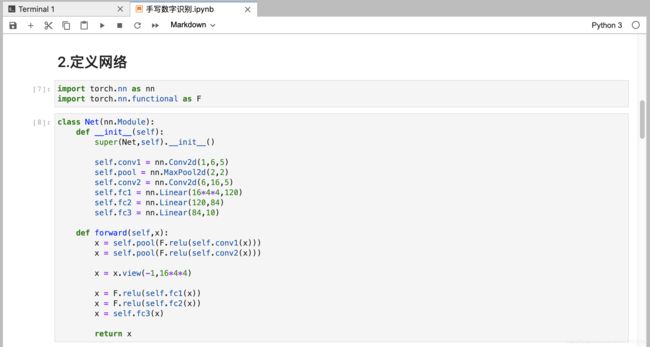
修改了一下网络结构,用到了2d卷积核池化。
class Net(nn.Module):
    def __init__(self):
        super(Net,self).__init__()

        self.conv1 = nn.Conv2d(1,6,5)
        self.pool = nn.MaxPool2d(2,2)
        self.conv2 = nn.Conv2d(6,16,5)
        self.fc1 = nn.Linear(16*4*4,120)
        self.fc2 = nn.Linear(120,84)
        self.fc3 = nn.Linear(84,10)

    def forward(self,x):
        x = self.pool(F.relu(self.conv1(x)))
        x = self.pool(F.relu(self.conv2(x)))

        x = x.view(-1,16*4*4)

        x = F.relu(self.fc1(x))
        x = F.relu(self.fc2(x))
        x = self.fc3(x)

        return x
测试集上的准确率99.58%!
哦吼,起飞!!!


