@TOC
*本文说明 请大家务必查看
目录结构:重点是简洁版、错误记录详情查看自我总结
本文有两个版本,详细版、简洁版。
前者适合新手,后者适合老手(方便大家查找,从而过滤掉某些步骤,节约时间成本) 所以大家按需查看哟。
| 详细版 | 简洁版 |
|---|
简洁版:包含所有步骤,以及命令的执行过程(适合新手)
简洁版:只包含命令(适合有一定熟练度的人)
前言
大家有羡慕过别人的博客网站吗?自己最初接触电脑的时候,看见一个朋友的博客就很是羡慕。
今天就教大家如何搭建自己的博客网站,非常简单,小白轻松上手。
首先介绍一下主角:Hexo
什么是 Hexo?
Hexo 是一个快速、简洁且高效的博客框架。Hexo 使用 Markdown(或其他渲染引擎)解析文章,在几秒内,即可利用靓丽的主题生成静态网页。
Markdown是一种轻量级标记语言,排版语法简洁 ,不到半小时就能完全掌握。这里就不做过多介绍了。
环境准备
| 系统 | Vcpu | Memory | 网卡类型 |
|---|---|---|---|
| centos7 | 2 | 4 | NAT模式 |
配置yum源,不会的看这里:(35条消息) linux+centos7 配置本地yum源_YG-刻骨铭心的博客-CSDN博客_为什么要配置本地yum源
详细版
入门:搭建步骤
安装git:
[root@localhost ~]# rm -rf /etc/yum.repos.d/*  #删除本地repo文件
[root@localhost ~]# curl -o /etc/yum.repos.d/CentOS-Base.repo https://mirrors.aliyun.com/repo/Centos-7.repo  ## 下载阿里云centos7镜像源
  % Total    % Received % Xferd  Average Speed   Time    Time     Time  Current
                                 Dload  Upload   Total   Spent    Left  Speed
100  2523  100  2523    0     0   5701      0 --:--:-- --:--:-- --:--:--  5721
[root@localhost ~]# yum clean all ; yum makecache #清理缓存、建立缓存
[root@localhost ~]# yum install -y git   # yum源 下载安装git
Loaded plugins: fastestmirror
Loading mirror speeds from cached hostfile
 * base: mirrors.aliyun.com

 * extras: mirrors.aliyun.com
 * updates: mirrors.aliyun.com
Resolving Dependencies
--> Running transaction check
---> Package git.x86_64 0:1.8.3.1-23.el7_8 will b
安装node:
node官网下载地址Index of /dist/ (nodejs.org) # (Node.js 版本需不低于 10.13,建议使用 Node.js 12.0 及以上版本)
[root@localhost ~]# yum install wget -y  # 下载安装wget
Loaded plugins: fastestmirror
Loading mirror speeds from cached hostfile
 * base: mirrors.aliyun.com
 * extras: mirrors.aliyun.com
 * updates: mirrors.aliyun.com
Resolving Dependencies
--> Running transaction check
---> Package wget.x86_64 0:1.14-18.el7_6.1 will be installed
--> Finished Dependency Resolution

Dependencies Resolved

================================================================================================================================
 Package                    Arch
 [root@localhost ~]# wget https://nodejs.org/dist/v16.14.2/node-v16.14.2-linux-x64.tar.xz  # 下载 node.js 软件压缩包
--2022-04-14 20:32:21--  https://nodejs.org/dist/v16.14.2/node-v16.14.2-linux-x64.tar.xz
Resolving nodejs.org (nodejs.org)... 104.20.22.46, 104.20.23.46, 2606:4700:10::6814:162e, ...
Connecting to nodejs.org (nodejs.org)|104.20.22.46|:443... connected.
HTTP request sent, awaiting response... 200 OK
Length: 21941244 (21M) [application/x-xz]
Saving to: ‘node-v16.14.2-linux-x64.tar.xz’

100%[======================================================================================>] 21,941,244   950KB/s   in 21s

2022-04-14 20:32:44 (999 KB/s) - ‘node-v16.14.2-linux-x64.tar.xz’ saved [21941244/21941244]
[root@localhost ~]# tar -vxf node-v16.14.2-linux-x64.tar.xz   # 解压node.js软件压缩软件包
node-v16.14.2-linux-x64/
node-v16.14.2-linux-x64/bin/

[root@localhost ~]# mv node-v16.14.2-linux-x64 /usr/local/bin  # 移动node到/usr/local/bin目录下
[root@localhost ~]# cd /usr/local/bin/  # 进入/usr/local/bin
[root@localhost bin]# ll  # 查看当前目录下的文件、目录
total 0
drwxr-xr-x. 6 1001 1001 108 Mar 18 05:52 node-v16.14.2-linux-x64
[root@localhost bin]# mv node-v16.14.2-linux-x64/ node  #修改node-v16.14.2-linux-x64 名称为 node
[root@localhost bin]# vi /etc/profile  # vi修改配置文件 添加node.j2软件环境变量
export NODE_HOEM=/usr/local/bin/node  # 设置node软件家目录的环境变量
export PATH=$PATH:$NODE_HOEM/bin  # 设置node软件到bin目录下环境变量  实现bin目录下命令的全局使用
[root@localhost bin]# source /etc/profile   # 使配置文件生效
[root@localhost bin]# node -v  # 查看node版本  说明安装配置成功
v16.14.2
[root@localhost bin]# npm -v  # 查看npm版本  说明安装配置成功
8.5.0
安装Hexo:
[root@localhost bin]# cd  # 切换到/root目录
[root@localhost ~]# npm install -g cnpm --registry=https://registry.npm.taobao.org  # 安装cnpm模块 、设置国内taobao仓库地址
npm WARN deprecated [email protected]: this library is no longer supported
npm WARN deprecated [email protected]: Please upgrade  to version 7 or higher.  Older versions may use Math.random() in certain circumstances, which is known to be problematic.  See https://v8.dev/blog/math-random for details.
npm WARN deprecated [email protected]: request has been deprecated, see https://github.com/request/request/issues/3142

added 372 packages in 37s

3 packages are looking for funding
  run `npm fund` for details
npm notice
npm notice New minor version of npm available! 8.5.0 -> 8.6.0
npm notice Changelog: https://github.com/npm/cli/releases/tag/v8.6.0
npm notice Run npm install -g [email protected] to update!
npm notice
[root@localhost ~]# cnpm -v  # 查看cnpm模块版本
[email protected] (/usr/local/bin/node/lib/node_modules/cnpm/lib/parse_argv.js)
[email protected] (/usr/local/bin/node/lib/node_modules/cnpm/node_modules/npm/lib/npm.js)
[email protected] (/usr/local/bin/node/bin/node)
[email protected] (/usr/local/bin/node/lib/node_modules/cnpm/node_modules/npminstall/lib/index.js)
prefix=/usr/local/bin/node
linux x64 3.10.0-862.el7.x86_64
registry=https://registry.npmmirror.com
[root@localhost ~]#  cnpm install -g hexo-cli # 安装hexo博客
Downloading hexo-cli to /usr/local/bin/node/lib/node_modules/hexo-cli_tmp
Copying /usr/local/bin/node/lib/node_modules/hexo-cli_tmp/[email protected]@hexo-cli to /usr/local/bin/node/lib/node_modules/hexo-cli
Installing hexo-cli's dependencies to /usr/local/bin/node/lib/node_modules/hexo-cli/node_modules
[1/10] abbrev@^1.1.1 installed at node_modules/[email protected]@abbrev
[2/10] bluebird@^3.5.5 installed at node_modules/[email protected]@bluebird
[3/10] tildify@^2.0.0 installed at node_modules/[email protected]@tildify
[4/10] command-exists@^1.2.8 installed at node_modules/[email protected]@command-exists
[5/10] chalk@^4.0.0 installed at node_modules/[email protected]@chalk
[6/10] hexo-log@^2.0.0 installed at node_modules/[email protected]@hexo-log
[7/10] minimist@^1.2.5 installed at node_modules/[email protected]@minimist
[8/10] resolve@^1.11.0 installed at node_modules/[email protected]@resolve
[9/10] hexo-fs@^3.0.1 installed at node_modules/[email protected]@hexo-fs
[10/10] hexo-util@^2.0.0 installed at node_modules/[email protected]@hexo-util
All packages installed (58 packages installed from npm registry, used 3s(network 3s), speed 622.85KB/s, json 58(276.43KB), tarball 1.73MB, manifests cache hit 0, etag hit 0 / miss 0)
[[email protected]] link /usr/local/bin/node/bin/hexo@ -> /usr/local/bin/node/lib/node_modules/hexo-cli/bin/hexo
[root@localhost ~]# mkdir test  # 创建test目录
[root@localhost ~]# cd test/  # 进入 test目录
[root@localhost test]# hexo init  # hexo初始化当前为工作目录
INFO  Cloning hexo-starter https://github.com/hexojs/hexo-starter.git
INFO  Install dependencies
INFO  Start blogging with Hexo!
[root@localhost ~]# npm install  # npm install命令根据package.json 文件的 dependencies 字段配置安装所有的依赖包
[root@localhost ~]# systemctl stop firewalld ;systemctl disable firewalld  # 停止、关闭防火墙
[root@localhost ~]# setenforce 0  # 临时关闭selinux
[root@localhost test]# hexo server  # 启动hexo博客  前台启动
INFO  Validating config
INFO  Start processing
INFO  Hexo is running at http://localhost:4000/ . Press Ctrl+C to stop.
[root@localhost test]# nohup hexo server & # 启动hexo博客 后台启动 按两次enter健
[root@loalhost ~]# jobs  # 列出系统作业号和名称
[1]+  Running                 nohup hexo server &  (wd: ~/hexo/blog)
[root@loalhost ~]# kill %1 # 结束作业号为1的进程
浏览器访问主机 ip:4000 如下图所示:
进阶:hexo基本操作
发布第一篇博客 :
[root@localhost test]# hexo new "My New Post---test hello"   # 新建一篇文章
INFO  Validating config
INFO  Created: ~/test/source/_posts/My-New-Post-test-hello.md
[root@localhost test]# echo "hello world --- this is a test" >>  ~/test/source/_posts/My-New-Post-test-hello.md   # 在My-New-Post-test-hello.md文件最后追加hello world --- this is a test
[root@localhost test]# hexo clean  # 清除缓存文件
INFO  Validating config
INFO  Deleted database.
[root@localhost test]# hexo generate  # 生成静态文件
INFO  Validating config
INFO  Start processing
INFO  Files loaded in 234 ms
(node:2270) Warning: Accessing non-existent property 'lineno' of module exports inside circular dependency
(Use `node --trace-warnings ...` to show where the warning was created)
(node:2270) Warning: Accessing non-existent property 'column' of module exports inside circular dependency
(node:2270) Warning: Accessing non-existent property 'filename' of module exports inside circular dependency
(node:2270) Warning: Accessing non-existent property 'lineno' of module exports inside circular dependency
(node:2270) Warning: Accessing non-existent property 'column' of module exports inside circular dependency
(node:2270) Warning: Accessing non-existent property 'filename' of module exports inside circular dependency
INFO  Generated: archives/index.html
INFO  Generated: archives/2022/index.html
INFO  Generated: archives/2022/04/index.html
INFO  Generated: index.html
INFO  Generated: fancybox/jquery.fancybox.min.css
INFO  Generated: js/script.js
INFO  Generated: css/fonts/fontawesome-webfont.woff2
INFO  Generated: css/style.css
INFO  Generated: fancybox/jquery.fancybox.min.js
INFO  Generated: js/jquery-3.4.1.min.js
INFO  Generated: css/fonts/FontAwesome.otf
INFO  Generated: css/fonts/fontawesome-webfont.eot
INFO  Generated: css/fonts/fontawesome-webfont.ttf
INFO  Generated: css/fonts/fontawesome-webfont.woff
INFO  Generated: css/images/banner.jpg
INFO  Generated: 2022/04/14/My-New-Post-test-hello/index.html
INFO  Generated: css/fonts/fontawesome-webfont.svg
INFO  Generated: 2022/04/14/hello-world/index.html
INFO  18 files generated in 704 ms
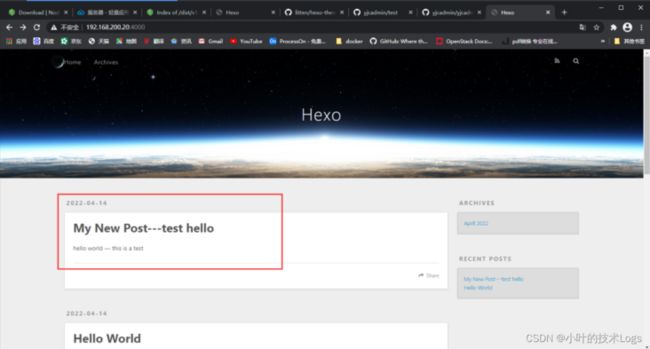
进入浏览器页面 按F5 刷新页面:
修改Hexo默认主题:
[root@localhost test]# cd /root/test  # 进入 /root/test目录
[root@localhost test]# git clone https://github.com/litten/hexo-theme-yilia.git themes/yilia  # git克隆(下载)hexo-theme-yilia.git项目放入themes/yilia目录下
Cloning into 'themes/yilia'...
remote: Enumerating objects: 2037, done.
remote: Counting objects: 100% (1/1), done.
remote: Total 2037 (delta 0), reused 0 (delta 0), pack-reused 2036
Receiving objects: 100% (2037/2037), 10.53 MiB | 1.40 MiB/s, done.
Resolving deltas: 100% (1079/1079), done.
[root@localhost test]# vi _config.yml  # 修改博客配置文件
#theme: landscape   # 注释字段
theme: yilia  # 添加字段

[root@localhost test]# hexo server
INFO  Validating config
INFO  Start processing
INFO  Hexo is running at http://localhost:4000/ . Press Ctrl+C to stop.
(node:2222) Warning: Accessing non-existent property 'lineno' of module exports inside circular dependency
(Use `node --trace-warnings ...` to show where the warning was created)
(node:2222) Warning: Accessing non-existent property 'column' of module exports inside circular dependency
(node:2222) Warning: Accessing non-existent property 'filename' of module exports inside circular dependency
(node:2222) Warning: Accessing non-existent property 'lineno' of module exports inside circular dependency
(node:2222) Warning: Accessing non-existent property 'column' of module exports inside circular dependency
(node:2222) Warning: Accessing non-existent property 'filename' of module exports inside circular dependency
^CINFO  Have a nice day
[root@localhost test]# hexo server  #ctrl+c停止之前的前台进程,之后重启hexo服务
INFO  Validating config
INFO  Start processing
WARN  Trying to "create" _posts/My-New-Post-test-hello.md, but the file already exists!
INFO  Hexo is running at http://localhost:4000/ . Press Ctrl+C to stop.
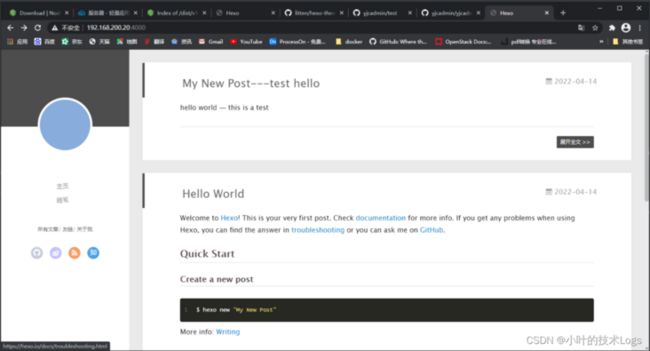
进入浏览器页面 按F5 刷新页面,主题修改成功:
实现github域名访问我们博客:
[root@localhost test]# ssh-keygen  # 生成密钥:私钥和公钥
Generating public/private rsa key pair.
Enter file in which to save the key (/root/.ssh/id_rsa):
Enter passphrase (empty for no passphrase):
Enter same passphrase again:
Your identification has been saved in /root/.ssh/id_rsa.
Your public key has been saved in /root/.ssh/id_rsa.pub.
The key fingerprint is:
SHA256:2U+9DP3wcgJKZb3So8yoOWhsiQ8BQR/HL8F7RKO/30w [email protected]
The key's randomart image is:
+---[RSA 2048]----+
| .o .o..o        |
|   o o+...   .   |
|  . . .=    o .  |
|   .  o.oo o + . |
|    .  oS o = B  |
|     .   o B * * |
|    .o o. o E = +|
|    ..* .+ +   + |
|     +. o.. o    |
+----[SHA256]-----+
[root@localhost test]# cat /root/.ssh/id_rsa.pub  # 查看公钥文件内容
ssh-rsa AAAAB3NzaC1yc2EAAAADAQABAAABAQDgxY4+7mlK4gVaadT6WPVua/gSslYoIYbF9FQmZmsTZ4oxZzpTiDndH05xdN1LJ8qs4Xm56IuDKAdUWYe6kqEtNVkoqYB3SCTMdaTYN6IqQMOFcFzhsI4k/FMsN3D3mDmaJ3gTvUDUHsuu27i9r5FcpZqbPEN78tJ2FkodQgbqp8z/fTJ8r2aI5CUVMDgQ6ZzKGaKgHF/oLEiNncyPHq6TMw/kZgLCA0s3wpfe/jGx9EtxgRPTj69ZR/31IAOs6sG20M75+KZelSSOzg9RoyMn3Y/zXPq10yZr0VrGm/UwGdom7K/haSS3tWL96tgLgmi1sj1MFOfLLdifQf4vbumn [email protected]
账号自行创建
在github上添加我们的ssh公钥地址(/root/.ssh/id_rsa.pub):
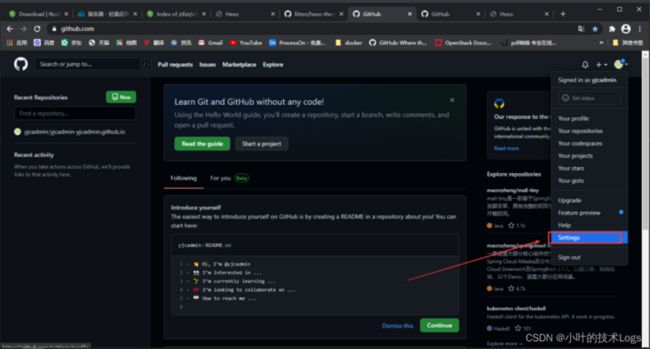
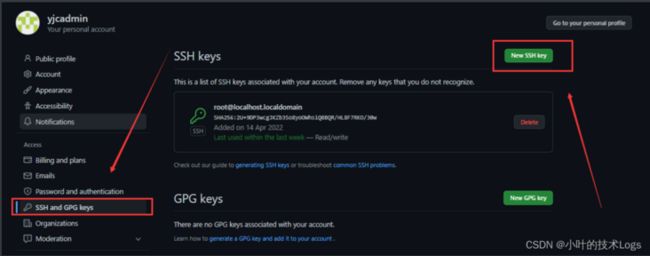
复制粘贴我们的ssh公钥文件(/root/.ssh/id_rsa.pub)的内容: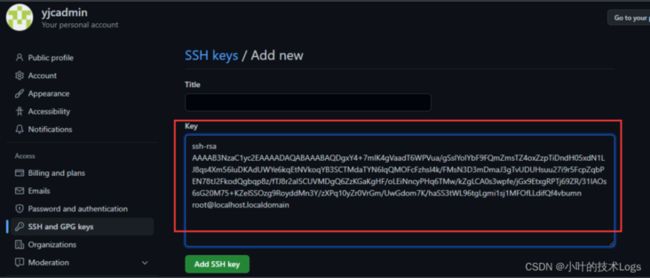

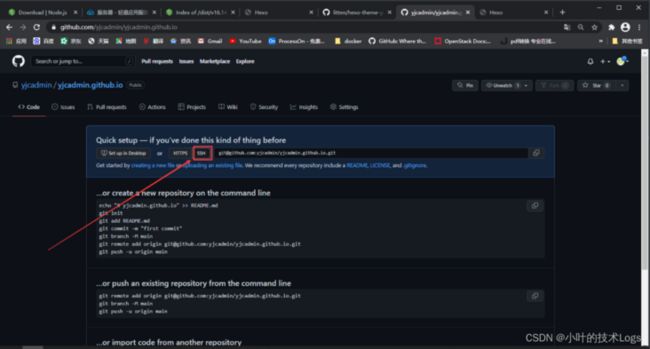
仓库名称格式 <你的 GitHub 用户名>.github.io 等会我们的站点会通过这个名称实现域名访问
如图所示:
这里务必使用ssh地址否则会报错:具体信息查看本文档的 错误标题 选项
[root@localhost test]# git init  # 当前目录建立一个git代码库
Reinitialized existing Git repository in /root/test/.git/
[root@localhost test]# git add .  # 当前目录代码推送到暂存空间
[root@localhost test]# git commit -m "first commit"  # 提交到资源库
[master e162d0b] first commit
 1 file changed, 2 insertions(+), 1 deletion(-)
[root@localhost test]# git remote add origin [email protected]:yjcadmin/yjcadmin.github.io.git
[root@localhost test]# git push -u origin master # 推送代码到目的仓库
Counting objects: 24, done.
Delta compression using up to 2 threads.
Compressing objects: 100% (19/19), done.
Writing objects: 100% (24/24), 49.82 KiB | 0 bytes/s, done.
Total 24 (delta 4), reused 0 (delta 0)
remote: Resolving deltas: 100% (4/4), done.
To [email protected]:yjcadmin/yjcadmin.github.io.git
 * [new branch]      master -> master
Branch master set up to track remote branch master from origin.
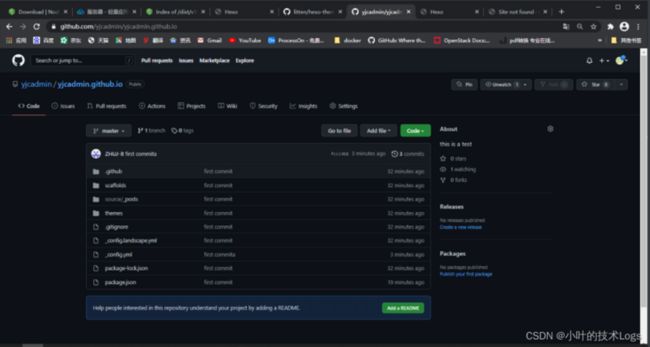
F5刷新页面:
[root@localhost test]# cnpm install --save hexo-deployer-git  # 安装hexo-deployer-git模块
✔ Installed 1 packages
✔ Linked 52 latest versions
✔ Run 0 scripts
✔ All packages installed (53 packages installed from npm registry, used 8s(network 8s), speed 396.04KB/s, json 53(289.51KB), tarball 2.86MB, manifests cache hit 0, etag hit 0 / miss 0)
[root@localhost test]# vi _config.yml
deploy:
  type: git
  repo: [email protected]:yjcadmin/yjcadmin.github.io.git
[root@localhost test]# hexo clean && hexo deploy  # 清除缓存、远程部署
INFO  Validating config
INFO  Deleted database.
INFO  Deleted public folder.
INFO  Validating config
INFO  Start processing
INFO  Files loaded in 292 ms
INFO  Generated: archives/index.html
INFO  Generated: archives/2022/index.html
INFO  Generated: archives/2022/04/index.html
INFO  Generated: index.html
INFO  Generated: fonts/default-skin.b257fa.svg
INFO  Generated: img/default-skin.png
INFO  Generated: fonts/iconfont.16acc2.ttf
INFO  Generated: fonts/iconfont.45d7ee.svg
INFO  Generated: fonts/iconfont.8c627f.woff
INFO  Generated: fonts/iconfont.b322fa.eot
INFO  Generated: fonts/tooltip.4004ff.svg
INFO  Generated: img/preloader.gif
INFO  Generated: img/scrollbar_arrow.png
INFO  Generated: main.0cf68a.css
INFO  Generated: main.0cf68a.js
INFO  Generated: mobile.992cbe.js
INFO  Generated: slider.e37972.js
INFO  Generated: 2022/04/14/My-New-Post-test-hello/index.html
INFO  Generated: 2022/04/14/hello-world/index.html
INFO  19 files generated in 84 ms
INFO  Deploying: git
INFO  Clearing .deploy_git folder...
INFO  Copying files from public folder...
INFO  Copying files from extend dirs...
# On branch master
nothing to commit, working directory clean
Counting objects: 34, done.
Delta compression using up to 2 threads.
Compressing objects: 100% (27/27), done.
Writing objects: 100% (34/34), 151.02 KiB | 0 bytes/s, done.
Total 34 (delta 6), reused 0 (delta 0)
remote: Resolving deltas: 100% (6/6), done.
To [email protected]:yjcadmin/yjcadmin.github.io.git
 + fccc4b8...50105b6 HEAD -> master (forced update)
Branch master set up to track remote branch master from [email protected]:yjcadmin/yjcadmin.github.io.git.
INFO  Deploy done: git
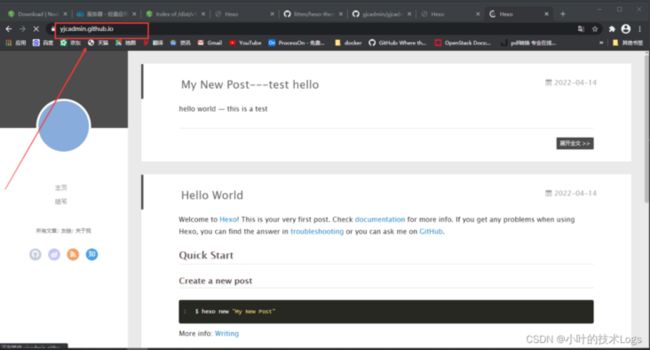
等待120秒F5刷新
卸载Hexo
npm uninstall hexo-cli -g # 卸载 hexo博客再找到文件夹中的blog,手动删除即可。
错误
这是自己遇到的错误信息以及解决方案(经供参考)
问题1
报错地址:
安装Hexo(标题)hexo init 之后
问题描述:
4高严重性漏洞
[root@master blog]# npm install
up to date, audited 248 packages in 2s
18 packages are looking for funding
  run `npm fund` for details
4 high severity vulnerabilities
To address all issues (including breaking changes), run:
  npm audit fix --force
Run `npm audit` for details.
解决方案:
审计修复——强制
[root@master blog]# npm audit fix --force
npm WARN using --force Recommended protections disabled.
npm WARN audit Updating hexo-renderer-ejs to 1.0.0,which is a SemVer major change.

removed 3 packages, changed 2 packages, and audited 245 packages in 2s

18 packages are looking for funding
  run `npm fund` for details

found 0 vulnerabilities
[root@master blog]# npm install

up to date, audited 245 packages in 1s

18 packages are looking for funding
  run `npm fund` for details

found 0 vulnerabilities
问题2
报错地址:
github域名访问(标题),推送本地仓库时
问题描述:
密码验证的支持在2021年8月13日被删除。使用个人访问令牌(ssh密钥)。
remote: Support for password authentication was removed on August 13, 2021. Please use a personal access token instead.
remote: Please see https://github.blog/2020-12-15-token-authentication-requirements-for-git-operations/ for more information.
fatal: Authentication failed for 'https://github.com/yjcadmin/yjcadmin.github.io.git/'
解决方案:
配置github免密登录(ssh免密)问题3
报错地址:
安装node(标题),解压node-v16.14.2-linux-x64.tar.xz时
问题描述:
不是gzip格式
[root@master ~]# tar -vzxf node-v16.14.2-linux-x64.tar.xz

gzip: stdin: not in gzip format
tar: Child returned status 1
tar: Error is not recoverable: exiting now
解决方案:
-z 参数 :通过gzip指令压缩/解压缩文件
所以不使用-z参数
tar -vxf node-v16.14.2-linux-x64.tar.xz自我总结
看到这里肯定是英俊潇洒、温柔大方的帅哥、美女!!!
写这一篇文章也不容易,前前后后2个的工作日是有的。也可能我一个新人花费的时间多一点,不过现在自己也写技术博客,才明白用心的每一位作者都不容易。需要学习 、测试、记录、写注释、规划目录结构、调整格式。
目录结构是昨晚(2022/4/14)想到de包含:介绍、详细版、简洁版、卸载、错误记录。特点是包含简洁版、错误记录
这样设置目录结构我认为就是一个在线电子笔记本,在忘掉某些技术的时候,可以在各大平台搜索 小叶的技术Logs (微信工作号、CSDN、简书、稀土掘金、segmentfault思否、博客源)查看简洁版可以让你快速回忆起整篇文章的内容。大大节约时间成本。
之后个人的所有博客都将会使用这种方式. 所以你或许需要关注这莫一个在线电子笔记本。 小叶的技术Logs
最后十分感谢大家能看到最后!!!
简洁版
入门:搭建步骤
安装git:
[root@localhost ~]# rm -rf /etc/yum.repos.d/*
[root@localhost ~]# curl -o /etc/yum.repos.d/CentOS-Base.repo https://mirrors.aliyun.com/repo/Centos-7.repo
[root@localhost ~]# yum clean all ; yum makecache
[root@localhost ~]# yum install -y git
安装node:
[root@localhost ~]# yum install wget -y
[root@localhost ~]# wget https://nodejs.org/dist/v16.14.2/node-v16.14.2-linux-x64.tar.xz
[root@localhost ~]# tar -vxf node-v16.14.2-linux-x64.tar.xz
[root@localhost ~]# mv node-v16.14.2-linux-x64 /usr/local/bin
[root@localhost ~]# cd /usr/local/bin/
[root@localhost bin]# mv node-v16.14.2-linux-x64/ node
[root@localhost bin]# vi /etc/profile
export NODE_HOEM=/usr/local/bin/node
export PATH=$PATH:$NODE_HOEM/bin
[root@localhost bin]# source /etc/profile
[root@localhost bin]# node -v
v16.14.2
[root@localhost bin]# npm -v
8.5.0
安装Hexo:
[root@localhost bin]# cd
[root@localhost ~]# npm install -g cnpm --registry=https://registry.npm.taobao.org
[root@localhost ~]# cnpm -v
[root@localhost ~]#  cnpm install -g hexo-cli
[root@localhost ~]# mkdir test
[root@localhost ~]# cd test/
[root@localhost test]# hexo init
[root@localhost ~]# systemctl stop firewalld
[root@localhost ~]# setenforce 0
[root@localhost test]# hexo server
进阶:hexo基本操作
发布文章 :
[root@localhost test]# hexo new "My New Post---test hello"
[root@localhost test]# echo "hello world --- this is a test" >>  ~/test/source/_posts/My-New-Post-test-hello.md
[root@localhost test]# hexo clean
[root@localhost test]# hexo g
修改主题:
[root@localhost test]# cd /root/test
[root@localhost test]# git clone https://github.com/litten/hexo-theme-yilia.git themes/yilia
[root@localhost test]# vi _config.yml
#theme: landscape   # 注释字段
theme: yilia  # 添加字段

[root@localhost test]# hexo server  #重启服务
[root@localhost test]# hexo server  #重启服务
github域名访问:
[root@localhost test]# ssh-keygen
[root@localhost test]# cat /root/.ssh/id_rsa.pub
## github设置ssh免密
## github创建自己    github用户名.github.io 格式命名的仓库,格式不能改变
[root@localhost test]# git init
[root@localhost test]# git add .
[root@localhost test]# git commit -m "first commit"
[root@localhost test]# git remote add origin [email protected]:yjcadmin/yjcadmin.github.io.git
[root@localhost test]# git push -u origin master
[root@localhost test]# cnpm install --save hexo-deployer-git
[root@localhost test]# vi _config.yml
deploy:
  type: git
  repo: [email protected]:yjcadmin/yjcadmin.github.io.git
[root@localhost test]# hexo clean && hexo deploy
卸载Hexo
npm uninstall hexo-cli -g
