微信小程序项目实战(二)构建个人页面
这里来绘制一下个人页面,调用wx.login登录函数来展示用户信息。
构建个人页面
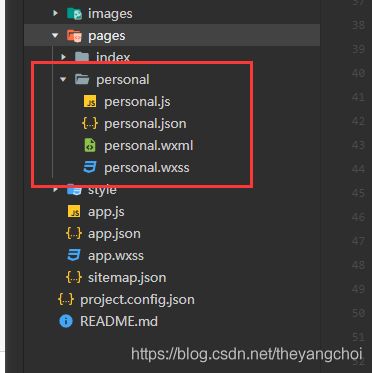
1.首先我们需要创建一个新的页面,表示为个人页面。

2.在app.json文件中配置路由路径,一般创建好心的page的时候是会自动配置的,但是还是要来app.js文件的pages下面看一下是否已经配置了

3.创建底部导航栏。使用tabBar进行创建,
设置默认字体颜色color
设置选中字体颜色selectedColor
设置模块list
设置模块中的跳转路径pagePath
设置模块中文字text
设置模块图标iconPath
设置模块选中图标selectedIconPath。
代码如下:
"tabBar": {
    "color": "#515151",
    "selectedColor": "#42bd56",
    "list": [{
      "pagePath": "pages/index/index",
      "text": "首页",
      "iconPath": "images/shouye.png",
      "selectedIconPath": "images/shouye_selected.png"
    },{
      "pagePath": "pages/personal/personal",
      "text": "我的",
      "iconPath": "images/wode.png",
      "selectedIconPath": "images/wode_selected.png"
    }]
  },
4.编写personal.wxml布局页面,并且通过一个按钮来点击获取用户信息。
<view class="container">
  <view class="avatar">
    <!-- getUserInfo
    open-type设置这个属性,表示该按钮点击后是用来获取用户信息的
    bindgetuserinfo 表示点击后相应的方法

    而我们显示用户信息肯定是要在用户给予权限之后才进行显示,所以要加这个if判断-->
    <button wx:if="{{!hasUserInfo && canIUse}}" open-type="getUserInfo" bindgetuserinfo="getUserInfo">微信登录</button>

    <block wx:else>
      <image src="{{userInfo.avatarUrl}}"></image>
      <text class="name">{{userInfo.nickName}}</text>
    </block>
  </view>

  <view class="info">
      <view class="section">
        <text>城市</text>
        <text>{{userInfo.city}}</text>
      </view>
      <view class="section">
        <text>性别</text>
        <text>{{userInfo.gender===1?"男":"女"}}</text>
      </view>
    </view>
</view>
5.编写person.wxss样式
.avatar{
  width: 100vw;
  height: 300rpx;
  background-color: #42bd56;
  color: #ffffff;
  display: flex;
  flex-direction: column;
  justify-content: center;
  align-items: center;
}

.avatar image{
  width: 150rpx;
  height: 150rpx;
  border-radius: 50%;
  margin-bottom: 30rpx;
}

.info .section{
  display: flex;
  justify-content: space-between;
  margin: 0 30rpx;
  border-bottom: 1px solid #ddd;
  height: 80rpx;
  line-height: 80rpx;
  font-size: 16px;
}
6.这里比较重要,编写personal.js文件,获取用户信息。
首先我们要在data里面设置数据源
  data: {
    userInfo: {},//用户数据
    hasUserInfo: false,//默认是没有用户信息
    canIUse: wx.canIUse('button.open-type.getUserInfo')//是否支持button上的授权,就是点击button弹出授权框
  },
然后在onLoad方法里面判断进行获取用户信息,这里要注意app.userInfoReadyCallback这个方法,设置了这个方法在app.js那里才能this点出来。
  onLoad: function (options) {
    //通过app.getlobalData.userInfo来判断用户信息是否存在,如果存在则直接设置用户信息
    if (app.globalData.userInfo) {
      this.setData({
        userInfo: app.globalData.userInfo,
        hasUserInfo: true
      })
    }
    //按钮点击触发
    else if (this.data.canIUse) {
      // 由于 getUserInfo 是网络请求,可能会在 Page.onLoad 之后才返回
      // 所以此处加入 callback 以防止这种情况
      app.userInfoReadyCallback = res => {
        this.setData({
          userInfo: res.userInfo,
          hasUserInfo: true
        })
      }
    } else {
      // 在没有 open-type=getUserInfo 版本的兼容处理
      wx.getUserInfo({
        success: res => {
          app.globalData.userInfo = res.userInfo
          this.setData({
            userInfo: res.userInfo,
            hasUserInfo: true
          })
        }
      })
    }
  },
最后实现按钮上面bind的getUserInfo函数
  getUserInfo: function (e) {
    console.log(e)
    //通过userInfo是否存在来判断是否允许
    if(e.detail.userInfo){
      app.globalData.userInfo = e.detail.userInfo
      this.setData({
        userInfo: e.detail.userInfo,
        hasUserInfo: true
      })
    }
  },
personal.js的所有代码如下:
// miniprogram/pages/personal/personal.js
let app = getApp()
Page({

  /**
   * 页面的初始数据
   */
  data: {
    userInfo: {},//用户数据
    hasUserInfo: false,//默认是没有用户信息
    canIUse: wx.canIUse('button.open-type.getUserInfo')//是否支持button上的授权,就是点击button弹出授权框
  },

  /**
   * 生命周期函数--监听页面加载
   */
  onLoad: function (options) {
    //通过app.getlobalData.userInfo来判断用户信息是否存在,如果存在则直接设置用户信息
    if (app.globalData.userInfo) {
      this.setData({
        userInfo: app.globalData.userInfo,
        hasUserInfo: true
      })
    }
    //按钮点击触发
    else if (this.data.canIUse) {
      // 由于 getUserInfo 是网络请求,可能会在 Page.onLoad 之后才返回
      // 所以此处加入 callback 以防止这种情况
      app.userInfoReadyCallback = res => {
        this.setData({
          userInfo: res.userInfo,
          hasUserInfo: true
        })
      }
    } else {
      // 在没有 open-type=getUserInfo 版本的兼容处理
      wx.getUserInfo({
        success: res => {
          app.globalData.userInfo = res.userInfo
          this.setData({
            userInfo: res.userInfo,
            hasUserInfo: true
          })
        }
      })
    }
  },
  getUserInfo: function (e) {
    console.log(e)
    //通过userInfo是否存在来判断是否允许
    if(e.detail.userInfo){
      app.globalData.userInfo = e.detail.userInfo
      this.setData({
        userInfo: e.detail.userInfo,
        hasUserInfo: true
      })
    }
  },
  /**
   * 生命周期函数--监听页面初次渲染完成
   */
  onReady: function () {

  },

  /**
   * 生命周期函数--监听页面显示
   */
  onShow: function () {

  },

  /**
   * 生命周期函数--监听页面隐藏
   */
  onHide: function () {

  },

  /**
   * 生命周期函数--监听页面卸载
   */
  onUnload: function () {

  },

  /**
   * 页面相关事件处理函数--监听用户下拉动作
   */
  onPullDownRefresh: function () {

  },

  /**
   * 页面上拉触底事件的处理函数
   */
  onReachBottom: function () {

  },

  /**
   * 用户点击右上角分享
   */
  onShareAppMessage: function () {

  }
})
获取展示
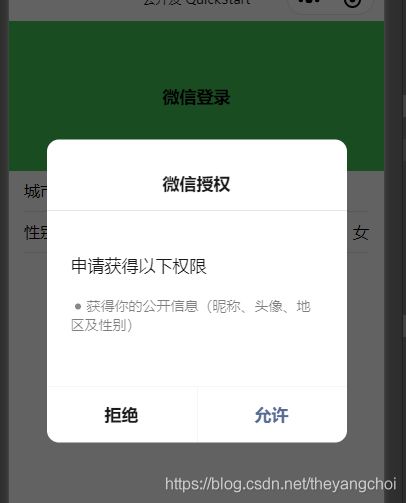
保存可以看到这样一个界面,没有展示任何信息,只是展示了一个微信登录的按钮。

点击微信登录,弹出授权框

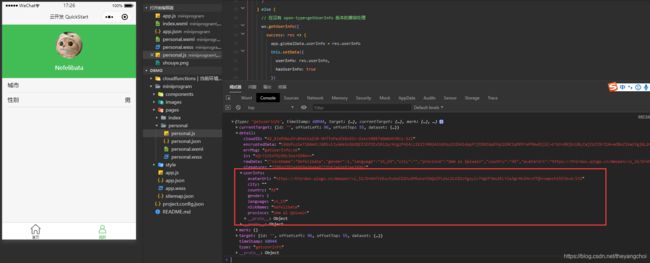
点击允许,就可以看到控制台有打印相应的数据,并且展示在了左边的模拟器上面

到这里就绘制好了一个个人界面了。
这里额外提一点button绑定的函数里面的if判断
  getUserInfo: function (e) {
    console.log(e)
    //通过userInfo是否存在来判断是否允许
    if(e.detail.userInfo){
      app.globalData.userInfo = e.detail.userInfo
      this.setData({
        userInfo: e.detail.userInfo,
        hasUserInfo: true
      })
    }
  }
为什么要加这个e.detail.userInfo?我们可以看到在personal.wxml里面有这样一句代码
<button wx:if="{{!hasUserInfo && canIUse}}" open-type="getUserInfo" bindgetuserinfo="getUserInfo">微信登录</button>
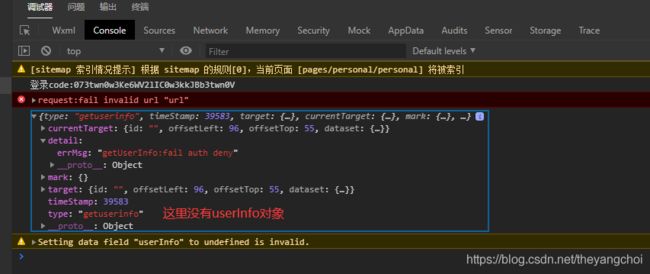
当hasUserInfo 不为true且canIUse的时候显示微信登录的按钮,而在getUserInfo函数中,我们最后将hasUserInfo设置为了 true,所以当我们点击微信登录,在弹框选择的时候选择拒绝这个按钮会消失。


按钮不见了。

这时候我们来看控制台,控制台输出的数据并没有userInfo这个对象,所以在peronal.wxml里面也无法获取到对应的数据并展示。

所以我们需要通过userInfo(e.detail.userInfo)这个对象来判断是否获取成功,如果没有成功则不设置数据,也不将hasUserInfo设置为true。
再看一次控制台,在给予权限的情况下,获取到的数据,就知道为什么是e.detail.userInfo了。e代表整个最外层返回的data,然后data下面的detail,在然后detail下面的userInfo

好了,到这里就真的结束了绘制一个个人页面。