TensorFlow2 Object Detection API安装及运行实验记录
目录
1. 安装
1.1 基本环境确认
1.2 TensorFlow Object Detection API Installation
1.2.1 Downloading the TensorFlow Model Garden
1.2.2 Protobuf Installation/Compilation
1.2.3 COCO API installation
1.2.4 Install the Object Detection API
1.2.5 Test your Installation
2. 简易运行实验
2.1 代码简单修改
2.2 UnicodeDecoderError
2.3 正确运行到底
3. Jupyter Notebook运行
1. 安装
基本上参照Ref1教程中所描述的流程。
1.1 基本环境确认
因为已经安装了Anaconda, Tensorflow, GPU driver等,所以前面几步安装都跳过。
Windows10
Anaconda Python 3.8.5
Tensorflow 2.5
CUDA:11.6
CuDNN:?
(查看显卡信息)控制面板-->硬件和声音-->NVIDIA控制面板-->帮助-->系统信息-->组件:
教程中建议创建一个虚环境用于实验,但是不是必须的。以下实验都是直接在base environment中进行的。
但是作为环境确认的目的,把教程中所提示的几个验证用命令执行了一下。
>>python -c "import tensorflow as tf;print(tf.reduce_sum(tf.random.normal([1000
, 1000])))"
2022-05-02 12:07:25.589977: I tensorflow/core/platform/cpu_feature_guard.cc:151] This TensorFlow bin
ary is optimized with oneAPI Deep Neural Network Library (oneDNN) to use the following CPU instructi
ons in performance-critical operations: AVX AVX2
To enable them in other operations, rebuild TensorFlow with the appropriate compiler flags.
2022-05-02 12:07:26.059706: I tensorflow/core/common_runtime/gpu/gpu_device.cc:1525] Created device
/job:localhost/replica:0/task:0/device:GPU:0 with 2661 MB memory: -> device: 0, name: GeForce GTX 1
050 Ti, pci bus id: 0000:01:00.0, compute capability: 6.1
tf.Tensor(-120.57622, shape=(), dtype=float32)
以上信息表明Tensorflow在CPU和GPU上都能够正常工作。
1.2 TensorFlow Object Detection API Installation
1.2.1 Downloading the TensorFlow Model Garden
从GitHub - tensorflow/models下载zip包(当然也可以用git clone的方式)并且在名为TensorFlow(教程上这么说,不过不是说非得这个名字吧)的目录下解压缩后并将models_master更名为models(这个是必须的)。
1.2.2 Protobuf Installation/Compilation
从Releases · protocolbuffers/protobuf · GitHub下载protoc-3.20.1-win64.zip(当前时刻的win64最新版本)解压后放在...\GoogleProtobuf目录下(这个目录名和上面的Tensorflow目录名一样应该都不是必然的)
将
打开一个新的Terminal(注意,每次系统环境发生变化时要新开Terminal才能生效,类似于Linux中source一下脚本),进入到TensorFlow/models/research/目录中并执行以下命令: :
>>protoc object_detection/protos/*.proto --python_out=.
1.2.3 COCO API installation
在命令行执行以下两条命令:
    pip install cython
    pip install git+https://github.com/philferriere/cocoapi.git#subdirectory=PythonAPI
根据教程说明,要求机器上安装了Visual C++ 2015 build tools,如果没有的话需要先安装。当然如果运行以上两条命令没有报错就说明不需要care它了。
Note(这个暂时还管不上,先mark一下,后面再来理会)
- The default metrics are based on those used in Pascal VOC evaluation.
- To use the COCO object detection metrics add metrics_set: "coco_detection_metrics" to the eval_config message in the config file.
- To use the COCO instance segmentation metrics add metrics_set: "coco_mask_metrics" to the eval_config message in the config file.
1.2.4 Install the Object Detection API
进入到Tensorflow\models\research目录运行以下命令:
    cp object_detection/packages/tf2/setup.py .
    python -m pip install --use-feature=2020-resolver .
第一次运行(以上第2条命令)报告信息如下:
WARNING: --use-feature=2020-resolver no longer has any effect, since it is now the default dependenc
y resolver in pip. This will become an error in pip 21.0.
Processing f:\dl\tensorflow\models\research
Preparing metadata (setup.py) ... done
Collecting avro-python3
Downloading avro-python3-1.10.2.tar.gz (38 kB)
Preparing metadata (setup.py) ... done
ERROR: Could not find a version that satisfies the requirement apache-beam (from object-detection) (
from versions: none)
ERROR: No matching distribution found for apache-beam
与教程中所提示的错误也不一样。。。教程中给出的以下指示似乎也没有什么信息,“have a look at ... and rerun”,看一下然后再重跑?看一下前面的描述能改变什么?
This is caused because installation of the
pycocotoolspackage has failed. To fix this have a look at the COCO API installation section and rerun the above commands.
Anyway,反正也不知道该咋办,直接就重新运行了一下,这次不一样了。上次出错的apache_beam包相关错误不再报了(有随机性?)。但是最后报了另外一个错误
WARNING: --use-feature=2020-resolver no longer has any effect, since it is now the default dependenc
y resolver in pip. This will become an error in pip 21.0.
Processing f:\dl\tensorflow\models\research
Preparing metadata (setup.py) ... done
Collecting avro-python3
Using cached avro-python3-1.10.2.tar.gz (38 kB)
Preparing metadata (setup.py) ... done
Collecting apache-beam
Downloading apache_beam-2.38.0-cp38-cp38-win_amd64.whl (4.1 MB)。。。。。。
Attempting uninstall: tensorboard
Found existing installation: tensorboard 2.5.0
Uninstalling tensorboard-2.5.0:
Successfully uninstalled tensorboard-2.5.0
ERROR: Could not install packages due to an OSError: [WinError 5] 拒绝访问。: 'C:\\Users\\chenxy\\Ap
pData\\Local\\Temp\\pip-uninstall-nkq8pny7\\tensorboard.exe'
Consider using the `--user` option or check the permissions.
第3次运行(将--use-feature=2020-resolver选项去掉,并加上--user选项)
python -m pip install --user .这次终于无事终了(正常结束)。
1.2.5 Test your Installation
执行以下命令来测试安装是否正确。
# From within TensorFlow/models/research/
>> python object_detection/builders/model_builder_tf2_test.py
。。。。。。
[ RUN ] ModelBuilderTF2Test.test_unknown_ssd_feature_extractor
INFO:tensorflow:time(__main__.ModelBuilderTF2Test.test_unknown_ssd_feature_extractor): 0.0s
I0501 23:19:44.044327 3280 test_util.py:2373] time(__main__.ModelBuilderTF2Test.test_unknown_ssd_fe
ature_extractor): 0.0s
[ OK ] ModelBuilderTF2Test.test_unknown_ssd_feature_extractor
----------------------------------------------------------------------
Ran 24 tests in 19.830sOK (skipped=1)
看上去正常。
2. 简易运行实验
在教程中安装后是“Training Custom Object Detector”,讲述如何训练一个自己的物体检测器,但是看上去很麻烦。入门学习最重要的事情是不要跨越太大,要选择很快就能看到结果得到反馈的那种事情。毕竟每一步都是坑,如果要走4步以后才能看到对错那如何来判断是哪一步出错了呢?所以我暂且跳过了“Training Custom Object Detector”,先看Examples。
Examples中提供了4个例子,分别提供了JupyterNotebook版和Python脚本版。
auto_examples_jupyter.zip
auto_examples_python.zip
首先确认两个版本的代码是完全一致的,只不过在Jupyter Notebook中互动性好一些,而且容易观察运行结果,尤其是最终的对象检测结果。选择plot_object_detection_saved_model来做实验,看看是不是开箱能用(解压后能够直接运行)的东西。
2.1 代码简单修改
首先在命令行执行:python plot_object_detection_saved_model.py
不出意外地报错,从log来看是因为download_images(), download_labels()中是分别要从“'https://raw.githubusercontent.com/tensorflow/models/master/research/object_detection/”下载图片和标注信息。但是该网站打不开,原因不明(应该不是被屏蔽,毕竟我都可以从github上下载模型包本身)。但是从目录路径来看,其实这些数据是在已经下载的模型安装包中的。选择了一个最简单粗暴的方法,把几个相关的文件都复制到当前目录底下来,然后修改以上两个函数如下:
def download_images():
    filenames = ['image1.jpg', 'image2.jpg'] # Here, you can add more image file to this list.
    image_paths = []
    for filename in filenames:
        image_paths.append(filename)
    return image_paths

def download_labels(filename):
    label_dir = pathlib.Path(filename)
    return str(label_dir)
然后运行,得到以下错误报告:
......
WARNING:absl:Importing a function (__inference_batchnorm_layer_call_and_return_conditional_losses_210580) with ops with unsaved custom gradients. Will likely fail if a gradient is requested.
WARNING:absl:Importing a function (__inference_batchnorm_layer_call_and_return_conditional_losses_202900) with ops with unsaved custom gradients. Will likely fail if a gradient is requested.
WARNING:absl:Importing a function (__inference_batchnorm_layer_call_and_return_conditional_losses_203260) with ops with unsaved custom gradients. Will likely fail if a gradient is requested.
Loading model...Done! Took 36.90919899940491 seconds
Traceback (most recent call last):
File "plot_object_detection_saved_model.py", line 148, in
category_index = label_map_util.create_category_index_from_labelmap(PATH_TO_LABELS,
File "C:\Users\chenxy\AppData\Roaming\Python\Python38\site-packages\object_detection\utils\label_map_util.py", line 360, in create_category_index_from_labelmap
categories = create_categories_from_labelmap(label_map_path, use_display_name)
File "C:\Users\chenxy\AppData\Roaming\Python\Python38\site-packages\object_detection\utils\label_map_util.py", line 340, in create_categories_from_labelmap
label_map = load_labelmap(label_map_path)
File "C:\Users\chenxy\AppData\Roaming\Python\Python38\site-packages\object_detection\utils\label_map_util.py", line 168, in load_labelmap
label_map_string = fid.read()
File "C:\Users\chenxy\AppData\Roaming\Python\Python38\site-packages\tensorflow\python\lib\io\file_io.py", line 114, in read
self._preread_check()
File "C:\Users\chenxy\AppData\Roaming\Python\Python38\site-packages\tensorflow\python\lib\io\file_io.py", line 76, in _preread_check
self._read_buf = _pywrap_file_io.BufferedInputStream(
UnicodeDecodeError: 'utf-8' codec can't decode byte 0xd5 in position 72: invalid continuation byte
前面的一大堆Warning,从后面的实验结果来看,并没有什么影响,don't care temporarily。
关键是后面的UnicodeDecoderError。
2.2 UnicodeDecoderError
查阅了估计有十几篇网上的博客啊,解决方案大同小异,都是比如说给open函数传递的参数修改一下编码方式之类的。可是这对于我的问题不管用啊。因为这个代码中它是调用库函数label_map_util.create_category_index_from_labelmap()来读取文件的,总不能去修改库函数的源代码吧。。。
一筹莫展。。。直到看到Ref2中有人报告说他碰到这个错误,但是最后发现是因为打开一个不存在的文件时报告这个错误。WTF!定睛一看,果然我眼瞎啊,源代码中要打开的文件是:LABEL_FILENAME = 'mscoco_label_map.pbtxt'。我复制到当前目录下的文件是“mscoco_complete_label_map.pbtxt”。。。
但是,这个事情的一个教训是,Tensorflow的错误报告信息有时候是非常离谱的,这完全风马牛不相及嘛。如果报告文件找不到,本来很快就可以意识到这个错误的。
2.3 正确运行到底
替换了正确的文件后,这次“正确(?)”到底了。
Loading model...Done! Took 35.94811391830444 seconds
mscoco_label_map.pbtxt
2022-05-02 11:31:15.058610: E tensorflow/core/platform/windows/subprocess.cc:287] Call to CreateProc
ess failed. Error code: 2
2022-05-02 11:31:15.059401: E tensorflow/core/platform/windows/subprocess.cc:287] Call to CreateProc
ess failed. Error code: 2
2022-05-02 11:31:15.063019: E tensorflow/core/platform/windows/subprocess.cc:287] Call to CreateProc
ess failed. Error code: 2
Running inference for image1.jpg... Done
Running inference for image2.jpg... Done
但是,如上所示,仍然是有运行错误报告的“Call to CreateProc ess failed. Error code: 2”。不过暂时不用care了,回头再查。
3. Jupyter Notebook运行
以上python脚本运行最后虽然报告可对输入图像分析结束,可以没有给出任何信息,感觉很无趣。接下来改用Jupyter Notebook运行ipynb文件。以上的几处代码修改也同样施加于ipynb中的代码。
然后除了models安装包中的图片外,还追加了一些本地的图片看看效果如何。运行。。。
JupyterNotebook中的运行也依然报告以下Waning信息。
WARNING:absl:Importing a function (__inference_batchnorm_layer_call_and_return_conditional_losses_203260) with ops with unsaved custom gradients. Will likely fail if a gradient is requested.
但是没有““Call to CreateProc ess failed. Error code: 2””的错误报告,这是为什么?
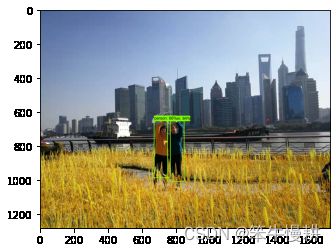
对于几张测试图片的实验结果如下所示:
感觉还是挺炫的。。。
接下来可以进一步玩耍探索更有趣的feature了。
Ref1:TensorFlow 2 Object Detection API tutorial
Ref2:_pywrap_file_io.BufferedInputStream raises UnicodeDecodeError


