python matplotlib 画图(柱状图)总结
之前的文章总结
1、Python 画图,点线图
点线图
2、Python 画图,柱状图
柱状图
最近在总结前期的一些工作,对这些绘图工具再系统总结
matplotlib 汇总(柱状图)
step1、普通柱状图绘制
- 导入matplotlib.pyplot模块
- 准备数据,可以使用numpy/pandas整理数据
- 调用pyplot.bar()绘制柱状图
import numpy as np
import matplotlib.pyplot as plt
import random

# 准备数据
x_data = [f"20{i}年" for i in range(16, 21)]
y_data = [random.randint(100, 300) for i in range(6)]

# 正确显示中文和负号
plt.rcParams["font.sans-serif"] = ["SimHei"]
plt.rcParams["axes.unicode_minus"] = False

# 画图,plt.bar()可以画柱状图
for i in range(len(x_data)):
    plt.bar(x_data[i], y_data[i])
# 设置图片名称
plt.title("销量分析")
# 设置x轴标签名
plt.xlabel("年份")
# 设置y轴标签名
plt.ylabel("销量")
# 显示
plt.show()
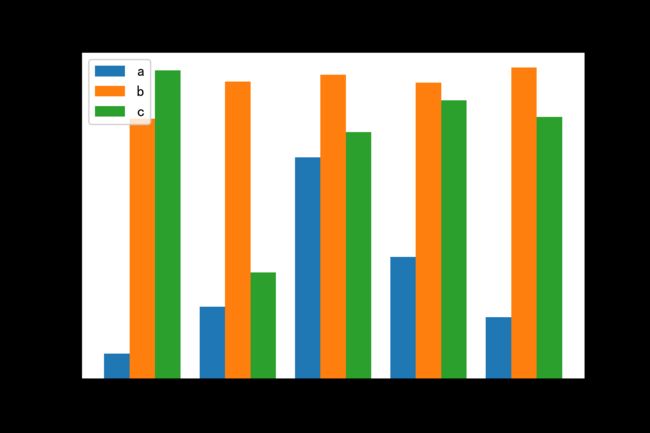
import matplotlib.pyplot as plt
import numpy as np

size = 5
# 返回size个0-1的随机数
a = np.random.random(size)
b = np.random.random(size)
c = np.random.random(size)
# x轴坐标, size=5, 返回[0, 1, 2, 3, 4]
x = np.arange(size)

# 有a/b/c三种类型的数据,n设置为3
total_width, n = 0.8, 3
# 每种类型的柱状图宽度
width = total_width / n

# 重新设置x轴的坐标
x = x - (total_width - width) / 2

# 画柱状图
plt.bar(x, a, width=width, label="a")
plt.bar(x + width, b, width=width, label="b")
plt.bar(x + 2*width, c, width=width, label="c")
# 显示图例
plt.legend()
# 显示柱状图
plt.show()
函数说明:
- plt.bar() 用于画柱状图,还可以使用plt.plot()绘制折线图
- plt.xlabel() plt.ylabel() 用于标注x轴、y轴
- plt.title() 用于给图片添加标题
- plt.legend() 用于给柱状图添加图例(注释)
- plt.show() 用于最终展示图片
step3、柱状图优化(轴标签、添加数字显示)
- 功能1:使用plt.xticks()代码可以把0, 1, …替换成第1组, 第2组…
- 功能2:显示具体的数字在柱状图中,可以在plt.legend()前添加plt.text()代码
- 功能3:保存图片
import matplotlib.pyplot as plt
import numpy as np

size = 5
# 返回size个0-1的随机数
a = np.random.random(size)
b = np.random.random(size)
c = np.random.random(size)
# x轴坐标, size=5, 返回[0, 1, 2, 3, 4]
x = np.arange(size)

# 有a/b/c三种类型的数据,n设置为3
total_width, n = 0.8, 3
# 每种类型的柱状图宽度
width = total_width / n

# 重新设置x轴的坐标
x = x - (total_width - width) / 2

# 画柱状图
plt.bar(x, a, width=width, label="a")
plt.bar(x + width, b, width=width, label="b")
plt.bar(x + 2*width, c, width=width, label="c")
# 显示图例
plt.legend()

# 功能1
x_labels = ["第1组", "第2组", "第3组", "第4组", "第5组"]
# 用第1组...替换横坐标x的值
plt.xticks(x, x_labels)

# 功能2
for i, j in zip(x, a):
    plt.text(i, j + 0.01, "%.2f" % j, ha="center", va="bottom", fontsize=7)
for i, j in zip(x + width, b):
    plt.text(i, j + 0.01, "%.2f" % j, ha="center", va="bottom", fontsize=7)
for i, j in zip(x + 2 * width, c):
    plt.text(i, j + 0.01, "%.2f" % j, ha="center", va="bottom", fontsize=7)

# 显示柱状图
plt.savefig(fname="./step_3.png", dpi=300)
plt.show()
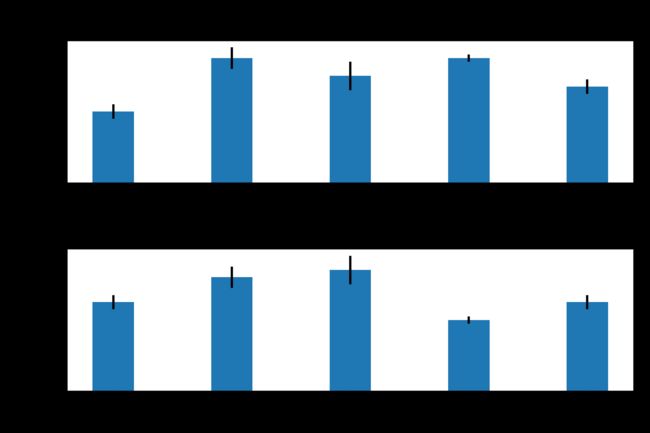
step4、带error bar(上下2组bar)
- 该图与plot画图不一样,调图(调节图对象 ax )也是用set_xtick,set_xticklabels
- tight_layout()表示当轴标签重叠时进行调节;详细可见 tight_layout 参考
- 此图添加误差的bar(error bar)
import numpy as np
import matplotlib.pyplot as plt

N = 5
men_means, men_std = (20, 35, 30, 35, 27), (2, 3, 4, 1, 2)
women_means, women_std = (25, 32, 34, 20, 25), (3, 5, 2, 3, 3)

ind = np.arange(N)    # the x locations for the groups
width = 0.35       # the width of the bars: can also be len(x) sequence

fig, axs = plt.subplots(2, 1)
axs[0].bar(ind, men_means, width, yerr=men_std)
axs[0].set_ylabel('Scores')
axs[0].set_title('Scores by group and gender (men)')
axs[0].set_xticks(ind)
axs[0].set_xticklabels(('G1', 'G2', 'G3', 'G4', 'G5'))
axs[0].set_yticks(np.arange(0, 41, 10))

axs[1].bar(ind, women_means, width, yerr=men_std)
axs[1].set_ylabel('Scores')
axs[1].set_title('Scores by group and gender (women)')
axs[1].set_xticks(ind)
axs[1].set_xticklabels(('G1', 'G2', 'G3', 'G4', 'G5'))
axs[1].set_yticks(np.arange(0, 41, 10))

plt.tight_layout()
plt.savefig(fname="./twobar_errorbar.png", dpi=300)
plt.show()
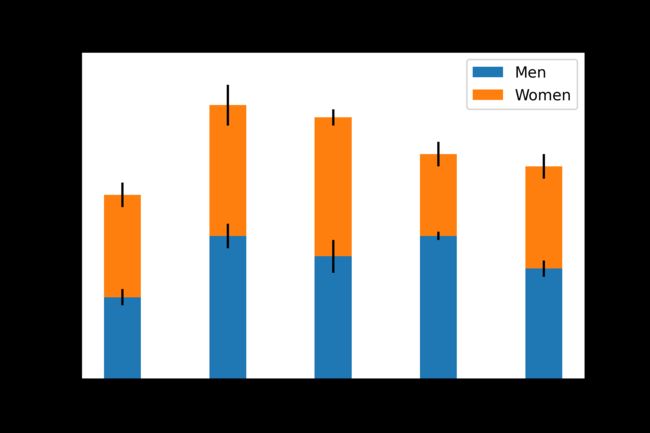
- 2组数据bar堆叠
import numpy as np
import matplotlib.pyplot as plt

N = 5
menMeans = (20, 35, 30, 35, 27)
womenMeans = (25, 32, 34, 20, 25)
menStd = (2, 3, 4, 1, 2)
womenStd = (3, 5, 2, 3, 3)
ind = np.arange(N)    # the x locations for the groups
width = 0.35       # the width of the bars: can also be len(x) sequence

p1 = plt.bar(ind, menMeans, width, yerr=menStd)
p2 = plt.bar(ind, womenMeans, width,
             bottom=menMeans, yerr=womenStd)  # 此处加了bottom

plt.ylabel('Scores')
plt.title('Scores by group and gender')
plt.xticks(ind, ('G1', 'G2', 'G3', 'G4', 'G5'))
plt.yticks(np.arange(0, 81, 10))
plt.legend((p1[0], p2[0]), ('Men', 'Women'))

plt.savefig(fname="./bar_add.png", dpi=300)
plt.show()
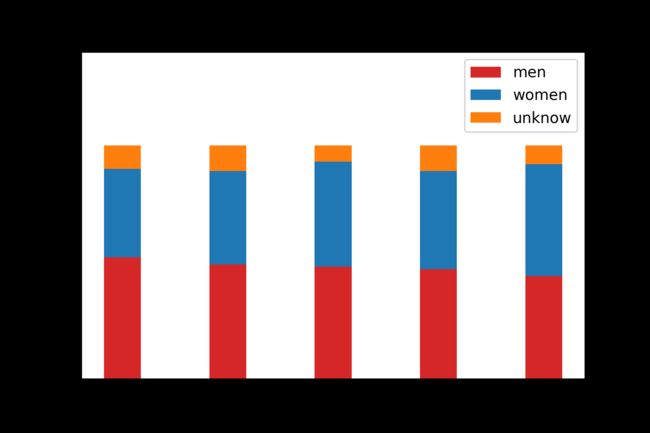
- 3组bar叠加
import numpy as np
import matplotlib.pyplot as plt
N = 5
S = (52, 49, 48, 47, 44)
C = (38, 40, 45, 42, 48)
d=[]
for i in range(0,len(S)):
    sum = S[i] + C[i]
    d.append(sum)
M = (10, 11, 7, 11, 8)

ind = np.arange(N)    # the x locations for the groups
width = 0.35       # the width of the bars: can also be len(x) sequence
p1 = plt.bar(ind, S, width, color='#d62728')#, yerr=menStd)
p2 = plt.bar(ind, C, width, bottom=S)#, yerr=womenStd)
p3 = plt.bar(ind, M, width, bottom=d)
plt.ylabel('Scores')
plt.title('Scores by group and gender')
plt.xticks(ind, ('G1', 'G2', 'G3', 'G4', 'G5'))
plt.yticks(np.arange(0, 141, 20))
plt.legend((p1[0], p2[0], p3[0]), ('men', 'women', 'unknow'))

plt.savefig(fname="./bar_add_v2.png", dpi=300)
plt.show()
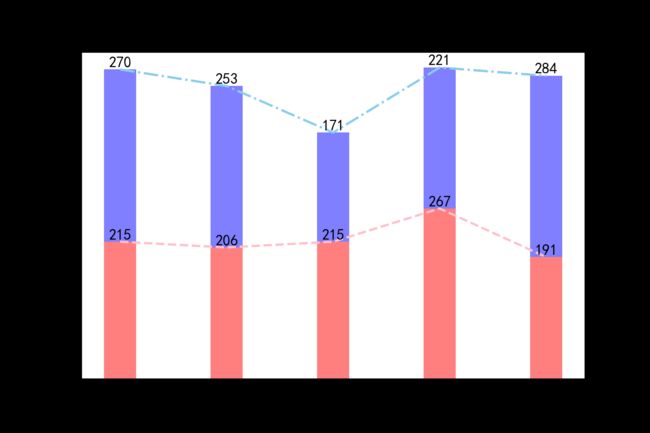
import random
import matplotlib.pyplot as plt
plt.rcParams["font.sans-serif"]=['SimHei']
plt.rcParams["axes.unicode_minus"]=False

x_data = ["20{}年".format(i) for i in range(16,21)]
y_data = list(random.randint(100,300) for i in range(5))
y2_data = list(random.randint(100,300) for i in range(5))

y3_data = [i + j for i, j in zip(y_data, y2_data)]

plt.plot(x_data,y_data,color="pink",linestyle="--")

plt.plot(x_data, y3_data, color="skyblue", linestyle="-.")

# 柱状图
plt.bar(x_data,y_data,lw=0.5,fc="r",width=0.3,label="Phone",alpha=0.5)
plt.bar(x_data,y2_data, lw=0.5, fc="b", width=0.3, label="Android",alpha=0.5,bottom=y_data)

for i,j in zip(x_data,y_data):
   plt.text(i,j+0.05,"%d"%j,ha="center",va="bottom")

for i2,j1,j2 in zip(x_data,y_data,y2_data):
   plt.text(i2,j1+j2+0.5,"%d"%j2,ha="center",va="bottom")

plt.savefig(fname="./bar_add_line.png", dpi=300)
plt.show()
import random
import matplotlib.pyplot as plt
import numpy as np
plt.rcParams["font.sans-serif"]=['SimHei']
plt.rcParams["axes.unicode_minus"]=False

x_data = ["20{}年".format(i) for i in range(16,21)]
y_data = list(random.randint(100,300) for i in range(5))
y2_data = list(random.randint(100,300) for i in range(5))

x_width = range(0,len(x_data))
x2_width = [i+0.3 for i in x_width]

plt.barh(x_width,y_data,lw=0.5,fc="r",height=0.3,label="Phone")
plt.barh(x2_width,y2_data,lw=0.5,fc="b",height=0.3,label="Android")
plt.yticks(np.arange(0,5) + 0.15, x_data)  # 注意y轴标签居中
plt.xlim(0, 421)

plt.legend()

plt.title("销量分析")
plt.ylabel("年份")
plt.xlabel("销量")

plt.savefig(fname="./barh.png", dpi=300)
plt.show()
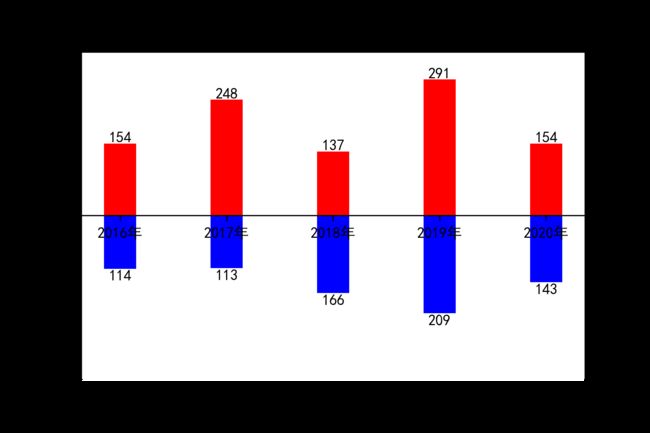
- pyplot.gca()方法创建axes对象
- 然后使用matplotlib.spines模块,然后调用set_position设置坐标轴位置
- spines[]选项有"left"|“bottom”|“width”|“height”;对应着上下左右
- set_position 值格式为(位置类型,数量);位置类型;“outward”|“axes”|“data”|;数量:中心->(“轴”,0.5),零->(“数据”,0.0);如在下面是调节data,x轴在0处显示
import random
import matplotlib.pyplot as plt
import numpy as np
plt.rcParams["font.sans-serif"]=['SimHei']
plt.rcParams["axes.unicode_minus"]=False

x_data = ["20{}年".format(i) for i in range(16,21)]
y_data = np.random.randint(100, 300,5)
y2_data = np.random.randint(100, 300,5)
ax = plt.gca()
ax.spines["bottom"].set_position(('data', 0))  # 调节x轴的位置
plt.bar(x_data,+y_data,lw=0.5,fc="r",width=0.3,label="Phone")
plt.bar(x_data,-y2_data, lw=0.5, fc="b", width=0.3, label="Android")
for i,j in zip(x_data,y_data):
    plt.text(i,j+25,"%d"%j,ha="center",va="top")
for i2,j2 in zip(x_data,y2_data):
    plt.text(i2,-j2-30,"%d"%j2,ha="center",va="bottom")

plt.ylim(-350,350)
plt.savefig(fname="./bar_up_down.png", dpi=300)
plt.show()
step9、绘制破损的柱状图
- bar的数据中间有数据缺失
import matplotlib.pyplot as plt

fig, ax = plt.subplots()
ax.broken_barh([(110, 30), (150, 10)], (10, 9), facecolors='blue')
ax.broken_barh([(10, 50), (100, 20), (130, 10)], (20, 9),
               facecolors=('red', 'yellow', 'green'))
ax.set_ylim(5, 35)
ax.set_xlim(0, 200)
ax.set_xlabel('seconds since start')
ax.set_yticks([15, 25])
ax.set_yticklabels(['Bill', 'Jim'])
ax.grid(True)

plt.savefig(fname="./bar_broken.png", dpi=300)
plt.show()
import numpy as np
import matplotlib.pyplot as plt
def get_data():
    size = 5
    border = 80
    x = np.linspace(start=1, stop=size, endpoint=True, num=size, dtype=np.dtype(int) )

    y1 = np.random.randint(low=border, high=100, size=size)
    y2 = np.random.randint(low=50, high=border, size=size)
    ret = (x, y1, y2)
    return ret
def main():
    plt.rcParams['font.sans-serif'] = ['SimHei']  # 中文乱码
    plt.rcParams['axes.unicode_minus'] = False  # 正负号
    data = get_data()

    plt.figure(figsize=(15, 10))
    plt.bar(x=data[0], height=data[1], alpha=0.5, width=0.6, color='green', edgecolor='red', label='直方图1', lw=3)
    plt.bar(x=data[0], height=data[2], alpha=0.8, width=0.4, color='blue', edgecolor='yellow', label='直方图2', lw=3)

    # 图例位置
    plt.legend(loc='upper right')
    plt.xlabel('x坐标轴', fontsize=25)
    plt.ylabel('y坐标轴', fontsize=20)
    plt.title('直方图(柱状图)', fontsize=30)
    # 若设置将覆盖默认的坐标轴刻度值。
    # 默认的刻度值即是x=data[0]
    plt.xticks(ticks=np.arange(start=1, stop=6, step=1), labels=list('zhang'), rotation=45, size=30, color='red')
    # 若设置将覆盖默认的坐标轴刻度值。
    # 默认的刻度值即是y=data[1],y=data[2]
    # 默认的刻度值由系统自动生成。
    plt.ylim(0, 120)
    plt.yticks(ticks=np.linspace(start=10, stop=110, endpoint=True, num=10, dtype=np.dtype(int)), rotation=90)

    # 画网格
    plt.grid(axis='x', linestyle='--', linewidth=3, color='red')  # 显示竖直的网格线
    plt.grid(axis='y', linestyle='-.', linewidth=3, color='gray')  # 显示水平的网格线

    plt.savefig(fname="./bar_in_out.png", dpi=300)
    plt.show()

if __name__ == '__main__':
    main()
参考链接:
step 1-3参考
step 5参考
step 6-8参考
step 9参考
step 10参考

