含并行连结的网络 GoogLeNet
在GoogleNet出现值前,流行的网络结构使用的卷积核从1×1到11×11,卷积核的选择并没有太多的原因。GoogLeNet的提出,说明有时候使用多个不同大小的卷积核组合是有利的。
import torch
from torch import nn
from torch.nn import functional as F
1. Inception块
Inception块是 GoogLeNet 的基本组成单元。Inception 块由四条并行的路径组成,每个路径使用不同大小的卷积核:
路径1:使用 1×1 卷积层;
路径2:先对输出执行 1×1 卷积层,来减少通道数,降低模型复杂性,然后接 3×3 卷积层;
路径3:先对输出执行 1×1 卷积层,然后接 5×5 卷积层;
路径4:使用 3×3 最大汇聚层,然后使用 1×1 卷积层;
在各自路径中使用合适的 padding ,使得各个路径的输出拥有相同的高和宽,然后将每条路径的输出在通道维度上做连结,作为 Inception 块的最终输出.
class Inception(nn.Module):
    def __init__(self, in_channels, out_channels):
        super(Inception, self).__init__()
        # 路径1
        c1, c2, c3, c4 = out_channels
        self.route1_1 = nn.Conv2d(in_channels, c1, kernel_size=1)
        # 路径2
        self.route2_1 = nn.Conv2d(in_channels, c2[0], kernel_size=1)
        self.route2_2 = nn.Conv2d(c2[0], c2[1], kernel_size=3, padding=1)
        # 路径3
        self.route3_1 = nn.Conv2d(in_channels, c3[0], kernel_size=1)
        self.route3_2 = nn.Conv2d(c3[0], c3[1], kernel_size=5, padding=2)
        # 路径4
        self.route4_1 = nn.MaxPool2d(kernel_size=3, stride=1, padding=1)
        self.route4_2 = nn.Conv2d(in_channels, c4, kernel_size=1)
    def forward(self, x):
        x1 = F.relu(self.route1_1(x))
        x2 = F.relu(self.route2_2(F.relu(self.route2_1(x))))
        x3 = F.relu(self.route3_2(F.relu(self.route3_1(x))))
        x4 = F.relu(self.route4_2(self.route4_1(x)))
        return torch.cat((x1, x2, x3, x4), dim=1)
2. 构造 GoogLeNet 网络
顺序定义 GoogLeNet 的模块。
第一个模块,顺序使用三个卷积层。
# 模型的第一个模块
b1 = nn.Sequential(
    nn.Conv2d(1, 64, kernel_size=7, stride=2, padding=3,),
    nn.ReLU(),
    nn.MaxPool2d(kernel_size=3, stride=2, padding=1),
    nn.Conv2d(64, 64, kernel_size=1),
    nn.ReLU(),
    nn.Conv2d(64, 192, kernel_size=3, padding=1),
    nn.ReLU(),
    nn.MaxPool2d(kernel_size=3, stride=2, padding=1)
                   )
第二个模块,使用两个Inception模块。
# Inception组成的第二个模块
b2 = nn.Sequential(
    Inception(192, (64, (96, 128), (16, 32), 32)),
    Inception(256, (128, (128, 192), (32, 96), 64)),
    nn.MaxPool2d(kernel_size=3, stride=2, padding=1)
                    )
第三个模块,串联五个Inception模块。
# Inception组成的第三个模块
b3 = nn.Sequential(
    Inception(480, (192, (96, 208), (16, 48), 64)),
    Inception(512, (160, (112, 224), (24, 64), 64)),
    Inception(512, (128, (128, 256), (24, 64), 64)),
    Inception(512, (112, (144, 288), (32, 64), 64)),
    Inception(528, (256, (160, 320), (32, 128), 128)),
    nn.MaxPool2d(kernel_size=3, stride=2, padding=1)
                    )
第四个模块,传来两个Inception模块。
GoogLeNet使用 avg pooling layer 代替了 fully-connected layer。一方面降低了维度,另一方面也可以视为对低层特征的组合。
# Inception组成的第四个模块
b4 = nn.Sequential(
    Inception(832, (256, (160, 320), (32, 128), 128)),
    Inception(832, (384, (192, 384), (48, 128), 128)),
    nn.AdaptiveAvgPool2d((1, 1)),
    nn.Flatten()
                    )
net = nn.Sequential(b1, b2, b3, b4, nn.Linear(1024, 10))
x = torch.randn(1, 1, 96, 96)
for layer in net:
    x = layer(x)
    print(layer.__class__.__name__, "output shape: ", x.shape)
输出:
Sequential output shape: torch.Size([1, 192, 28, 28])
Sequential output shape: torch.Size([1, 480, 14, 14])
Sequential output shape: torch.Size([1, 832, 7, 7])
Sequential output shape: torch.Size([1, 1024])
Linear output shape: torch.Size([1, 10])
3. FashionMNIST训练测试
def load_datasets_Cifar10(batch_size, resize=None):
    trans = [transforms.ToTensor()]
    if resize:
        transform = trans.insert(0, transforms.Resize(resize))
    trans = transforms.Compose(trans)
    train_data = torchvision.datasets.CIFAR10(root="../data", train=True, transform=trans, download=True)
    test_data = torchvision.datasets.CIFAR10(root="../data", train=False, transform=trans, download=True)
    print("Cifar10 下载完成...")
    return (torch.utils.data.DataLoader(train_data, batch_size, shuffle=True),
            torch.utils.data.DataLoader(test_data, batch_size, shuffle=False))
def load_datasets_FashionMNIST(batch_size, resize=None):
    trans = [transforms.ToTensor()]
    if resize:
        transform = trans.insert(0, transforms.Resize(resize))
    trans = transforms.Compose(trans)
    train_data = torchvision.datasets.FashionMNIST(root="../data", train=True, transform=trans, download=True)
    test_data = torchvision.datasets.FashionMNIST(root="../data", train=False, transform=trans, download=True)
    print("FashionMNIST 下载完成...")
    return (torch.utils.data.DataLoader(train_data, batch_size, shuffle=True),
            torch.utils.data.DataLoader(test_data, batch_size, shuffle=False))
def load_datasets(dataset, batch_size, resize):
    if dataset == "Cifar10":
        return load_datasets_Cifar10(batch_size, resize=resize)
    else:
        return load_datasets_FashionMNIST(batch_size, resize=resize)
train_iter, test_iter = load_datasets("", 128, 96) # Cifar10
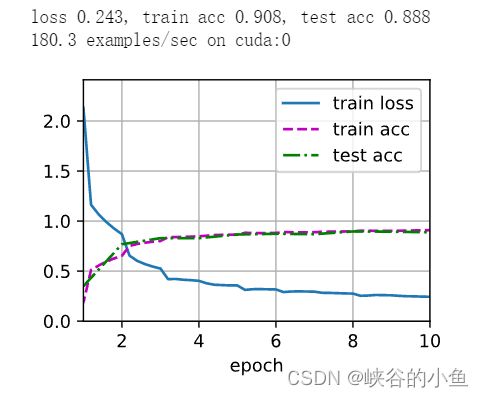
训练结果:
到此这篇关于PyTorch详解经典网络种含并行连结的网络GoogLeNet实现流程的文章就介绍到这了,更多相关PyTorch GoogLeNet内容请搜索脚本之家以前的文章或继续浏览下面的相关文章希望大家以后多多支持脚本之家!
