从零开始创建Vue项目(附带模板Demo)
文章目录
- 前言
- 一、node.js安装
-
- 1. 下载
- 2. 安装
- 3.配置npm镜像cnpm
- 4.安装vue脚手架vue-cli
- 二、创建项目
- 三、项目构建
-
- 1. 后端请求模块构建
- 2. 路由及项目结构
前言
新手向教程,包含vue项目模板的使用
一、node.js安装
1. 下载
node.js官网下载地址:https://nodejs.org/zh-cn/download/

2. 安装
可以自选安装路径,其他全部默认安装即可,选择安装器的好处是不需要手动配置环境变量,安装程序安装时自动配置
3.配置npm镜像cnpm
配置国内镜像可以加速下载,并降低因网络问题导致包安装失败的可能(推荐方法)
npm install -g cnpm --registry=https://registry.npm.taobao.org
注意:如果嫌麻烦不想分开npm和cnpm,可以直接配置npm的镜像地址(不太推荐),直接加速npm,方法如下:
npm config set registry https://registry.npm.taobao.org
4.安装vue脚手架vue-cli
cnpm install -g vue-cli
二、创建项目
vue init webpack <项目名(项目名不能有大写字母)>
选项如下,只安装vue-router

因为最后一步选择了自动执行了npm install,所以无需再次执行
直接cd进入目录即可npm run dev启动项目
三、项目构建
此部分的项目构建方式按照我的想法设计,小白可以直接用我的模板,可以直接上手使用,免去很多重复配置,Demo完整项目见 https://github.com/Aiden-L/Vue2Demo
1. 后端请求模块构建
cnpm install axios
在项目中src下新建common目录,用于存放全局的函数和样式

创建config.js和request.js
例如,我的封装方式:
(Demo完整项目见 https://github.com/Aiden-L/Vue2Demo)
// config.js
// 将服务器地址配置在config中会使上线部署或更改服务器非常方便
export default {
	webUrl: 'http://127.0.0.1:8000',
	staticUrl: 'http://127.0.0.1:8000/static/image/'
}
// request.js
import config from "./config.js";

export default{
	config:{
		baseUrl: config.webUrl,
		data: {},
		method: "get"
	},
	request(options = {}){
		// console.log(this.config.baseUrl + ' is working!');
    const axios = require('axios');

    options.header = options.header || {
    	'Content-Type':'application/json',
    	'Authorization': 'none'
    };
		options.method = options.method || this.config.method;
		options.url = this.config.baseUrl+options.url;
		return axios(options);
	},
	get(url,data,options={}){
		options.url = url;
		options.params = data;
		options.method = 'get';
		return this.request(options);
	},
	post(url,data,options={}){
		options.url = url;
		options.data = data;
		options.method = 'post';
		return this.request(options);
	}
}
在main.js中引入配置
// import myrequest
import myRequest from './common/request.js'
Vue.prototype.$request = myRequest
// import myconfig
import config from './common/config.js'
Vue.prototype.$config = config
请求后端Demo:
methods: {
  async sendPostRequest(){
    // POST请求
    let ret = await this.$request.post('/user/login/',{
      'username': 'Aiden',
      'password': '123'
    })
    console.log(ret.data)
  },
  async sendGetRequest(){
    // GET请求
    let ret = await this.$request.get('/user/getinfo/',{
      'username': 'Aiden'
    })
    console.log(ret.data)
  }
}
2. 路由及项目结构
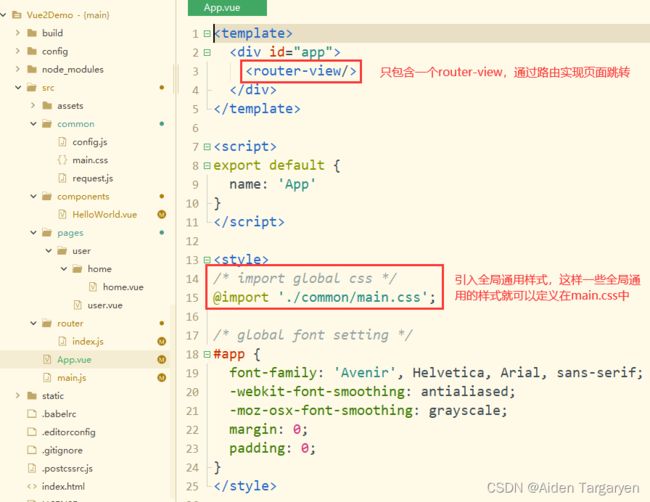
由于我们在项目创建时,选择了安装vue-router,路由已经自动配好了,这里讲一下Demo里的项目结构和逻辑


博客中的项目已上传Github https://github.com/Aiden-L/Vue2Demo,持续更新,可以直接下载使用,喜欢的话记得Star哦!