本文实例为大家分享了C++基于easyx实现迷宫游戏的具体代码,供大家参考,具体内容如下
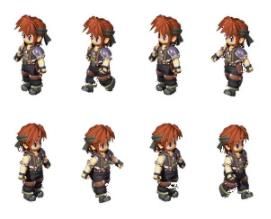
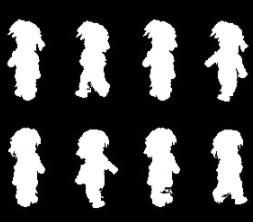
/*走迷宫*/ #define _CRT_SECURE_NO_DEPRECATEd #define _CRT_SECURE_NO_WARNINGS #include#include #include #include #define LEFT 0//方向 #define RIGHT 1 #define UP 0//由于当前素材只有左右二个方向,所以上下共用了左右方向 #define DOWN 1 #define ROAD 0//地图元素类型 #define WALL 1 #define ENTERX 1//入口 x列,y行 #define ENTERY 0 #define OUTX 11 //出口 x列,y行 #define OUTY 8 #define HUMANWIDTH 75 #define HUMANHEIGHT 130 #define WIDTH 12//地图大小 #define HEIGHT 10 IMAGE img_human; IMAGE img_human_mask; IMAGE img_wall; IMAGE img_road; int moveNum[2] = { 0 };//当前动作序号 int direction;//上下左右四个方向 int human_witdh; int human_height; int x, y;//x列数,y行数 int map[HEIGHT][WIDTH] = {//地图 { 1,1,1,1,1,1,1,1,1,1,1,1 }, { 0,0,0,1,1,1,1,1,1,1,1,1 }, { 1,1,0,1,1,1,1,0,1,1,1,1 }, { 1,1,0,0,1,1,1,0,1,1,1,1 }, { 1,1,1,0,1,1,1,0,1,1,1,1 }, { 1,1,1,0,1,1,1,0,1,1,1,1 }, { 1,1,1,0,1,1,1,0,1,1,1,1 }, { 1,1,1,0,0,0,0,0,0,0,1,1 }, { 1,1,1,1,1,1,1,1,1,0,0,0 }, { 1,1,1,1,1,1,1,1,1,1,1,1 }, }; void showbk() {//绘制背景 for (int j = 0; j < WIDTH; j++) for (int i = 0; i < HEIGHT; i++) if (map[i][j] == WALL) putimage(j * img_wall.getwidth(), i * img_wall.getheight(), img_wall.getwidth(), img_wall.getheight(), &img_wall, 0, 0, SRCCOPY); else putimage(j * img_wall.getwidth(), i * img_wall.getheight(), img_wall.getwidth(), img_wall.getheight(), &img_road, 0, 0, SRCCOPY); } void start()//初始化 { loadimage(&img_wall, _T(".\\walls.gif")); initgraph(img_wall.getwidth() * WIDTH, img_wall.getheight() * HEIGHT); loadimage(&img_human, _T(".\\行走素材图.jpg")); loadimage(&img_human_mask,_T( ".\\行走素材图mask.jpg")); human_witdh = 75;//img_human.getwidth()/4; human_height = 130;//img_human.getheight()/2; //putimage(x,y,HUMANWIDTH,HUMANHEIGHT,&img_human,0,0); loadimage(&img_road, _T(".\\road.gif")); x = 0; y = 1; } void updateWithoutInput() { } void drawRole(int x0, int y0)//绘制前景 { putimage((x - x0 / 4.0) * img_wall.getwidth() - 7, (y - y0 / 4.0) * img_wall.getheight() - 70, human_witdh, human_height, &img_human_mask, moveNum[direction] * human_witdh, direction * (human_height - 10), NOTSRCERASE); putimage((x - x0 / 4.0) * img_wall.getwidth() - 7, (y - y0 / 4.0) * img_wall.getheight() - 70, human_witdh, human_height, &img_human, moveNum[direction] * human_witdh, direction * (human_height - 10), SRCINVERT); } void show(int x0, int y0) { showbk(); //clearrectangle(x,y,x+human_witdh,y+human_height); //先显示背景 //准备好遮罩MASK图和源图,三元光栅操作 drawRole(x0, y0); FlushBatchDraw(); Sleep(50); } void readRecordFile() {//读取存档 FILE* fp; int temp; fp = fopen(".\\record.dat", "r"); fscanf(fp, "%d %d", &x, &y); fclose(fp); } void WriteRecordFile() {//保存存档 FILE* fp; int temp; fp = fopen(".\\record.dat", "w"); fprintf(fp, "%d %d ", x, y); fclose(fp); } void updateWithInput() {//增加过度 char input; int olddirection = direction; int oldx = x; int oldy = y; /******异步输入检测方向键状态 if(GetAsyncKeyState(VK_LEFT)&0x8000) 向左 if(GetAsyncKeyState(VK_RIGHT)&0x8000) 向右 if(GetAsyncKeyState(VK_UP)&0x8000) 向上 if(GetAsyncKeyState(VK_DOWN)&0x8000) 向下 ********/ if (_kbhit()) { input = _getch(); switch (input) { case 'a':direction = LEFT; if (map[y][x - 1] == ROAD) x--; moveNum[direction] = 0; break; case 'd':direction = RIGHT; if (map[y][x + 1] == ROAD) x++; moveNum[direction] = 0; break; case 'w':direction = UP; if (map[y - 1][x] == ROAD) y--; moveNum[direction] = 0; break; case 's':direction = DOWN; if (map[y + 1][x] == ROAD) y++; moveNum[direction] = 0; break; case 'W':WriteRecordFile(); break; case 'R':readRecordFile(); break; } if (x != oldx || y != oldy) for (int i = 4; i > 0; i--) {//过渡动画 show((x - oldx) * i, (y - oldy) * i); moveNum[direction]++;//动作序号,一个完整动作分解为四个姿势 moveNum[direction] %= 4; } } } int main() { start(); BeginBatchDraw(); while (1) { show(0, 0); Sleep(50); if (x == OUTX && y == OUTY)//到达了出口 { outtextxy(0, 0, _T("reach target!")); Sleep(50); break; } updateWithoutInput(); updateWithInput(); } EndBatchDraw(); _getch(); closegraph(); return 0; }
以上就是本文的全部内容,希望对大家的学习有所帮助,也希望大家多多支持脚本之家。


