- pytorch基础 nn.embedding
yuweififi
pytorch人工智能nlp
nn.Embedding是PyTorch中的一个模块,用于创建嵌入层(embeddinglayer),它将离散的索引(例如词汇表中的单词索引)映射为固定大小的稠密向量。这是许多NLP模型(包括Transformer)中的基本组件。示例用法:importtorchimporttorch.nnasnn#定义一个嵌入层vocab_size=10000#词汇表大小embedding_dim=512#嵌入向
- pytorch基础-layernormal 与 batchnormal
yuweififi
pytorch人工智能python
nn.LayerNorm(层归一化)和nn.BatchNorm(批量归一化)是深度学习中常用的两种归一化方法,都有助于提高模型的训练效率和稳定性,但它们在归一化维度、应用场景、计算方式等方面存在明显区别,以下为你详细介绍:1、归一化维度nn.LayerNorm:对单个样本的特征维度进行归一化。无论输入数据的形状如何,它会计算每个样本在特征维度上的均值和方差,然后进行归一化。例如,对于一个形状为(b
- 通过TensorFlow实现简单深度学习模型(2)
yyc_audio
人工智能深度学习python机器学习
前文我们已经实现了对每批数据的训练,下面继续实现一轮完整的训练。完整的训练循环一轮训练就是对训练数据的每个批量都重复上述训练步骤,而完整的训练循环就是重复多轮训练。deffit(model,images,labels,epochs,batch_size=128):forepoch_counterinrange(epochs):print(f"Epoch{epoch_counter}")batch_
- Pytorch使用手册—使用TACOTRON2进行文本到语音转换(专题二十四)
AI专题精讲
Pytorch入门到精通pytorch人工智能python
一、概述本教程展示了如何使用torchaudio中的预训练Tacotron2构建文本到语音的管道。文本到语音的管道流程如下:文本预处理首先,输入的文本被编码为一系列符号。在本教程中,我们将使用英语字符和音标作为符号。谱图生成从编码后的文本中生成谱图。我们使用Tacotron2模型来完成这一步。3.时域转换最后一步是将谱图转换为波形。从谱图生成语音的过程也称为Vocder(声码器)。在本教程中,我们
- Pytorch使用手册--将 PyTorch 模型导出为 ONNX(专题二十六)
AI专题精讲
Pytorch入门到精通pytorch人工智能python
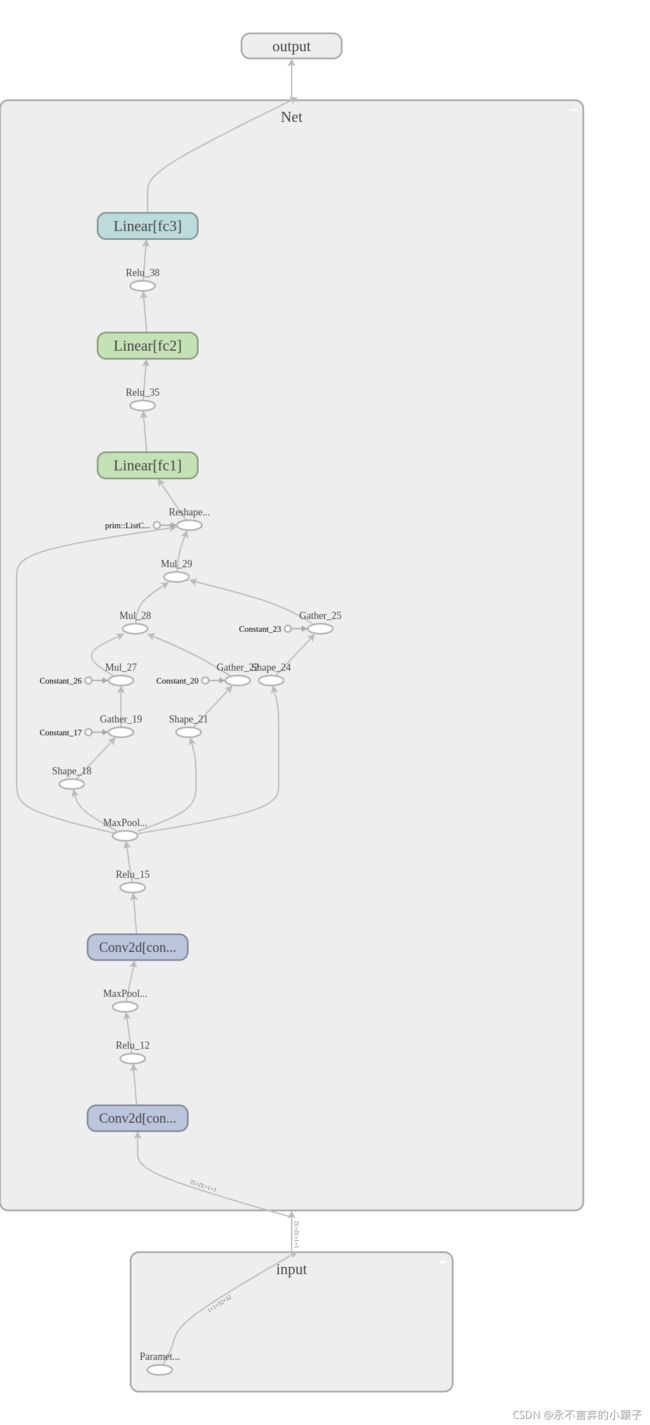
注意截至PyTorch2.1,ONNX导出器有两个版本。torch.onnx.dynamo_export是最新的(仍处于测试阶段)导出器,基于PyTorch2.0发布的TorchDynamo技术。torch.onnx.export基于TorchScript后端,自PyTorch1.2.0起可用。一、torch.onnx.dynamo_export使用在60分钟入门中,我们有机会从高层次上了解PyT
- Transformer 代码剖析2 - 模型训练 (pytorch实现)
lczdyx
Transformer代码剖析transformerpytorch深度学习人工智能python
一、模型初始化模块参考:项目代码1.1参数统计函数defcount_parameters(model):returnsum(p.numel()forpinmodel.parameters()ifp.requires_grad)遍历模型参数筛选可训练参数统计参数数量返回总数技术解析:numel()方法计算张量元素总数requires_grad筛选需要梯度更新的参数统计结果反映模型复杂度,典型Tran
- Stable diffusion 3.5本地运行环境配置记录
寸先生的牛马庄园
扩散模型stablediffusion
1.环境配置创建虚环境condacreate-nsd3.5python=3.10Pytorch(>2.0)condainstallpytorch==2.2.2torchvision==0.17.2torchaudio==2.2.2pytorch-cuda=12.1-cpytorch-cnvidiaJupyter能使用Anaconda虚环境condainstallipykernelpython-mi
- 阿里巴巴DIN模型原理与Python实现
eso1983
python开发语言算法推荐算法
阿里巴巴的DeepInterestNetwork(DIN)是一种用于点击率预测(CTR)的深度学习模型,特别针对电商场景中用户兴趣多样化和动态变化的特性设计。其核心思想是通过注意力机制动态捕捉用户历史行为中与当前候选商品相关的兴趣。1.DIN模型原理1.核心问题传统推荐模型(如Embedding+MLP)将用户历史行为视为固定长度的向量,忽略了用户兴趣的多样性。例如,用户历史行为中可能包含多个互不
- PyTorch使用常见异常和解决办法汇总
东哥说AI
机器学习与深度学习实战PyTorch异常解决办法
文章目录1.使用conda安装PyTorch后同时在Jupyter导入失败Nomodulenamed'torch'2.PyTorch使用张量时报错expectedscalartypeDoublebutfoundFloat3.PyTorch创建Embedding时报错IndexError:indexoutofrangeinself1.使用conda安装PyTorch后同时在Jupyter导入失败No
- pytorch基础-比较矩阵是否相等
yuweififi
pytorch人工智能
1、使用NumPy库NumPy是Python中用于科学计算的常用库,它提供了array_equal和allclose函数来判断矩阵是否相等。array_equal用于精确比较,allclose用于考虑一定误差范围的近似比较,适合浮点数矩阵。importnumpyasnp#创建示例矩阵matrix_a=np.array([[1,2,3],[4,5,6]])matrix_b=np.array([[1,
- 神经网络中的Adam
化作星辰
神经网络人工智能深度学习
Adam(AdaptiveMomentEstimation)是一种广泛使用的优化算法,结合了RMSprop和动量(Momentum)的优点。它通过计算梯度的一阶矩估计(mean)和二阶矩估计(uncenteredvariance),为每个参数提供自适应学习率。Adam由DiederikP.Kingma和JimmyBa在2014年的论文《Adam:AMethodforStochasticOptimi
- 神经网络中的Nesterov Momentum
化作星辰
神经网络人工智能深度学习
NesterovAcceleratedGradient(NAG),也称为NesterovMomentum,是一种改进版的动量优化算法,旨在加速梯度下降过程中的收敛速度,并提高对最优解的逼近效率。它由YuriiNesterov在1983年提出,是对传统动量方法的一种增强。###传统动量法回顾在传统的动量方法中,更新规则不仅考虑当前的梯度,还包含了之前所有梯度的方向和大小的累积(即“动量”),以帮助克
- 神经网络中的Adagrad
化作星辰
神经网络人工智能深度学习
Adagrad(AdaptiveGradient)是一种自适应学习率的优化算法,专门设计用于在训练过程中自动调整每个参数的学习率。这种方法对于处理稀疏数据特别有效,并且非常适合那些需要频繁更新但很少使用的参数的学习任务。###Adagrad的核心思想Adagrad通过累积过去所有梯度平方的和来调整每个权重的学习率。具体来说,它为网络中的每个参数维护一个历史梯度平方和,然后用这个累积值来缩放当前的学
- 月之暗面改进并开源了 Muon 优化算法,对行业有哪些影响?
互联网之路.
知识点开源算法
互联网各领域资料分享专区(不定期更新):Sheet正文月之暗面团队改进并开源的Muon优化算法在深度学习和大模型训练领域引发了广泛关注,其核心创新在于显著降低算力需求(相比AdamW减少48%的FLOPs)并提升训练效率,同时通过开源推动技术生态的共建。1.显著降低大模型训练成本,推动技术普惠算力需求锐减:Muon通过引入权重衰减和一致的RMS更新,解决了原始Muon在大规模训练中的稳定性问题,使
- Spring Boot 动态配置数据源全解析
♢.*
springboot后端java
亲爱的小伙伴们,在求知的漫漫旅途中,若你对深度学习的奥秘、Java与Python的奇妙世界,亦或是读研论文的撰写攻略有所探寻,那不妨给我一个小小的关注吧。我会精心筹备,在未来的日子里不定期地为大家呈上这些领域的知识宝藏与实用经验分享。每一个点赞,都如同春日里的一缕阳光,给予我满满的动力与温暖,让我们在学习成长的道路上相伴而行,共同进步✨。期待你的关注与点赞哟!引言在企业级应用开发中,单一数据源往往
- 深入解析:如何编写 Mapper 文件
♢.*
oracle数据库mybatis
亲爱的小伙伴们,在求知的漫漫旅途中,若你对深度学习的奥秘、Java与Python的奇妙世界,亦或是读研论文的撰写攻略有所探寻,那不妨给我一个小小的关注吧。我会精心筹备,在未来的日子里不定期地为大家呈上这些领域的知识宝藏与实用经验分享。每一个点赞,都如同春日里的一缕阳光,给予我满满的动力与温暖,让我们在学习成长的道路上相伴而行,共同进步✨。期待你的关注与点赞哟!在软件开发尤其是涉及数据库交互的项目中
- Spring Boot 中 @Transactional 注解全面解析
♢.*
springboot数据库sql
亲爱的小伙伴们,在求知的漫漫旅途中,若你对深度学习的奥秘、Java与Python的奇妙世界,亦或是读研论文的撰写攻略有所探寻,那不妨给我一个小小的关注吧。我会精心筹备,在未来的日子里不定期地为大家呈上这些领域的知识宝藏与实用经验分享。每一个点赞,都如同春日里的一缕阳光,给予我满满的动力与温暖,让我们在学习成长的道路上相伴而行,共同进步✨。期待你的关注与点赞哟!引言在企业级应用开发中,数据的一致性和
- 大模型专栏博文汇总和索引
Donvink
大模型transformer深度学习人工智能语言模型
大模型专栏主要是汇总了我在学习大模型相关技术期间所做的一些总结和笔记,主要包括以下几个子专栏:DeepSeek-R1AIGC大模型实践Transformer多模态系统视频理解对比学习目标检测目标跟踪图神经网络大模型专栏汇总了以上所有子专栏的论文,目前暂时先按照不同的技术领域划分子专栏,子专栏之间的内容可能会有交集,不完全是独立的。为了方便查阅相关模块的内容,故以此文章进行汇总与索引。一、DeepS
- 深度学习模型优化与医疗诊断应用突破
智能计算研究中心
其他
内容概要近年来,深度学习技术的迭代演进正在重塑医疗诊断领域的实践范式。随着PyTorch与TensorFlow等开源框架的持续优化,模型开发效率显著提升,为医疗场景下的复杂数据处理提供了技术基座。当前研究聚焦于迁移学习与模型压缩算法的协同创新,通过复用预训练模型的泛化能力与降低计算负载,有效解决了医疗数据样本稀缺与硬件资源受限的痛点问题。与此同时,自适应学习机制通过动态调整网络参数更新策略,在病理
- 跨框架模型演进与行业应用路径
智能计算研究中心
其他
内容概要在人工智能技术持续迭代的背景下,模型框架的演进与行业应用的深度融合已成为推动产业智能化升级的核心驱动力。本文系统性梳理TensorFlow、PyTorch、MXNet等主流框架的技术发展脉络,重点分析其从通用计算架构向多模态、轻量化方向的转型路径。同时,针对模型优化技术领域,深入探讨迁移学习、超参数调优及模型压缩等方法的创新突破,揭示其在降低计算资源消耗、提升推理效率方面的关键作用。在行业
- 金融风控与医疗影像算法创新前沿
智能计算研究中心
其他
内容概要在金融风控与医疗影像交叉领域,算法创新正推动两大行业的技术范式变革。联邦学习算法通过分布式数据协作机制,在保证隐私安全的前提下,显著提升金融风险预测模型的泛化能力。医疗影像诊断领域则依托三维卷积神经网络(3D-CNN)架构,实现了对CT、MRI等多模态影像的精准病灶分割,诊断准确率较传统方法提升23.6%。值得关注的是,可解释性算法(如LIME和SHAP)的深度应用,使两类场景中的模型决策
- 阿里云服务器的作用
腾云服务器
阿里云服务器云计算
使用阿里云服务器能做什么?大家都知道可以用来搭建网站、数据库、机器学习、Python爬虫、大数据分析等应用,阿里云服务器网来详细说下使用阿里云服务器常见的玩法以及企业或个人用户常见的使用场景:玩转阿里云服务器使用阿里云服务器最常见的应用就是用来搭建网站,例如个人博客、企业网站等;除了搭建网站还可以利用阿里云GPU服务器搭建机器学习和深度学习等AI应用;使用阿里云大数据类型云服务器做数据分析;利用云
- 阿里云 人工智能与机器学习
HaoHao_010
阿里云云服务器云计算服务器
阿里云的人工智能(AI)与机器学习(ML)服务为企业提供了全面的AI解决方案,帮助用户在多个行业实现数据智能化,提升决策效率,推动业务创新。阿里云通过先进的技术和丰富的工具,支持用户开发、部署和管理AI应用。以下是阿里云在人工智能和机器学习方面的主要产品与服务:1.云上机器学习平台—PaaS服务PAI(PlatformforAI)PAI是阿里云推出的人工智能平台,提供一系列机器学习与深度学习工具和
- AI探索笔记:浅谈人工智能算法分类
安意诚Matrix
机器学习笔记人工智能笔记
人工智能算法分类这是一张经典的图片,基本概况了人工智能算法的现状。这张图片通过三个同心圆展示了人工智能、机器学习和深度学习之间的包含关系,其中人工智能是最广泛的范畴,机器学习是其子集,专注于数据驱动的算法改进,而深度学习则是机器学习中利用多层神经网络进行学习的特定方法。但是随着时代的发展,这张图片表达得也不是太全面了。我更喜欢把人工智能算法做如下的分类:传统机器学习算法-线性回归、逻辑回归、支持向
- VQ-Diffusion 深度解析与实战指南
晏灵昀Odette
VQ-Diffusion深度解析与实战指南VQ-Diffusion项目地址:https://gitcode.com/gh_mirrors/vqd/VQ-Diffusion1.项目介绍VQ-Diffusion是一个用于文本到图像合成的深度学习模型,基于矢量量化变分自编码器(VQ-VAE)和去噪扩散概率模型(DenoisingDiffusionProbabilisticModel)。该模型通过将DDP
- pytorch阶段性总结2
Colinnian
pytorch人工智能python
nn神经网络functional当中卷积的使用importtorchimporttorch.nn.functionalasF#数据input=torch.tensor([[1,2,0,3,1],[0,1,2,3,1],[1,2,1,0,0],[5,2,3,1,1],[2,1,0,1,1]])#卷积核kernel=torch.tensor([[1,2,1],[0,1,0],[2,1,0]])#min
- 【模块】AKConv卷积模块
dearr__
扒网络模块深度学习人工智能
论文《AKConv:ConvolutionalKernelwithArbitrarySampledShapesandArbitraryNumberofParameters》1、作用AKConv旨在解决深度学习中标准卷积操作的两个固有限制:限定在局部窗口内,限制了从其他位置捕获信息的能力;卷积核固定大小,限制了对不同目标形状和大小的适应能力。这种新方法允许卷积核具有任意参数和采样形状,提供了一种灵活
- AI探索笔记:线性回归
安意诚Matrix
机器学习笔记人工智能笔记线性回归
前言写这篇博客,主要是自己来练练手。网络上教程已经是数不胜数,也都讲得非常清楚了。但自己不动手,知识和能力还是别人的。下面分别用传统方法(sklearn)和神经网络(pytorch)来解决线性回归问题。内容什么是线性回归线性回归(LinearRegression)是统计学和机器学习中最基础且广泛使用的预测模型,用于建立**自变量(输入特征)与因变量(输出目标)**之间的线性关系模型。其核心思想是通
- DCMNet一种用于目标检测的轻量级骨干结构模型详解及代码复现
清风AI
深度学习算法详解及代码复现深度学习机器学习计算机视觉人工智能算法目标检测
模型背景在深度学习技术快速发展的背景下,目标检测领域取得了显著进展。早期的手工特征提取方法如Viola-Jones和HOG逐渐被卷积神经网络(CNN)取代,其中AlexNet在2012年的ILSVRC比赛中表现突出,推动了CNN在计算机视觉中的广泛应用。然而,这些早期模型在精度和效率方面仍存在不足,尤其是在处理复杂场景和小目标时表现不佳。这为DCMNet等新型轻量化目标检测模型的出现提供了契机,旨
- UNet:UNet在自然环境监测中的应用案例_2024-07-24_09-14-11.Tex
chenjj4003
游戏开发2深度学习计算机视觉人工智能性能优化游戏前端javascript
UNet:UNet在自然环境监测中的应用案例UNet模型概述UNet是一种广泛应用于图像分割任务的卷积神经网络模型,由OlafRonneberger、PhilippFischer和ThomasBrox在2015年提出。其设计初衷是为了在生物医学图像分析中进行细胞和组织的精确分割,但因其高效性和准确性,迅速在自然环境监测、遥感图像分析、卫星图像处理等领域找到了应用。架构原理UNet模型采用了一个编码
- 辗转相处求最大公约数
沐刃青蛟
C++漏洞
无言面对”江东父老“了,接触编程一年了,今天发现还不会辗转相除法求最大公约数。惭愧惭愧!
为此,总结一下以方便日后忘了好查找。
1.输入要比较的两个数a,b
忽略:2.比较大小(因为后面要的是大的数对小的数做%操作)
3.辗转相除(用循环不停的取余,如a%b,直至b=0)
4.最后的a为两数的最大公约数
&
- F5负载均衡会话保持技术及原理技术白皮书
bijian1013
F5负载均衡
一.什么是会话保持? 在大多数电子商务的应用系统或者需要进行用户身份认证的在线系统中,一个客户与服务器经常经过好几次的交互过程才能完成一笔交易或者是一个请求的完成。由于这几次交互过程是密切相关的,服务器在进行这些交互过程的某一个交互步骤时,往往需要了解上一次交互过程的处理结果,或者上几步的交互过程结果,服务器进行下
- Object.equals方法:重载还是覆盖
Cwind
javagenericsoverrideoverload
本文译自StackOverflow上对此问题的讨论。
原问题链接
在阅读Joshua Bloch的《Effective Java(第二版)》第8条“覆盖equals时请遵守通用约定”时对如下论述有疑问:
“不要将equals声明中的Object对象替换为其他的类型。程序员编写出下面这样的equals方法并不鲜见,这会使程序员花上数个小时都搞不清它为什么不能正常工作:”
pu
- 初始线程
15700786134
暑假学习的第一课是讲线程,任务是是界面上的一条线运动起来。
既然是在界面上,那必定得先有一个界面,所以第一步就是,自己的类继承JAVA中的JFrame,在新建的类中写一个界面,代码如下:
public class ShapeFr
- Linux的tcpdump
被触发
tcpdump
用简单的话来定义tcpdump,就是:dump the traffic on a network,根据使用者的定义对网络上的数据包进行截获的包分析工具。 tcpdump可以将网络中传送的数据包的“头”完全截获下来提供分析。它支 持针对网络层、协议、主机、网络或端口的过滤,并提供and、or、not等逻辑语句来帮助你去掉无用的信息。
实用命令实例
默认启动
tcpdump
普通情况下,直
- 安卓程序listview优化后还是卡顿
肆无忌惮_
ListView
最近用eclipse开发一个安卓app,listview使用baseadapter,里面有一个ImageView和两个TextView。使用了Holder内部类进行优化了还是很卡顿。后来发现是图片资源的问题。把一张分辨率高的图片放在了drawable-mdpi文件夹下,当我在每个item中显示,他都要进行缩放,导致很卡顿。解决办法是把这个高分辨率图片放到drawable-xxhdpi下。
&nb
- 扩展easyUI tab控件,添加加载遮罩效果
知了ing
jquery
(function () {
$.extend($.fn.tabs.methods, {
//显示遮罩
loading: function (jq, msg) {
return jq.each(function () {
var panel = $(this).tabs(&
- gradle上传jar到nexus
矮蛋蛋
gradle
原文地址:
https://docs.gradle.org/current/userguide/maven_plugin.html
configurations {
deployerJars
}
dependencies {
deployerJars "org.apache.maven.wagon
- 千万条数据外网导入数据库的解决方案。
alleni123
sqlmysql
从某网上爬了数千万的数据,存在文本中。
然后要导入mysql数据库。
悲剧的是数据库和我存数据的服务器不在一个内网里面。。
ping了一下, 19ms的延迟。
于是下面的代码是没用的。
ps = con.prepareStatement(sql);
ps.setString(1, info.getYear())............;
ps.exec
- JAVA IO InputStreamReader和OutputStreamReader
百合不是茶
JAVA.io操作 字符流
这是第三篇关于java.io的文章了,从开始对io的不了解-->熟悉--->模糊,是这几天来对文件操作中最大的感受,本来自己认为的熟悉了的,刚刚在回想起前面学的好像又不是很清晰了,模糊对我现在或许是最好的鼓励 我会更加的去学 加油!:
JAVA的API提供了另外一种数据保存途径,使用字符流来保存的,字符流只能保存字符形式的流
字节流和字符的难点:a,怎么将读到的数据
- MO、MT解读
bijian1013
GSM
MO= Mobile originate,上行,即用户上发给SP的信息。MT= Mobile Terminate,下行,即SP端下发给用户的信息;
上行:mo提交短信到短信中心下行:mt短信中心向特定的用户转发短信,你的短信是这样的,你所提交的短信,投递的地址是短信中心。短信中心收到你的短信后,存储转发,转发的时候就会根据你填写的接收方号码寻找路由,下发。在彩信领域是一样的道理。下行业务:由SP
- 五个JavaScript基础问题
bijian1013
JavaScriptcallapplythisHoisting
下面是五个关于前端相关的基础问题,但却很能体现JavaScript的基本功底。
问题1:Scope作用范围
考虑下面的代码:
(function() {
var a = b = 5;
})();
console.log(b);
什么会被打印在控制台上?
回答:
上面的代码会打印 5。
&nbs
- 【Thrift二】Thrift Hello World
bit1129
Hello world
本篇,不考虑细节问题和为什么,先照葫芦画瓢写一个Thrift版本的Hello World,了解Thrift RPC服务开发的基本流程
1. 在Intellij中创建一个Maven模块,加入对Thrift的依赖,同时还要加上slf4j依赖,如果不加slf4j依赖,在后面启动Thrift Server时会报错
<dependency>
- 【Avro一】Avro入门
bit1129
入门
本文的目的主要是总结下基于Avro Schema代码生成,然后进行序列化和反序列化开发的基本流程。需要指出的是,Avro并不要求一定得根据Schema文件生成代码,这对于动态类型语言很有用。
1. 添加Maven依赖
<?xml version="1.0" encoding="UTF-8"?>
<proj
- 安装nginx+ngx_lua支持WAF防护功能
ronin47
需要的软件:LuaJIT-2.0.0.tar.gz nginx-1.4.4.tar.gz &nb
- java-5.查找最小的K个元素-使用最大堆
bylijinnan
java
import java.util.Arrays;
import java.util.Random;
public class MinKElement {
/**
* 5.最小的K个元素
* I would like to use MaxHeap.
* using QuickSort is also OK
*/
public static void
- TCP的TIME-WAIT
bylijinnan
socket
原文连接:
http://vincent.bernat.im/en/blog/2014-tcp-time-wait-state-linux.html
以下为对原文的阅读笔记
说明:
主动关闭的一方称为local end,被动关闭的一方称为remote end
本地IP、本地端口、远端IP、远端端口这一“四元组”称为quadruplet,也称为socket
1、TIME_WA
- jquery ajax 序列化表单
coder_xpf
Jquery ajax 序列化
checkbox 如果不设定值,默认选中值为on;设定值之后,选中则为设定的值
<input type="checkbox" name="favor" id="favor" checked="checked"/>
$("#favor&quo
- Apache集群乱码和最高并发控制
cuisuqiang
apachetomcat并发集群乱码
都知道如果使用Http访问,那么在Connector中增加URIEncoding即可,其实使用AJP时也一样,增加useBodyEncodingForURI和URIEncoding即可。
最大连接数也是一样的,增加maxThreads属性即可,如下,配置如下:
<Connector maxThreads="300" port="8019" prot
- websocket
dalan_123
websocket
一、低延迟的客户端-服务器 和 服务器-客户端的连接
很多时候所谓的http的请求、响应的模式,都是客户端加载一个网页,直到用户在进行下一次点击的时候,什么都不会发生。并且所有的http的通信都是客户端控制的,这时候就需要用户的互动或定期轮训的,以便从服务器端加载新的数据。
通常采用的技术比如推送和comet(使用http长连接、无需安装浏览器安装插件的两种方式:基于ajax的长
- 菜鸟分析网络执法官
dcj3sjt126com
网络
最近在论坛上看到很多贴子在讨论网络执法官的问题。菜鸟我正好知道这回事情.人道"人之患好为人师" 手里忍不住,就写点东西吧. 我也很忙.又没有MM,又没有MONEY....晕倒有点跑题.
OK,闲话少说,切如正题. 要了解网络执法官的原理. 就要先了解局域网的通信的原理.
前面我们看到了.在以太网上传输的都是具有以太网头的数据包.
- Android相对布局属性全集
dcj3sjt126com
android
RelativeLayout布局android:layout_marginTop="25dip" //顶部距离android:gravity="left" //空间布局位置android:layout_marginLeft="15dip //距离左边距
// 相对于给定ID控件android:layout_above 将该控件的底部置于给定ID的
- Tomcat内存设置详解
eksliang
jvmtomcattomcat内存设置
Java内存溢出详解
一、常见的Java内存溢出有以下三种:
1. java.lang.OutOfMemoryError: Java heap space ----JVM Heap(堆)溢出JVM在启动的时候会自动设置JVM Heap的值,其初始空间(即-Xms)是物理内存的1/64,最大空间(-Xmx)不可超过物理内存。
可以利用JVM提
- Java6 JVM参数选项
greatwqs
javaHotSpotjvmjvm参数JVM Options
Java 6 JVM参数选项大全(中文版)
作者:Ken Wu
Email:
[email protected]
转载本文档请注明原文链接 http://kenwublog.com/docs/java6-jvm-options-chinese-edition.htm!
本文是基于最新的SUN官方文档Java SE 6 Hotspot VM Opt
- weblogic创建JMC
i5land
weblogicjms
进入 weblogic控制太
1.创建持久化存储
--Services--Persistant Stores--new--Create FileStores--name随便起--target默认--Directory写入在本机建立的文件夹的路径--ok
2.创建JMS服务器
--Services--Messaging--JMS Servers--new--name随便起--Pers
- 基于 DHT 网络的磁力链接和BT种子的搜索引擎架构
justjavac
DHT
上周开发了一个磁力链接和 BT 种子的搜索引擎 {Magnet & Torrent},本文简单介绍一下主要的系统功能和用到的技术。
系统包括几个独立的部分:
使用 Python 的 Scrapy 框架开发的网络爬虫,用来爬取磁力链接和种子;
使用 PHP CI 框架开发的简易网站;
搜索引擎目前直接使用的 MySQL,将来可以考虑使
- sql添加、删除表中的列
macroli
sql
添加没有默认值:alter table Test add BazaarType char(1)
有默认值的添加列:alter table Test add BazaarType char(1) default(0)
删除没有默认值的列:alter table Test drop COLUMN BazaarType
删除有默认值的列:先删除约束(默认值)alter table Test DRO
- PHP中二维数组的排序方法
abc123456789cba
排序二维数组PHP
<?php/*** @package BugFree* @version $Id: FunctionsMain.inc.php,v 1.32 2005/09/24 11:38:37 wwccss Exp $*** Sort an two-dimension array by some level
- hive优化之------控制hive任务中的map数和reduce数
superlxw1234
hivehive优化
一、 控制hive任务中的map数: 1. 通常情况下,作业会通过input的目录产生一个或者多个map任务。 主要的决定因素有: input的文件总个数,input的文件大小,集群设置的文件块大小(目前为128M, 可在hive中通过set dfs.block.size;命令查看到,该参数不能自定义修改);2.
- Spring Boot 1.2.4 发布
wiselyman
spring boot
Spring Boot 1.2.4已于6.4日发布,repo.spring.io and Maven Central可以下载(推荐使用maven或者gradle构建下载)。
这是一个维护版本,包含了一些修复small number of fixes,建议所有的用户升级。
Spring Boot 1.3的第一个里程碑版本将在几天后发布,包含许多