Vue3学习笔记-masaikk
Vue3学习笔记-masaikk
学习vue3及其相关组件的笔记。代码位于myvue: vue前端学习 (gitee.com)的vue3分支。笔记源文件位于masaikk/interviewAccess - 码云 - 开源中国 (gitee.com)
vue项目基础
Vue-cli相关知识
vue-cli-service封装了webpack
例如demo1/node_modules/@vue/cli-service/package.json中,指定了bin所指向的二进制文件的位置。
{
    "bin": {
    "vue-cli-service": "bin/vue-cli-service.js"
  },
}
vite
vite很快,但是目前社区支持不够。
Vue生命周期
参考链接
Vue3父子组件传递值
参考如下博客:
https://juejin.cn/post/6965062549771386887
父传子是使用props的方法,子传父使用$emit的方法。
示例子组件向父组件传递信息:
//子组件
  methods:{
    sendEmitToFather(){
      console.log('sending...');
      this.$emit('son-mege','Hello from son')
    }
  }
父组件中在节点上绑定消息,传入函数
<template>
  <div>
    <p>
      {{ mess }} in father page
    </p>
    <div>
      <use-props :son-data=this.mess @son-mege="getMessageFromSon"></use-props>
    </div>

  </div>
</template>

<script>
import useProps from "@/components/compisi/useProps";


export default {
  name: "CompPage",
  components: {useProps},
  data() {
    return {
      mess: 'from composition page'
    }
  },
  composition: {
    useProps
  },
  methods:{
    getMessageFromSon(data){
      console.log(data);
    }
  }
}
</script>
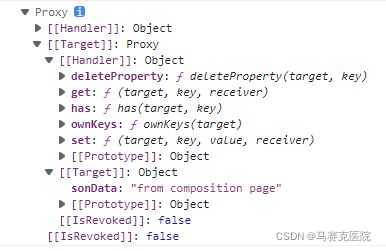
自动传入data数据,打印的情况如下所示
props
这里是父向子传递数据的方式之一。
首先在自组件中声明props,如下所示:
export default {
  name: "useProps",
  props: {
    sonData: {
      type: String,
      required: true,
    }
  },
  data() {
    return {
      mess: "use data props"
    }
  }
}
其中,props可以是数组也可以是对象。
然后在父组件中使用子组件中传入props参数,如下所示:
    <div>
      <use-props :son-data=this.mess></use-props>
    </div>
完整代码为demo2/src/views/CompPage.vue
Composition API
Mixin
复用的代码,如果Mixin与组件中出现命名冲突
options API 的弊端
某一个功能的各个逻辑会拆分到各个属性中。如果这个组件变得更大,那么拆分的会越来越散,难以阅读。
setup函数
传入props与context参数。对应着父传子的props。
setup因为比beforeCreated()函数还前,所以没有this对象。
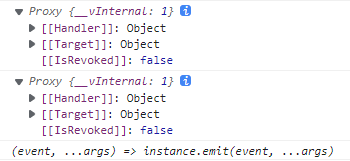
在setup中记录props为一个proxy对象
  setup(props, context) {
    console.log(props);
  },
另一个参数context,它包括三个属性:
- attrs:所有非prop的attribute
- slots:父组件的插槽
- emit:$emit
或者直接使用解构写法来获取着三个属性
  setup(props, {attrs, slots, emit}) {
    console.log(attrs);
    console.log(slots);
    console.log(emit);
  },
setup的返回
返回一个对象,也可以在组件中使用,比如
  setup(props, {attrs, slots, emit}) {
    console.log(attrs);
    console.log(slots);
    console.log(emit);
    return {
      messSetup: "message form setup function"
    }
  },
以上参考代码位于demo2/src/components/compisi/useProps.vue
响应式
使用reactive获取响应式对象,(这样的话数据如果有变化也能渲染到DOM里面)
此处代码位于demo2/src/components/compisi/useSetup.vue
例如:
  setup(props, context) {

    const state=reactive({
      counter:100,
      tittle: "counter",
    })

    const increment = () => {
      state.counter++;
    }

    return {
      state,
      increment
    }
  }
reactive的参数只能是对象或者数组。基本数据类型需要用ref。
ref对象在template中被使用的时候,可以省略.value属性,称之为“自动解包”。在setup函数中,没有这个功能,必须要使用.value属性。例如:
    let refCounter=ref(200);

    const state=reactive({
      counter:100,
      tittle: "counter",
    })

    const increment = () => {
      state.counter++;
      refCounter.value++;
      console.log(refCounter.value);
    }
使用readonly关键字得到一个原生对象的只读代理,即一个set方法被劫持的Proxy对象。例如:
    const readOnlyInfo=readonly({
      tittle:"a setup counter"
    })
toRef和toRefs
都是收一个响应式对象的。
使用toRefs将响应式对象解包成数个ref,使用如下语法
let { defaultMessage, defaultAudioURL } = toRefs(props);
使用toRef是将reactive对象中的某件键转化为ref对象。
watchEffect和watch的区别
watchEffect会首先执行一次,然后记录下来里面有多少个可响应对象,最后然后里面的可响应对象有变化,就出现执行。默认的watchEffect会在挂载之前就运行,或者可以使用传入参数{flush:"post"}来让它挂载之后再运行。
watch不会一开始就执行,记录某一个可响应对象的变化后执行。
通过ref来获取dom
设置节点的ref属性,然后使用ref来获取,结合上述的watchEffect。要注意的是,这个对象必须要在挂载之后才能运行,使用钩子函数onMounted,或者监听变化:
    <h2 ref="title">
      哈哈哈
    </h2>


setup(){
    const title=ref(null)
    watchEffect(()=>{
      console.log(title.value);
    })
}
代码位于demo2/src/components/compisi/useSetup2.vue
获取audio节点
定义如下
使用flush设置为post的watchEffect,如下所示:
    const audioNode=ref(null)
    watchEffect(()=>{
      console.log(audioNode.value.src);
      audioNode.value.src="http://119.23.182.180/azur/t2.mp3"
      audioNode.value.play()
    },{
      flush:"post"
    })
Vue博客
Introduction · 深入剖析Vue源码 (penblog.cn)
vue-router
router-link的replace属性代表着url是否会被压栈。默认没这个属性就不会压栈。
导入vue-router
使用如以下代码安装依赖
npm install vue-router@next
在导入声明的时候可以使用import type { RouteRecordRaw } from "vue-router";的形式来声明导入的是type。
参考代码:
import { createRouter, createWebHashHistory } from "vue-router";
import type { RouteRecordRaw } from "vue-router";

const routes: RouteRecordRaw[] = [
  {
    path: "/",
    redirect: "/login",
  },
  {
    path: "/login",
    component: () => import(""),
  },
];

const router = createRouter({
  routes: [],
  history: createWebHashHistory(),
});

export default router;
然后在main.ts中进行注册:
import { createApp } from "vue";
import App from "./App.vue";
import router from "./router";

const app = createApp(App);
app.use(router);
app.mount("#app");
最后在App.vue中引入
懒加载
类似于如下代码
    {
        path: '/about',
        name: 'About',
        // route level code-splitting
        // this generates a separate chunk (about.[hash].js) for this route
        // which is lazy-loaded when the route is visited.
        component: () => import(/* webpackChunkName: "about" */ '../views/About.vue')
    },
这样的话可以讲打包后的js文件分开,并且在打包的时候也可以指定打包后的js文件的名字,例如
component: () => import(/* webpackChunkName: "type-chunk" */'../views/Type.vue')
打包后的文件如下
路由中的name属性
可以通过名字来跳转
路由中的meta属性
传入一个对象来承载自定义数据
动态路由匹配
类似Django的urls,使用匹配的方式来设置动态路由
    {
        path: '/user/:uid',
        name: 'user',
        component: () => import(/* webpackChunkName: "user-chunk" */'../views/User.vue')
    }
相应的,在App.vue文件里面的view-linker也要修改
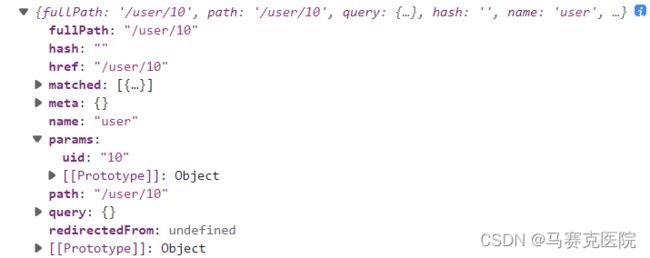
可以在vue文件里面通过this.$route来访问
或者使用vue-router4以上提供的hook函数
import { useRoute } from 'vue-router'

  setup(){
    const route = useRoute();
    console.log(route.params.uid);
  },
NotFound
如果路由没有匹配到,显示的页面
    {
        path: "/:pathMatch(.*)*",
        component: ()=>import(/* webpackChunkName: "PageNotFound"*/'../views/NotFound.vue')
    }
注意要放在urls的最下面
而且能通过代码$route.params.pathMatch拿到。
路由嵌套
等于向路由列表里面添加children属性
{
        path: '/father',
        name: 'father',
        component: ()=>import(/* webpackChunkName: "father-chunk" */'../views/Father.vue'),
        children:[
            {
                path: 'son1',
                component:()=>import(/* webpackChunkName: "son1-ch"*/'../views/FatherSon1.vue')

            },
            {
                path: 'son2',
                component:()=>import(/* webpackChunkName: "son2-ch"*/'../views/FatherSon2.vue')

            },
        ]
    },
并且注意,子路由不需要加上\
用代码跳转路由
注意$router和$route区别
  methods:{
    jumpToFather(){
      this.$router.push('/father')
    }
  }
也提供了在setup()里面使用的hook
先import {useRouter} from 'vue-router';
setup(){
    const router = useRouter();
    const jumpToFatherInSetupFunc=()=>{
      router.push('/father')
    }
    return {
      jumpToFatherInSetupFunc
    }
  }
动态添加路由
添加顶级路由,可以使用router对象的addRoute方法。
router.addRoute({
    path:"/o1",
    name:"otherPage1",
    component:()=>import('../views/OtherPages1.vue')
})
添加二级路由,也可以使用上述方法,不过不同之处在于需要添加父路由的name属性作为传参。
而且需要注意,子路由的匹配规则不需要第一个/
代码如下所示:
//添加二级路由
router.addRoute('father',{
    path:"o1",
    name:"otherPage1",
    component:()=>import('../views/OtherPages1.vue')
})
VueX
导入
使用npm install vuex@next --save安装
创建store/index.ts
import { createStore } from "vuex";

const store = createStore({
  state: () => {
    return {
      name: "masaikk",
    };
  },
});

export default store;
然后在main.ts中进行注册
import { createApp } from "vue";
import App from "./App.vue";
import router from "./router";
import store from "./store";

const app = createApp(App);
app.use(router);
app.use(store);
app.mount("#app");
使用时 {{ $store.state.name }}
基础知识
注意不能用在component里面操作state,而是应该在mutations里面注册函数,用于修改state。
import { createStore } from 'vuex'

export default createStore({
  state: {
    counter:0,
  },
  mutations: {
      increment(state){
          state.counter++;
      },
      decrement(state){
          state.counter--;
      }
  },
  actions: {
  },
  modules: {
  }
})
注意,在component中需要使用commit来注册mutations ★ \bigstar ★
  methods: {
    incre() {
      this.$store.commit('increment');
    },
    decre() {
      this.$store.commit('decrement');
    }
  }
最终component中使用state的代码为
<p>This counter is {{ this.$store.state.counter }}</p>
整个component的代码为
<template>
  <div>
    <p>This counter is {{ this.$store.state.counter }}</p>
    <div>
      <button @click="incre">increment</button>
      <button @click="decre">decrement</button>

    </div>
  </div>

</template>

<script>
export default {
  name: "CounterComp",
  methods: {
    incre() {
      this.$store.commit('increment');
    },
    decre() {
      this.$store.commit('decrement');
    }
  }
}
</script>
也可以将获取store的逻辑写道computed里面
  computed:{
    sCounterNumber(){
      return this.$store.state.counter;
    }
  },
setup里面使用store
使用vuex提供的useStatehook,配合computed的hook。
  setup() {
    const store = useStore();
    const sCounter = computed(() => store.state.counter);
    return {
      sCounter
    }
  },
VueX的getters
对于getters的方法来说,对于每个函数都要传入state参数,然后方法中使用state获取状态。
    getters: {
        totalPrice:(state)=> {
            let totalPrice = 0;
            for (const book of state.books) {
                totalPrice += book.price * book.number;
            }
            return totalPrice;
        }
    }
具体在使用的时候使用this.$store.getters.name来使用getters的值。
  computed: {
    totalPrice() {
      return this.$store.getters.totalPrice;
    }
  }
代码位于demo2/src/components/UseStoreUtils.vue
或者传入两个参数(state,getters)用于调用其他的getters方法
单一状态树
VueX推荐只使用一个$store


