【五一专属】阿里云ECS大测评#五一专属|向所有热爱分享的“技术劳动者”致敬#
本篇博客参与阿里云 ECS实例测评,这里采用阿里的C5.large计算型实例
本次对云服务器ECS产品能力的体验和建议,可帮助其他用户选用云服务,使用云服务器ECS创建应用场景测评
首先对实例的硬件(CPU,内存,磁盘)进行测试,采用对比对象为AWS的C5,C5a同等大小实例进行对比,在本篇的“目录二,目录三”可以看到。
其次"使用云服务器ECS创建应用场景测评,基于阿里云ECS c5.large搭建云上博客,论坛,家庭云,Gitlab协同办公",这里根据一般用户的常见使用场景,进行了基于阿里云 ECS c5.large采取LAMP、LNMP架构搭建Wordpress场景,LAMP搭建Discuz!论坛场景,安装CasaOS家庭云私人NAS场景,安装极狐GitLab 一体化 DevOps 平台场景。希望这篇文章对您有帮助,也让你在众多服务商中采买自己需要的服务器。
本篇阅读预计需要45分钟。
对应的视频
阿里云社区:https://developer.aliyun.com/live/249082
BiliBili平台:https://www.bilibili.com/video/BV1iL4y1F7nm
文章目录:
- 一、实例控制台对比
- 1.阿里云
- A.自定义购买
- B.快速购买
- 2.AWS
- 1.阿里云
- 二、实例类型对比
- 1.阿里云 C5实例族介绍
- 2.AWS EC2 C5.large和C5a.large介绍
- 3.型号对比总结
- 三、同比类型性能测试
- 1.CPU测试(GeekBench 5 对实例进行测试)
- A.本次测试采集到测试对象的CPU型号
- B.测试命令
- C.测试结果
- D.CPU汇总测试对比
- 2.块存储性能测试
- 1.hdparm测试硬盘性能
- 2.使用dd命令对磁盘进行性能测试
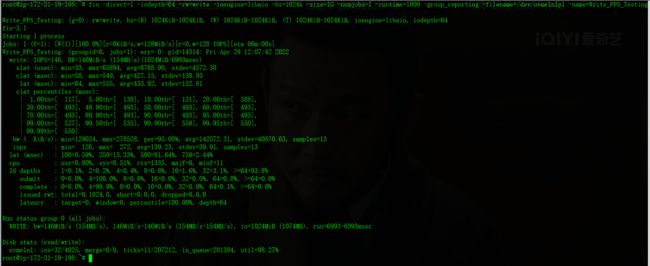
- 3.Fio工具测试硬盘
- 3.内存性能测试
- 查看内存信息
- 内存写入、读取测试(左侧阿里云—右侧AWS)
- 1.CPU测试(GeekBench 5 对实例进行测试)
- 四、服务搭建对比测试
- 1.基于LAMP架构搭建WordPress个人博客(CentOS 7)
- 2.基于LNMP架构搭建WordPress个人博客(CentOS 7)
- 3.基于Aliux 3系统搭建LAMP架构部署Wordpress个人博客
- 4.基于Aliux 3系统搭建LNMP架构部署Wordpress个人博客
- 5.基于LAMP架构部署Discuz论坛(CentOS 7)
- 6.基于ubuntu搭建CasaOS 家庭云
- 7.基于Ubuntu 20.04 64安装私有化部署版极狐GitLab
- 总结
一、实例控制台对比
二、实例类型对比
三、同比类型性能测试
四、服务搭建对比测试
一、实例控制台对比
1.阿里云:
A.自定义购买:
首先打开阿里云的ECS实例控制台,可以在概览面板中很清晰的看到创建实例

点击创建实例后,会弹出一个新的浏览器页面,其中定义了快速购买和自定义购买两个面板模块,很清晰的显示出用户的购买实例的付费模式,购买地域,可用区,实例的规格,数量,存储等,按照流程走,到确认订单,一共是五个步骤
B.快速购买:
相较于自定义购买,用户可以在快速购买界面实现直接下单,而不需要再跳转到其他页面进行额外设置

2.AWS:
点击启动实例后,会进入创建实例页面,需对实例进行配置
包括:实例名称,镜像,实例规格,安全组,密钥,网络,存储大小等


二、实例类型对比
#### 阿里云官方不同应用场景推荐 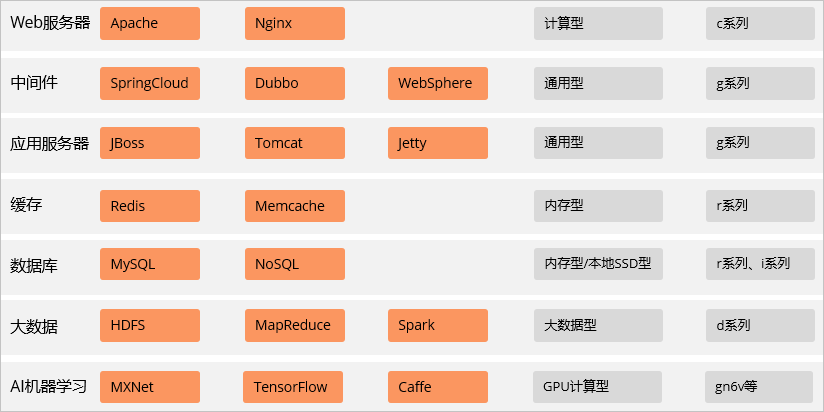1.阿里云 C5实例族介绍,引用官方文档
计算型实例规格族c5
c5的特点如下:
-
计算:
-
处理器与内存配比为1:2
-
处理器:2.5 GHz主频的Intel ® Xeon ® Platinum 8163(Skylake)或者8269CY(Cascade Lake),计算性能稳定
说明 该规格族的实例有可能部署在不同的服务器平台,如果您的业务需要将实例部署在同一服务器平台,建议您选用c6、c6e、c7。
-
-
存储:
- I/O优化实例
- 支持ESSD云盘、SSD云盘和高效云盘
说明 不同实例规格族的云盘性能上限不同,本规格族的单台实例最高支持20万IOPS
-
网络:
- 支持IPv6
- 超高网络PPS收发包能力
- 实例网络性能与计算规格对应(规格越高网络性能越强)
-
适用场景:
- 高网络包收发场景,例如视频弹幕、电信业务转发等
- Web前端服务器
- 大型多人在线游戏(MMO)前端
- 数据分析、批量计算、视频编码
- 高性能科学和工程应用
c5包括的实例规格及指标数据如下表所示
| 实例规格 | vCPU | 内存 | 网络带宽(Gbit/s) | 网络收发包PPS | 多队列 | 弹性网卡 | 单网卡私有IP |
|---|---|---|---|---|---|---|---|
| ecs.c5.large | 2 | 4 | 1 | 30万 | 2 | 2 | 6 |
2.AWS EC2 C5.large和C5a.large实例,引用AWS官方文档解释
Amazon EC2 C5 实例针对计算密集型工作负载进行了优化,并按计算比率以较低的价格提供经济高效的高性能。
特点:
- C5 实例根据实例的大小提供处理器选项。
- 新的 C5 和 C5d 12xlarge、24xlarge 和 Metal 实例大小采用定制的第二代 Intel Xeon 可扩展处理器 (Cascade Lake),具有 3.6GHz 的持续全核 Turbo 频率和高达 3.9GHz 的单核 Turbo 频率。
- 其他 C5 实例尺寸将在第二代 Intel Xeon 可扩展处理器 (Cascade Lake) 或第一代 Intel Xeon Platinum 8000 系列 (Skylake-SP) 处理器上启动,具有高达 3.4GHz 的持续全核 Turbo 频率,以及高达 3.5GHz 的单核 Turbo 频率。
- 新的较大型 24xlarge 实例大小提供 96 个 vCPUs、192 GiB 内存和可选的 3.6TB 基于 NVMe 的本地 SSD
- 需要包含 ENA 和 NVMe 驱动程序的 HVM AMI
- Elastic Network Adapter (ENA) 为 C5 实例提供高达 25Gbps 的网络带宽和高达 19Gbps 的 Amazon EBS 专用带宽。
- 由 AWS Nitro 系统(专用硬件和轻量级管理程序的组合)提供支持
| 型号 | vCPU | 内存 | 实例存储 (GB) | 网络带宽 (Gbps) | EBS 带宽 (Mbps) |
|---|---|---|---|---|---|
| ecs.c5.large | 2 | 4 | 仅限 EBS | 最高 10 | 最高 4750 |
Amazon EC2 C5a 实例可为众多计算密集型工作负载提供一流的 x86 性价比。
特点:
- 第二代 AMD EPYC 7002 系列处理器,运行频率高达 3.3GHz
- Elastic Network Adapter (ENA) 为 C5a 实例提供高达 20 Gbps 的网络带宽和高达 9.5 Gbps 的 Amazon EBS 专用带宽
- 由 AWS Nitro 系统(专用硬件和轻量级管理程序的组合)提供支持
| 型号 | vCPU | 内存 | 实例存储 (GB) | 网络带宽 (Gbps) | EBS 带宽 (Mbps) |
|---|---|---|---|---|---|
| c5a.large | 2 | 4 | 仅限 EBS | 最高 10 | 最高 3170 |
3.型号对比总结:
| Aliyun ecs.c5.large 高效云盘版 | AWS C5.large EBS SSD gp2 | AWS C5a.large EBS SSD gp2 | |
|---|---|---|---|
| CPU型号 | 2.5 GHz主频的Intel ® Xeon ® Platinum 8163(Skylake)或者8269CY(Cascade Lake) | 第二代 Intel Xeon 可扩展处理器 (Cascade Lake) 或第一代 Intel Xeon Platinum 8000 系列 (Skylake-SP) 处理器 | 第二代 AMD EPYC 7002 |
| vCPU | 2 | 2 | 2 |
| 内存 | 4G | 4G | 4G |
| 网络带宽(Gbit/s) | 1Gbps | 最高 10Gbps | 最高 10Gbps |
| 块存储带宽 | 高效云盘最高140Mbps | 最高 4750Mbps | 最高 3170Mbps |
三、同比类型性能测试
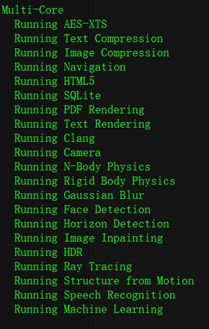
## 1.CPU测试 **GeekBench 5 对实例进行测试**这里采用阿里云 Aliyun ecs.c5.large 高效云盘版 对比 AWS EC2 C5.large 和 C5a.large,为保证考虑到C5采用Intel芯片的差异性,这里采用2台C5.large、1台C5a.large进行测试
A.本次测试采集到测试对象的CPU型号如下
| 实例 | CPU型号 |
|---|---|
| Aliyun ecs.c5.large | Intel Xeon Platinum 8163 @ 2.50 GHz 1 Processor, 1 Core, 2 Threads |
| Amazon EC2 c5.large | Intel Xeon Platinum 8275CL @ 3.64 GHz 1 Processor, 1 Core, 2 Threads |
| Amazon EC2 c5.large | Intel Xeon Platinum 8124M @ 3.45 GHz 1 Processor, 1 Core, 2 Threads |
| Amazon EC2 c5a.large | AMD EPYC 7R32 @ 3.31 GHz 1 Processor, 1 Core, 2 Threads |
B.测试命令如下:
sudo wget https://cdn.geekbench.com/Geekbench-5.4.1-Linux.tar.gz
tar xf Geekbench-5.4.1-Linux.tar.gz
cd Geekbench-5.4.1-Linux
./geekbench5
C.测试结果如下
①.Aliyun ecs.c5.large
Intel Xeon Platinum 8163 @ 2.50 GHz 1 Processor, 1 Core, 2 Threads
②.Amazon EC2 c5.large
Intel Xeon Platinum 8275CL @ 3.64 GHz 1 Processor, 1 Core, 2 Threads
③.Amazon EC2 c5.large
Intel Xeon Platinum 8124M @ 3.45 GHz 1 Processor, 1 Core, 2 Threads
④.Amazon EC2 c5a.large
AMD EPYC 7R32 @ 3.31 GHz 1 Processor, 1 Core, 2 Threads
D.CPU汇总测试对比
对比测试链接:
8163 VS 8275CL
https://browser.geekbench.com/v5/cpu/compare/14590617?baseline=14590554
8163 VS 8124M
https://browser.geekbench.com/v5/cpu/compare/14590617?baseline=14591215
Intel Xeon Platinum 8163 @ 2.50 GHz VS AMD EPYC 7R32 @ 3.31 GHz
https://browser.geekbench.com/v5/cpu/compare/14590617?baseline=14594576
Aliyun ecs.c5.large
Intel Xeon Platinum 8163 @ 2.50 GHz 1 Processor, 1 Core, 2 Threads 对比 AWS EC2 C5.Large Intel Xeon Platinum 8275CL @ 3.64 GHz 1 Processor, 1 Core, 2 Threads

Aliyun ecs.c5.large
Intel Xeon Platinum 8163 @ 2.50 GHz 1 Processor, 1 Core, 2 Threads 对比 Amazon EC2 c5.large Intel Xeon Platinum 8124M @ 3.45 GHz 1 Processor, 1 Core, 2 Threads

Aliyun ecs.c5.large
Intel Xeon Platinum 8163 @ 2.50 GHz 1 Processor, 1 Core, 2 Threads 对比 Amazon EC2 c5a.large AMD EPYC 7R32 @ 3.31 GHz 1 Processor, 1 Core, 2 Threads

2.块存储性能测试
1.hdparm测试硬盘性能
显示硬盘的相关信息
# hdparm /dev/vda
评估硬盘的读取效率
# hdparm -t /dev/vda
测试硬盘缓存的读取速度
# hdparm -T /dev/vda
直接测试硬盘的读性能
# hdparm -tT --direct /dev/vda
查看DMA情况
# hdparm -cdt /dev/vda
2.使用dd命令对磁盘进行性能测试
dd测试脚本
[root@sh-host ~]# cat disk.sh
echo "test 10G"
time sh -c "dd if=/dev/zero of=./ddfile bs=1M count=10240 oflag=direct && sync";
rm ./ddfile;

echo "test 1G/1M"
time sh -c "dd if=/dev/zero of=./ddfile bs=1M count=1024 oflag=direct && sync";
rm ./ddfile;

echo "test 1G/512K"
time sh -c "dd if=/dev/zero of=./ddfile bs=512k count=2048 oflag=direct && sync";
rm ./ddfile;

echo "test 1G/256K"
time sh -c "dd if=/dev/zero of=./ddfile bs=256k count=4096 oflag=direct && sync";
rm ./ddfile;

echo "test 1G/256K"
time sh -c "dd if=/dev/zero of=./ddfile bs=256k count=8192 oflag=direct && sync";
rm ./ddfile;

echo "test 1G/4K"
time sh -c "dd if=/dev/zero of=./ddfile bs=4k count=262144 oflag=direct && sync";
rm ./ddfile;
dd测试结果如下
AWS EBS SSD gp2 20G
[root@ip-172-31-30-56 ~]# bash disk.sh
test 10G
10240+0 records in
10240+0 records out
10737418240 bytes (11 GB) copied, 78.9134 s, 136 MB/s

real    1m18.923s
user    0m0.005s
sys     0m1.313s
test 1G/1M
1024+0 records in
1024+0 records out
1073741824 bytes (1.1 GB) copied, 7.98374 s, 134 MB/s

real    0m7.990s
user    0m0.007s
sys     0m0.131s
test 1G/512K
2048+0 records in
2048+0 records out
1073741824 bytes (1.1 GB) copied, 7.98495 s, 134 MB/s

real    0m7.991s
user    0m0.006s
sys     0m0.149s
test 1G/256K
4096+0 records in
4096+0 records out
1073741824 bytes (1.1 GB) copied, 7.98434 s, 134 MB/s

real    0m7.987s
user    0m0.002s
sys     0m0.159s
test 1G/256K
8192+0 records in
8192+0 records out
2147483648 bytes (2.1 GB) copied, 15.9784 s, 134 MB/s

real    0m15.981s
user    0m0.011s
sys     0m0.303s
test 1G/4K
262144+0 records in
262144+0 records out
1073741824 bytes (1.1 GB) copied, 127.651 s, 8.4 MB/s

real    2m7.655s
user    0m0.286s
sys     0m2.382s
[root@ip-172-31-30-56 ~]#
阿里云 EBS 高效云盘 20G
[root@sh-host ~]# bash disk.sh
test 10G
10240+0 records in
10240+0 records out
10737418240 bytes (11 GB) copied, 99.4206 s, 108 MB/s

real    1m39.440s
user    0m0.028s
sys     0m1.916s
test 1G/1M
1024+0 records in
1024+0 records out
1073741824 bytes (1.1 GB) copied, 9.9211 s, 108 MB/s

real    0m9.942s
user    0m0.003s
sys     0m0.206s
test 1G/512K
2048+0 records in
2048+0 records out
1073741824 bytes (1.1 GB) copied, 9.93499 s, 108 MB/s

real    0m9.955s
user    0m0.003s
sys     0m0.221s
test 1G/256K
4096+0 records in
4096+0 records out
1073741824 bytes (1.1 GB) copied, 9.90859 s, 108 MB/s

real    0m9.927s
user    0m0.006s
sys     0m0.256s
test 1G/256K
8192+0 records in
8192+0 records out
2147483648 bytes (2.1 GB) copied, 19.87 s, 108 MB/s

real    0m19.889s
user    0m0.014s
sys     0m0.496s
test 1G/4K
262144+0 records in
262144+0 records out
1073741824 bytes (1.1 GB) copied, 132.547 s, 8.1 MB/s

real    2m12.565s
user    0m0.284s
sys     0m6.281s
[root@sh-host ~]#
3.Fio工具测试硬盘
官方文档测试指定测试工具— FIO
这里查阅两家云服务商提供的文档,都明确使用fio工具进行云盘的基准测试
操作步骤
1.远程连接ECS实例
采用SecureCRT进行连接

2.查询块存储设备是否已经4KiB对齐
sudo fdisk -lu
返回的结果中,Start值能被8整除即是4KiB对齐。否则,请完成4KiB对齐后再继续性能测试。
3.依次运行以下命令安装libaio和FIO。
sudo yum install libaio -y
sudo yum install libaio-devel -y
sudo yum install fio -y
4.对硬盘进行分区和格式化。
磁盘分区示例,以亚马逊为例
云盘性能测试命令
说明 本示例中,使用的设备名为 /dev/your_device,请您根据实际情况替换。例如需要测试的云盘为 /dev/vdb ,则将以下示例命令中的 /dev/your_device 替换为 /dev/vdb
随机写IOPS:
fio -direct=1 -iodepth=128 -rw=randwrite -ioengine=libaio -bs=4k -size=1G -numjobs=1 -runtime=1000 -group_reporting -filename=/dev/your_device -name=Rand_Write_Testing
随机读IOPS:
fio -direct=1 -iodepth=128 -rw=randread -ioengine=libaio -bs=4k -size=1G -numjobs=1 -runtime=1000 -group_reporting -filename=/dev/your_device -name=Rand_Read_Testing
顺序写吞吐量:
fio -direct=1 -iodepth=64 -rw=write -ioengine=libaio -bs=1024k -size=1G -numjobs=1 -runtime=1000 -group_reporting -filename=/dev/your_device -name=Write_PPS_Testing
顺序读吞吐量:
fio -direct=1 -iodepth=64 -rw=read -ioengine=libaio -bs=1024k -size=1G -numjobs=1 -runtime=1000 -group_reporting -filename=/dev/your_device -name=Read_PPS_Testing
随机写时延:
fio -direct=1 -iodepth=1 -rw=randwrite -ioengine=libaio -bs=4k -size=1G -numjobs=1 -group_reporting -filename=/dev/your_device -name=Rand_Write_Latency_Testing
随机读时延:
fio -direct=1 -iodepth=1 -rw=randread -ioengine=libaio -bs=4k -size=1G -numjobs=1 -group_reporting -filename=/dev/your_device -name=Rand_Read_Latency_Testing
以下命令可执行 16 KB 随机写入操作。
sudo fio --filename=/dev/your_device --ioengine=psync --name fio_test_file --direct=1 --rw=randwrite --bs=16k --size=1G --numjobs=16 --time_based --runtime=180 --group_reporting --norandommap
以下命令可执行 16 KB 随机读取操作。
sudo fio --filename=/dev/your_device --name fio_test_file --direct=1 --rw=randread --bs=16k --size=1G --numjobs=16 --time_based --runtime=180 --group_reporting --norandommap
以下命令执行 1 MiB 的顺序读取操作:
sudo fio --filename=/dev/<device> --direct=1 --rw=read --randrepeat=0 --ioengine=libaio --bs=1024k --iodepth=8 --time_based=1 --runtime=180 --name=fio_direct_read_test
以下命令针对块储存设备执行 1 MiB 的顺序写入操作:
sudo fio --filename=/dev/<device> --direct=1 --rw=write --randrepeat=0 --ioengine=libaio --bs=1024k --iodepth=8 --time_based=1 --runtime=180 --name=fio_direct_write_test
3.内存性能测试
查看内存信息
内存写入、读取测试(左侧阿里云—右侧AWS)
# time sh -c "dd if=/dev/zero of=/dev/shm/fill bs=1M count=10240"  #写入测试
# time sh -c "dd if=/dev/shm/fill of=/dev/null bs=1M count=10240"  #读取测试
四、服务搭建对比测试
1. 基于LAMP架构搭建WordPress个人博客(CentOS 7)
1.安装mariadb,php,http等服务
yum -y install mariadb mariadb-server php php-server wget php-fpm php-mysql
2.启动httpd,mariadb,并初始化mairadb
systemctl start mariadb httpd
3.初始化数据库
mysql_secure_installation #设置数据库root用户密码
4.测试php
echo "" > /var/www/html/phpinfo.php
http://Host_IP/phpinfo.php
删除phpinfo.php测试文件
rm -f /var/www/html/phpinfo.php
5.下载wordpress 4.9中文版并配置
wget https://cn.wordpress.org/wordpress-4.9-zh_CN.tar.gz
觉得在线下载慢的,可以先下载到电脑上面再传到服务器里面,使用winSCP

6.解压tar包
tar -zxf wordpress-4.9-zh_CN.tar.gz
7.登录mysql,创建wordpress数据库和用户,演示采用密码很简单,仅作演示,请勿盲从
MariaDB [(none)]> create database `wordpress-db`;
MariaDB [(none)]> grant all privileges on `wordpress-db`.* to 'wordpress'@'localhost' identified by '000000';
MariaDB [(none)]> flush privileges;
8.将wp-config-sample.php复制为wp-config.php,并编辑配置
[root@sh-host ~]# cp wordpress/wp-config-sample.php wordpress/wp-config.php
[root@sh-host ~]# vi wordpress/wp-config.php
修改配置中数据库名称 数据库用户及密码
如图,修改如下行
23、26、29
分别设置之前创建的数据库名称,登录的数据库账号、密码,这里也可以创建wordpress专属数据库用户,这次仅作演示,请勿盲从


9.复制 wordpress 安装目录的内容到http目录下
[root@sh-host ~]# cp -r wordpress/* /var/www/html/
10.允许 WordPress 使用 permalink
[root@sh-host ~]# vi /etc/httpd/conf/httpd.conf
修改 151行的 AllowOverride None 为 AllowOverride All

11.重启httpd和mariadb服务
[root@sh-host ~]# systemctl restart httpd mariadb

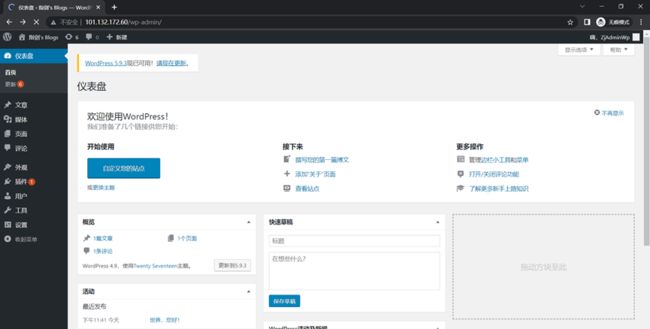
12.访问网页后台,进行最终配置
至此,Wordpress博客搭建完成,您可以根据自己的喜好DIY自己的Worpress博客
13.查看C5实例的负载
安装云监控插件
阿里云实例云监控地址:https://cloudmonitornext.console.aliyun.com/hostMonitoring/all

该图为ECS C5.large的控制台监控图,由此可以看出运行LAMP架构的WordPress对C5简直就是毛毛雨,CPU基本处于静默状态,内存平均在20%左右

2. 基于LNMP架构搭建WordPress个人博客(CentOS 7)
1. 安装nginx、mariadb、php
yum -y install nginx mariadb mariadb-server php php-server wget php-fpm php-mysql
2.启动mariadb,并初始化mairadb
systemctl start mariadb
mysql_secure_installation  #设置数据库root用户密码
3.修改php-fpm 和 nginx 配置文件
编辑配置文件
vi /etc/nginx/nginx.conf
修改44、45行内容,去除65-71的注释,并修改
location / {
        root   /usr/share/nginx/html/;
        index   index.php index.html index.htm;         //在这里加上 index.php
   }
location ~ \.php$ {
        root           /usr/share/nginx/html/;    //修改为网站目录
        fastcgi_pass   127.0.0.1:9000;
        fastcgi_index  index.php;
        fastcgi_param  SCRIPT_FILENAME  $document_root$fastcgi_script_name;  //修改 /scripts  为 $document_root
        include        fastcgi_params;
    }
4.编辑php-fpm配置文件
[root@sh-host ~]# vi /etc/php-fpm.d/www.conf
修改 39、14行内容 将原有的 apache修改为 nginx

5.启动php
[root@sh-host ~]# systemctl start php-fpm
6.下载wordpress 4.9中文版并配置
wget https://cn.wordpress.org/wordpress-4.9-zh_CN.tar.gz
觉得在线下载慢的,可以先下载到电脑上面再传到服务器里面,使用winSCP
解压tar包
tar -zxf wordpress-4.9-zh_CN.tar.gz
7.登录mysql,创建wordpress数据库和用户,演示采用密码很简单,仅作演示,请勿盲从
MariaDB [(none)]> create database `wordpress-db`;
MariaDB [(none)]> grant all privileges on `wordpress-db`.* to 'wordpress'@'localhost' identified by '000000';
MariaDB [(none)]> flush privileges;
8.将wp-config-sample.php复制为wp-config.php,并编辑配置
[root@sh-host ~]# cp wordpress/wp-config-sample.php wordpress/wp-config.php
[root@sh-host ~]# vi wordpress/wp-config.php
修改配置中数据库名称 数据库用户及密码
如图,修改如下行
23、26、29
分别设置之前创建的数据库名称,登录的数据库账号、密码,这次仅作演示,请勿盲从


9.复制 wordpress 安装目录的内容到/usr/share/nginx/目录下
移除原有目录的页面文件
[root@sh-host ~]# mv /usr/share/nginx/html/* /opt/
[root@sh-host ~]# cp -r wordpress/* /usr/share/nginx/html/
10.更改nginx目录权限
[root@sh-host ~]# chown -R nginx:nginx /usr/share/nginx/
11.重启nginx和mariadb服务
[root@sh-host ~]# systemctl restart nginx mariadb
#或者nginx -s reload
12.访问网页后台,进行最终配置
13.查看实例负载情况
至此,Wordpress博客搭建完成,您可以根据自己的喜好DIY自己的Worpress博客
安装云监控插件
阿里云实例云监控地址:https://cloudmonitornext.console.aliyun.com/hostMonitoring/all

查看C5实例的负载
该图为ECS C5.large的控制台监控图,由此可以看出运行LNMP架构的WordPress CPU基本处于静默状态,同比采用LAMP,内存的使用率稍高一点

3.基于Aliux 3系统搭建LAMP架构部署Wordpress个人博客
1.首先更换系统
2.连接实例进行基础设置
①.首先连接实例
②.更新yum源
yum -y update
③.检查防火墙
systemctl status firewalld #查看防火墙状态
systemctl stop firewalld  #临时关闭防火墙
systemctl disable firewalld #关闭开机自启防火墙
3.安装LAMP环境
①.安装 Apache Web 服务器的最新版本,以及适用于 Amazon Linux 2022 的 PHP 程序包
sudo yum install -y httpd wget php-fpm php-mysqli php-json php php-devel
②.安装 MariaDB 软件包
yum -y install mariadb mariadb-server
③.启动 Apache Web 服务器并设置开机自启
systemctl start httpd
systemctl enable httpd
systemctl is-enabled httpd #查看是否启动
④.mariadb,并初始化mairadb
systemctl start mariadb
systemctl enable mariadb
④.初始化数据库
mysql_secure_installation #设置数据库root用户密码
⑤.登录mysql,创建wordpress数据库和用户,演示采用密码很简单,仅作演示,请勿盲从
MariaDB [(none)]> create database `wordpress-db`;
MariaDB [(none)]> grant all privileges on `wordpress-db`.* to 'wordpress'@'localhost' identified by '000000';
MariaDB [(none)]> flush privileges;
⑥.测试php
echo "" > /var/www/html/phpinfo.php
http://Host_IP/phpinfo.php
⑦.删除phpinfo.php文件
rm -f /var/www/html/phpinfo.php
4.安装Wordpress并访问
①.下载wordpress 4.9 中文版
wget https://cn.wordpress.org/wordpress-4.9-zh_CN.tar.gz
②.解压tar包
tar -zxf wordpress-4.9-zh_CN.tar.gz
③.将wp-config-sample.php复制为wp-config.php,并编辑配置
cp wordpress/wp-config-sample.php wordpress/wp-config.php
vi wordpress/wp-config.php
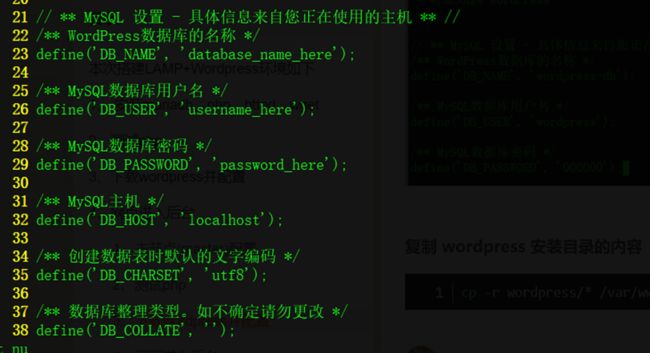
修改配置中数据库名称 数据库用户及密码
如图,修改如下行
23、26、29
分别设置之前创建的数据库名称,登录的数据库账号、密码,这里也可以创建wordpress专属数据库用户,这次仅作演示,请勿盲从

④.复制 wordpress 安装目录的内容到http目录下
[root@sh-host ~]# cp -r wordpress/* /var/www/html/
⑤.允许 WordPress 使用 permalink
[root@sh-host ~]# vi /etc/httpd/conf/httpd.conf
修改 151行附近的 AllowOverride None 为 AllowOverride All

⑥.重启httpd和mariadb服务
[root@sh-host ~]# systemctl restart httpd mariadb
⑦.访问网页后台,进行最终配置
至此,您的wordpress个人博客搭建完成,可以自己升级最新版本wordpress,也可以发布文章,承接广告
5.查看实例监控
安装云监控插件
阿里云实例云监控地址:https://cloudmonitornext.console.aliyun.com/hostMonitoring/all

按照本次测评惯例依旧查看一下实例的监控,从下图可以看到,在基于Alinux 3运行的LAMP架构的wordpress依旧是占用很低的实例资源,甚至在内存方面消耗得比CentOS更低

4.基于Aliux 3系统搭建LNMP架构部署Wordpress个人博客
由于官方文档中提供了Alinux2搭建LNMP架构方法,这里并不再演示,这里仅演示Alinux 3
1.首先更换系统
2.连接实例进行基础设置
①.首先连接实例
②.更新yum源
yum -y update
③.检查防火墙
systemctl status firewalld #查看防火墙状态
systemctl stop firewalld  #临时关闭防火墙
systemctl disable firewalld #关闭开机自启防火墙
2.安装LNMP环境
①.安装nginx
说明 本教程只提供一个版本的Nginx作为示例,如果您需要安装其他版本的Nginx,请参见常见问题。
运行以下命令安装Nginx。
yum -y install nginx
运行以下命令查看Nginx版本。
nginx -v
返回结果如下所示,表示Nginx安装成功。
nginx version: nginx/1.20.1
②.安装mariadb
yum -y install mariadb mariadb-server
启动mariadb并查看版本信息
systemctl start mariadb
systemctl enable mariadb
mysql -V
③.初始化数据库
mysql_secure_installation #设置数据库root用户密码
④.登录mysql,创建wordpress数据库和用户,演示采用密码很简单,仅作演示,请勿盲从
MariaDB [(none)]> create database `wordpress-db`;
MariaDB [(none)]> grant all privileges on `wordpress-db`.* to 'wordpress'@'localhost' identified by '000000';
MariaDB [(none)]> flush privileges;
⑤.安装php
yum -y install php php-fpm php-mysqlnd
⑥.测试php
echo "" > /usr/share/nginx/html/phpinfo.php
http://Host_IP/phpinfo.php
⑦.删除phpinfo.php文件
rm -f /usr/share/nginx/html/phpinfo.php
4.安装Wordpress并访问
①.下载wordpress 4.9 中文版
wget https://cn.wordpress.org/wordpress-4.9-zh_CN.tar.gz
②.解压tar包
tar -zxf wordpress-4.9-zh_CN.tar.gz
③.将wp-config-sample.php复制为wp-config.php,并编辑配置
cp wordpress/wp-config-sample.php wordpress/wp-config.php
vi wordpress/wp-config.php
修改配置中数据库名称 数据库用户及密码
如图,修改如下行
23、26、29
分别设置之前创建的数据库名称,登录的数据库账号、密码,这里也可以创建wordpress专属数据库用户,这次仅作演示,请勿盲从


④.复制 wordpress 安装目录的内容到nginx目录下
[root@sh-host ~]# cp -r wordpress/* /usr/share/nginx/html/
⑤.更改nginx目录权限
chown -R nginx:nginx /usr/share/nginx/
⑥.访问实例地址,进行配置
5.查看实例监控
安装云监控插件
阿里云实例云监控地址:https://cloudmonitornext.console.aliyun.com/hostMonitoring/all

从监控数据看到,Alibaba Linux 3 来搭建LNMP环境托管wordpress似乎用的平均内存比LAMP架构更低一点,依旧,整体部署下来,对C5.large实例没有任何负担,以很低的资源负载运行wordpress系统,说明c5.large完全能胜任该任务,也体现出阿里云ECS C5计算实例的强大性能
5. 基于LAMP架构部署Discuz论坛
1、 安装必要服务以及组件(使用离线源/也可使用在线源)
安装Apache 、mariadb-server、php、php-mysql //php-mysql是php连接mysql的组件
安装apache和mariadb-server:
yum -y install httpd mariadb-server php php-mysql
2. 启用http,mariadb服务并设置开机自启
systemctl start httpd mariadb
systemctl enable httpd mariadb
3.初始化数据库
mysql_secure_installation #设置数据库root用户密码
4.登录数据库并创建对应数据库,设置discuz数据库登录用户
mysql -uroot -p //根据自己设定的mysqlroot密码进行登陆
5.创建discuz的数据库:
MariaDB [(none)]> create database discuz;
#给discuz创建一个用户,并且赋予权限:
MariaDB [(none)]> grant  all  on  discuz.*   to  'ad-discuz'@'localhost' identified  by '000000';       //这里设置ad-discuz用户登录管理 discus 数据库 ,此步骤也可省略,之间使用root用户数据库进行连接
6、搭建Discuz!社区论坛
①.使用wget命令下载zip包并解压
安装wget和unzip命令
yum -y install wget unzip
wget http://download.comsenz.com/DiscuzX/3.2/Discuz_X3.2_SC_UTF8.zip  #获取zip源码包
unzip Discuz_X3.2_SC_UTF8.zip #使用unzip命令解压zip包
②.复制文件
复制upload中的文件到 /var/www/html 目录中,并使用chmod命令递归赋予777权限给html目录下的所有文件
cp -r upload/* /var/www/html/
chmod -R 777 /var/www/html/*    //请注意,不要打错命令,否则在安装时会提示不可写
③.重启httpd服务,使用浏览器进行部署
[root@sh-host ~]# systemctl restart httpd
④.安装步骤1:
⑤.安装步骤二,选择全新安装
⑥.安装步骤三,创建数据库,选择之前创建的数据库
⑦.等待安装完成
⑧.登录测试
7.查看实例监控数据
至此,Discuz论坛安装完成
6. 基于ubuntu搭建CasaOS 家庭云
CasaOS官网: https://www.casaos.io/
CasaOS Github项目地址: https://github.com/IceWhaleTech/CasaOS
1.系统选择
参考Github推荐的安装系统,这里使用Ubuntu server 20.04 amd 64

2.采用一键脚本进行安装
curl -fsSL https://get.icewhale.io/casaos.sh | bash
如果提示Downloading CasaOS 失败,请重新运行脚本即可,直至成功
![]()
3.然后访问你的公网IP地址
4.设置你的账号 密码 即可
5.在界面可以看到你的CasaOS云
点击应用中心 可以 以容器方式安装服务,包括常见的 NextCloud,Jellyfin,Emby,Qbittorrent等

6.应用安装演示
①.这里我点击安装一个NextCloud进行演示,安装完成后如下
②.点击NextCloud的图标即可,注意弹出的网站窗口的连接端口
注意端口开放
③.对nextcloud进行设置,包括管理员的账号密码,数据存储位置,以及数据库的设置,可以选配三种数据库,设置好后,滑动到下面,点击安装即可
④.至此,您的nextCloud 容器安装设置完成
6.查看安装了CasaOS并且运行一个NextCloud容器的服务器性能监控
7. 基于Ubuntu 20.04 64安装私有化部署版极狐GitLab
1. 安装和配置必须的依赖项
sudo apt-get update
sudo apt-get install -y curl openssh-server ca-certificates tzdata perl
2. 下载极狐GitLab 安装包并安装极狐GitLab
①.下载极狐GitLab 安装包。
# Ubuntu 16.04
wget https://omnibus.gitlab.cn/ubuntu/xenial/gitlab-jh_14.10.0-jh.0_amd64.deb
# Ubuntu 18.04
wget https://omnibus.gitlab.cn/ubuntu/bionic/gitlab-jh_14.10.0-jh.0_amd64.deb
# Ubuntu 20.04
wget https://omnibus.gitlab.cn/ubuntu/focal/gitlab-jh_14.10.0-jh.0_amd64.deb
②.接下来,安装极狐GitLab。
确保您已正确设置您的 DNS,并更改 https://gitlab.example.com 为您要访问极狐GitLab 实例的 URL。安装包将在该 URL 上自动配置和启动极狐GitLab。
对于 https 站点,极狐GitLab 将使用 Let’s Encrypt 自动请求 SSL 证书,这需要有效的主机名和入站 HTTP 访问。您也可以使用自己的证书或仅使用 http://(不带s)。
如果您想为初始管理员用户(root)指定自定义密码,请查看文档。如果未指定密码,将自动生成随机密码。
文档地址:https://docs.gitlab.cn/omnibus/installation/index.html#%E8%AE%BE%E7%BD%AE%E5%88%9D%E5%A7%8B%E5%AF%86%E7%A0%81
执行如下命令开始安装:
#请将https://gitlab.example.com 替换为您自己的域名,如果没有证书就使用 http://gitlab.example.com 采用http://
sudo EXTERNAL_URL="https://gitlab.example.com" dpkg -i gitlab-jh_14.10.0-jh.0_amd64.deb
③.等待安装完成
3. 访问极狐GitLab 实例并登录
查看系统生成密码
cat /etc/gitlab/initial_root_password
建议安装成功初始登录成功之后,立即修改初始密码)。使用此密码和用户名 root 登录。


4. 后续配置
请参阅GitLab官网
https://docs.gitlab.cn/jh/install/next_steps.html


