Vue3基础
Vue3基础
- 1. 搭建vue项目-vite方式
- 2. Vue声明式语法与数据双向绑定
- 3. Vue模板语法
-
- 3.1 插值
- 3.2 动态指令
- 4. 计算属性和侦听器
-
- 4.1 计算属性
- 4.2 watch侦听器
- 5. Class与Style绑定
-
- 5.1 类的样式
- 5.2 内联样式
- 6. 条件渲染与列表渲染
-
- 6.1 条件渲染: v-if 与 v-show
- 6.2 列表渲染: v-for
- 7. 事件处理
- 8. 表单输入绑定
- 9. 组件
-
- 9.1 组件的基本使用
- 9.2 子组件与父组件之间的数据传递
-
- (1)通过`props方式`将父组件的内容传递给子组件
- (2)通过自定义事件将子组件数据传递给父组件
- 10. vue2中的 过滤器 filter
官方文档
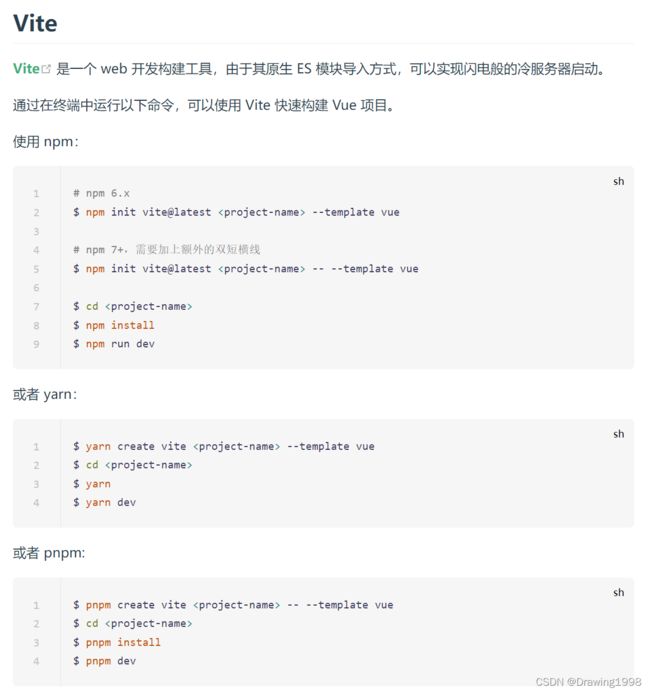
1. 搭建vue项目-vite方式
参考官方文档:

2. Vue声明式语法与数据双向绑定
<template>
    <h1 @click="changeMsg">{{msg}}h1>
    <input type="text" v-model="msg" />
template>

<script>
    export default {
        name: 'App',
        data(){
            return {
                msg: "Hello Vue"
            }
        },
        methods: {
            changeMsg(){
                this.msg="开心开心"
            }
        }
    }
script>

3. Vue模板语法

3.1 插值
{{ 文本插值 }}
<template>
<h1>{{msg}}h1>
<input type="text" v-model="msg" />
<h1 @click="changeMsg" v-once>这个值不会发生改变:{{ msg }}h1>
<div v-html="content">div>
<div :id="id">div>
<h1>{{msg.split('')}}h1>
<h1>{{msg.split('').reverse()}}h1>
<h1>{{msg.split('').reverse().join('')}}h1>
template>
<script>
export default {
name: 'App',
data(){
return {
msg: "Hello Vue",
content: "标题1
标题2
",
id: "d1"
}
},
methods: {
changeMsg(){
this.msg="开心开心",
this.id="d2"
}
}
}
script>
<style>
#d1{
width: 100px;
height: 100px;
background-color: blue;
}
#d2{
width: 100px;
height: 100px;
background-color:blueviolet;
}
style>

3.2 动态指令
指令 (Directives) 是带有 v- 前缀的特殊 attribute。指令的职责是,当表达式的值改变时,将其产生的连带影响,响应式地作用于 DOM。
<template>

    <div v-bind:[attributeName]="d1">div>
    <button @click="toggleColor">点击切换颜色button>
template>

<script>
    // 声明式
    export default{
        name: 'App',
        data() {
            return {
                attributeName: "class",
                d1: 'd1'
            }
        },
        methods: {
            toggleColor: function() {
                this.attributeName = "id"
            }
        }
    }
script>

<style>
    .d1{
        width: 100px;
        height: 100px;
        background-color: purple;
    }
    #d1{
        width: 100px;
        height: 100px;
        background-color: blue;
    }
style>

4. 计算属性和侦听器
4.1 计算属性
计算属性与方法的不同之处在于:计算属性将基于它们的响应依赖关系缓存。
<template>

    <div>{{ msg.split('').reverse().join('') }}div>
    <div>{{ reverseMsg }}div>
template>

<script>
    // 声明式
    export default{
        name: 'App',
        data() {
            return {
                msg: "Hello World"
            }
        },
        computed: {
            reverseMsg:function() {
                return this.msg.split('').reverse().join('')
            }
        }
    }
script>

4.2 watch侦听器
虽然计算属性在大多数情况下更合适,但有时也需要一个自定义的侦听器。这就是为什么 Vue 通过 watch 选项提供了一个更通用的方法来响应数据的变化。当需要在数据变化时执行异步或开销较大的操作时,这个方式是最有用的。
<template>

    <div>{{ msg.split('').reverse().join('') }}div>
    <div>{{ reverseMsg }}div>

    <input type="text" v-model="msg">
    <h1>{{msg}}h1>
template>

<script>
    // 声明式
    export default{
        name: 'App',
        data() {
            return {
                msg: "Hello World"
            }
        },
        computed: {
            reverseMsg:function() {
                return this.msg.split('').reverse().join('')
            }
        },
        watch: {     //侦听值的变化
            msg:function(newValue, oldValue){
                if(newValue.length < 8){
                    alert('输入的值太少了')
                }
            }
        }
    }
script>

5. Class与Style绑定
5.1 类的样式
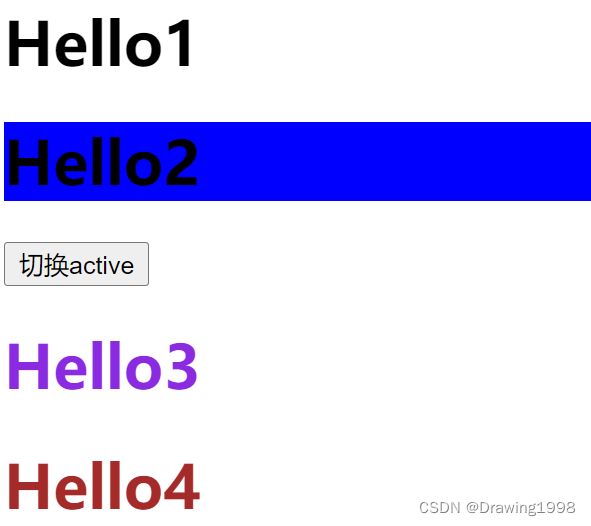
操作元素的 class 列表和内联样式是数据绑定的一个常见需求。因为它们都是 attribute,所以我们可以用 v-bind 处理它们:只需要通过表达式计算出字符串结果即可。不过,字符串拼接麻烦且易错。因此,在将 v-bind 用于 class 和 style 时,Vue.js 做了专门的增强。表达式结果的类型除了字符串之外,还可以是对象或数组
<template>


    <h1 :class="msg">Hello1h1>

    <h1 :class="{active:isActive}">Hello2h1>
    <button @click="toggleActive">切换activebutton>

    <h1 :class="arr">Hello3h1>

    <h1 :class="[classname4,{active:!isActive}]">Hello4h1>
template>

<script>
    // 声明式
    export default{
        name: 'App',
        data() {
            return {
                msg: "Hello World",
                isActive:false,
                arr:['swiper','active'],    //arr是一个数组
                classname4:"abc"
            }
        },
        methods: {
            toggleActive:function(){
                this.isActive = !this.isActive
                this.arr.pop()     //点击按钮之后删除arr的最后一个样式
                this.classname4="cba"
            }
        }
    }
script>

<style>
    .active{       /*active为true时显示该样式,为false时不显示该样式,这样就实现了一个切换的效果   */
        background-color:blue
    }
    .swiper{
        color: blueviolet;
    }
    .abc{
        color: white;
    }
    .cba{
        color: brown;
    }

style>

点击切换按钮后:
5.2 内联样式
<template>


    <h1 :style="msg">Hello1h1>

    <h1 :style="{background:'lightblue'}">Hello2h1>
    <button @click="toggleActive">切换activebutton>
    <h1 :style="styleObj">Hello3h1>

    <h1 :style="[styleObj,{width:'500px'}]">Hello4h1>
template>

<script>
import { getCurrentInstance } from "vue"

    // 声明式
    export default{
        name: 'App',
        data() {
            return {
                msg: "background:yellow",    //这里msg就用于设置样式了
                styleObj:{
                    'background-color':'green',     //如果遇到需要多个单词组成的样式,需要用引号引起来,也可以使用驼峰命名法
                    border:'3px solid black'
                }
            }
        },
        methods: {
            toggleActive:function(){
                this.styleObj.backgroundColor="skyblue"
            }
        }
    }
script>

切换后:

6. 条件渲染与列表渲染
6.1 条件渲染: v-if 与 v-show
<template>
    <div>
        <h1 v-if="user=='超级vip'">欢迎金主爸爸h1>
        <h1 v-else>充值会让你更强大h1>
        <button @click="toggleUser">vip过期button>


        <h1 v-show="isShow">切换显示内容h1>
        <button @click="toggleShow">切换button>
    div>
template>

<script>
import { getCurrentInstance } from "vue"

    // 声明式
    export default{
        name: 'App',
        data() {
            return {
                user:"超级vip",
                isShow:true
            }
        },
        methods:{
            toggleUser:function(){
                this.user="普通用户"
            },
            toggleShow:function(){
                this.isShow=!this.isShow
            }
        }
    }
script>
6.2 列表渲染: v-for
<template>
    <div>
        <ol>

            <li v-for="(item,i) in news" :key="i">{{item}}--->{{i}}li>

        ol>

        <ol>

            <li v-for="(item,i) in news1" :key="i">{{item.title}}--{{item.tag}}--{{item.num}}--->{{i}}li>
        ol>

        <ol>

            <li v-for="(item,i) in obj" :key="i">{{item}}li>
        ol>
    div>
template>

<script>
    // 声明式
    export default{
        name: 'App',
        data() {
            return{
                // news是数组
                news:[
                    'news1-balabala',
                    'news2-balabala',
                    'news3-balabala'
                ],
                // news1是对象
                news1:[
                    {
                        title:'news1-balabala',
                        tag:"沸",
                        num:"450万"
                    },
                    {
                        title:'news2-balabala',
                        tag:"新",
                        num:"520万"
                    },
                    {
                        title:'news3-balabala',
                        tag:"热",
                        num:"360万"
                    }
                ],
                obj:{
                    name:"zhao",
                    age:24,
                    city:"杭州"
                }
            }
        }
    }
script>

7. 事件处理
可以用 v-on 指令监听 DOM 事件,并在触发时运行一些 JavaScript 代码。
<template>
    <div>


        <h1 @click="addEvent">{{num}}h1>
        <h1 @click="num+=2">{{num}}h1>

        <h1 @click="addNumEvent(10)">{{num}}h1>

        <h1 @click="addNumEvent1(10,$event)">{{num}}h1>

        <h1 :style="{background:color}" @click="addNumEvent(10),changeColor()">{{num}}h1>

        <h1 @click.once="addNumEvent(10)">{{num}}h1>


         <input type="text" @keydown.enter="searchEvent">


    div>
template>

<script>
    // 声明式
    export default{
        name: 'App',
        data() {
            return{
                num:0,
                color:'blue'
            }
        },
        methods:{
            addEvent:function(){
                this.num += 2
            },
            addNumEvent:function(number){
                this.num += number
            },
            addNumEvent1:function(number,event){
                console.log(number)
                this.num += number
            },
            changeColor:function(){
                this.color='purple'
            },
            searchEvent:function(){
                console.log('按下了回车键')
            }
        }
    }
script>

8. 表单输入绑定

<template>
    <div>
        <input v-model="searchKey" type="text" @keydown.enter="searchEvent">
        <h1>{{searchKey}}h1>

        <input type="checkbox" name="like" v-model="checked" value="123">
        <h1>{{checked}}h1>

        <input type="checkbox" name="likes" v-model="fruits" value="苹果">苹果
        <input type="checkbox" name="likes" v-model="fruits" value="雪梨">雪梨
        <input type="checkbox" name="likes" v-model="fruits" value="香蕉">香蕉
        <input type="checkbox" name="likes" v-model="fruits" value="葡萄">葡萄
        <h1>{{fruits}}h1>

        <input type="radio" name="sex" v-model="picked" value="man">男
        <input type="radio" name="sex" v-model="picked" value="woman">女
        <h1>{{picked}}h1>

        <select name="city" v-model="city">
            <option value="北京">北京option>
            <option value="上海">上海option>
            <option value="广州">广州option>
            <option value="深圳">深圳option>
        select>
        <h1>{{city}}h1>

        <select name="city" v-model="citys" multiple>
            <option value="北京">北京option>
            <option value="上海">上海option>
            <option value="广州">广州option>
            <option value="深圳">深圳option>
        select>
        <h1>{{citys}}h1>

        <input type="checkbox" name="like" v-model="checked1" true-value="喜欢" false-value="不喜欢">
        <h1>{{checked1}}h1>

        <input v-model.lazy="searchKey" class="text" @keydown.enter="searchEvent">
        <h1>{{searchKey}}h1>

        <input v-model.lazy.number="searchKey" class="text" @keydown.enter="searchEvent">
        <h1>{{searchKey}}h1>

        <input v-model.lazy.trim="searchKey" class="text" @keydown.enter="searchEvent">
        <h1>{{searchKey}}h1>
    div>
template>

<script>
    // 声明式
    export default{
        data() {
            return{    //初始化的值
                searchKey:"百度一下",
                checked:false,     //默认情况下是未选中
                fruits:[],
                picked:"",
                city:"",
                citys:[],
                checked1:""
            }
        },
        methods:{
            searchEvent:function(){
                console.log('按下了回车键')
            }
        }
    }
script>
9. 组件
9.1 组件的基本使用
一般把我们创建的组件放在component目录下,组件名一般习惯用大写字母开头。
例如我们在component文件夹下创建Header.vue
<template>
    <div>
        <h1>这是头部组件h1>
    div>
template>
然后在文件中这样使用:
<template>
    <div>
        <Header>Header>
    div>
template>

<script>
    import Header from './components/Header.vue'
    // 声明式
    export default{
        components: { Header }
    }
script>
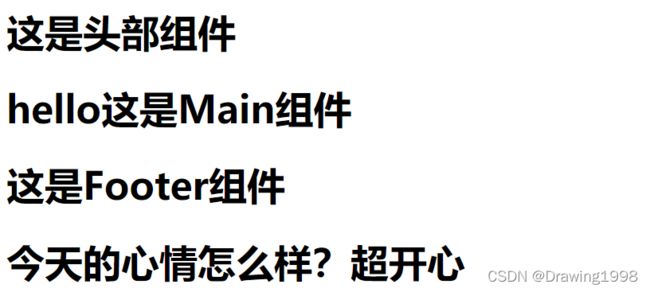
9.2 子组件与父组件之间的数据传递
(1)通过props方式将父组件的内容传递给子组件
子组件:News.vue
<template>
    <div>
        <h1>今天的心情怎么样?{{content}}h1>
    div>
template>

<script>
    export default{
        props:['content']
    }
script>
父组件:App.vue
<template>
    <div>
        <Header>Header>
        <Main>Main>
        <Footer>Footer>

        <News :content="Content">News>
    div>
template>

<script>
    import Header from './components/Header.vue'
    import Main from './components/Main.vue'
    import Footer from './components/Footer.vue'
    import News from './components/News.vue'
    // 声明式
    export default{
        data(){
            return{
                Content:"超开心"
            }
        },
        components: { Header,Main,Footer,News }
    }
script>
(2)通过自定义事件将子组件数据传递给父组件
子组件:Login.vue
<template>
    <div>
        <input type="text" v-model="username">
        <button @click="sendMsg">将数据提交给父组件button>
    div>
template>

<script>
    export default{
        data:function(){
            return {
                username:""
            }
        },
        methods:{
            sendMsg:function(){
                // 触发自定义事件,$emit(事件名称,传递的参数)
                this.$emit("sendParentMsg",this.username)   //将username传递给父组件
            }
        }
    }
script>
父组件:App.vue
<template>
    <div>

        <Login @sendParentMsg="getChildMsg">Login>
        <h1>从子组件获取到的值:{{msg}}h1>
    div>
template>

<script>
    import Login from './components/Login.vue'
    export default{
        data(){
            return{
                msg:""
            }
        },
        methods:{
            getChildMsg(value){
                this.msg=value
            }
        },
        components: { Login }
    }
script>

10. vue2中的 过滤器 filter
过滤器主要用于在视图中再次去处理你绑定的数据。
但是在vue3.x不能用过滤器,需要使用方法调用或计算属性来替换它们。
过滤器的用法参考官方文档