LSM-Tree - LevelDb布隆过滤器
引言
布隆过滤器有点类似哈希表,但是比哈希表的效率要更高,因为使用了位来判断Key是否存在,布隆过滤器在完成高效搜索key是否存在的同时带来一定的副作用-- 不保证Key一定存在,所以它只适用于允许一定容错率的系统。
一句话概括:Bloom Filter 是一个基于概率的数据结构,它只能告诉我们一个元素绝对不在集合内或可能在集合内。
布隆过滤器比较悬浮的东西是它不保证元素百分百在一个集合内,所以适用于具备一定容错的业务,关于它的理论和实践很多内容都是参考或者直接摘自网上的资料加上自己的理解,如有错误欢迎指正。
理论
理论基础相关文章都大同小异,这里归纳自这一篇大神写的文章:Bloom Filter概念和原理_jiaomeng的博客-CSDN博客_bloomfilter,简洁易懂,另外建议多参考原始论文,这里很多内容其实也是归纳自老外早已写出来的论文。
在这个网址中可以通过JS代码查看实际的运行效果:
Bloom Filters by Example (llimllib.github.io)
注意在案例中使用了Fnv和Murmur这两个简单的哈希函数。
对于一个布隆过滤器,通常有如下定义:
- n 个 key。
- m bits 的空间 v,全部初始化为0。
Bloom Filter 理论建议使用k个相互独立的哈希函数(Hash Function),用于表示
S={x1, x2,…,xn}的n个元素的集合,对任意一个元素x,第 i 个哈希函数映射的位置hi(x) 就会被置为1(1≤i≤k)。如果有多个哈希函数位置都为1,那么只有 第一个哈希结果被使用。比如下面的图中从左往右数第二个“1”所在的位置就是最终哈希函数选中位置。
为了判断当前的元素是否在集合当中,需要对于当前的元素y进行k次的哈希函数,如果所有的hi(y)次数是1(i <= i <= k中的次数都是1)就认为当前的元素y可能在集合中,否则就绝对不存在。
以下面的内容y1因为存在hash为0的结果,所以认为不存在于集合,而y2所有的hash都落在1上,可以认为可能存在集合。
布隆过滤器的理论内容相对简单,关键部分是哈希函数的选择和错误率的平衡。
错误率计算
首先布隆过滤器需要注意bit位长度,也就是数组长度。通常一个大的布隆过滤器会比小的布隆过滤器有更小的错误率。
误判率的计算公式为:(1-e^(-kn/m))^k。
推导过程如下,过程不是特别重要,了解最终公式即可:
n为key的个数,m为bits的位数(也就是数组大小)
根据这个公式可以发现,需要先确定可能插入的数据集的容量大小 _n_, 然后再调整 k 和 _m_ 来为你的应用配置过滤器,m 越大,k 越大, n 越小,那么误判率越小。
考虑到 p 为设置为0的概率,因此可以认为 m 有一半设置为1,一半设置为0时,误判率最低,注意这句话在最后的推导部分会详细介绍。
多少个哈希函数?
根据错误率计算结论,这里又有一个问题,就是究竟应该选择多少个哈希函数,哈希函数的过多容易导致计算效率降低影响性能,太少又会让误判率升高。
高兴的是,这个公式也有人推导出来了:
hash 函数 k 的最优个数为 ln2 * (m/n)。
可以通过以下的步骤来确定 Bloom filter 的大小:
- 确定 _n_ 的变动范围
- 选定 _m_ 的值
- 计算 _k_ 的最优值
- 对于给定的n, _m_, k计算错误率。如果这个错误率不能接受,那么回到第二步,否则结束
Bloom filter 的时间复杂度和空间复杂度?
插入和测试操作的时间复杂度都是 O(k),这是因为如果想要插入或者查询一个元素,只需要对于元素进行k次数的函数运算。
空间复杂度就比较难以估算了,因为误差率的存在,大小是难以确定的,如果难以估算一个过滤器的大小,最好选择一个哈希表或者一个可拓展的 Bloom filter。
注意⚠️:LevelDB的过滤器大小是不能少于64位的bit数组。
m中多少位数为1合适
直接记住结论:可以认为 m 有一半设置为1,一半设置为0时,误判率最低。
levelDB实现
LevelDB的布隆过滤器精髓在哈希函数上,它通过一个哈希达到多个哈希的性能,同时保证误判率在一定的限制。
具体的代码实现可以阅读bloom.cc:leveldb/bloom_test.cc at main · google/leveldb · GitHub
index.md介绍
这里先不深入源代码,先看看作者在index.md是如何解释的:
leveldb/index.md at main · google/leveldb · GitHub
由于leveldb数据在磁盘上的组织方式,一个Get()的调用可能涉及到从磁盘上多次读取,所以可选的FilterPolicy机制可以被用来可以用来大大减少磁盘读取的次数,其实这里就是指的使用布隆过滤器提高过滤效率。
leveldb::Options options;

options.filter_policy = NewBloomFilterPolicy(10);

leveldb::DB* db;

leveldb::DB::Open(options, "/tmp/testdb", &db);

... use the database ...

delete db;
// 注意,关闭leveldb的时候需要手动释放过滤器所占用内存空间
delete options.filter_policy;
前面的代码将基于布隆过滤器的过滤策略与数据库联系起来。
基于布隆过滤器的过滤依赖于在内存中为每个密钥保留一定数量的数据(本例中每个密钥为10bits,因为这是我们传递给NewBloomFilterPolicy的参数)。
这个过滤器将减少Get()调用所需的不必要的磁盘IO次数,提升效率大约是100倍。增加每一个key的位数将导致更大的减少,但代价占用是更多的内存。我们建议那些工作集不适合放在内存中的应用程序不适合在内存中使用,并且进行大量随机读取的应用程序设置一个过滤策略。
FilterPolicy
整个过滤器通过对外的接口FilterPolicy,目的是减少DB::Get()函数调用时间,通常内部默认使用布隆过滤器。
下面是接口定义的代码:
namespace leveldb {


class Slice;

class LEVELDB_EXPORT FilterPolicy {

public:

virtual ~FilterPolicy();

// Return the name of this policy. Note that if the filter encoding

// changes in an incompatible way, the name returned by this method

// must be changed. Otherwise, old incompatible filters may be

// passed to methods of this type.

/*返回该策略的名称。注意如果过滤器的编码变化,此方法返回的名称必须被改变。否则不兼容旧的过滤器可能被传递给这种类型的方法。
*/
virtual const char* Name() const = 0;


// keys[0,n-1] contains a list of keys (potentially with duplicates)

// that are ordered according to the user supplied comparator.

// Append a filter that summarizes keys[0,n-1] to *dst.

//

// Warning: do not change the initial contents of *dst. Instead,

// append the newly constructed filter to *dst.

/* keys[0,n-1] 包含一个键的列表(可能有重复的)。根据用户提供的比较器进行排序。将一个总结keys[0,n-1]的过滤器追加到*dst。

 警告:不要改变*dst的初始内容。 相反将新构建的过滤器追加到*dst中。
*/
virtual void CreateFilter(const Slice* keys, int n,

std::string* dst) const = 0;


// "filter" contains the data appended by a preceding call to

// CreateFilter() on this class. This method must return true if

// the key was in the list of keys passed to CreateFilter().

// This method may return true or false if the key was not on the

// list, but it should aim to return false with a high probability.
/*
 "filter "包含了前面对这个类的CreateFilter()的调用所附加的数据。如果键在传递给CreateFilter()的键列表中,该方法必须返回true。如果键不在列表中,该方法可能会返回true或false,但它应该以返回false的概率大为目标。
*/
virtual bool KeyMayMatch(const Slice& key, const Slice& filter) const = 0;

};

// 这一部分注释较多,放到后文介绍

LEVELDB_EXPORT const FilterPolicy* NewBloomFilterPolicy(int bits_per_key);


} // namespace leveldb


#endif // STORAGE_LEVELDB_INCLUDE_FILTER_POLICY_H_
bloom.cc
关于具体的代码解释放在了注释当中,比较值得关注的是创建过滤器的部分以及哈希函数的部分,这部分介绍的是过滤器本身的源代码,关键的哈希函数放到了下面的小节。
// Copyright (c) 2012 The LevelDB Authors. All rights reserved.

// Use of this source code is governed by a BSD-style license that can be

// found in the LICENSE file. See the AUTHORS file for names of contributors.


#include "leveldb/filter_policy.h"
#include "leveldb/Slice.h"

#include "util/hash.h"


namespace leveldb {


namespace {

// 哈希函数
static uint32_t BloomHash(const Slice& key) {
    // 注意 0xbc9f1d34
    return Hash(key.data(), key.size(), 0xbc9f1d34);

}


class BloomFilterPolicy : public FilterPolicy {

public:
    explicit BloomFilterPolicy(int bits_per_key) : bits_per_key_(bits_per_key) {

        // We intentionally round down to reduce probing cost a little bit
        // 我们有意四舍五入,以减少一点探测成本
        k_ = static_cast(bits_per_key * 0.69); // 0.69 =~ ln(2)

        if (k_ < 1) k_ = 1;

        if (k_ > 30) k_ = 30;

    }


const char* Name() const override { return "leveldb.BuiltinBloomFilter2"; }


void CreateFilter(const Slice* keys, int n, std::string* dst) const override {

    // Compute bloom filter size (in both bits and bytes)
    // 计算布过滤器的大小(包括比特和字节)。
    size_t bits = n * bits_per_key_;


    // For small n, we can see a very high false positive rate. Fix it

    // by enforcing a minimum bloom filter length.
    // 对于小的n,我们可以看到一个非常高的误判率。通过强制执行最小Bloom filter长度来解决这个问题。
    // tip: 这里就是之前说的如果bit位数过小会增加误判率
    if (bits < 64) bits = 64;

    size_t bytes = (bits + 7) / 8;
    // 至少有64个bits
    bits = bytes * 8;

    const size_t init_size = dst->size();
    // 调整容器的大小,使其包含_n个_元素。
    dst->resize(init_size + bytes, 0);

    dst->push_back(static_cast(k_)); // Remember # of probes in filter

    char* array = &(*dst)[init_size];

    for (int i = 0; i < n; i++) {

        // Use double-hashing to generate a sequence of hash values.
        // See analysis in [Kirsch,Mitzenmacher 2006].
        // 使用双重哈希法生成一连串的哈希值。见[Kirsch,Mitzenmacher 2006]中的分析。
        // tips: 原始论文请看参考资料 -> LNCS 4168 - Less Hashing, Same Performance: Building a Better Bloom Filter (harvard.edu)
        uint32_t h = BloomHash(keys[i]);

        const uint32_t delta = (h >> 17) | (h << 15); // // 向右旋转17位

        for (size_t j = 0; j < k_; j++) {

        const uint32_t bitpos = h % bits;

        array[bitpos / 8] |= (1 << (bitpos % 8));

        h += delta;

    }

}

}


    /*
        关键函数:

    */
    bool KeyMayMatch(const Slice& key, const Slice& bloom_filter) const override {

    const size_t len = bloom_filter.size();

    // 只有1位的过滤器无意义
    if (len < 2) return false;

    const char* array = bloom_filter.data();

    const size_t bits = (len - 1) * 8;

    // Use the encoded k so that we can read filters generated by
    // bloom filters created using different parameters.

    // 使用编码的k,这样我们就可以读取由 使用不同参数创建的bloom过滤器。
    const size_t k = array[len - 1];

    if (k > 30) {

        // 超过我们设定 k 个数,直接返回 true,不滤掉该 SSTable.

        // Reserved for potentially new encodings for short bloom filters.
        // Consider it a match.
        // 保留给可能出现的新编码的短Bloom过滤器。认为它是一种匹配。
        return true;

    }

    // 关键:哈希函数
    uint32_t h = BloomHash(key);
    // 右旋17位
    const uint32_t delta = (h >> 17) | (h << 15); // Rotate right 17 bits

    for (size_t j = 0; j < k; j++) {

        const uint32_t bitpos = h % bits;

        if ((array[bitpos / 8] & (1 << (bitpos % 8))) == 0) return false;

            h += delta;

        }

        return true;

    }


    private:

        size_t bits_per_key_;

        size_t k_;

        };

    } // namespace


    // 新的布隆过滤器策略(请看下文注释)
    const FilterPolicy* NewBloomFilterPolicy(int bits_per_key) {

        return new BloomFilterPolicy(bits_per_key);

    }


} // namespace leveldb NewBloomFilterPolicy函数
为什么叫做新的布隆过滤器策略,可以看作者所给的注释:
返回一个新的过滤策略,该策略使用一个Bloom过滤器,每个密钥大约有指定的每个密钥的比特数。键的比特数是10。
最终测试最佳值是10,这将产生一个误报率为1%的过滤器。
注意使用之后必须要手动释放掉相关对象内存:
调用者必须在使用该结果的任何数据库关闭后删除该结果,数据库被关闭后,调用者必须删除该结果。
如果使用的是自定义的比较器,它忽略了被比较的键的某些部分以及被比较的键的某些部分,这时候不允许使用NewBloomFilterPolicy(),而必须提供自定义的FilterPolicy实现,因为原始的过滤器它也忽略了键的相应部分。
例如,如果比较器忽略了尾部的空格,那么使用一个的FilterPolicy(比如NewBloomFilterPolicy),原始对FilterPolicy(如NewBloomFilterPolicy)行为就会出现失误,因为它不会忽略键的尾部空格。
hash.cc
之前说过关键的代码其中之一是优质的哈希函数,下面是hash.cc的相关代码:
注意这里的哈希函数使用的伪随机数种子为0xbc9f1d34,对应的10进制为9134。
这里也可以看到LevelDB利用自己的优质哈希函数,使得一个函数取代N个函数的效果,这算是对理论的调整,内部也控制levelDB长度最少为64个bit位。
/*
data:bit 位数
n:n 个 key
seed:种子,实际固定为 0xbc9f1d34
*/
uint32_t Hash(const char* data, size_t n, uint32_t seed) {

    // Similar to murmur hash
    // 类似杂音哈希
    const uint32_t m = 0xc6a4a793;

    const uint32_t r = 24;
    // limit指向了char*数组的最后一个位置的下一个位置,类似于迭代器end()
    const char* limit = data + n;

    uint32_t h = seed ^ (n * m);

    // Pick up four bytes at a time
    // 以4个字节作为一次解析
    while (data + 4 <= limit) {
        //  每次解码前4个字节,直到最后剩下小于4个字节

        // DecodeFixed32 低级别的Get...版本,直接从字符缓冲区读取 而不进行任何边界检查,最近的clang和gcc将其优化为一条 mov / ldr 指令。
        uint32_t w = DecodeFixed32(data);

        data += 4;

        h += w;

        h *= m;

        h ^= (h >> 16);

    }

    // Pick up remaining bytes
    // 处理剩余的字节
    switch (limit - data) {
        // 将剩下的字节转化到uint32_t里面
        case 3:
            // static_cast 表示的是良性转换,含义表示
            h += static_cast(data[2]) << 16;

            // FALLTHROUGH_INTENDED宏可以用来注解开关标签之间的隐性落差。真正的定义应该由外部提供。 这个是为不支持的编译器提供的后备版本。
            /*
            #ifndef FALLTHROUGH_INTENDED

            #define FALLTHROUGH_INTENDED \

            do { \

            } while (0)

            #endif
            */
            FALLTHROUGH_INTENDED;

        case 2:

            h += static_cast(data[1]) << 8;

            FALLTHROUGH_INTENDED;

        case 1:

            h += static_cast(data[0]);

            h *= m;

            h ^= (h >> r);

            break;

    }

    return h;

}
Slice.h
可以看作类似Redis的简单字符串sds设计,只不过语言使用的是c++。
相关解释可以阅读文档:
leveldb/index.md at main · google/leveldb · GitHub
Slice 是一个简单的数据结构,包含一个进入一些外部存储的指针和size。 Slice的用户必须确保在相应的外部存储被取消分配后不使用该Slice(用完必须手动释放内存)。
多个线程可以在一个Slice上调用const方法而不需要外部同步(线程安全对象),但如果任何一个线程可能会调用非const方法,所有访问同一Slice的线程都必须使用外部同步。
C++ 或者类C的 字符串可以简单的转化为Slice:
leveldb::Slice s1 = "hello";

std::string str("world");
leveldb::Slice s2 = str;
反过来也是一样的:
std::string str = s1.ToString();
assert(str == std::string("hello"));
在使用Slice时要小心因为要由调用者来确保Slice所指向的外部字节数组在Slice使用时保持有效。例如,下面的例子是错误的:
下面的例子中Slice将可能指向一个外部的引用,同时不保证外部引用存在。
leveldb::Slice Slice;
if (...) {
  std::string str = ...;
  Slice = str;
}
Use(Slice);
当if语句超出范围时,str将被销毁,Slice的存储内容将消失。
其他内容
单元测试
作者编写的单元测试可以更为直观的看到具体效果,路径为:/leveldb-main/util/bloom_test.cc。
// Copyright (c) 2012 The LevelDB Authors. All rights reserved.

// Use of this source code is governed by a BSD-style license that can be

// found in the LICENSE file. See the AUTHORS file for names of contributors.


#include "gtest/gtest.h"

#include "leveldb/filter_policy.h"

#include "util/coding.h"

#include "util/logging.h"

#include "util/testutil.h"


namespace leveldb {


    static const int kVerbose = 1;


    static Slice Key(int i, char* buffer) {

    EncodeFixed32(buffer, i);

        return Slice(buffer, sizeof(uint32_t));

    }


class BloomTest : public testing::Test {

    public:

    BloomTest() : policy_(NewBloomFilterPolicy(10)) {}


    ~BloomTest() { delete policy_; }


    void Reset() {

        keys_.clear();

        filter_.clear();

    }


    void Add(const Slice& s) { keys_.push_back(s.ToString()); }


    //
    void Build() {

        std::vector key_Slices;

        for (size_t i = 0; i < keys_.size(); i++) {

            key_Slices.push_back(Slice(keys_[i]));

        }

        filter_.clear();

        policy_->CreateFilter(&key_Slices[0], static_cast(key_Slices.size()),

        &filter_);

        keys_.clear();

        if (kVerbose >= 2) DumpFilter();

    }


    size_t FilterSize() const { return filter_.size(); }


    // 打印
    void DumpFilter() {

        std::fprintf(stderr, "F(");

        for (size_t i = 0; i + 1 < filter_.size(); i++) {

            const unsigned int c = static_cast(filter_[i]);

            for (int j = 0; j < 8; j++) {

            std::fprintf(stderr, "%c", (c & (1 << j)) ? '1' : '.');

        }

        }

        std::fprintf(stderr, ")\n");

    }


    // 匹配
    bool Matches(const Slice& s) {

        if (!keys_.empty()) {

            Build();

        }

        return policy_->KeyMayMatch(s, filter_);

    }


    double FalsePositiveRate() {

        char buffer[sizeof(int)];

            int result = 0;

            for (int i = 0; i < 10000; i++) {

            if (Matches(Key(i + 1000000000, buffer))) {

            result++;

        }

    }

    return result / 10000.0;

}


private:

    const FilterPolicy* policy_;

    std::string filter_;

    std::vector keys_;

};


TEST_F(BloomTest, EmptyFilter) {

    ASSERT_TRUE(!Matches("hello"));

    ASSERT_TRUE(!Matches("world"));

}


TEST_F(BloomTest, Small) {

    Add("hello");

    Add("world");

    ASSERT_TRUE(Matches("hello"));

    ASSERT_TRUE(Matches("world"));

    ASSERT_TRUE(!Matches("x"));

    ASSERT_TRUE(!Matches("foo"));

}


static int NextLength(int length) {

    if (length < 10) {

        length += 1;

    } else if (length < 100) {

        length += 10;

    } else if (length < 1000) {

        length += 100;

    } else {

        length += 1000;

    }

    return length;

}


TEST_F(BloomTest, VaryingLengths) {

    char buffer[sizeof(int)];


    // Count number of filters that significantly exceed the false positive rate

    int mediocre_filters = 0;

    int good_filters = 0;


    for (int length = 1; length <= 10000; length = NextLength(length)) {

    Reset();

    for (int i = 0; i < length; i++) {

    Add(Key(i, buffer));

}

    Build();


ASSERT_LE(FilterSize(), static_cast((length * 10 / 8) + 40))

<< length;


// All added keys must match

for (int i = 0; i < length; i++) {

    ASSERT_TRUE(Matches(Key(i, buffer)))

    << "Length " << length << "; key " << i;

}


// Check false positive rate

double rate = FalsePositiveRate();

    if (kVerbose >= 1) {

        std::fprintf(stderr,

        "False positives: %5.2f%% @ length = %6d ; bytes = %6d\n",

        rate * 100.0, length, static_cast(FilterSize()));

    }

    ASSERT_LE(rate, 0.02); // Must not be over 2%

    if (rate > 0.0125)

        mediocre_filters++; // Allowed, but not too often

    else

        good_filters++;

}

if (kVerbose >= 1) {

    std::fprintf(stderr, "Filters: %d good, %d mediocre\n", good_filters,

    mediocre_filters);

}

    ASSERT_LE(mediocre_filters, good_filters / 5);

}


// Different bits-per-byte


} // namespace leveldb
c++语法
补充:
个人并没有学过C++,所以这部分补充一些不理解的关键字和语法含义。
explicit
C++ 参考手册如下解释:
explicit修饰的构造函数不能被隐式调用。- 禁止类对象之间的隐式转换。
这篇文章我们关注的就是第一点:构造函数被explicit修饰后, 就不能再被隐式调用了。
这里用了网上相关的案例:
#include
#include
#include

class Explicit
{
    private:

    public:
        Explicit(int size)
        {
            std::cout << " the size is " << size << std::endl;
        }
        Explicit(const char* str)
        {
            std::string _str = str;
            std::cout << " the str is " << _str << std::endl;
        }

        Explicit(const Explicit& ins)
        {
            std::cout << " The Explicit is ins" << std::endl;
        }

        Explicit(int a,int b)
        {
            std::cout << " the a is " << a  << " the b is " << b << std::endl;
        }
};

int main()
{
    Explicit test0(15);
    Explicit test1 = 10;// 隐式调用Explicit(int size)

    Explicit test2("RIGHTRIGHT");
    Explicit test3 = "BUGBUGBUG";// 隐式调用Explicit(const char* str)

    Explicit test4(1, 10);
    Explicit test5 = test1;
} 虽然程序没有错误,但是把一个int类型或者const char*类型的变量赋值给Explicit类型的变量看起来总归不是很好,并且一旦使用出错很难排查,所以这时候构造函数被explicit修饰后, 就不能再被隐式调用了,添加关键字之后的效果不演示了,加上之后整个程序是无法通过编译的。
吐槽:很神经病的东西,在过去的版本中使用隐式调用提高编码效率,结果后面发现坑太大挖坑自己填。
resize函数
直接看下面的案例更容易理解:
- myvector.resize(5);
将原来有10个数的vector数组,调整为5个数的长度,多余的数删掉,释放内存。 5 < 10 减小数组长度 - myvector.resize(8,100);
将5个数长度的vector数组的长度调整为8,不够的数用100来填补,即增加了3个100。 8 > 5 增大数组长度,指定填充元素 - myvector.resize(12);
将8个数长度的vector数组的长度调整为12,用0默认填补,即增加了4个0。 12 > 8 增大数组长度,未指定填充元素
数学推导
推导部分给想要更加深入了解的人,可以直接记住上面的结论,看不懂也没关系。
下面的大部分内容来自论文根据 LNCS 4168 - Less Hashing, Same Performance: Building a Better Bloom Filter (harvard.edu) 翻译。
false position:误判率,也就是随着哈希和为1的bit位增加导致的误判率上升。
根据 bloom filter 的组成,对一个指定的 bit,其被设置为0、1的概率分别为:
P(1) = 1/m
P(0) = 1 - 1/m
k 个 hash 函数,该 bit 设置为 0 的概率为:
P'(0) = P(0) ** k = (1 - 1/m) ** k再经过 n 个 key,该 bit 设置为 0 的概率为
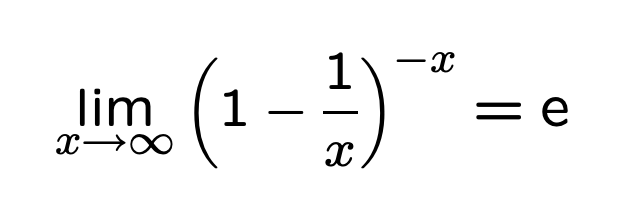
P''(0) = P'(0) ** n = (1 - 1/m) ** kn根据自然对数e的公式:
我们可以近似计算前面的P''(0)
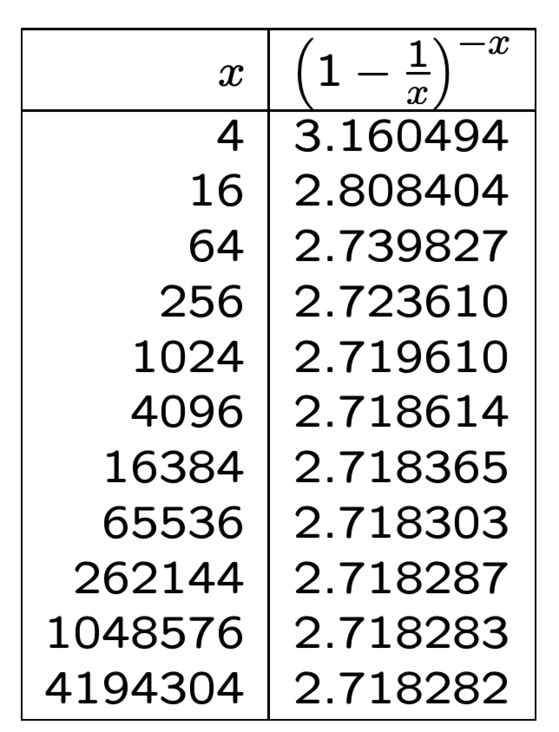
关于自然对数 e 的值,可以看下面的内容:
当检测某个实际不存在的 key 时,满足条件:
其对应的 k 个 bit 恰好都设置为了1,此时即 false positive 的场景。
概率为:
问题是,怎么最小化 false_positive 呢?
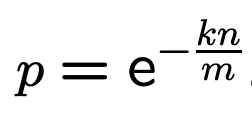
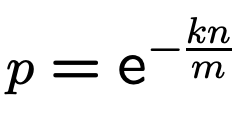
为了简化描述,先定义 p (即P''(0):某个 bit 设置为0的概率):
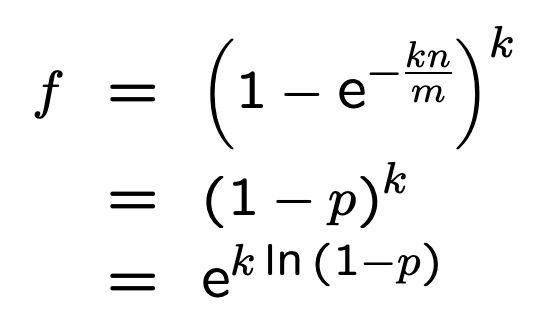
根据公式推导:
底数是 e,为固定值,那么最小化 false_positive_rate 即为最小化指数
根据之前的计算结果,我们可以做下面的变形:
最终得到结果 g:
根据对称性,当 p = 1/2 时,f 取得最小值。
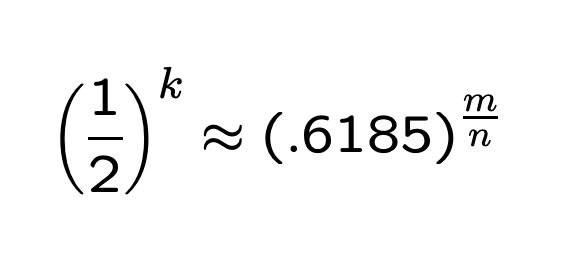
此时k、f最小值为:
最终的推导结果:
考虑到 p 为设置为0的概率,因此可以认为 m 有一半设置为1,一半设置为0时,误判率最低。
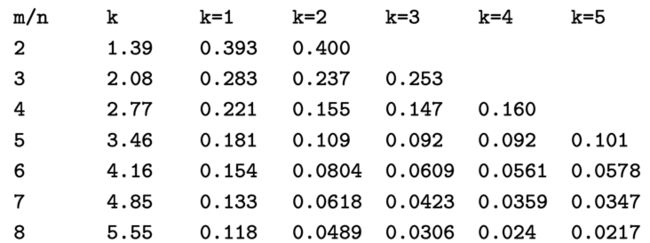
false position和m/n、k 的组合关系表例子可以下面的截图:
总结
Bloom Filter 通常用于快速判断某个元素是否在集合中。其本质上容忍一定的错误率来换取时空的高效性。
对于LevelDB的意义:在哈希表的基础上省下了冲突处理部分,LevelDB 在实现时使用了某种优化:利用一个哈希函数来达到近似 k 个哈希函数的效果。这样做实现了高效的并发写入同时不会牺牲过多的性能。
LevelDB除开哈希函数和针对并发写入的优化部分之外,其他部分都非常贴合布隆过滤器的理论基础,也是优秀的学习案例,作为C++版本的过滤器生产案例应用也是一个不错的参考范本。
最后,有问题找布隆准没错。
参考资料
下面的资料绝对能让你吃透布隆过滤器。
公众号请“阅读原文”获取访问链接。
- Bloom Filter概念和原理_jiaomeng的博客-CSDN博客_bloomfilter
- Bloom Filters by Example (llimllib.github.io)
- C++四种类型转换运算符:static_cast、dynamic_cast、const_cast和reinterpret_cast_C语言中文网 (biancheng.net)
- LNCS 4168 - Less Hashing, Same Performance: Building a Better Bloom Filter (harvard.edu)
- leveldb/index.md at main · google/leveldb · GitHub
- im2005b.pdf (harvard.edu)
- Compressed bloom filters - Networking, IEEE/ACM Transactions on (harvard.edu)
- leveldb笔记之9:bloom filter - Ying's Blog (izualzhy.cn)


