简单的SSM项目实现 持续更新(添加新的功能模块)
简单的SSM项目实现
代码上传到gitee了:https://gitee.com/key2136/ssmmin
1.版本信息
- Interllij IDEA 2020.1.1
- MySQL 5.7.19
- Tomcat 9
- Maven 3.6
2.搭建数据库
数据库名称为: zxc
/*
 Navicat MySQL Data Transfer

 Source Server         : location
 Source Server Type    : MySQL
 Source Server Version : 50729
 Source Host           : localhost:3306
 Source Schema         : zxc

 Target Server Type    : MySQL
 Target Server Version : 50729
 File Encoding         : 65001

 Date: 19/05/2022 15:52:35
*/

SET NAMES utf8mb4;
SET FOREIGN_KEY_CHECKS = 0;

-- ----------------------------
-- Table structure for phone
-- ----------------------------
DROP TABLE IF EXISTS `phone`;
CREATE TABLE `phone`  (
  `phoneId` int(11) NOT NULL AUTO_INCREMENT,
  `phoneName` varchar(255) CHARACTER SET utf8mb4 COLLATE utf8mb4_unicode_ci NULL DEFAULT NULL,
  `phonePrice` varchar(255) CHARACTER SET utf8mb4 COLLATE utf8mb4_unicode_ci NULL DEFAULT NULL,
  PRIMARY KEY (`phoneId`) USING BTREE
) ENGINE = InnoDB AUTO_INCREMENT = 4 CHARACTER SET = utf8mb4 COLLATE = utf8mb4_unicode_ci ROW_FORMAT = DYNAMIC;

-- ----------------------------
-- Records of phone
-- ----------------------------
INSERT INTO `phone` VALUES (1, '华为', '4000');
INSERT INTO `phone` VALUES (2, '苹果', '5000');
INSERT INTO `phone` VALUES (3, '小米', '3000');

-- ----------------------------
-- Table structure for user
-- ----------------------------
DROP TABLE IF EXISTS `user`;
CREATE TABLE `user`  (
  `username` varchar(255) CHARACTER SET utf8mb4 COLLATE utf8mb4_unicode_ci NOT NULL,
  `password` varchar(255) CHARACTER SET utf8mb4 COLLATE utf8mb4_unicode_ci NULL DEFAULT NULL,
  PRIMARY KEY (`username`) USING BTREE
) ENGINE = InnoDB CHARACTER SET = utf8mb4 COLLATE = utf8mb4_unicode_ci ROW_FORMAT = DYNAMIC;

-- ----------------------------
-- Records of user
-- ----------------------------
INSERT INTO `user` VALUES ('user', '123456');

SET FOREIGN_KEY_CHECKS = 1;
3.基本的环境搭配
1、新建一Maven项目!
添加web项目,添加tomcat,添加lib目录导包
参考: Intellij IDEA 建立一个新的 Spring MVC 模块_KEY的航行日记的博客-CSDN博客
【idea新建一个web项目】Intellij IDEA 2020.1.1创建Java web项目(详细图文教程)_KEY的航行日记的博客-CSDN博客
有些不完善,懒得改了
2、导入相关的pom.xml依赖 及 Maven静态资源过滤
<dependencies>

   <dependency>
       <groupId>junitgroupId>
       <artifactId>junitartifactId>
       <version>4.12version>
   dependency>

   <dependency>
       <groupId>mysqlgroupId>
       <artifactId>mysql-connector-javaartifactId>
       <version>5.1.47version>
   dependency>

   <dependency>
       <groupId>com.mchangegroupId>
       <artifactId>c3p0artifactId>
       <version>0.9.5.2version>
   dependency>


   <dependency>
       <groupId>javax.servletgroupId>
       <artifactId>servlet-apiartifactId>
       <version>2.5version>
   dependency>
   <dependency>
       <groupId>javax.servlet.jspgroupId>
       <artifactId>jsp-apiartifactId>
       <version>2.2version>
   dependency>
   <dependency>
       <groupId>javax.servletgroupId>
       <artifactId>jstlartifactId>
       <version>1.2version>
   dependency>


   <dependency>
       <groupId>org.mybatisgroupId>
       <artifactId>mybatisartifactId>
       <version>3.5.2version>
   dependency>
   <dependency>
       <groupId>org.mybatisgroupId>
       <artifactId>mybatis-springartifactId>
       <version>2.0.2version>
   dependency>


   <dependency>
       <groupId>org.springframeworkgroupId>
       <artifactId>spring-webmvcartifactId>
       <version>5.1.9.RELEASEversion>
   dependency>
   <dependency>
       <groupId>org.springframeworkgroupId>
       <artifactId>spring-jdbcartifactId>
       <version>5.1.9.RELEASEversion>
   dependency>
dependencies>


<build>
   <resources>
       <resource>
           <directory>src/main/javadirectory>
           <includes>
               <include>**/*.propertiesinclude>
               <include>**/*.xmlinclude>
           includes>
           <filtering>falsefiltering>
       resource>
       <resource>
           <directory>src/main/resourcesdirectory>
           <includes>
               <include>**/*.propertiesinclude>
               <include>**/*.xmlinclude>
           includes>
           <filtering>falsefiltering>
       resource>
   resources>
build>
3、建立基本结构和配置框架
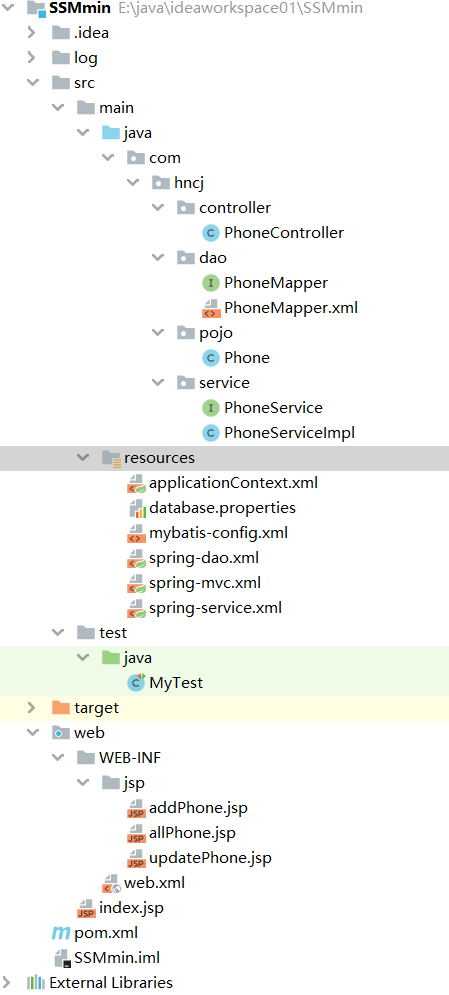
3.1、项目结构图
配置文件的头文件如下
- mybatis-config.xml
DOCTYPE configuration
       PUBLIC "-//mybatis.org//DTD Config 3.0//EN"
       "http://mybatis.org/dtd/mybatis-3-config.dtd">
<configuration>

configuration>
- applicationContext.xml
<beans xmlns="http://www.springframework.org/schema/beans"
      xmlns:xsi="http://www.w3.org/2001/XMLSchema-instance"
      xsi:schemaLocation="http://www.springframework.org/schema/beans
       http://www.springframework.org/schema/beans/spring-beans.xsd">

beans>
3、Mybatis层编写
3.2、Mybatis层编写
1、数据库配置文件
database.properties
jdbc.driver=com.mysql.jdbc.Driver
jdbc.url=jdbc:mysql:///zxc?useSSL=false&3useUnicode=true&characterEncoding=utf8
jdbc.username=root
jdbc.password=123456
2、IDEA关联数据库(可省略)
3、编写MyBatis的核心配置文件
mybatis-config.xml
DOCTYPE configuration
        PUBLIC "-//mybatis.org//DTD Config 3.0//EN"
        "http://mybatis.org/dtd/mybatis-3-config.dtd">
<configuration>


    <typeAliases>
        <package name="com.hncj.pojo"/>
    typeAliases>

    <mappers>
        <mapper resource="com/hncj/dao/PhoneMapper.xml"/>
    mappers>

configuration>
4、编写数据库对应的实体类
com.kuang.pojo.Phone
package com.hncj.pojo;

public class Phone {
    private int phoneId;
    private String phoneName;
    private String phonePrice;

    public Phone() {
    }
//添加 有参无参构造方法、set、get、toSting()  快捷键:Alt+Insert
5、编写Dao层的 Mapper接口!
com.hncj.dao.PhoneMapper
package com.hncj.dao;

import com.hncj.pojo.Phone;
import org.springframework.stereotype.Component;
import java.util.List;

public interface PhoneMapper {

    //    查询所有的手机
    List<Phone> queryAllPhone();

    //    添加一个手机
    int addPhone(Phone phone);

    //    根据id删除一个手机
    int deletePhone(int id);

    //    修改(更新)手机的信息
    int updatePhone(Phone phone);

    //    根据id返回一个Phone
    Phone queryPhoneById(int id);

}
6、编写接口对应的 Mapper.xml 文件。需要导入MyBatis的包;
com.hncj.dao.PhoneMapper.xml
DOCTYPE mapper
        PUBLIC "-//mybatis.org//DTD Mapper 3.0//EN"
        "http://mybatis.org/dtd/mybatis-3-mapper.dtd">

<mapper namespace="com.hncj.dao.PhoneMapper">


    <select id="queryAllPhone" resultType="Phone">
        select * from zxc.phone
    select>


    <insert id="addPhone" parameterType="Phone">
        insert into zxc.phone(phoneName,phonePrice)
        value (#{phoneName},#{phonePrice})
    insert>


    <delete id="deletePhone" parameterType="int">
        delete from zxc.phone where phoneID = #{phoneId}
    delete>


    <update id="updatePhone" parameterType="Phone">
        update zxc.phone set phoneName = #{phoneName},phonePrice = #{phonePrice}
        where phoneID = #{phoneId}
    update>


    <select id="queryPhoneById" resultType="Phone">
        select * from zxc.phone where phoneId = #{phoneId}
    select>

mapper>
7、编写Service层的接口和实现类
com.kuang.service.PhoneService
package com.hncj.service;

import com.hncj.pojo.Phone;
import org.springframework.stereotype.Service;
import java.util.List;

public interface PhoneService {

    //    查询所有的手机
    List<Phone> queryAllPhone();

    //    添加一个手机
    int addPhone(Phone phone);

    //    根据id删除一个手机
    int deletePhone(int id);

    //    修改(更新)手机的信息
    int updatePhone(Phone phone);

    //    根据id返回一个Phone
    Phone queryPhoneById(int id);

}
com.kuang.service.PhoneServiceImpl
package com.hncj.service;

import com.hncj.dao.PhoneMapper;
import com.hncj.pojo.Phone;
import org.springframework.stereotype.Component;

import java.util.List;

@Component
public class PhoneServiceImpl implements PhoneService {

    private PhoneMapper phoneMapper;

    //调用dao层的操作,设置一个set接口,方便Spring管理
    //set方式注入IOC容器中, 在spring-service.xml配置注入
    public void setPhoneMapper(PhoneMapper phoneMapper) {
        this.phoneMapper = phoneMapper;
    }

    public List<Phone> queryAllPhone() {
        return phoneMapper.queryAllPhone();
    }

    public int addPhone(Phone phone) {
        return phoneMapper.addPhone(phone);
    }

    public int deletePhone(int id) {
        return phoneMapper.deletePhone(id);
    }

    public int updatePhone(Phone phone) {
        return phoneMapper.updatePhone(phone);
    }

    public Phone queryPhoneById(int id) {
        return phoneMapper.queryPhoneById(id);
    }

}
到此,底层需求操作编写完毕!
3.3、Spring层
1、配置Spring整合MyBatis,我们这里数据源使用c3p0连接池;
2、我们去编写Spring整合Mybatis的相关的配置文件;
spring-dao.xml
<beans xmlns="http://www.springframework.org/schema/beans"
       xmlns:xsi="http://www.w3.org/2001/XMLSchema-instance"
       xmlns:context="http://www.springframework.org/schema/context"
       xsi:schemaLocation="http://www.springframework.org/schema/beans
       http://www.springframework.org/schema/beans/spring-beans.xsd
       http://www.springframework.org/schema/context
       https://www.springframework.org/schema/context/spring-context.xsd">


    <context:property-placeholder location="classpath:database.properties"/>


    <bean id="dataSource" class="com.mchange.v2.c3p0.ComboPooledDataSource">
        <property name="driverClass" value="${jdbc.driver}"/>
        <property name="jdbcUrl" value="${jdbc.url}"/>
        <property name="user" value="${jdbc.username}"/>
        <property name="password" value="${jdbc.password}"/>


        <property name="maxPoolSize" value="30"/>
        <property name="minPoolSize" value="10"/>

        <property name="autoCommitOnClose" value="false"/>

        <property name="checkoutTimeout" value="10000"/>

        <property name="acquireRetryAttempts" value="2"/>
    bean>


    <bean id="sqlSessionFactory" class="org.mybatis.spring.SqlSessionFactoryBean">

        <property name="dataSource" ref="dataSource"/>

        <property name="configLocation" value="classpath:mybatis-config.xml"/>
    bean>


    <bean class="org.mybatis.spring.mapper.MapperScannerConfigurer">

        <property name="sqlSessionFactoryBeanName" value="sqlSessionFactory"/>

        <property name="basePackage" value="com.hncj.dao"/>
    bean>

beans>
3、Spring整合service层
<beans xmlns="http://www.springframework.org/schema/beans"
       xmlns:xsi="http://www.w3.org/2001/XMLSchema-instance"
       xmlns:context="http://www.springframework.org/schema/context"
       xsi:schemaLocation="http://www.springframework.org/schema/beans
   http://www.springframework.org/schema/beans/spring-beans.xsd
   http://www.springframework.org/schema/context
   http://www.springframework.org/schema/context/spring-context.xsd">


    <context:component-scan base-package="com.hncj.service" />


    <bean id="PhoneServiceImpl" class="com.hncj.service.PhoneServiceImpl">
        <property name="phoneMapper" ref="phoneMapper"/>
    bean>


    <bean id="transactionManager" class="org.springframework.jdbc.datasource.DataSourceTransactionManager">


        <property name="dataSource" ref="dataSource" />
    bean>
beans>
Spring层搞定!再次理解一下,Spring就是一个大杂烩,一个容器!对吧!
3.4、SpringMVC层
1、web.xml
<web-app xmlns="http://xmlns.jcp.org/xml/ns/javaee"
         xmlns:xsi="http://www.w3.org/2001/XMLSchema-instance"
         xsi:schemaLocation="http://xmlns.jcp.org/xml/ns/javaee http://xmlns.jcp.org/xml/ns/javaee/web-app_4_0.xsd"
         version="4.0">


    <servlet>
        <servlet-name>DispatcherServletservlet-name>
        <servlet-class>org.springframework.web.servlet.DispatcherServletservlet-class>
        <init-param>
            <param-name>contextConfigLocationparam-name>

            <param-value>classpath:applicationContext.xmlparam-value>
        init-param>
        <load-on-startup>1load-on-startup>
    servlet>
    <servlet-mapping>
        <servlet-name>DispatcherServletservlet-name>
        <url-pattern>/url-pattern>
    servlet-mapping>


    <filter>
        <filter-name>encodingFilterfilter-name>
        <filter-class>
            org.springframework.web.filter.CharacterEncodingFilter
        filter-class>
        <init-param>
            <param-name>encodingparam-name>
            <param-value>utf-8param-value>
        init-param>
    filter>
    <filter-mapping>
        <filter-name>encodingFilterfilter-name>
        <url-pattern>/*url-pattern>
    filter-mapping>


    <session-config>
        <session-timeout>15session-timeout>
    session-config>

web-app>
2、spring-mvc.xml
<beans xmlns="http://www.springframework.org/schema/beans"
       xmlns:xsi="http://www.w3.org/2001/XMLSchema-instance"
       xmlns:context="http://www.springframework.org/schema/context"
       xmlns:mvc="http://www.springframework.org/schema/mvc"
       xsi:schemaLocation="http://www.springframework.org/schema/beans
   http://www.springframework.org/schema/beans/spring-beans.xsd
   http://www.springframework.org/schema/context
   http://www.springframework.org/schema/context/spring-context.xsd
   http://www.springframework.org/schema/mvc
   https://www.springframework.org/schema/mvc/spring-mvc.xsd">


    <mvc:annotation-driven/>

    <mvc:default-servlet-handler/>


    <bean class="org.springframework.web.servlet.view.InternalResourceViewResolver">
        <property name="viewClass" value="org.springframework.web.servlet.view.JstlView"/>
        <property name="prefix" value="/WEB-INF/jsp/"/>
        <property name="suffix" value=".jsp"/>
    bean>


    <context:component-scan base-package="com.hncj.controller"/>

beans>
3、Spring配置整合文件,applicationContext.xml
<beans xmlns="http://www.springframework.org/schema/beans"
      xmlns:xsi="http://www.w3.org/2001/XMLSchema-instance"
      xsi:schemaLocation="http://www.springframework.org/schema/beans
       http://www.springframework.org/schema/beans/spring-beans.xsd">

   <import resource="spring-dao.xml"/>
   <import resource="spring-service.xml"/>
   <import resource="spring-mvc.xml"/>

beans>
配置文件,暂时结束!
测试一下
这里做一个测试,检查一下底层代码是否搭建成功
    @Test
    public void Text1() {
        ApplicationContext con = new ClassPathXmlApplicationContext("applicationContext.xml");
        PhoneService phoneServiceImpl = (PhoneService) con.getBean("PhoneServiceImpl");
        for (Phone phone : phoneServiceImpl.queryAllPhone()) {
            System.out.println(phone);
        }
    }
在之前我遇到一个bug,bean注入失败,在下面这个文章里
【已解决】SSM中bean注入失败 Error creating bean with name ‘XXX.xml‘ defined in class path resource
3.5、Controller和视图层
PhoneController
package com.hncj.controller;

import com.hncj.pojo.Phone;
import com.hncj.service.PhoneService;
import org.springframework.beans.factory.annotation.Autowired;
import org.springframework.beans.factory.annotation.Qualifier;
import org.springframework.stereotype.Controller;
import org.springframework.ui.Model;
import org.springframework.web.bind.annotation.PathVariable;
import org.springframework.web.bind.annotation.RequestMapping;

import java.util.List;

/*
@Controller注解类型用于声明Spring类的实例是一个控制器
Spring可以使用扫描机制来找到应用程序中所有基于注解的控制器类,
为了保证Spring能找到你的控制器,需要在配置文件中声明组件扫描。
 */
/*
@RequestMapping注解用于映射url到控制器类或一个特定的处理程序方法。
可用于类或方法上。用于类上,表示类中的所有响应请求的方法都是以该地址作为父路径。
 */
@Controller
@RequestMapping("/phone")
public class PhoneController {

    /*
    @Autowired是根据byType自动装配的,加上@Qualifier则可以根据byName的方式自动装配
    @Qualifier不能单独使用。
     */
    @Autowired
    @Qualifier("PhoneServiceImpl")
    private PhoneService phoneService;

    //查询全部手机
    @RequestMapping("/allPhone")
    public String list(Model model){
        List<Phone> list = phoneService.queryAllPhone();
        model.addAttribute("list",list);
        return "allPhone";
    }

    //新增手机
    @RequestMapping("toAddPhone")
    public String toAddPhone(){
        return "addPhone";
    }
    @RequestMapping("addPhone")
    public String addPhone(Phone phone){
        phoneService.addPhone(phone);
        System.out.println(phone);
        return "redirect:/phone/allPhone";
    }

    //修改手机
    @RequestMapping("/toUpdatePhone")
    public String toUpdatePhone(Model model, int id){
        Phone phone = phoneService.queryPhoneById(id);
        System.out.println(phone);
        model.addAttribute("phone",phone);
        return "updatePhone";
    }

    @RequestMapping("/updatePhone")
    public String updatePhone(Model model,Phone phone){
        System.out.println(phone);
        phoneService.updatePhone(phone);
        Phone phone1 = phoneService.queryPhoneById(phone.getPhoneId());
        model.addAttribute("phone1",phone1);
        return "redirect:/phone/allPhone";
    }


    //删除手机
    @RequestMapping("/del/{id}")
    public String deletePhone(@PathVariable("id") int id){
        phoneService.deletePhone(id);
        return "redirect:/phone/allPhone";
    }
}
index.jsp
<%@ page language="java" contentType="text/html; charset=UTF-8" pageEncoding="UTF-8" %>
DOCTYPE HTML>
<html>
<head>
  <title>首页title>
  <style type="text/css">
    a {
      text-decoration: none;
      color: black;
      font-size: 18px;
    }
    h3 {
      width: 180px;
      height: 38px;
      margin: 100px auto;
      text-align: center;
      line-height: 38px;
      background: deepskyblue;
      border-radius: 4px;
    }
  style>
head>
<body>

<h3>
  <a href="${pageContext.request.contextPath}/phone/allPhone ">点击进入列表页a>
h3>
body>
html>
allphone.jsp
<%@ taglib prefix="c" uri="http://java.sun.com/jsp/jstl/core" %>
<%@ page contentType="text/html;charset=UTF-8" language="java" %>
<html>
<head>
    <title>手机列表title>
    <meta name="viewport" content="width=device-width, initial-scale=1.0">

    <link href="https://cdn.bootcss.com/bootstrap/3.3.7/css/bootstrap.min.css" rel="stylesheet">
head>
<body>

<div class="container">

    <div class="row clearfix">
        <div class="col-md-12 column">
            <div class="page-header">
                <h1>
                    <small>手机列表 —— 显示所有手机small>
                h1>
            div>
        div>
    div>

    <div class="row">
        <div class="col-md-4 column">
            <a class="btn btn-primary" href="${pageContext.request.contextPath}/phone/toAddPhone">新增a>
        div>
    div>

    <div class="row clearfix">
        <div class="col-md-12 column">
            <table class="table table-hover table-striped">
                <thead>
                <tr>
                    <th>手机编号th>
                    <th>手机名字th>
                    <th>手机价格th>
                    <th>操作th>
                tr>
                thead>

                <tbody>
                <c:forEach var="phone" items="${requestScope.get('list')}">
                    <tr>
                        <td>${phone.getPhoneId()}td>
                        <td>${phone.getPhoneName()}td>
                        <td>${phone.getPhonePrice()}td>
                        <td>
                            <a href="${pageContext.request.contextPath}/phone/toUpdatePhone?id=${phone.getPhoneId()}">更改a> |
                            <a href="${pageContext.request.contextPath}/phone/del/${phone.getPhoneId()}" onclick="return confirm('确认删除')">删除a>
                        td>
                    tr>
                c:forEach>
                tbody>
            table>
        div>
    div>
div>
addPhone.jsp
<%@ taglib prefix="c" uri="http://java.sun.com/jsp/jstl/core" %>
<%@ page contentType="text/html;charset=UTF-8" language="java" %>
<html>
<head>
    <title>修改信息</title>
    <meta name="viewport" content="width=device-width, initial-scale=1.0">
    <!-- 引入 Bootstrap -->
    <link href="https://cdn.bootcss.com/bootstrap/3.3.7/css/bootstrap.min.css" rel="stylesheet">
</head>
<body>
<div class="container">

    <div class="row clearfix">
        <div class="col-md-12 column">
            <div class="page-header">
                <h1>
                    <small>新增手机</small>
                </h1>
            </div>
        </div>
    </div>

    <form action="${pageContext.request.contextPath}/phone/addPhone" method="post">
        手机名字:<input type="text" name="phoneName"><br><br><br>
        手机价格:<input type="text" name="phonePrice"><br><br><br>
        <input type="submit" value="新增">
    </form>

</div>
updatePhone.jsp
<%@ taglib prefix="c" uri="http://java.sun.com/jsp/jstl/core" %>
<%@ page contentType="text/html;charset=UTF-8" language="java" %>
<html>
<head>
    <title>修改信息title>
    <meta name="viewport" content="width=device-width, initial-scale=1.0">

    <link href="https://cdn.bootcss.com/bootstrap/3.3.7/css/bootstrap.min.css" rel="stylesheet">
head>
<body>
<div class="container">

    <div class="row clearfix">
        <div class="col-md-12 column">
            <div class="page-header">
                <h1>
                    <small>修改信息small>
                h1>
            div>
        div>
    div>

    <form action="${pageContext.request.contextPath}/phone/updatePhone" method="post">
        <input type="hidden" name="phoneId" value="${phone.getPhoneId()}"/>
        手机名字:<input type="text" name="phoneName" value="${phone.getPhoneName()}"/>
        手机价格:<input type="text" name="phonePrice" value="${phone.getPhonePrice()}"/>
        <input type="submit" value="提交"/>
    form>

div>
到目前为止,这个SSM项目整合已经完全的OK了
接下来开始修改和添加其他功能
4、排错
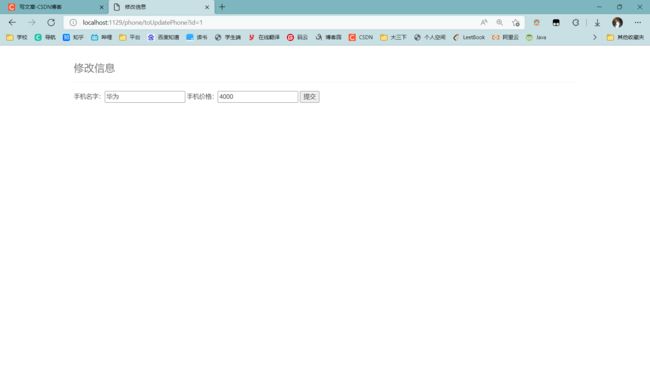
5、效果图
6、添加新功能 或 更改功能
最近在学别的东西,SSM先放一放,后续有时间会添加
1、添加模糊查询
PhoneMapper
    //模糊查询
    List<Phone> queryPhoneByName(String name);
PhoneMapper.xml
    <select id="queryPhoneByName" parameterType="String" resultType="Phone">
        select * from zxc.phone
        where phoneName like #{phoneName}
    select>
PhoneService
    //模糊查询
    List<Phone> queryPhoneByName(String name);
PhoneServiceImpl
 public List<Phone> queryPhoneByName(String phoneName) {
        return phoneMapper.queryPhoneByName(phoneName);
    }
PhoneController
    //模糊查询
    @RequestMapping("/queryPhone")
    public String likePhoneName(Model model,String phoneName){
        List<Phone> phones = phoneService.queryPhoneByName("%" + phoneName + "%");
        model.addAttribute("list",phones);
        return "allPhone";
    }
}
allPhone.jsp ps.注意添加的位置
 <div class="row">
        <div class="col-md-4 column">
            <a class="btn btn-primary" href="${pageContext.request.contextPath}/phone/toAddPhone">新增a>
        div>
        <div class="col-md-4 column">
            <form action="${pageContext.request.contextPath}/phone/queryPhone" method="post">
                <label>
                    <input type="text" name="phoneName" class="form-control" placeholder="请输入手机名称" required>
                label>
                <input type="submit" value="查询" class="btn btn-primary">
            form>
        div>
    div>


