一、什么是 Thymeleaf
Thymeleaf 是新一代的 Java 模板引擎,类似于 Velocity、FreeMarker 等传统引擎,其语言和 HTML 很接近,而且扩展性更高;
Thymeleaf 的主要目的是将优雅的模板引入开发工作流程中,并将 HTML 在浏览器中正确显示。同时能够作为静态引擎,让开发成员之间更方便协作开发;
Spring Boot 官方推荐使用模板,而且 Spring Boot 也为 Thymeleaf 提供了完整的自动化 配置解决方案;
Thymeleaf 使用教程请戳 Tutorial: Using Thymeleaf,配合 Spring 使用的教程请戳 Tutorial: Thymeleaf + Spring。
二、整合过程
准备过程
正式开始整合过程之前,这里先给出本文的搭建环境,方便大家进行后续内容的学习。
- JDK 11(理论上其他版本的 JDK 也是可以的,但是更为推荐 JDK 1.8 及以后的版本)
- IDEA(这里没有啥要求,但我个人的话是出新的版本我就会更新,虽然臃肿,但是更新了确实好用 )
- SpringBoot 2.x(现在主流应该都是 2.x 版本,1.x 的都是老一点的版本了)
添加 Thymeleaf 依赖
添加 Thymeleaf 依赖有两种方式:
- 第一种
在新建项目时添加,在 Templeate Engines 中勾选 Thymeleaf;
- 第二种
对于忘记在新建项目时未添加 Thymeleaf 依赖的项目,可以直接在项目的 pom.xml 中手动添加依赖即可;
    org.springframework.boot
    spring-boot-starter-thymeleaf
编写实体类和 Controller
- 新建实体类 User
这里因为使用 Lombok,所以省去了各种 setter、getter,同时还省去了各种构造方法和重写 toString() 等方法,大大简化了代码。而我们所要做的,仅仅是在 pom.xml 中添加 Lombok 的依赖,然后在我们的实体类中加入对应的注解即可。
以下是在 pom.xml 中插入 Lombok 依赖的对应代码。
    org.projectlombok
    lombok
    true
然后我们就可以编写我们的实体类,这里主要用到了 @Data、@Component、@AllArgsConstructor 、NoArgsConstructor 四个注解,其中各个注解的含义如下:
- @Component:把类实例化到 Spring 容器,相当于在配置文件中配置;
- @Data :给类的所有属性提供 get 和 set 方法,此外还有 equals、canEqual、hashCode、toString 方法以及 默认参数为空的构造方法;
- @AllArgsConstructor:为类提供一个 全参构造方法,但此时不再提供默认构造方法;
- @NoArgsConstructor:因为使用了 AllArgsConstructor 会导致类没有默认空参构造方法,所以此时需要它为类提供一个 无参构造方法;
package com.cunyu.pojo;

import lombok.AllArgsConstructor;
import lombok.Data;
import lombok.NoArgsConstructor;
import org.springframework.stereotype.Component;

/**
 * @author : cunyu
 * @version : 1.0
 * @className : User
 * @date : 2020/7/29 16:20
 * @description : User 实体类
 */

@Component
@Data
@AllArgsConstructor
@NoArgsConstructor
public class User {
    private int age;
    private String name;
    private String email;
}
- 编写 Controller
此时主要需要注意的是 setViewName() 和 addObject(),前者表示方法对应的前端页面,也就是我们模板中对应文件名的 .html 文件,而后者则主要给属性注入值,然后将属性传递到前端模板。
package com.cunyu.controller;

import com.cunyu.pojo.User;
import org.springframework.stereotype.Controller;
import org.springframework.web.bind.annotation.GetMapping;
import org.springframework.web.bind.annotation.RequestMapping;
import org.springframework.web.servlet.ModelAndView;

/**
 * @author : cunyu
 * @version : 1.0
 * @className : UserController
 * @date : 2020/7/29 16:22
 * @description : UserController
 */

@Controller
public class UserController {

    // 访问 ip:port/index
    @GetMapping("/index")
    public ModelAndView index() {
        ModelAndView modelAndView = new ModelAndView();
        // 设置跳转的视图,即位于 templates/index.html
        modelAndView.setViewName("index");
        modelAndView.addObject("title", "Thymeleaf 使用");
        modelAndView.addObject("desc", "Spring Boot 整合 Thymeleaf");

        User author = new User(25, "村雨遥", "[email protected]");

        modelAndView.addObject("author", author);
        return modelAndView;
    }
}
创建Thymeleaf 模板
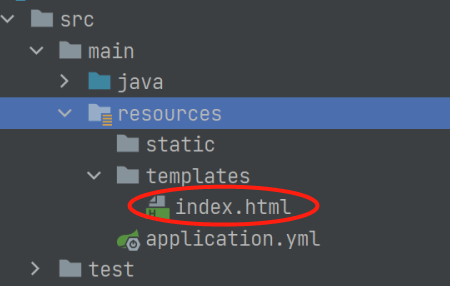
第上面的代码中,我们设置了跳转的视图为 index,所以我们需要在 src/main/resources/templates 中创建 index.html。
=====作者信息=====
三、测试
启动项目,然后在浏览器中访问 http://localhost:8080/index,如果出现下图中的信息,说明整合成功。
注意事项:
为了方便使用,我们在使用 Thymeleaf 模板时,可以添加一些自己的配置。而添加的位置则是项目的配置文件 application.yml,项目默认配置文件应该是 application.properties,但 SpringBoot 更加推荐使用 yml 来配置,所以我们这里需要手动将其改为 yml 的格式。
spring:
  thymeleaf:
    cache: false
    prefix: classpath:/templates/
    suffix: .html
    mode: HTML
    encoding: UTF-8
    servlet:
      content-type: text/html
总结:
本文主要介绍了 Themeleaf 的相关简介,然后对利用 SpringBoot 整合 Thymeleaf 的过程进行了描述,最后则是使用 Thymeleaf 中常用的一些相关配置的注意事项。
到此这篇关于Spring Boot 整合 Thymeleaf 详情的文章就介绍到这了,更多相关Spring Boot 整合 Thymeleaf 内容请搜索脚本之家以前的文章或继续浏览下面的相关文章希望大家以后多多支持脚本之家!

