SpringCloud-微服务配置统一管理SpringCloud Config,java工程师面试突击
public static void main(String[] args) {
SpringApplication.run(ConfigApplication.class, args);
}
}
![]()
4、添加application属性文件:
server.port=9000
spring.application.name=config-server-9000
spring.cloud.config.server.git.uri=https://gitee.com/lfalex/spring-cloud-repo
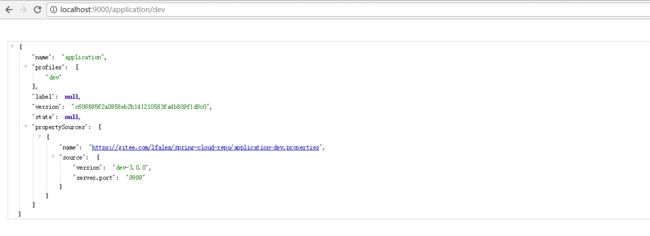
5、启动项目,简单测试,访问:localhost:9000/application/dev,localhost:9000/application-dev.properties:
访问规则:
![]()
/{appication}/{profile}/[{label}]
/{application}-{profile}.yml
/{application}-{profile}.properties
/{label}/{application}-{profile}.properties
/{label}/{application}-{profile}.yml
![]()
它们都可以映射到对应的配置文件{application}-{profile}.properties,其中{label}为具体的分支,默认为master;
创建客户端(一般为具体的微服务):
1、创建Maven项目 config-client,添加依赖:
![]()
org.springframework.boot
spring-boot-starter-web
org.springframework.cloud
spring-cloud-starter-config
org.springframework.boot
spring-boot-starter-actuator
![]()
2、创建一般启动类即可,无需添加注解,创建Controller,为测试做准备:
![]()
@Value("${version}")
private String version;
@RequestMapping("/getVersion")
public String getVersion() {
return this.version;
}
![]()
3、为了更明显的测试Config是否生效,在application配置文件中添加:
server.port=9001
4、添加bootstrap.properties配置文件,bootstrap.properties为默认文件名,在springcloud中配置文件有个优先级的概念,当本地application.properties文件和bootstrap.properties文件中配置了同样的属性不同的值,由于bootstrap的优先级高,则在bootstrap中的属性不会被application中的覆盖,反而会覆盖掉application中的配置:
![]()
#对应着config server所获取配置文件的{application}和URL
spring.application.name=application
spring.cloud.config.uri=http://localhost:9000/
#对应着文件后面的后缀{p
《一线大厂Java面试题解析+后端开发学习笔记+最新架构讲解视频+实战项目源码讲义》
【docs.qq.com/doc/DSmxTbFJ1cmN1R2dB】 完整内容开源分享
rofile}
spring.cloud.config.profile=dev
#分支
spring.cloud.config.label=master
![]()
5、先启动服务器,再启动客户端,观察端口和页面,由于前面在application中添加了端口为9001,而远程仓库的配置文件中也添加了端口9999:
这样就实现了基本的远程配置仓库了,但是一旦有文件更改还得重新启动项目,这样就很有问题了,所以需要刷新,使用/refresh端点刷新:
1、在application或远程文件中添加:
#由于要使用actuator,所以必须要将安全权限关闭
management.security.enabled=false
2、在controller上添加注解@RefreshScope注解:
@RestController
@RefreshScope //非重启项目手动刷新配置注解
public class ConfigController {
。。。。
}
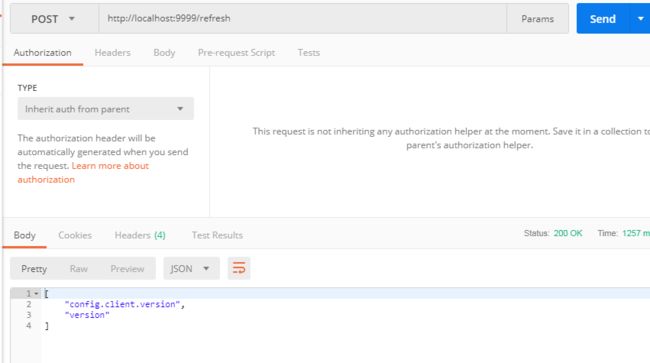
3、启动测试,打开,修改version=dev-3.0.0为version=dev-4.0.0,并发送刷新请求http://localhost:9999/refresh,刷新测试页面查看:
三、SpringCloud Bus自动刷新配置
=======================
前面的基于端点刷新,只针对一个服务,若为多个微服务,这样就很繁琐,所以需要一个可以集体刷新或指定刷新的组件=》SpringCloud Bus;
1、使用SpringCloud Bus需要使用RabbitMQ,未安装的请安装,基于之前的端点刷新的项目,添加依赖:
org.springframework.cloud
spring-cloud-starter-bus-amqp
==========
前面的基于端点刷新,只针对一个服务,若为多个微服务,这样就很繁琐,所以需要一个可以集体刷新或指定刷新的组件=》SpringCloud Bus;
1、使用SpringCloud Bus需要使用RabbitMQ,未安装的请安装,基于之前的端点刷新的项目,添加依赖:
org.springframework.cloud
spring-cloud-starter-bus-amqp


