权限框架SpringSecurity(一)——自定义登录
文章目录
- 1. 新建项目
- 2. 用户配置
-
- 2.1 配置文件
- 2.2 配置类
-
- 2.2.1 PasswordEncoder
- 2.2.2 配置类
- 3. 自定义表单登录页
-
- 3.1 服务端定义
- 3.2 自定义登录源码解析
- 4. 登录回调
-
- 4.1 登录成功回调
- 4.2 登录失败回调
- 5. 注销登录
最近在研究一个开源的后台管理系统
RuoYi,对于里面使用的 SpringSecurity,以前没用过,下面来学习一下。
RuoYi官网:https://doc.ruoyi.vip
1. 新建项目
新建Spring Boot项目,先引入web依赖
<dependency>
    <groupId>org.springframework.bootgroupId>
    <artifactId>spring-boot-starter-webartifactId>
dependency>
项目创建成功后,添加一个测试的 IndexController,内容如下
@RestController
public class IndexController {

    @RequestMapping("/index")
    public String index(){
        return "hello index";
    }
}
接下直接来启动项目,在浏览器中访问:http://localhost:8080/index,发现是可以任意访问的。
好了,下面来引入Spring Security依赖
<dependency>
    <groupId>org.springframework.bootgroupId>
    <artifactId>spring-boot-starter-securityartifactId>
dependency>
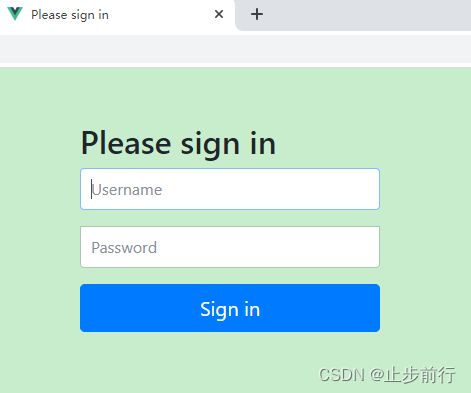
重新启动项目,再访问http://localhost:8080/index,发现跳转到下面这个登录页面了。没错,这就加入了权限校验。
那这个用户名和密码是什么呢?查看下项目启动过程日志,会看到如下一行日志:
Using generated security password: 210b9d32-323e-4467-bf26-e0563a3c3c34
这就是Spring Security为默认用户user生成的临时密码,是一个 UUID 字符串。
输入用户名密码,登录成功后,就可以访问到 /index接口。
在
Spring Security中,默认的登录页面和登录接口,都是/login,只不过一个是get请求(登录页面),另一个是post请求(登录接口)
可以看到,引入SpringSecurity依赖就可以保护了所有接口,很方便!!!
对于上面默认的用户名和随机生成的临时密码,看下源码。和用户相关的自动化配置类UserDetailsServiceAutoConfiguration
在控制台看到的日志就是这里打印出来的。打印的条件是 isPasswordGenerated() 方法返回 true,即密码是默认生成的。
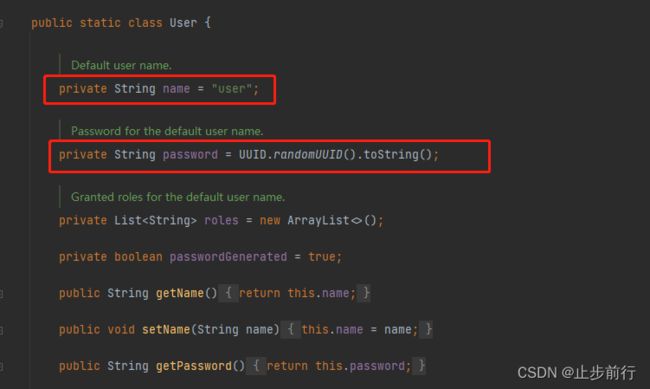
点击查看user.isPasswordGenerated()方法,发现会进入到 SecurityProperties 中,在 SecurityProperties 中可以看到静态内部类User定义:
看上面代码注释,默认的用户名就是 user,默认的密码则是 UUID,而默认情况下,passwordGenerated 也为 true。解密成功!
2. 用户配置
2.1 配置文件
默认密码每次重启项目都会变,很不方便。如果不用默认用户名和密码,可以在 application.properties 中配置默认的用户名密码。怎么配置呢?
继续查看SecurityProperties类,默认的用户就在这定义,如果要自定义自己的用户名密码,必然是要去覆盖默认配置,看下 SecurityProperties 的定义:
@ConfigurationProperties(prefix = "spring.security")
public class SecurityProperties {}
看到@ConfigurationProperties注解是不是明白了,不明白的话,要补习Spring相关知识了。只需要以 spring.security.user 为前缀,去定义用户名密码即可:
spring.security.user.name=scorpios
spring.security.user.password=123456
这里关注下 User中的setPassword() 方法
public void setPassword(String password) {
	if (!StringUtils.hasLength(password)) {
		return;
	}
	this.passwordGenerated = false;
	this.password = password;
}
设置密码的同时,还设置了 passwordGenerated 属性为 false,这个属性设置为 false 之后,控制台就不会打印默认的密码,重启项目,就可以使用自定义的用户名密码登录。
2.2 配置类
除了在配置文件中配置自定义用户名密码外,还可以在配置类中配置自定义用户名密码。
在配置类中配置,需要指定PasswordEncoder,这个用户密码加密。在Spring Security 中提供了多种密码加密方案,官方推荐使用 BCryptPasswordEncoder。
BCryptPasswordEncoder 使用 BCrypt 强哈希函数,开发者在使用时可以选择提供 strength 和 SecureRandom 实例。strength 越大,密钥的迭代次数越多,密钥迭代次数为 2^strength。strength 取值在 4~31 之间,默认为 10。BCryptPasswordEncoder 是 PasswordEncoder 接口的实现类。
2.2.1 PasswordEncoder
PasswordEncoder 接口中定义了三个方法
public interface PasswordEncoder {
    // 该方法用来对明文密码进行加密,返回加密之后的密文
	String encode(CharSequence rawPassword);

    // 该方法是一个密码校对方法,在用户登录时,将用户传来的明文密码和数据库中保存的密文密码作为参数,传入到这个方法中去,根据返回的Boolean值判断用户密码是否输入正确
	boolean matches(CharSequence rawPassword, String encodedPassword);

    // 是否还要进行再次加密,这个一般来说不用
	default boolean upgradeEncoding(String encodedPassword) {
		return false;
	}
}
看下这个接口的实现类
2.2.2 配置类
具体配置
@Configuration
public class SecurityConfig extends WebSecurityConfigurerAdapter {

    /**
     * 强散列哈希加密实现
     */
    @Bean
    PasswordEncoder passwordEncoder() {
        return NoOpPasswordEncoder.getInstance();
        // return new BCryptPasswordEncoder();
    }

    /**
     * 身份认证
     */
    @Override
    protected void configure(AuthenticationManagerBuilder auth) throws Exception {
        auth.inMemoryAuthentication()
                .withUser("admin")
                .password("123").roles("admin");
    }

    @Override
    protected void configure(HttpSecurity http) throws Exception {
        super.configure(http);
    }

    @Override
    public void configure(WebSecurity web) throws Exception {
        super.configure(web);
    }
}
-
自定义
SecurityConfig继承自WebSecurityConfigurerAdapter,重写里边的configure方法注意:这个configure方法有好几个重载方法,要区分一下
-
提供了
PasswordEncoder的实例,这里只是测试,先不对密码加密,所以返回NoOpPasswordEncoder的实例 -
configure方法通过inMemoryAuthentication来开启在内存中定义用户,withUser是用户名,password中是用户密码,roles中是用户角色,如果需要配置多个用户,用and相连
配置完成后,再次启动项目,此时再去访问 /index接口,就会发现只有 Java 代码中的用户名密码才能访问成功,application.properties配置文件中的用户名密码就无法登录
在配置类中添加用户方式,必须要提供一个PasswordEncoder实列,不然会报下面这个错:
There is no PasswordEncoder mapped for the id “null”
3. 自定义表单登录页
Spring Security提供的默认表单登录页面有点简单,如果想使用自己的登录页该怎么办?
3.1 服务端定义
继续关注 SecurityConfig 类,继续重写它的 configure(WebSecurity web) 和 configure(HttpSecurity http) 方法,如下:
@Override
public void configure(WebSecurity web) throws Exception {
    web.ignoring().antMatchers("/js/**", "/css/**","/images/**");
}

@Override
protected void configure(HttpSecurity http) throws Exception {
    http.authorizeRequests()
            .anyRequest().authenticated()
            .and()
            .formLogin()
            .loginPage("/login.html")
            .permitAll()
            .and()
            .csrf().disable();
}
web.ignoring()用来配置忽略掉的URL地址,一般对于静态文件采用此操作and方法表示结束当前标签,上下文回到HttpSecurity,开启新一轮的配置formLogin表示开启表单登录loginPage指定自定义登录页面permitAll表示登录相关的页面/接口不要被拦截- 关闭
csrf
当自定义了登录页面为 /login.html 时,Spring Security 也会自动注册一个 /login.html 接口,这个接口是 POST 请求,用来处理登录逻辑(这句话能不能理解?)
将登录页面相关静态文件放到 Spring Boot 项目的 resources/static 目录下即可:
<form action="/login.html" method="post">
    <div class="input">
        <label for="name">用户名label>
        <input type="text" name="username" id="username">
        <span class="spin">span>
    div>
    <div class="input">
        <label for="pass">密码label>
        <input type="password" name="password" id="password">
        <span class="spin">span>
    div>
    <div class="button login">
        <button type="submit">
            <span>登录span>
            <i class="fa fa-check">i>
        button>
    div>
form>
配置完成后,再去重启项目,此时访问任意接口,就会自动重定向到自定义的这个页面上来,输入用户名密码就可以重新登录了。
当自定义了登录页面为
/login.html时,Spring Security也会自动注册一个/login.html接口,这个接口是POST请求,用来处理登录逻辑再来想想这句话,并没有做其他操作,验证用户名和密码的过程并没有参与,
SpringSecurity是怎么验证的呢?就是你自定义登录页,它会自动注册一个/login.html接口,这个接口是POST请求在
Spring Security中,如果不做任何配置,默认的登录页面和登录接口的地址都是/login,当配置了loginPage为/login.html之后,这个配置从字面上理解,就是设置登录页面的地址为/login.html。实际上它还有一个隐藏的操作,就是登录接口地址也设置成
/login.html。换句话说,新的登录页面和登录接口地址都是/login.html,现在存在如下两个请求:
- GET http://localhost:8080/login.html 用户访问登录页面
- POST http://localhost:8080/login.html 用户校验用户点击登录后的用户名和密码
前面的 GET 请求用来获取登录页面,后面的 POST 请求用来提交登录数据。
登录页面和登录接口能不能分开配置呢?答案是肯定的,在 SecurityConfig 中,可以通过 loginProcessingUrl()方法来指定登录接口地址。这样配置之后,登录页面地址和登录接口地址就分开。
.and()
.formLogin()
.loginPage("/login.html")
.loginProcessingUrl("/doLogin")
.permitAll()
.and()
注意:这个接口/doLogin不需要自己编写,仍是SpringSecurity提供的。
3.2 自定义登录源码解析
下面看下源码:
Form 表单相关配置在 FormLoginConfigurer 中,该类继承 AbstractAuthenticationFilterConfigurer ,所以在 FormLoginConfigurer 初始化时,也会初始化AbstractAuthenticationFilterConfigurer ,在 AbstractAuthenticationFilterConfigurer 的构造方法中可以看到:
protected AbstractAuthenticationFilterConfigurer() {
    // 设置登录页面
	setLoginPage("/login");
}
这就是配置默认的 loginPage 为 /login。此外,FormLoginConfigurer 的初始化方法 init()方法中也调用了父类的 init()方法:
public void init(H http) throws Exception {
	super.init(http);
	initDefaultLoginFilter(http);
}
具体看一下在父类的init()方法中调用的 updateAuthenticationDefaults()方法:
protected final void updateAuthenticationDefaults() {
    // 设置登录接口
    if (this.loginProcessingUrl == null) {
        loginProcessingUrl(this.loginPage);
    }
    if (this.failureHandler == null) {
        failureUrl(this.loginPage + "?error");
    }
    LogoutConfigurer<B> logoutConfigurer = getBuilder().getConfigurer(LogoutConfigurer.class);
    if (logoutConfigurer != null && !logoutConfigurer.isCustomLogoutSuccess()) {
        logoutConfigurer.logoutSuccessUrl(this.loginPage + "?logout");
    }
}
如果没有给 loginProcessingUrl 设置值,默认就使用 loginPage 作为 loginProcessingUrl
4. 登录回调
对于客户端登录分为两种情况
- 前后端不分登录
- 前后端分离登录
4.1 登录成功回调
下面先介绍下前后端不分离登录。
Spring Security 和登录成功重定向 URL 相关的方法有两个:
defaultSuccessUrl()successForwardUrl()
对于上面两个方法,在配置时只需要配置一个即可,二者区别如下:
- 如果在
defaultSuccessUrl()中指定登录成功跳转页面为/index,此时分两种情况,如果是直接在浏览器中输入登录地址,登录成功后,就直接跳转到/index,如果是在浏览器中输入了其他地址,例如http://localhost:8080/hello,因为并没有登录,会重定向到登录页面,此时登录成功后会来到/hello页面 defaultSuccessUrl()有一个重载方法,第二个参数默认值为false,如果设置第二个参数为true,则defaultSuccessUrl()的效果和successForwardUrl一致successForwardUrl()表示无论请求是从哪里来的,登录后一律跳转到successForwardUrl()指定的地址。例如successForwardUrl()指定的地址为/index,在浏览器地址栏输入http://localhost:8080/hello,结果因为没有登录,重定向到登录页面,当你登录成功之后,就会服务端跳转到/index页面;或者你直接就在浏览器输入了登录页面地址,登录成功后也是来到/index
.and()
.formLogin()
.loginPage("/login.html")
.loginProcessingUrl("/doLogin")
.defaultSuccessUrl("/index")
.successForwardUrl("/index")
.permitAll()
.and()
4.2 登录失败回调
登录失败也有两个方法
failureForwardUrl()failureUrl()
failureForwardUrl() 是登录失败之后会发生服务端跳转,failureUrl() 则在登录失败之后,会发生重定向。
同样,二者配置其一即可。
服务器跳转,浏览器地址不会变;重定向是浏览器跳转,浏览器地址会发生改变;
5. 注销登录
注销登录默认接口是 /logout,自己也可以自定义配置。
.and()
.logout()
.logoutUrl("/logout")
.logoutRequestMatcher(new AntPathRequestMatcher("/logout","POST"))
.logoutSuccessUrl("/index")
.permitAll()
.and()
注销登录的配置:
-
默认注销的
URL是/logout,是一个GET请求,可以通过logoutUrl()方法来修改默认的注销URL -
logoutRequestMatcher()方法不仅可以修改注销URL,还可以修改请求方式,此方法和logoutUrl()任意设置一个即可 -
logoutSuccessUrl()表示注销成功后要跳转的页面


