Springboot 启动流程源码解析(广播器,以及内嵌tomcat启动)
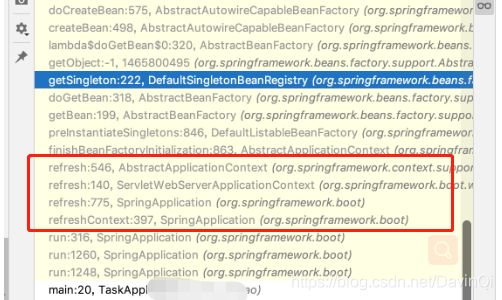
首先启动项目,跟踪方法调用栈:
1,触发时刻:
首先知道当spring容器启动时会执行 refresh()
@Override
public void refresh() throws BeansException, IllegalStateException {
	synchronized (this.startupShutdownMonitor) {

		prepareRefresh();
        // 用于获得一个新的 BeanFactory。该方法会解析所有 Spring 配置文件

		ConfigurableListableBeanFactory beanFactory = obtainFreshBeanFactory();


        // 准备bean工厂
        prepareBeanFactory(beanFactory);

		try {

            // spring的预留接口
			postProcessBeanFactory(beanFactory);


            // spring核心方法,实例化和调用所有 BeanFactoryPostProcessor
			invokeBeanFactoryPostProcessors(beanFactory);

            // 注册所有的bean 注册所有的  到 beanPostProcessors的List中
			registerBeanPostProcessors(beanFactory);

            // 初始化国际化信息
            initMessageSource();

			// 初始化单例的广播器,之后注册监听器、发布事件都基于该广播器执行
			initApplicationEventMulticaster();

			// 属于spring的预留接口,在后面的版本中扩展
			onRefresh();

			// 注册监听器到广播器中
			registerListeners();

            // spring核心 实例化bean,bean的整个生命周期也从这里开始
			finishBeanFactoryInitialization(beanFactory);

			finishRefresh();
		} catch (BeansException ex) {

			destroyBeans();

			cancelRefresh(ex);

			throw ex;
		} finally {
			resetCommonCaches();
		}
	}
这里主要看:
// 初始化单例的广播器,之后注册监听器、发布事件都基于该广播器执行
initApplicationEventMulticaster();
org.springframework.context.support.AbstractApplicationContext#initApplicationEventMulticaster
protected void initApplicationEventMulticaster() {
	// 获取bean工厂
	ConfigurableListableBeanFactory beanFactory = getBeanFactory();
	// 是否有 applicationEventMulticaster这个beanName
	if (beanFactory.containsLocalBean(APPLICATION_EVENT_MULTICASTER_BEAN_NAME)) {
		// 存在则实例化这个bean
		this.applicationEventMulticaster =
				beanFactory.getBean(APPLICATION_EVENT_MULTICASTER_BEAN_NAME, ApplicationEventMulticaster.class);
	}
	else {
		// 否则new 一个SimpleApplicationEventMulticaster 并注册单例到bean工厂
		this.applicationEventMulticaster = new SimpleApplicationEventMulticaster(beanFactory);
		beanFactory.registerSingleton(APPLICATION_EVENT_MULTICASTER_BEAN_NAME, this.applicationEventMulticaster);
	}
}
// 注册监听器到广播器中
registerListeners();
org.springframework.context.support.AbstractApplicationContext#registerListeners
// 注册到广播器
// Add beans that implement ApplicationListener as listeners. Doesn't affect other listeners, which can be added without being beans
// 添加将ApplicationListener实现为侦听器的bean。不影响其他监听器,可以添加而不是bean
protected void registerListeners() {
    // Register statically specified listeners first.
	// 获取所的 监听器 添加到广播器中
	for (ApplicationListener listener : getApplicationListeners()) {
		getApplicationEventMulticaster().addApplicationListener(listener);
	}

	// Do not initialize FactoryBeans here: We need to leave all regular beans
	// uninitialized to let post-processors apply to them!
    // 获取所的 监听器 添加到广播器的BeanName
	String[] listenerBeanNames = getBeanNamesForType(ApplicationListener.class, true, false);
	for (String listenerBeanName : listenerBeanNames) {
		getApplicationEventMulticaster().addApplicationListenerBean(listenerBeanName);
	}

	// Publish early application events now that we finally have a multicaster...
	// 在prepareRefresh()之后 ,registerListeners()之前、的都会缓存在这里进行统一发布
	// multicastEvent方法具体实现放在发布过程详解
	Set earlyEventsToProcess = this.earlyApplicationEvents;
	this.earlyApplicationEvents = null;
	if (earlyEventsToProcess != null) {
		for (ApplicationEvent earlyEvent : earlyEventsToProcess) {
			getApplicationEventMulticaster().multicastEvent(earlyEvent);
		}
	}
}
@Override
public void addApplicationListener(ApplicationListener listener) {
synchronized (this.retrievalMutex) {
// Explicitly remove target for a proxy, if registered already,
// in order to avoid double invocations of the same listener.
Object singletonTarget = AopProxyUtils.getSingletonTarget(listener);
if (singletonTarget instanceof ApplicationListener) {
this.defaultRetriever.applicationListeners.remove(singletonTarget);
}
this.defaultRetriever.applicationListeners.add(listener);
this.retrieverCache.clear();
}
}
@Override
public void addApplicationListenerBean(String listenerBeanName) {
synchronized (this.retrievalMutex) {
this.defaultRetriever.applicationListenerBeans.add(listenerBeanName);
this.retrieverCache.clear();
}
}就是放到这个对象里了
上述就是容器自己启动时发布的事件:
在上下中还有个发布的事件的地方:
@RunWith(value = SpringJUnit4ClassRunner.class)
@SpringBootTest(classes = Application.class)
public class ListenerTest implements ApplicationContextAware {
 private static Logger logger = LoggerFactory.getLogger(ListenerTest.class);

 private ApplicationContext context = null;

 @Override
 public void setApplicationContext(ApplicationContext applicationContext) throws BeansException {
  this.context = applicationContext;
 }

 @Test
 public void listener() {
  context.publishEvent(new MyEvent(this, "事件测试"));
 }

}
@Override
public void publishEvent(ApplicationEvent event) {
publishEvent(event, null);
}
protected void publishEvent(Object event, @Nullable ResolvableType eventType) {
Assert.notNull(event, "Event must not be null");
// 判断事件源是否实现了ApplicationEvent接口并进行转化
ApplicationEvent applicationEvent;
if (event instanceof ApplicationEvent) {
applicationEvent = (ApplicationEvent) event;
}
else {
// 如果没有也要封装成ApplicationEvent事件
applicationEvent = new PayloadApplicationEvent<>(this, event);
if (eventType == null) {
eventType = ((PayloadApplicationEvent) applicationEvent).getResolvableType();
}
}
// 在初始化应用上下文预处理方法(prepareRefresh)之后,注册监听器方法(registerListeners)之前,这期间的发布全部进行延迟发布,交由registerListeners方法统一发布
// 此时earlyApplicationEvents为null
if (this.earlyApplicationEvents != null) {
this.earlyApplicationEvents.add(applicationEvent);
}
else {
// 获取广播器并发布事件
getApplicationEventMulticaster().multicastEvent(applicationEvent, eventType);
}
// 通过父上下文发布事件
if (this.parent != null) {
if (this.parent instanceof AbstractApplicationContext) {
((AbstractApplicationContext) this.parent).publishEvent(event, eventType);
}
else {
this.parent.publishEvent(event);
}
}
}
我们发现调用的都是这个multicastEvent()
我们看下是怎么发布事件的:
org.springframework.context.event.SimpleApplicationEventMulticaster#multicastEvent(org.springframework.context.ApplicationEvent)
@Override
public void multicastEvent(ApplicationEvent event) {
	multicastEvent(event, resolveDefaultEventType(event));
}


@Override
public void multicastEvent(final ApplicationEvent event, @Nullable ResolvableType eventType) {
	// 包装事件源,可以方便解析事件源的泛型
	ResolvableType type = (eventType != null ? eventType : resolveDefaultEventType(event));
	// 获取任务执行(默认为空)
	Executor executor = getTaskExecutor();
	// 通过事件源和事件类型获取感知的监听器后遍历发布
	for (ApplicationListener listener : getApplicationListeners(event, type)) {
		// 如果有设置任务执行则使用任务执行发布
		if (executor != null) {
			executor.execute(() -> invokeListener(listener, event));
		}
		else {
			// 如果没有设置任务执行则直接发布
			invokeListener(listener, event);
		}
	}
}
看到这大概就懂了 ,getApplicationListeners()获取对应事件的监听器 ,再循环监听器,执行这个事件。
org.springframework.context.event.AbstractApplicationEventMulticaster#getApplicationListeners(org.springframework.context.ApplicationEvent, org.springframework.core.ResolvableType)
protected Collection> getApplicationListeners(ApplicationEvent event, ResolvableType eventType) {
	// 获取事件的源
	Object source = event.getSource();
	// 事件源的类型
	Class sourceType = (source != null ? source.getClass() : null);
	// 一个简单类,当做map的key使用,用以区分不同的事件类型并设置缓存
	ListenerCacheKey cacheKey = new ListenerCacheKey(eventType, sourceType);

	// 尝试从缓存获取
	ListenerRetriever retriever = this.retrieverCache.get(cacheKey);
	// 如果缓存不为空则返回监听器列表
	if (retriever != null) {
		return retriever.getApplicationListeners();
	}

	// 判断类是否可以缓存的
	if (this.beanClassLoader == null
			|| (ClassUtils.isCacheSafe(event.getClass(), this.beanClassLoader) && (sourceType == null || ClassUtils.isCacheSafe(sourceType, this.beanClassLoader)))) {
		// Fully synchronized building and caching of a ListenerRetriever
		synchronized (this.retrievalMutex) {
			// 典型的单例,再次尝试获取缓存
			retriever = this.retrieverCache.get(cacheKey);
			if (retriever != null) {
				return retriever.getApplicationListeners();
			}
			// 创建缓存的数据
			retriever = new ListenerRetriever(true);
			// 通过事件源查找符合的监听器
			Collection> listeners = retrieveApplicationListeners(eventType, sourceType, retriever);
			// 设置缓存
			this.retrieverCache.put(cacheKey, retriever);
			return listeners;
		}
	}
	else {
		// 通过事件源查找符合的监听器
		return retrieveApplicationListeners(eventType, sourceType, null);
	}
}
private Collection> retrieveApplicationListeners(
		ResolvableType eventType, @Nullable Class sourceType, @Nullable ListenerRetriever retriever) {

	// 查找的监听器集合
	List> allListeners = new ArrayList<>();
	Set> listeners;
	Set listenerBeans;
	synchronized (this.retrievalMutex) {
		// 获取前面注册监听器方法(registerListeners)注册的监听器
		listeners = new LinkedHashSet<>(this.defaultRetriever.applicationListeners);
		listenerBeans = new LinkedHashSet<>(this.defaultRetriever.applicationListenerBeans);
	}

	// 遍历硬编码注册的监听器
	for (ApplicationListener listener : listeners) {
		// 判断是否符合监听器
		if (supportsEvent(listener, eventType, sourceType)) {
			if (retriever != null) {
				// 为缓存添加的
				retriever.applicationListeners.add(listener);
			}
			// 添加到查找到的监听器中
			allListeners.add(listener);
		}
	}

	// 解析通过实现ApplicationListener接口的监听器
	if (!listenerBeans.isEmpty()) {
		// 获取bean工厂
		ConfigurableBeanFactory beanFactory = getBeanFactory();
		for (String listenerBeanName : listenerBeans) {
			try {
				// 判断是否符合监听器
				if (supportsEvent(beanFactory, listenerBeanName, eventType)) {
					// 通过bean工厂获取监听器
					ApplicationListener listener = beanFactory.getBean(listenerBeanName, ApplicationListener.class);

					// 如果不存在结果集中并且符合需要感知的监听器
					if (!allListeners.contains(listener) && supportsEvent(listener, eventType, sourceType)) {
						// 如果需要缓存
						if (retriever != null) {
							// 如果是单例,则添加监听器到缓存,否则添加beanName缓存
							if (beanFactory.isSingleton(listenerBeanName)) {
								retriever.applicationListeners.add(listener);
							}
							else {
								retriever.applicationListenerBeans.add(listenerBeanName);
							}
						}
						// 添加到查找到的监听器中
						allListeners.add(listener);
					}
				}
				else {
					// 删除不符合感知的监听器需要移除对应的缓存和监听器结果
					Object listener = beanFactory.getSingleton(listenerBeanName);
					if (retriever != null) {
						retriever.applicationListeners.remove(listener);
					}
					allListeners.remove(listener);
				}
			}
			catch (NoSuchBeanDefinitionException ex) {
				// Singleton listener instance (without backing bean definition) disappeared -
				// probably in the middle of the destruction phase
			}
		}
	}

	// 对监听器排序,如果存在@Order注解
	AnnotationAwareOrderComparator.sort(allListeners);
	// 如果applicationListenerBeans为空说明监听器全部在allListeners里,则清空applicationListeners重新添加即可
	// applicationListenerBeans为空说明没有非单例bean
	if (retriever != null && retriever.applicationListenerBeans.isEmpty()) {
		retriever.applicationListeners.clear();
		retriever.applicationListeners.addAll(allListeners);
	}
	// 反正最终查找到的监听器
	return allListeners;
}
org.springframework.context.event.SimpleApplicationEventMulticaster#invokeListener
事件执行:
protected void invokeListener(ApplicationListener listener, ApplicationEvent event) {
   ErrorHandler errorHandler = getErrorHandler();
   if (errorHandler != null) {
      try {
         doInvokeListener(listener, event);
      }
      catch (Throwable err) {
         errorHandler.handleError(err);
      }
   }
   else {
      doInvokeListener(listener, event);
   }
}
2,MVC容器初始化
我们在创建springMvc项目时会再启动的配置中配置一个ContextLoaderListener
比如传统的XML:
    contextConfigLocation
    classpath*:applictionContext.xml


   org.springframework.web.context.ContextLoaderListener


    dispatcher-servlet
    org.springframework.web.servlet.DispatcherServlet

      contextConfigLocation
      classpath*:springMVC-conf.xml


  dispatcher-servlet
  /*
public class ContextLoaderListener extends ContextLoader implements ServletContextListener {
	public ContextLoaderListener() {
	}

	public ContextLoaderListener(WebApplicationContext context) {
		super(context);
	}


	@Override
	public void contextInitialized(ServletContextEvent event) {
		initWebApplicationContext(event.getServletContext());
	}

	@Override
	public void contextDestroyed(ServletContextEvent event) {
		closeWebApplicationContext(event.getServletContext());
		ContextCleanupListener.cleanupAttributes(event.getServletContext());
	}
}
触发上下文: WebApplicationContext实例
//ContextLoader.java
public WebApplicationContext initWebApplicationContext(ServletContext servletContext) {
	//初始化Spring容器时如果发现servlet 容器中已存在根Spring容根器则抛出异常,证明rootWebApplicationContext只能有一个。
	if (servletContext.getAttribute(WebApplicationContext.ROOT_WEB_APPLICATION_CONTEXT_ATTRIBUTE) != null) {
		throw new IllegalStateException(
				"Cannot initialize context because there is already a root application context present - " +
				"check whether you have multiple ContextLoader* definitions in your web.xml!");
	}

	try {
		//创建webApplicationContext实例
		if (this.context == null) {
		    this.context = createWebApplicationContext(servletContext);
		}
		if (this.context instanceof ConfigurableWebApplicationContext) {
			ConfigurableWebApplicationContext cwac = (ConfigurableWebApplicationContext) this.context;
			if (!cwac.isActive()) {
				if (cwac.getParent() == null) {
					ApplicationContext parent = loadParentContext(servletContext);
					cwac.setParent(parent);
				}
				//配置WebApplicationContext
				configureAndRefreshWebApplicationContext(cwac, servletContext);
			}
		}

		/**
		   把生成的webApplicationContext设置成root WebApplicationContext。保存在ServletContext上下文中。
		   下一步初始化MVC ApplicationContext时需要从ServletContext取出根上下文作为其父上下文。
		**/
		servletContext.setAttribute(WebApplicationContext.ROOT_WEB_APPLICATION_CONTEXT_ATTRIBUTE, this.context);

		ClassLoader ccl = Thread.currentThread().getContextClassLoader();
		if (ccl == ContextLoader.class.getClassLoader()) {
			currentContext = this.context;
		}
		else if (ccl != null) {
			currentContextPerThread.put(ccl, this.context);
		}

		return this.context;
	}
	catch (RuntimeException | Error ex) {
		servletContext.setAttribute(WebApplicationContext.ROOT_WEB_APPLICATION_CONTEXT_ATTRIBUTE, ex);
		throw ex;
	}
}
Springboot 内嵌tomcat后 是如何启动的呢?
既然我们想知道tomcat在SpringBoot中是怎么启动的,那么run方法中,重点关注创建应用上下文(createApplicationContext)和刷新上下文(refreshContext)。
public ConfigurableApplicationContext run(String... args) {
        StopWatch stopWatch = new StopWatch();
        stopWatch.start();
        ConfigurableApplicationContext context = null;
        Collection exceptionReporters = new ArrayList();
        this.configureHeadlessProperty();
        SpringApplicationRunListeners listeners = this.getRunListeners(args);
        listeners.starting();

        Collection exceptionReporters;
        try {
            ApplicationArguments applicationArguments = new DefaultApplicationArguments(args);
            ConfigurableEnvironment environment = this.prepareEnvironment(listeners, applicationArguments);
            this.configureIgnoreBeanInfo(environment);
            Banner printedBanner = this.printBanner(environment);
            // 创建上下文
            context = this.createApplicationContext();
            exceptionReporters = this.getSpringFactoriesInstances(SpringBootExceptionReporter.class, new Class[]{ConfigurableApplicationContext.class}, context);
            this.prepareContext(context, environment, listeners, applicationArguments, printedBanner);

            // 刷新上下文 就是上文代码中的 refresh() 那。。。
            this.refreshContext(context);
            this.afterRefresh(context, applicationArguments);
            stopWatch.stop();
            if (this.logStartupInfo) {
                (new StartupInfoLogger(this.mainApplicationClass)).logStarted(this.getApplicationLog(), stopWatch);
            }

            listeners.started(context);
            this.callRunners(context, applicationArguments);
        } catch (Throwable var10) {
            this.handleRunFailure(context, var10, exceptionReporters, listeners);
            throw new IllegalStateException(var10);
        }

        try {
            listeners.running(context);
            return context;
        } catch (Throwable var9) {
            this.handleRunFailure(context, var9, exceptionReporters, (SpringApplicationRunListeners)null);
            throw new IllegalStateException(var9);
        }
    }
1设置系统属性『java.awt.headless』,为true则启用headless模式支持;
2,通过 SpringFactoriesLoader 检索 META-INF/spring.factories ,找到声明的所有SpringApplicationRunListener的实现类并将其实例化,之后逐个调用其started()方法,广播SpringBoot要开始执行了;
3 发布应用开始启动事件;
4 初始化参数
5 创建并配置当前SpringBoot应用将要使用的Environment(包括配置要使用的PropertySource以及Profile),并遍历调用所有的SpringApplicationRunListener的environmentPrepared()方法,广播Environment准备完毕。
6 打印banner;
7 创建应用上下文;
8 通过SpringFactoriesLoader检索META-INF/spring.factories,获取并实例化异常分析器;
9 为ApplicationContext加载environment,之后逐个执行ApplicationContextInitializer的initialize()方法来进一步封装ApplicationContext,并调用所有的SpringApplicationRunListener的contextPrepared()方法,【EventPublishingRunListener只提供了一个空的contextPrepared()方法】,之后初始化IoC容器,并调用SpringApplicationRunListener的contextLoaded()方法,广播ApplicationContext的IoC加载完成,这里就包括通过@EnableAutoConfiguration导入的各种自动配置类;
10 刷新上下文;
11 再一次刷新上下文,实现类扩展;
12发布应用已经启动的事件;
13遍历所有注册的ApplicationRunner和CommandLineRunner,并执行其run()方法(可以实现自己的ApplicationRunner或者CommandLineRunner,来对SpringBoot的启动过程进行扩展);
14 应用已经启动完成的监听事件。
也就是:
1. 配置属性 > 2. 获取监听器,发布应用开始启动事件 > 3. 初始化输入参数 > 4. 配置环境,输出 banner > 5. 创建上下文 > 6. 预处理上下文 > 7. 刷新上下文 > 8. 再刷新上下文 > 9. 发布应用已经启动事件 > 10. 发布应用启动完成事件。
创建上下文:
//创建上下文
protected ConfigurableApplicationContext createApplicationContext() {
	Class contextClass = this.applicationContextClass;
	if (contextClass == null) {
		try {
			switch(this.webApplicationType) {
				case SERVLET:
                    //创建AnnotationConfigServletWebServerApplicationContext
				    contextClass = Class.forName("org.springframework.boot.web.servlet.context.AnnotationConfigServletWebServerApplicationContext");
					break;
				case REACTIVE:
					contextClass = Class.forName("org.springframework.boot.web.reactive.context.AnnotationConfigReactiveWebServerApplicationContext");
					break;
				default:
					contextClass = Class.forName("org.springframework.context.annotation.AnnotationConfigApplicationContext");
			}
		} catch (ClassNotFoundException var3) {
			throw new IllegalStateException("Unable create a default ApplicationContext, please specify an ApplicationContextClass", var3);
		}
	}

	return (ConfigurableApplicationContext)BeanUtils.instantiateClass(contextClass);
}
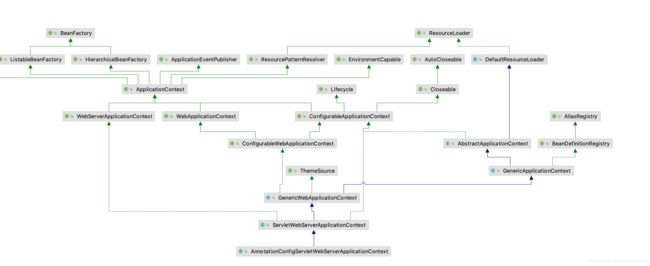
创建AnnotationConfigServletWebServerApplicationContext类。
而AnnotationConfigServletWebServerApplicationContext类继承了ServletWebServerApplicationContext,而这个类是最终集成了AbstractApplicationContext
刷新上下文:
run() -> this.refreshContext(context) ->refresh() .. -> onRefresh();org.springframework.boot.web.servlet.context.ServletWebServerApplicationContext#onRefresh
    protected void onRefresh() {
        super.onRefresh();

        try {
            this.createWebServer();
        } catch (Throwable var2) {
            throw new ApplicationContextException("Unable to start web server", var2);
        }
    }
private void createWebServer() {
WebServer webServer = this.webServer;
ServletContext servletContext = this.getServletContext();
if (webServer == null && servletContext == null) {
ServletWebServerFactory factory = this.getWebServerFactory();
// 创建一个WebServer
this.webServer = factory.getWebServer(new ServletContextInitializer[]{this.getSelfInitializer()});
} else if (servletContext != null) {
try {
this.getSelfInitializer().onStartup(servletContext);
} catch (ServletException var4) {
throw new ApplicationContextException("Cannot initialize servlet context", var4);
}
}
this.initPropertySources();
} public WebServer getWebServer(ServletContextInitializer... initializers) {
Tomcat tomcat = new Tomcat();
File baseDir = this.baseDirectory != null ? this.baseDirectory : this.createTempDir("tomcat");
tomcat.setBaseDir(baseDir.getAbsolutePath());
Connector connector = new Connector(this.protocol);
tomcat.getService().addConnector(connector);
this.customizeConnector(connector);
tomcat.setConnector(connector);
tomcat.getHost().setAutoDeploy(false);
this.configureEngine(tomcat.getEngine());
Iterator var5 = this.additionalTomcatConnectors.iterator();
while(var5.hasNext()) {
Connector additionalConnector = (Connector)var5.next();
tomcat.getService().addConnector(additionalConnector);
}
this.prepareContext(tomcat.getHost(), initializers);
return this.getTomcatWebServer(tomcat);
}
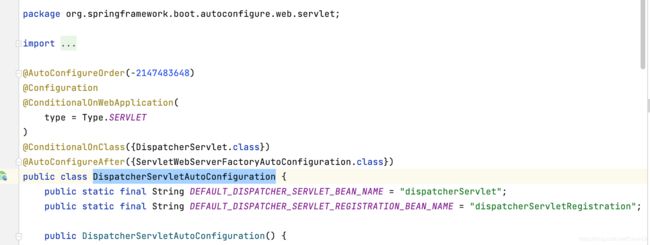
DispatcherServlet ..需要的Bean在哪里配置了呢 看下图
在 org.springframework.boot.autoconfigure 中有如下配置。
@Configuration
    @Conditional({DispatcherServletAutoConfiguration.DefaultDispatcherServletCondition.class})
    @ConditionalOnClass({ServletRegistration.class})
    @EnableConfigurationProperties({HttpProperties.class, WebMvcProperties.class})
    protected static class DispatcherServletConfiguration {
        private final HttpProperties httpProperties;
        private final WebMvcProperties webMvcProperties;

        public DispatcherServletConfiguration(HttpProperties httpProperties, WebMvcProperties webMvcProperties) {
            this.httpProperties = httpProperties;
            this.webMvcProperties = webMvcProperties;
        }

        @Bean(
            name = {"dispatcherServlet"}
        )
        public DispatcherServlet dispatcherServlet() {
            DispatcherServlet dispatcherServlet = new DispatcherServlet();
            dispatcherServlet.setDispatchOptionsRequest(this.webMvcProperties.isDispatchOptionsRequest());
            dispatcherServlet.setDispatchTraceRequest(this.webMvcProperties.isDispatchTraceRequest());
            dispatcherServlet.setThrowExceptionIfNoHandlerFound(this.webMvcProperties.isThrowExceptionIfNoHandlerFound());
            dispatcherServlet.setEnableLoggingRequestDetails(this.httpProperties.isLogRequestDetails());
            return dispatcherServlet;
        }

        @Bean
        @ConditionalOnBean({MultipartResolver.class})
        @ConditionalOnMissingBean(
            name = {"multipartResolver"}
        )
        public MultipartResolver multipartResolver(MultipartResolver resolver) {
            return resolver;
        }
    }
# Auto Configure
org.springframework.boot.autoconfigure.EnableAutoConfiguration=\
org.springframework.boot.autoconfigure.web.servlet.DispatcherServletAutoConfiguration,\
org.springframework.boot.autoconfigure.web.servlet.ServletWebServerFactoryAutoConfiguration,\
Target(ElementType.TYPE)
Retention(RetentionPolicy.RUNTIME)
@Documented
@Inherited
@AutoConfigurationPackage
@Import(AutoConfigurationImportSelector.class)
public @interface EnableAutoConfiguration {
String ENABLED_OVERRIDE_PROPERTY = "spring.boot.enableautoconfiguration";
/**
* Exclude specific auto-configuration classes such that they will never be applied.
* @return the classes to exclude
*/
Class[] exclude() default {};
/**
* Exclude specific auto-configuration class names such that they will never be
* applied.
* @return the class names to exclude
* @since 1.3.0
*/
String[] excludeName() default {};
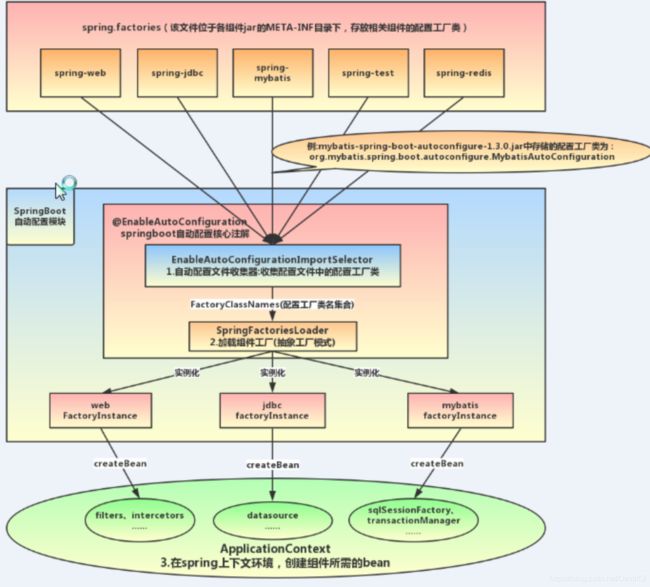
其中引入了@Import(AutoConfigurationImportSelector.class) 他是真正实现自动装配的关键类。
public String[] selectImports(AnnotationMetadata annotationMetadata) {
    //1.是否开启自动配置,默认开启
    if (!isEnabled(annotationMetadata)) {
        return NO_IMPORTS;
    }
    //2.从META-INF/spring-autoconfigure-metadata.properties文件中载入属性配置(有一些有默认值),获取注解信息
    AutoConfigurationMetadata autoConfigurationMetadata = AutoConfigurationMetadataLoader
            .loadMetadata(this.beanClassLoader);
    //3.获取所有的配置列表
    AutoConfigurationEntry autoConfigurationEntry = getAutoConfigurationEntry(autoConfigurationMetadata,
            annotationMetadata);
    return StringUtils.toStringArray(autoConfigurationEntry.getConfigurations());
}
    public static AutoConfigurationMetadata loadMetadata(ClassLoader classLoader) {
        return loadMetadata(classLoader, "META-INF/spring-autoconfigure-metadata.properties");
    }
protected AutoConfigurationImportSelector.AutoConfigurationEntry getAutoConfigurationEntry(AutoConfigurationMetadata autoConfigurationMetadata, AnnotationMetadata annotationMetadata) {
if (!this.isEnabled(annotationMetadata)) {
return EMPTY_ENTRY;
} else {
AnnotationAttributes attributes = this.getAttributes(annotationMetadata);
List configurations = this.getCandidateConfigurations(annotationMetadata, attributes);
configurations = this.removeDuplicates(configurations);
Set exclusions = this.getExclusions(annotationMetadata, attributes);
this.checkExcludedClasses(configurations, exclusions);
configurations.removeAll(exclusions);
configurations = this.filter(configurations, autoConfigurationMetadata);
this.fireAutoConfigurationImportEvents(configurations, exclusions);
return new AutoConfigurationImportSelector.AutoConfigurationEntry(configurations, exclusions);
}
} protected List getCandidateConfigurations(AnnotationMetadata metadata, AnnotationAttributes attributes) {
List configurations = SpringFactoriesLoader.loadFactoryNames(this.getSpringFactoriesLoaderFactoryClass(), this.getBeanClassLoader());
Assert.notEmpty(configurations, "No auto configuration classes found in META-INF/spring.factories. If you are using a custom packaging, make sure that file is correct.");
return configurations;
}
上述代码说明加载了两文件中的:
META-INF/spring.factories 和 META-INF/spring-autoconfigure-metadata.properties 的文件的class的路径:
package org.springframework.context.annotation;
import org.springframework.core.type.AnnotationMetadata;
/**
* Interface to be implemented by types that determine which @{@link Configuration}
* class(es) should be imported based on a given selection criteria, usually one or more
* annotation attributes.
*
* An {@link ImportSelector} may implement any of the following
* {@link org.springframework.beans.factory.Aware Aware} interfaces, and their respective
* methods will be called prior to {@link #selectImports}:
*
* - {@link org.springframework.context.EnvironmentAware EnvironmentAware}
* - {@link org.springframework.beans.factory.BeanFactoryAware BeanFactoryAware}
* - {@link org.springframework.beans.factory.BeanClassLoaderAware BeanClassLoaderAware}
* - {@link org.springframework.context.ResourceLoaderAware ResourceLoaderAware}
*
*
* ImportSelectors are usually processed in the same way as regular {@code @Import}
* annotations, however, it is also possible to defer selection of imports until all
* {@code @Configuration} classes have been processed (see {@link DeferredImportSelector}
* for details).
*
* @author Chris Beams
* @since 3.1
* @see DeferredImportSelector
* @see Import
* @see ImportBeanDefinitionRegistrar
* @see Configuration
*/
public interface ImportSelector {
/**
* Select and return the names of which class(es) should be imported based on
* the {@link AnnotationMetadata} of the importing @{@link Configuration} class.
*/
String[] selectImports(AnnotationMetadata importingClassMetadata);
什么时候调用的这个方法?
如果该接口的实现类同时实现EnvironmentAware, BeanFactoryAware ,BeanClassLoaderAware或者ResourceLoaderAware,那么在调用其selectImports方法之前先调用上述接口中对应的方法,如果需要在所有的@Configuration处理完在导入时可以实现DeferredImportSelector(延迟导入)接口。
ConfigurationClassPostProcessor
org.springframework.context.annotation.ConfigurationClassPostProcessor#postProcessBeanFactory
-> new ConfigurationClassParser()
		// Parse each @Configuration class
		ConfigurationClassParser parser = new ConfigurationClassParser(
				this.metadataReaderFactory, this.problemReporter, this.environment,
				this.resourceLoader, this.componentScanBeanNameGenerator, registry);
     // 解析各种注解用的
	@Nullable
	protected final SourceClass doProcessConfigurationClass(ConfigurationClass configClass, SourceClass sourceClass)
			throws IOException {

		if (configClass.getMetadata().isAnnotated(Component.class.getName())) {
			// Recursively process any member (nested) classes first
			processMemberClasses(configClass, sourceClass);
		}

		// 解析 @PropertySource 注解
		for (AnnotationAttributes propertySource : AnnotationConfigUtils.attributesForRepeatable(
				sourceClass.getMetadata(), PropertySources.class,
				org.springframework.context.annotation.PropertySource.class)) {
			if (this.environment instanceof ConfigurableEnvironment) {
				processPropertySource(propertySource);
			}
			else {
				logger.info("Ignoring @PropertySource annotation on [" + sourceClass.getMetadata().getClassName() +
						"]. Reason: Environment must implement ConfigurableEnvironment");
			}
		}

		// 解析 @ComponentScan
		Set componentScans = AnnotationConfigUtils.attributesForRepeatable(
				sourceClass.getMetadata(), ComponentScans.class, ComponentScan.class);
		if (!componentScans.isEmpty() &&
				!this.conditionEvaluator.shouldSkip(sourceClass.getMetadata(), ConfigurationPhase.REGISTER_BEAN)) {
			for (AnnotationAttributes componentScan : componentScans) {
				// The config class is annotated with @ComponentScan -> perform the scan immediately
				Set scannedBeanDefinitions =
						this.componentScanParser.parse(componentScan, sourceClass.getMetadata().getClassName());
				// Check the set of scanned definitions for any further config classes and parse recursively if needed
				for (BeanDefinitionHolder holder : scannedBeanDefinitions) {
					BeanDefinition bdCand = holder.getBeanDefinition().getOriginatingBeanDefinition();
					if (bdCand == null) {
						bdCand = holder.getBeanDefinition();
					}
					if (ConfigurationClassUtils.checkConfigurationClassCandidate(bdCand, this.metadataReaderFactory)) {
						parse(bdCand.getBeanClassName(), holder.getBeanName());
					}
				}
			}
		}

		// 解析 @Import annotations
		processImports(configClass, sourceClass, getImports(sourceClass), true);

		// 解析 @ImportResource annotations
		AnnotationAttributes importResource =
				AnnotationConfigUtils.attributesFor(sourceClass.getMetadata(), ImportResource.class);
		if (importResource != null) {
			String[] resources = importResource.getStringArray("locations");
			Class readerClass = importResource.getClass("reader");
			for (String resource : resources) {
				String resolvedResource = this.environment.resolveRequiredPlaceholders(resource);
				configClass.addImportedResource(resolvedResource, readerClass);
			}
		}

		// 解析 @Bean 方法
		Set beanMethods = retrieveBeanMethodMetadata(sourceClass);
		for (MethodMetadata methodMetadata : beanMethods) {
			configClass.addBeanMethod(new BeanMethod(methodMetadata, configClass));
		}

		// Process default methods on interfaces
		processInterfaces(configClass, sourceClass);

		// Process superclass, if any
		if (sourceClass.getMetadata().hasSuperClass()) {
			String superclass = sourceClass.getMetadata().getSuperClassName();
			if (superclass != null && !superclass.startsWith("java") &&
					!this.knownSuperclasses.containsKey(superclass)) {
				this.knownSuperclasses.put(superclass, configClass);
				// Superclass found, return its annotation metadata and recurse
				return sourceClass.getSuperClass();
			}
		}

		// No superclass -> processing is complete
		return null;
	}
看这块就是读取所有的impor注解的地方:
processImports(configClass, sourceClass, getImports(sourceClass), true);这里会把上边的所有的导入的class。
那么这个方法是在什么时候执行的?
就是在上边 refresh()方法中的 invokeBeanFactoryPostProcessors() : 实例化和调用所有 BeanFactoryPostProcessor
protected void invokeBeanFactoryPostProcessors(ConfigurableListableBeanFactory beanFactory) {
		PostProcessorRegistrationDelegate.invokeBeanFactoryPostProcessors(beanFactory, getBeanFactoryPostProcessors());

		// Detect a LoadTimeWeaver and prepare for weaving, if found in the meantime
		// (e.g. through an @Bean method registered by ConfigurationClassPostProcessor)
		if (beanFactory.getTempClassLoader() == null && beanFactory.containsBean(LOAD_TIME_WEAVER_BEAN_NAME)) {
			beanFactory.addBeanPostProcessor(new LoadTimeWeaverAwareProcessor(beanFactory));
			beanFactory.setTempClassLoader(new ContextTypeMatchClassLoader(beanFactory.getBeanClassLoader()));
		}
	}
invokeBeanFactoryPostProcessors(registryProcessors, beanFactory); private static void invokeBeanFactoryPostProcessors(
Collection postProcessors, ConfigurableListableBeanFactory beanFactory) {
for (BeanFactoryPostProcessor postProcessor : postProcessors) {
postProcessor.postProcessBeanFactory(beanFactory);
}
}
postProcessBeanFactory 作用:在应用程序上下文的标准初始化之后修改其内部bean工厂。所有bean定义都将被加载,但是还没有bean被实例化,这允许覆盖或添加属性。
end。
