SpringBoot+SpringSecurity+Thymeleaf 演示CSRF攻击
目录
-
- 一、什么是CSRF?
- 二、演示CSRF攻击
-
- 2.1.添加pom依赖
- 2.2.添加UserDetailsService实现类
- 2.3.添加security配置类
- 2.4.添加控制器
- 2.5.添加html
- 2.6.创建攻击者项目
- 2.7.测试
- 三、防止CSRF攻击
-
- 3.1.调整代码
- 3.2.测试
- 四、原理
注意:如果对SpringSecurity不是很了解的,一定要先去读我的这一篇文章,写的非常详细
https://blog.csdn.net/weixin_43888891/article/details/124111885
通过本篇文章可以学到以下三点:
- 通过代码示例来 演示CSRF攻击!
- 通过security给我们提供的保护机制,来进行防止CSRF攻击
- security防止CSRF的原理
下方代码的源码链接:https://gitee.com/gzl_com/spring-security
一、什么是CSRF?
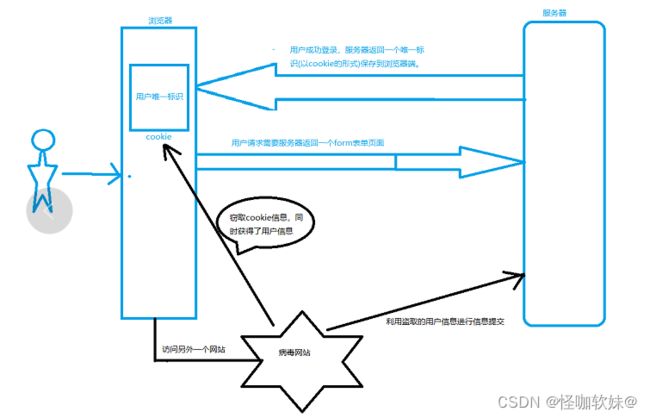
跨站请求伪造(英语:Cross-site request forgery),也被称为 one-click attack 或者 session riding,通常缩写为 CSRF 或者 XSRF, 是一种挟制用户在当前已登录的 Web 应用程序上执行非本意的操作的攻击方法。跟跨网站脚本(XSS)相比,XSS利用的是用户对指定网站的信任,CSRF 利用的是网站对用户网页浏览器的信任。
跨站请求攻击,简单地说,是攻击者通过一些技术手段欺骗用户的浏览器去访问一个自己曾经认证过的网站并运行一些操作(如发邮件,发消息,甚至财产操作如转账和购买商品)。由于浏览器曾经认证过,所以被访问的网站会认为是真正的用户操作而去运行。这利用了 web 中用户身份验证的一个漏洞:简单的身份验证只能保证请求发自某个用户的浏览器,却不能保证请求本身是用户自愿发出的。
从 Spring Security 4.0 开始,默认情况下会启用 CSRF 保护,以防止 CSRF 攻击应用程序,Spring Security CSRF 会针对 PATCH,POST,PUT 和 DELETE 方法进行防护。
二、演示CSRF攻击
本案例直接演示假如我不开启CSRF保护会出现什么情况。
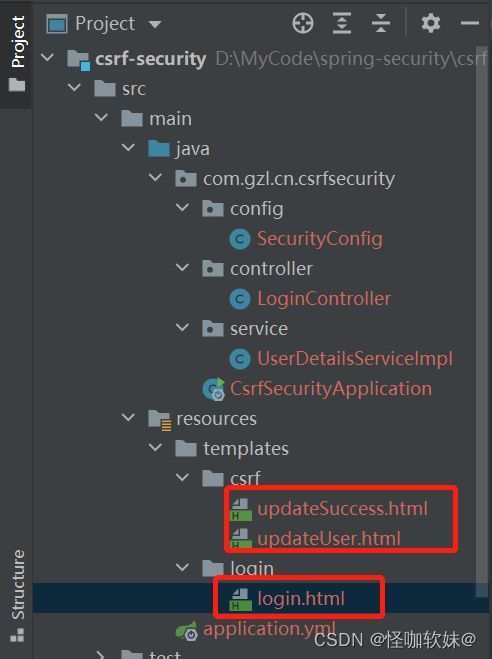
创建项目的过程就省略了,直接ider创建springboot项目即可。为了直观一点,这里我创建了两个项目,一个项目是我们自己的项目,另一个项目作为攻击者所在的服务器项目。
以下示例主要就是演示这一场景:
我通过账号密码登录了tb,然后这时候我没有关闭这个浏览器,又去浏览别的浏览器了,不知道怎么回事点击了一个广告进来了,而这个广告页面其实就是恶意的,他提前知道了tb修改密码的接口访问地址,然后在广告页面内嵌一个修改密码的地址,而我们并没有退出登录tb,也就意味着他是可以拿到认证的,可能我们随便一点击广告页面,然后触发接口,我们的淘宝密码就 被修改了,这就是整个被CSRF攻击的流程。
当然tb不可能这么low,人家有最牛的安全防护人员,这里只是拿他举例而已。
2.1.添加pom依赖
<dependencies>
    <dependency>
        <groupId>org.springframework.bootgroupId>
        <artifactId>spring-boot-starter-securityartifactId>
    dependency>
    <dependency>
        <groupId>org.springframework.bootgroupId>
        <artifactId>spring-boot-starter-thymeleafartifactId>
    dependency>
    <dependency>
        <groupId>org.springframework.bootgroupId>
        <artifactId>spring-boot-starter-webartifactId>
    dependency>

    <dependency>
        <groupId>org.springframework.securitygroupId>
        <artifactId>spring-security-testartifactId>
        <scope>testscope>
    dependency>


    <dependency>
        <groupId>org.thymeleaf.extrasgroupId>
        <artifactId>thymeleaf-extras-springsecurity5artifactId>
    dependency>
dependencies>
2.2.添加UserDetailsService实现类
@Service
public class UserDetailsServiceImpl implements UserDetailsService {

    @Override
    public UserDetails loadUserByUsername(String s) throws UsernameNotFoundException {

        List<SimpleGrantedAuthority> list = new ArrayList<>();
        list.add(new SimpleGrantedAuthority("role"));
        UserDetails userDetails = new User("lucy", new BCryptPasswordEncoder().encode("123")
                , list);
        return userDetails;
    }
}
2.3.添加security配置类
这里一定要添加 http.csrf().disable(); 因为CSRF保护security默认是开启的,添加这个就是关闭CSRF保护的意思。
@Configuration
public class SecurityConfig extends WebSecurityConfigurerAdapter {
    @Resource
    UserDetailsService userDetailsService;

    //实现用户身份认证
    @Override
    protected void configure(AuthenticationManagerBuilder auth) throws Exception {
        BCryptPasswordEncoder encoder = new BCryptPasswordEncoder();
        auth.userDetailsService(userDetailsService).passwordEncoder(encoder);
    }

    @Override
    protected void configure(HttpSecurity http) throws Exception {
        //配置url的访问权限
        http.authorizeRequests()
                .antMatchers("/userLogin").permitAll()
                .antMatchers("/login/**").permitAll()
                .anyRequest().authenticated();

        //关闭csrf保护功能
        http.csrf().disable();

        //使用自定义的登录窗口
        http.formLogin()
                .loginPage("/userLogin").permitAll()
                .usernameParameter("username").passwordParameter("password")
                .defaultSuccessUrl("/toUpdate")
                .failureUrl("/userLogin?error");
    }
}
2.4.添加控制器
因为我们项目当中用到了Thymeleaf ,Thymeleaf 可以通过接口String返回的字符串,去寻找html。例如:/userLogin接口返回的字符串是login/login,他的意思就是我通过/userLogin请求实际上就是跳转到templates/login/login.html页面当中。
@Controller
public class LoginController {

    @GetMapping("/userLogin")
    public String login() {
        return "login/login";
    }

    @GetMapping("/toUpdate")
    public String test() {
        return "csrf/updateUser";
    }

    @PostMapping("/updatePassword")
    public String getToken(String username, String password) {
        System.out.println(username);
        System.out.println(password);
        System.out.println("修改密码成功");
        return "csrf/updateSuccess";
    }
}
2.5.添加html
DOCTYPE html>
<html xmlns="http://www.w3.org/1999/xhtml" xmlns:th="http://www.thymeleaf.org">
<head>
    <meta charset="UTF-8">
    <title>用户修改title>
head>
<body>
<div>

    修改成功
div>

body>
html>
updateUser.html:
DOCTYPE html>
<html xmlns="http://www.w3.org/1999/xhtml" xmlns:th="http://www.thymeleaf.org">
<head>
    <meta charset="UTF-8">
    <title>用户修改title>
head>
<body>
<div align="center">
    <form  method="post" action="updatePassword">

        用户名: <input type="text" name="username" /><br />
        密  码: <input type="password" name="password" /><br />
        <button type="submit">修改button>
    form>
div>
body>
html>
login.html:
DOCTYPE html>
<html xmlns="http://www.w3.org/1999/xhtml" xmlns:th="http://www.thymeleaf.org">
<head>
    <meta http-equiv="Content-Type" content="text/html; charset=UTF-8">
    <title>用户登录界面title>
head>
<body class="text-center">
    <form class="form-signin" th:method="post" th:action="@{/userLogin}">
        <h1 class="h3 mb-3 font-weight-normal">请登录h1>

        <input type="text" class="form-control" placeholder="用户名" required="" autofocus="" name="username">
        <input type="password" class="form-control" placeholder="密码" required="" name="password">
        <button class="btn btn-lg btn-primary btn-block" type="submit" >登录button>
    form>
body>
html>
2.6.创建攻击者项目
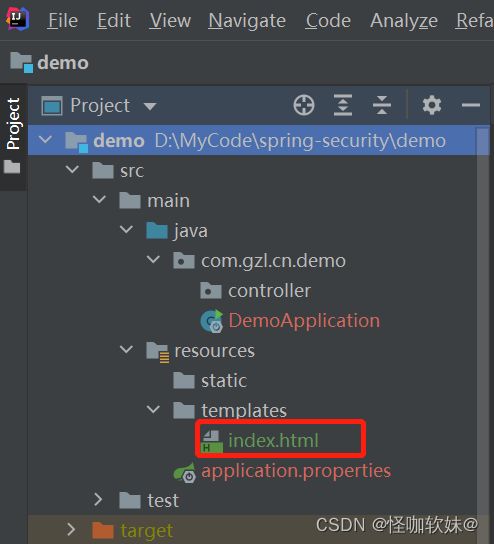
这个项目就是一个空项目,只有一个文件,就是模仿弹出来的广告。
pom依赖
<dependencies>
	<dependency>
		<groupId>org.springframework.bootgroupId>
		<artifactId>spring-boot-starter-webartifactId>
	dependency>

	<dependency>
		<groupId>org.springframework.bootgroupId>
		<artifactId>spring-boot-starter-testartifactId>
		<scope>testscope>
	dependency>

	<dependency>
           <groupId>org.springframework.bootgroupId>
           <artifactId>spring-boot-starter-thymeleafartifactId>
       dependency>
dependencies>
可能有的甚至会做一个假tb,当你不注意他的网址的时候以为是真的,然后点击进去输入了自己的个人信息等,一旦他掌握的有相关修改接口,后果不堪设想。
index.html:
DOCTYPE html>
<html xmlns="http://www.w3.org/1999/xhtml" xmlns:th="http://www.thymeleaf.org">
<head>
    <meta charset="UTF-8">
    <title>用户修改title>
head>
<body>
<div align="center">
    <form  method="post" action="http://localhost:8080/updatePassword">
        用户名: <input type="text" name="username" /><br />
        密  码: <input type="password" name="password" /><br />
        <button type="submit">修改button>
    form>
div>
body>
html>
通过application.properties配置当中修改端口号,避免和上面项目产生冲突
server.port=8081
2.7.测试
- http://localhost:8080/userLogin登录:账号lucy,密码123
- http://localhost:8081/ 不小心点开这个广告了
- 然后通过8081端口的网址输入账号密码,直接密码被修改了
三、防止CSRF攻击
3.1.调整代码
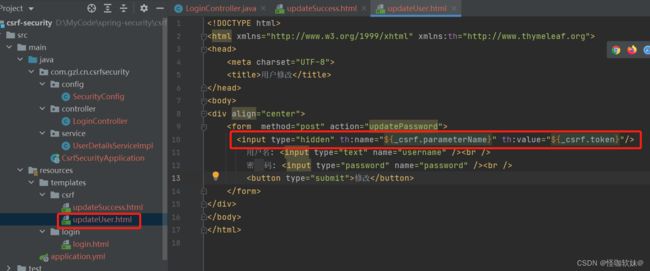
1.在登录页面添加一个隐藏域:
<input type="hidden" th:name="${_csrf.parameterName}" th:value="${_csrf.token}"/>
// http.csrf().disable();

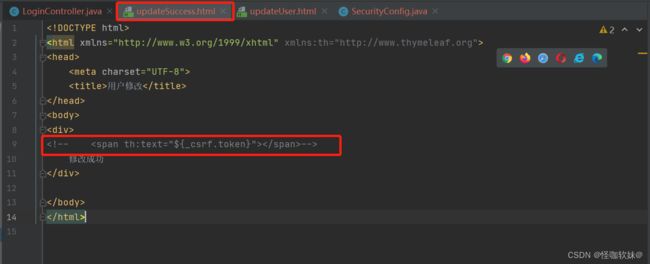
3.可以把这个注释放开,当修改成功跳转到这个页面的时候,我们看一下_csrf.token到底是什么
3.2.测试
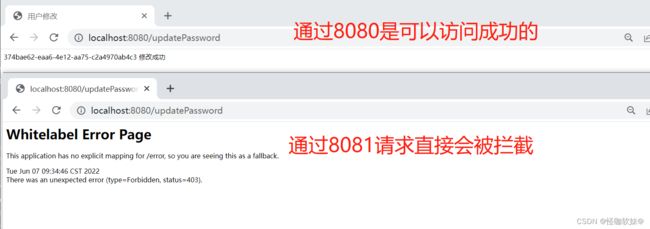
这时候使用8080登录后,通过8081去修改是直接报403的。
四、原理
这个value值是随机生成的,而这时病毒网站可以窃取到用户唯一标识,却无法知道给该用户的随机token,这就能防止csrf攻击所造成的影响。
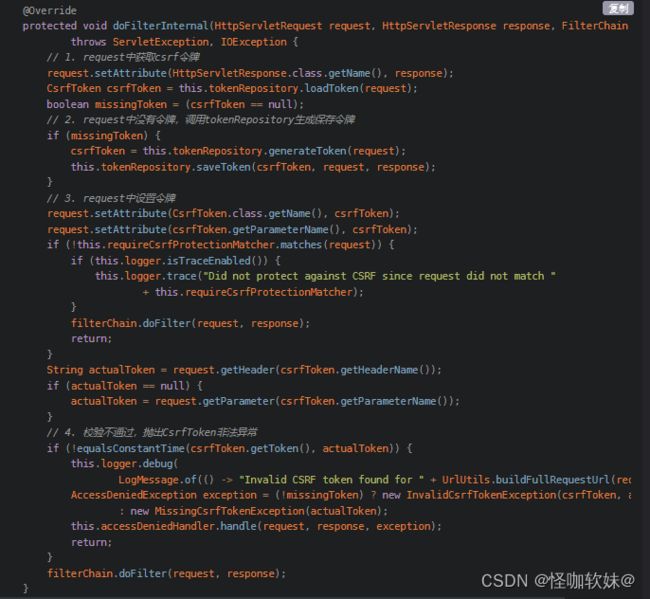
完成CSRF防护的 核心 就是 CsrfFilter 当中的doFilterInternal方法。
- 他的流程就是登录的时候生成token,然后传到request域中,并且session当中也会保存一份
- 然后html页面访问接口的时候需要从域当中取到token值,以Header或者Parameter的形式传入到后端
- 后端拿到这个token值的时候,每次请求会和session当中的token进行比较
通过上面得知tokenRepository实现类很重要,他决定了token保存位置。默认是存储到session。
