CSS:flex布局
flex布局
- 1. 主轴和交叉轴:flex-direction
- 2. flex-wrap
- 3. flex-flow
- 4. flex-basis
- 5. flex-grow
- 6. flex-shrink
- 7. 元素在主轴和交叉轴上的对齐方式
-
- 7.1) 主轴:justify-content
- 7.2) 交叉轴:align-items
- 8. align-self
flex 布局是一个 Flexible Box 模型,通常被称为 flexbox,是一种一维的布局模型;它在我们的 CSS 设计中有着广泛的应用,接下来将会介绍一下 flex 布局的基本用法。
其中 1 ~ 3、7 是在 flex 容器上进行设定,4 ~ 6、8 是在 flex 元素上进行设定
1. 主轴和交叉轴:flex-direction
主轴由 flex-direction 定义(默认值为 row),交叉轴垂直于它
我们使用
flexbox的所有属性都跟这两根轴线有关
flex-direction 的值如下:
row/row-reverse:主轴方向为行,row为从起始线(一般为左)到终止线(一般为右)排列子元素,row-reverse为从终止线到起始线排列子元素column/column-reverse:主轴方向为列,column为从起始线(一般为上)到终止线(一般为下)排列子元素,column为从终止线到起始线排列子元素
现在我们来试试设定之后它的效果:
初始页面:
DOCTYPE html>
<html lang="en">
<head>
    <meta charset="UTF-8">
    <meta http-equiv="X-UA-Compatible" content="IE=edge">
    <meta name="viewport" content="width=device-width, initial-scale=1.0">
    <title>flex布局title>
    <style>
        .box {
            width: 700px;
            margin: 20px auto;
            border: 1px solid rgb(0, 0, 0);
        }
        .box1 {
            width: 200px;
            height: 100px;
            background-color: aqua;
        }
        .box2 {
            width: 200px;
            height: 100px;
            background-color: lightgreen;
        }
        .box3 {
            width: 200px;
            height: 100px;
            background-color: gray;
        }
    style>
head>
<body>
    <div class="box">
        <div class="box1">div>
        <div class="box2">div>
        <div class="box3">div>
    div>
body>
html>
- 首先给父元素
box添加display: flex(使得box变成一个弹性容器)
.box {
    width: 700px;
    height: 400px;
    margin: 20px auto;
    border: 1px solid rgb(0, 0, 0);
    display: flex;
}
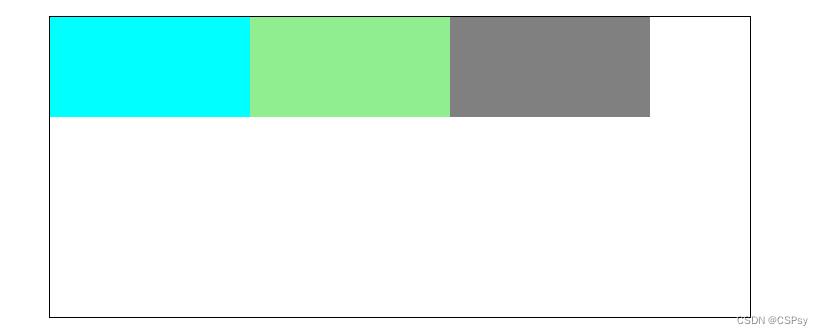
这个时候,我们会看到,3 个子元素 box 一行排列,从左往右(这是因为 flex-direction 的默认值为 row)
- 设定
flex-direction为我们想要的值,即设定子元素的排列方式
.box {
    width: 700px;
    height: 400px;
    margin: 20px auto;
    border: 1px solid rgb(0, 0, 0);
    display: flex;
    /* 设定子元素的排列方式 */
    flex-direction: row-reverse;
}
2. flex-wrap
flex-wrap: 设定当轴线放不下时,是否换行
它的值如下:
nowrap(默认值):不换行wrap:换行,第一行在上方wrap-reverse:换行,第一行在下方
让我们来看看它的效果:
DOCTYPE html>
<html lang="en">
<head>
    <meta charset="UTF-8">
    <meta http-equiv="X-UA-Compatible" content="IE=edge">
    <meta name="viewport" content="width=device-width, initial-scale=1.0">
    <title>flex布局title>
    <style>
        .box {
            width: 700px;
            margin: 20px auto;
            border: 1px solid rgb(0, 0, 0);
            display: flex;
        }
        .box1 {
            width: 200px;
            height: 100px;
            background-color: aqua;
        }
        .box2 {
            width: 200px;
            height: 100px;
            background-color: lightgreen;
        }
        .box3 {
            width: 200px;
            height: 100px;
            background-color: gray;
        }
    style>
head>
<body>
    <div class="box">
        <div class="box1">div>
        <div class="box2">div>
        <div class="box3">div>
        <div class="box2">div>
        <div class="box3">div>
        <div class="box1">div>
    div>
body>
html>
子元素宽度虽然加起来超过了父元素容器的宽度,但由于 flex-wrap 属性默认值是 no-wrap,所以,它不会进行换行,会在容器内按比例缩小排列
- 接下来我们来更改一下它的值看看:
.box {
    width: 700px;
    height: 400px;
    margin: 20px auto;
    border: 1px solid rgb(0, 0, 0);
    display: flex;
    flex-wrap: wrap;
}
3. flex-flow
对于 flex-direction 属性和 flex-wrap 属性,我们可以简写在 flex-flow 中
它的格式如下:flex-flow:
举个例子看看它的写法:
flex-flow: row wrap;
4. flex-basis
flex-basis: 指定了 flex 元素在主轴方向上的初始大小
Note:
当一个元素同时被设置了flex-basis(除值为auto外) 和width(或者在flex-direction: column情况下设置了height) ,flex-basis具有更高的优先级。
它的使用如下:
初始页面:
DOCTYPE html>
<html lang="en">
<head>
    <meta charset="UTF-8">
    <meta http-equiv="X-UA-Compatible" content="IE=edge">
    <meta name="viewport" content="width=device-width, initial-scale=1.0">
    <title>flex布局title>
    <style>
        .box {
            width: 700px;
            margin: 20px auto;
            border: 1px solid rgb(0, 0, 0);
            display: flex;
            flex-wrap: wrap;
        }
        .box1 {
            width: 200px;
            height: 100px;
            background-color: aqua;
        }
        .box2 {
            width: 200px;
            height: 100px;
            background-color: lightgreen;
        }
        .box3 {
            width: 200px;
            height: 100px;
            background-color: gray;
        }
    style>
head>
<body>
    <div class="box">
        <div class="box1">div>
        <div class="box2">div>
        <div class="box3">div>
        <div class="box2">div>
        <div class="box3">div>
        <div class="box1">div>
    div>
body>
html>
.box1 {
    flex-basis: 50px;
    width: 200px;
    height: 100px;
    background-color: aqua;
}

我们可以看到,box1 的宽度变为了 flex-basis 设定的值 50px(因为 flex-basis 有更高优先级,所以 width 将不会生效)
这里只讲解了 flex-basis 设定固定值的用法,它的更多用法可以看 MDN 文档:flex-basis 进行学习
5. flex-grow
flex-grow: 定义 flex 元素的增长系数(默认值为 0)
它的作用如下:
- 会在容器太大时对
flex元素作出调整,分配剩余空间的相对比例,默认为 0,即不分配剩余空间
它的效果如下:
初始页面
DOCTYPE html>
<html lang="en">
<head>
    <meta charset="UTF-8">
    <meta http-equiv="X-UA-Compatible" content="IE=edge">
    <meta name="viewport" content="width=device-width, initial-scale=1.0">
    <title>flex布局title>
    <style>
        .box {
            width: 700px;
            margin: 20px auto;
            border: 1px solid rgb(0, 0, 0);
            display: flex;
            flex-wrap: wrap;
        }
        .box1 {
            /* flex-grow: 1; */
            width: 200px;
            height: 100px;
            background-color: aqua;
        }
        .box2 {
            width: 200px;
            height: 100px;
            background-color: lightgreen;
        }
        .box3 {
            width: 200px;
            height: 100px;
            background-color: gray;
        }
    style>
head>
<body>
    <div class="box">
        <div class="box1">div>
        <div class="box2">div>
        <div class="box3">div>
        <div class="box2">div>
        <div class="box3">div>
        <div class="box1">div>
    div>
body>
html>
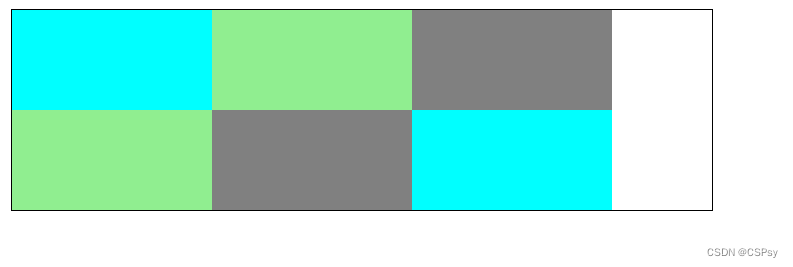 我们可以看到每一行都有剩余空间,此时,对
 box1 和 box3 设定 flex-grow 属性,来分配它们两个所占有的剩余空间比例为 1 : 3;
即剩余空间分成 4 份 box1 占据 1 份,box3 占据 3 份;
由于剩余空间剩下 100px,所以 box1 会增加 25px,box3 会增加 75px
.box1 {
    width: 200px;
    height: 100px;
    flex-grow: 1;
    background-color: aqua;
}
.box3 {
    width: 200px;
    height: 100px;
    flex-grow: 3;
    background-color: gray;
}
6. flex-shrink
flex-shrink:定义 flex 元素的收缩规则(默认值为 1)
它的作用如下:
- 当
flex元素的默认宽度之和大于容器的时候,就会发生收缩,其收缩的大小是依据flex-shrink的值,默认为 1,即每个flex元素收缩比例都相同
举个例子看看:
初始页面:
DOCTYPE html>
<html lang="en">
<head>
    <meta charset="UTF-8">
    <meta http-equiv="X-UA-Compatible" content="IE=edge">
    <meta name="viewport" content="width=device-width, initial-scale=1.0">
    <title>flex布局title>
    <style>
        .box {
            width: 700px;
            margin: 20px auto;
            border: 1px solid rgb(0, 0, 0);
            display: flex;
        }
        .box1 {
            width: 200px;
            height: 100px;
            background-color: aqua;
        }
        .box2 {
            width: 200px;
            height: 100px;
            background-color: lightgreen;
        }
        .box3 {
            width: 200px;
            height: 100px;
            background-color: gray;
        }
    style>
head>
<body>
    <div class="box">
        <div class="box1">div>
        <div class="box2">div>
        <div class="box3">div>
        <div class="box2">div>
        <div class="box3">div>
        <div class="box1">div>
    div>
body>
html>

这个时候,没有设置 flex-shrink的值,所以,默认为 1,每个 flex 元素都相等,每个 flex 元素收缩相同空间
此时,我们给 box1 和 box3 设置 flex-shrink 的值分别为 1 和 3
那么 box3 收缩的空间将会是 box1 的 3 倍
.box1 {
    width: 200px;
    height: 100px;
    flex-shrink: 1;
    background-color: aqua;
}
.box3 {
    width: 200px;
    height: 100px;
    flex-shrink: 3;
    background-color: gray;
}
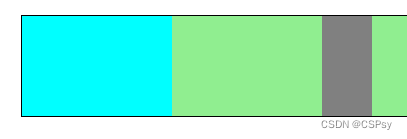
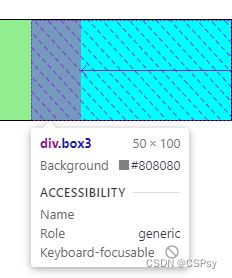
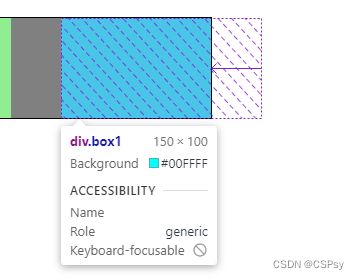
我们可以看到 box1 被压缩了 50px,而 box3 被压缩了 150px,被压缩的空间为 box1 的 3 倍
7. 元素在主轴和交叉轴上的对齐方式
7.1) 主轴:justify-content
justify-content:设定 flex 元素在主轴方向上的对齐方式
它的值如下:
flex-start(默认值):flex元素从容器的起始线(一般为左 / 上)开始排列flex-end:flex元素从容器的终止线(一般为右 / 下)开始排列center:在中间排列space-between:将排列好之后的剩余空间平均分配到元素之间,所以flex元素之间间隔相等,第一个和最后一个flex元素会紧贴容器的边缘space-around:使每个flex元素的左右空间相等
第一个和最后一个元素和容器的边缘留有空隙,这个空隙宽度就是flex元素之间宽度的一半(相当于只有一个左空间或右空间)space-evenly:使每个flex元素之间和flex元素距离边距的距离都相等
7.2) 交叉轴:align-items
align-items: 设定 flex 元素在交叉轴方向上的对齐方式
它的值如下:
flex-start:flex元素从容器的起始线(一般为左 / 上)开始排列flex-end:flex元素从容器的终止线(一般为右 / 下)开始排列center:在中间排列stretch(默认值):拉伸flex元素,填满flex容器baseline:沿基线对齐
基线是文本相关的概念,可以认为它是字母排列的下端基准线
8. align-self
align-self: 设定你单个 flex 元素自己的对齐方式,而不会影响到全部 flex 元素
align-self可设置的值与align-items的一样,并且它会覆盖align-items所设置的值
举个例子:
初始页面:
DOCTYPE html>
<html lang="en">
<head>
    <meta charset="UTF-8">
    <meta http-equiv="X-UA-Compatible" content="IE=edge">
    <meta name="viewport" content="width=device-width, initial-scale=1.0">
    <title>flex布局title>
    <style>
        .box {
            width: 700px;
            height: 300px;
            margin: 20px auto;
            border: 1px solid rgb(0, 0, 0);
            display: flex;
            align-items: flex-start;
        }
        .box1 {
            width: 200px;
            height: 100px;
            background-color: aqua;
        }
        .box2 {
            width: 200px;
            height: 100px;
            background-color: lightgreen;
        }
        .box3 {
            width: 200px;
            height: 100px;
            background-color: gray;
        }
    style>
head>
<body>
    <div class="box">
        <div class="box1">div>
        <div class="box2">div>
        <div class="box3">div>
    div>
body>
html>
这个时候,我们给 box1 设定个 alifn-self 为 flex-end,box1 就会去从终止线处开始排列:
.box1 {
    width: 200px;
    height: 100px;
    align-self: flex-end;
    background-color: aqua;
}


